Quantcast
Channel: GameDev Academy
Viewing all 1620 articles
Browse latest View live

A Comprehensive Guide to Variables in C++

$
0
0

You can access the full course here: C++ Programming for Beginners

Basic Variables

As fun as input output is, it’s time to start learning about the language basics so we can make our programs actually do something significant. There’s no better place to start than with variables. Variables are a fundamental component of every program ever written. They provide a way to store and modify values as the program runs. Variables have a name, a type, and a value where the type dictates the kind of data that can be held (text, number, etc.). C++ is statically typed meaning once a variable is assigned a type, it cannot change (unlike dynamic languages like Python). The basic types are:

  • bool
  • int
  • float
  • double
  • char
  • nullptr
  • void
  • string

Technically strings are not basic variables; they are considered to be an array of characters or chars. In fact, the C language doesn’t even have strings. C++ is high level enough that they at least allow us to use strings. Before we dive into each variable type let’s talk about declaring vs initializing.

Declaring a variable is just assigning a name and a type. This can even be done outside of a function. Essentially, the compiler allocates some space for it (depending on the type of variable) but doesn’t store a value. Initializing a variable is assigning a value to it. We need to make sure the value we assign matches the type. We can break the process of creating variables into these 2 different parts or do it all at once. Our .h files can be used to declare variables and the .cpp files are used to initialize them (among other things).

Just a heads up; until otherwise stated, any code that you want to write to practice or follow along should go between the { } in the main function, otherwise you won’t be able to run it.

Booleans

Let’s start with Booleans or bool. These are true or false values; if the value is not true, it’s false and vice versa. Use these when you need a variable that can only take on one of two values such as:

bool isGameOver = false;

A game is either over or not; there are only two possible states (pausing a game still falls under the category of not over). We could split this up into:

bool isGameOver;
isGameOver = false;

If we wanted but it doesn’t matter here. We can also assign the result of some comparison operation like this:

bool isFalse = 5 > 10

5 is not greater than 10 so this stores false.

Numbers

There are 3 basic numerical types in C++ int, float, and double. There are actually variants on these such as unsigned int for when we just want positive numbers or ints with a specific number of bits. That’s beyond the scope of the course so let’s ignore those for now. Use integers or int when you want whole numbers:

int xPos = 5;
int yPos = -2;

Use floats or doubles when you want decimal numbers:

float percentHealth = 0.45;
double pi = 3.14159;

Doubles offer more decimal places than floats but nothing we will be doing here will require that precision so we’ll stick with just floats.

Numbers can also store the results of an arithmetic expression such as:

float percentHealth = 80 / 100;

Characters

Characters, or char, are single digit text variables between the single quote: ‘’. For example:

char c = ‘c’;

With strings available, the character type is not used too often. They potentially (but not necessarily) take up less space in memory but are more difficult to work with as you have to convert back and forth to combine them.

Nullptr

Nullptr is a value assigned to a pointer when we don’t have anything for it to point at. That likely won’t mean a lot just yet so we’ll skip this one for now and come back to it when we talk about pointers.

Void

Void is used in two cases: when we don’t want to output a specific value from a function or when we don’t want to take any parameters as input. When used with pointers, this means that it could be a pointer of any time. Again, that won’t mean a lot right now so let’s ignore this one too.

Strings

We’ve already seen some of these in our code examples! Strings represent text data such as messages or names and are initialized between double quotes: “”. Unlike characters, they can be of any length including 0. These are part of the std library so you have to use the special std:: syntax or include using namespace std. Some examples might be:

std::string name = “Nimish”
std::string emptyString = “”;


Transcript

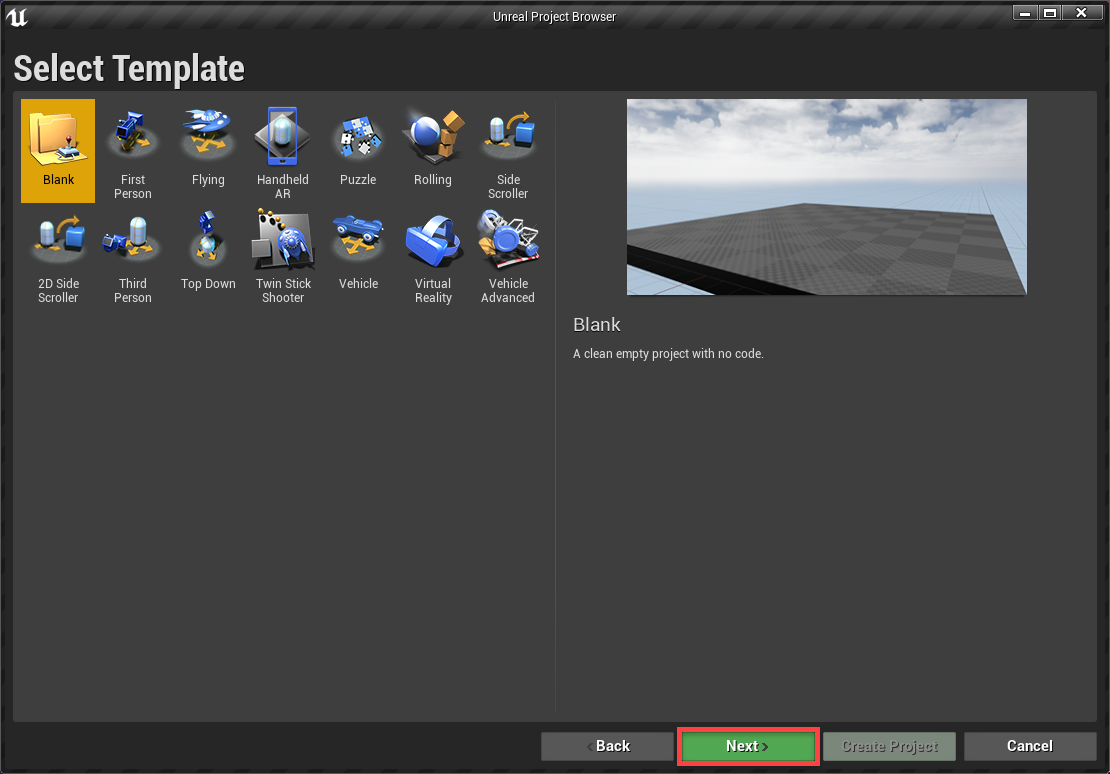
What is up everyone and welcome to the fifth tutorial in our “Learn C++” course. This will be on variables, and is part one of two just because there is quite a lot to take in with regards to variables, and I don’t want to overwhelm you with everything all at once. So in part one, we’re going to focus on what are variables. Then we’ll talk about some of the basic variable types in C++, these will be in the slides, and then we’ll turn to the code and focus on assigning and reassigning variables with some examples.

So for starters, what are variables? Variables is simply a way to store and modify data within a program. Pretty much every program will need some kind of variables to help maintain its state throughout its execution. Variables can be used temporarily or can exist throughout the entire program’s execution.

Take for example a game, often they’ll ask what your name is right at the beginning, and then they’ll store it somewhere. Well, that name will exist throughout the entire time that you’re playing the game, and also in future runs as well. However, if we’re entering, let’s say a specific level, there may be a lot of variables that help set up the level that are basically destroyed, as soon as we leave the level or go into a different one.

Now, each variable uses a “type” to dictate the kind of data that can be stored. So there might be, let’s say, numerical types of variables, well there may might be text based variables or true false variables, these are all determined with the type which we have to assign. Creating a variable can be broken down into two stages; declaration and initialization. Declaration is essentially assigning a type and a name to a variable. And then initialization is storing a value in that variable.

So some of the types in C++. For starters, C++ is statically typed. So statically typed means once we assign a type to a variable, that type can never change. If we create let’s say, a numerical variable, we cannot then later store a true or false value in it. Now this is unlike languages like Python, which are considered dynamically typed, those definitely allow you to modify types of variables, but C++ is a bit more rigid that way.

So some of the basic types we might encounter will be Booleans, which are true or false values, integers, which are positive or negative whole numbers, floats and doubles, which are decimal numbers, characters, which are single byte characters, and then there are null pointers and void types.

Now, null pointers and voids are a little bit more advanced, so I doubt we’ll actually cover those too much in this course, but I just wanted to include them here just in case some of you say, “Well, there are actually other types and you didn’t include them.”

Okay, so I think we’ll focus on bools, ints, floats. We might take a look at some doubles, but we’ll kind of skip over those for the most part because they’re actually quite similar to floats, and the characters and strings, we’ll actually cover in the next tutorial.

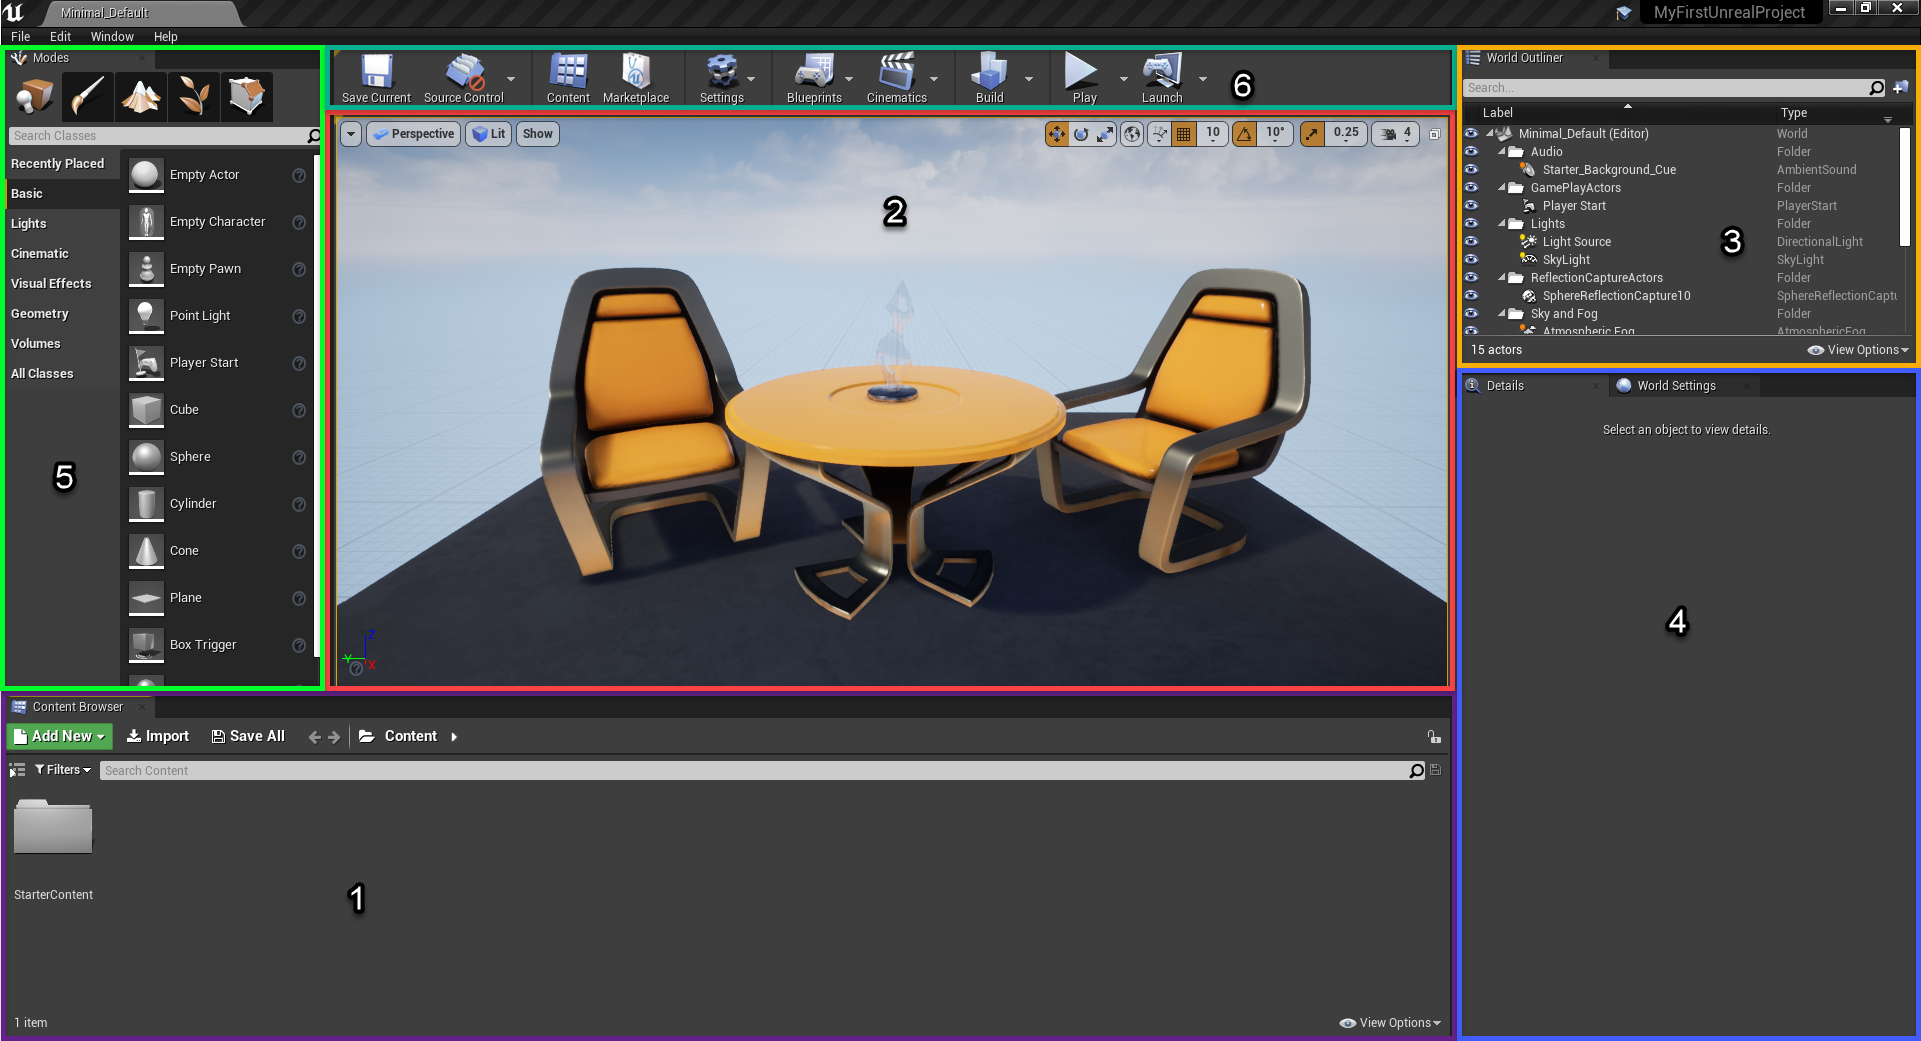
So let’s head on over to the code and go over at some examples. Okay, so as you can see, I’ve kind of cleared out my main file and put everything in old code. And I’ll continue to do that as we go. All right, so the first stage is going to be talking about how to declare and initialize variables.

So the two stages are gonna be assigning a type and a name, okay. So that will be the declaration and then initialization will be name equals some value, okay. We can do this in two steps, or we can do it in one like this.

So let’s focus on Boolean variables, because they’re the simplest. The type is gonna be a bool, okay? The name is gonna be whatever we want. Let’s think about something game related, so maybe it’s something like “isGameOver”, okay? And then we can leave it at that. We can then assign it in a value. So isGameOver is equal to false because maybe the game is still running, okay? So Boolean is perfect for this kind of a variable, because the game is either over or it’s not over. So even if it’s paused, that doesn’t mean the game is over it’s technically still running. So it’s either true or false. There’s only one of two possible states.

Okay, so we can put this all in one go if we want suppose saying bool isGameOver is equal to false doesn’t really matter too much. So we’re actually gonna break it up. Okay, if later on, we decide that okay the game is over, we died, or maybe we just won, then we’re just going to say; isGameOver is equal to true. So this is assigning the value for the first time and then this is reassigning it later on.

We can also perform other operations, we can have a another variable such as bool isNotGameOver. I know this doesn’t really make too much sense, but just bear with me here. And we can assign it the value of isGameOver. So basically, this will say whatever value we find here true, we’re just going to copy that into here, okay.

So at this point in time they’re equal but then I could reassign it later. So I could say isGameOver is equal to, you know, false again, and then this one doesn’t change, okay? So just something to note there. We can also take Boolean values and assign them the value of some comparison operation. So for example isGameOver is going to be equal to five greater than two. Now I know this really doesn’t make much sense, given our context, but this is a perfectly valid operation, because five is greater than two, it stores the value of true, okay? So again, something to note there. Just interesting semantics.

Okay, so that’s Booleans for you, they’re very simple. Again, it’s either true or false, there’s not too much more to know there.

So next up is gonna be integers. So integers are whole numbers. Can be positive or negative. And as you can see, there are a ton of variants. So we’re not gonna worry about any of these, like int 16 and 32. There’re also like unsigned integers, if you go all the way down. We’re not gonna worry about those. We just don’t really need that level of specificity. So we can kind of ignore that.

So an int let’s say, let’s say currentHealth, okay? Maybe is equal to 100, okay. So again, we can we can split this into two parts, we could do this and say currentHealth is equal to 100. Or we can do it all in one go. Let’s do it all in one go just for the sake of variety here. We can also take our integers and we can assign them the value of some operation two but it shouldn’t be a comparison operation cause this returns true or false, and doesn’t return a number.

But we could do something like currentHealth is equal to 50 minus two, for example, and that’s also perfectly valid. We’ll talk more about operators like this later on. For now, just know that it’s totally possible to do so. Just like with Booleans, we can assign them a literal value like this, or we can assign them the value of some other variable, that’s entirely up to us what we wanna do with them.

Okay, so finally, we’ll move to floats and doubles. Floats and doubles are both decimal numbers, but doubles offer double the precision of floats. That’s how they get the name interestingly enough. So if a float is a decimal number, then a double will potentially double the amount of decimal places it can hold. Like I said, I don’t really use doubles very much, because I just don’t need that level of precision. And they would take up a bit more memory.

So as much as possible, we’ll stick to floats. If we really, really need to be precise, then we can use doubles instead. But we’ll do floats, let’s say, maybe we’ll do like percentHealth or something like that is going to be equal to 0.45. And that would be a perfectly valid thing. Just like with, I’ll show you an example of doubles, because why not?

Let’s say pi, for example, so 3.14159 probably shouldn’t add extra decimal places if I don’t need them. So that would be an example of a double or a float. Now I could totally use a float to represent this, that’s fine. You’ll note that if actually if I scroll over it, you can see that it’s storing all of these values here, but this is not going to store quite as many values in there.

All right, one final thing I should say is that we can’t assign decimal numbers to integers. But we can assign whole numbers to doubles or floats, okay. So I could totally do five, and that’s fine, okay. Just like I could do 5.9, it would be interpreted as 5.0. But if I did five, that would also be fine, okay?

We should also be aware that if we are doing operations, such as a whole number minus a decimal number, then we can’t store that inside of an integer, we would have to use a float or do some kind of conversions to make sure that we’re dealing with variables of the same type. We’ll talk more about that when we get to operators and operations, but you know, just keep that in mind as we go.

Okay, so that’s it for now. We covered Booleans ints, and floats and doubles. When we come back, we’ll talk quickly about characters and then move to strings. So thanks for watching. See you guys in the next one.

What’s up guys, welcome to the sixth tutorial in our Learn C++ course, here we’ll cover part two of variables, there’s only two types we really need to go over, and those are going to be characters and strings in C++.

So, we’ll just quickly talk about characters, these are simple text-based variables, they’re used for single digit texts only, and as basically anything of length one between the single quote marks, Okay? So it cannot be length zero, it cannot be length two, three, four et cetera, has to be of length one. There’s a great way to represent special characters such as newline or return characters, otherwise, I personally don’t really use them that much.

Next up is gonna be strings, these are text-based variables, we’ve actually seen some examples of these already. These are used for texts, names and messages throughout our code, and it’s basically anything between these double quotes. Unlike the characters, they can be of length zero, one, two, three, four, etcetera basically, up until an infinite length well – not quite because that would actually crash a program, but they could be very, very big, Okay?

So let’s head on over to the code and take a look at some examples. Right, so once again, cleared everything out. So the first thing is going to be our characters. Now these are aside from Booleans, the simplest, I guess, simplest type. But just because they take up the second least amount of memory, it’s just by default take up eight bits, characters are four Booleans are actually just the one. But again, that’s kind of beyond the scope of the course. Okay?

So first of all, we can create a character with C-H-A-R, and all the char, okay? And we can call this whatever we want, so maybe let’s call this character G, okay, single quotes, and we’ll just put the G there, and just like that, all right. So similarly, the characters can have, Oh gee I guess I can’t call this character period. I can do that by couldn’t call it this, okay. If I did a character period like that, that’s also fine. And I could also have numbers as well. So I can do a character one is equal to one like this, okay? So there’s no restriction as to what I can put in there, it just has to be of length one only.

Like I said, I really don’t find myself using characters very often because we have strings, which are so much more powerful. So why use a character instead of a string? Well, the only reason I could really think of is if we are using special characters that just don’t really have a good string representation, which doesn’t really happen very often. And if we just don’t need something that has the functionality of a string.

Strings are actually considered arrays of characters. And in languages like C which are very, very low level, even more low level than C++, there is no string type. We have to use arrays of characters, so it gets to be a bit hairy. If you’re coming from C, then probably will be very familiar with characters. If you’re just hanging out with C++ and you have strings, you really don’t need to worry about characters so much.

Okay, so next up is going to be strings. So if we didn’t have the namespace standard, we would have to declare them as standard string, okay? Otherwise we can actually just say string. We’ll give this the name. So let’s do like a player name. And let’s just put our name, so it needs to be between the double quotes here, otherwise, doesn’t really matter what it is. We can do string empty, and we can have it like this. That’s a perfectly valid string as well, we can have a really long string, I’m not going to type out a really long string, but we could totally do that.

Also, I should note, because the strings are kind of considered arrays, there are a host of functions that come with strings. So we can do let’s say, empty dots. And then you’ll see a list of all of these strings. So you can append a string onto the end of it. You can get the beginning, you can clear it out to kind of get rid of all of the characters and just make an empty string. You can copy it, you can empty it, you can erase it. You can get the length or the max size, so on and so forth. You can pop out the last character, so you get rid of that last character in the string. And there are a ton of functions.

Just to kind of demonstrate one, I’m actually gonna to do the player names. It’s a bit more interesting. The player name, and we’re gonna to get the length of that. Okay, we can get it like this. And let’s say I want to output it, what I could do is, I could just say actually C out, okay, and then just play it name dot length. Like that. Okay, good stuff. Oh, and actually I have this facing the wrong way. Okay, cool. So if I give the Save and I give it Run, you can see I get six. And that makes sense because Nimish has six characters.

Okay, so feel free to play around with those functions a little bit. Again, the best way to learn how to code is to try stuff yourself and practice. So try out some of these other functions, okay? And just note that some of them will take in arguments, so for example, if I want to append some other string onto the end of it, okay, and then I wanted to print that out, I would have to do something like this, and then say C out, player name, if I can actually spell it properly. Okay? And you should see like a bunch of characters on the end of it.

So some of these arguments, some of these functions rather take in arguments like this, and some of them don’t need arguments. So for example, if you’re just guessing the side or the length, then it doesn’t matter. Okay, so once you’re done playing around with those, we’ll come back and we’ll focus on pointers. Now pointers get a little bit more complex. So make sure you’re super comfortable with all of these types that we’ve discussed before moving on to the next section.

Alright, thanks for watching. See you guys in the next one.

Interested in continuing? Check out the full C++ Programming for Beginners course, which is part of our C++ Programming Bundle.


Creating 2D lights using the Universal Render Pipeline (URP)

$
0
0

 There are a lot of new 2D features added in Unity 2019.3 along with the release of Universal Render Pipeline (formerly LWRP) including 2D sprite Editor, 2D Animation, 2D lighting, etc.

 In this tutorial, we will be looking at how to set up URP to create 2D lights and shadows.


Download

Download Example Project - Unity 2019.3 2D Lights

Unzip and open ‘Assets/Scenes/ExampleStart.scene‘.


Table Of Contents

=========================================================

Project set-up

  • Installing a Universal Render Pipeline
  • Creating a Universal Render Pipeline Asset
  • Assigning the URP Asset in the Graphics settings
  • Creating and assigning a 2D Renderer data to the URP Asset

2D lights and shadows

  • Adding a 2D light component
  • Light types and properties
  • Normal Map for detailed shadows
  • Animating the 2D light components

Reference/Links

====================================================


Project set-up

The set-up process is not required if you’re using the example project. You can skip this section if you already know how to set up a universal render pipeline.


a. Installing a Universal Render Pipeline

To create a new project that uses Universal Render Pipeline, open up the latest version of Unity Hub. 

Go to Create > New Unity project > Choose ‘Universal RP Template’.

Creating a project with urp template


 If you wish to add the Universal Render Pipeline to an existing project instead, you will need to install it from the package manager.

 To do this, go to Package Manager > All Packages > Universal RP and make sure it is installed and up to date.

packagemanager_urp


b. Creating a Universal Render Pipeline Asset


 Once you have installed the Universal Render Pipeline to your project, you can create a URP asset that is used to configure the pipeline.

To do this, right-click in the Project window. Select Create > Rendering > Universal Render Pipeline > Pipeline Asset

how to create urp pipeline asset

This asset can be used to control various graphical features and quality settings.  When you click on ‘Pipeline Asset’, you will see that two asset files are automatically created:

  • UniversalRenderPipelineAsset.asset
  • UniversalRenderPipelineAsset_Renderer.asset

Note that the second asset (‘_Renderer’) is not needed as it will be replaced with a newly created 2D renderer after the next step.


c. Assigning the Universal Render Pipeline Asset in the Graphics settings

Creating a pipeline asset alone will not make our project use the URP straight away. We need to change the graphics settings by navigating to Edit > Project Settings > Graphics.

Within Graphics settings, you can drag and drop the UniversalRenderPipelineAsset into the Scriptable Render Pipeline Settings field.

Project settings-Graphics-Universal render pipeline


* Potential Issue *

 After changing the graphics settings, some of the objects in your scene might turn pink. This is because some of the built-in shaders are not renderable by UniversalRP Materials. 

To fix this issue, simply go to Edit > Render Pipeline > Universal Render Pipeline > Upgrade Project Materials to UniversalRP Materials.

(Note: This may take a while as Unity will attempt to update every single material in the Assets folder. Alternatively, you can manually select materials and upgrade the selected materials.)

Update Project Materials


d. Creating and assigning a 2D Renderer Data to the URP Asset

Now the project is ready to use the Universal Render Pipeline, but we need to set up the URP asset first so that 2D lights can properly illuminate our scene. This can be done by creating a 2D Renderer Data by the same method we created the URP asset.

You can do so by right-clicking Project view and Create > Rendering > Universal Render Pipeline > 2D Renderer Data.

Once that is created, click on the UniversalRenderPipelineAsset that you created earlier. You can drag and drop the 2D Renderer Data into Renderer List in the Inspector, and set it to Default.

URP set 2d renderer default


2D lights and shadows

Congratulations! Now your project is all set up and ready to use 2D lightings. In this section, we will be looking at the various applications of 2D lights.

a. 2D Global Light and its properties

Your scene may have turned completely dark after the previous step. This is because the default (3D) light cannot illuminate our scene anymore.

We can light up the scene again by adding a 2D light to the scene. Click on any GameObject in the scene view, and go to ‘Add Component’ > Search ‘Light’ > Select ‘Light 2D (Experimental)‘.

Or alternatively, you can navigate to GameObject > Light >  2D.

Add 2D Light component


Note that 3D lights are not usable at this stage. Once you add a global light, your scene objects will be visible again.

Global Light On/Off comparison


  • Light Type (= Global light affects all rendered Sprites on all target sorting layers.)
  • Light Order (= Lower values are rendered first.)
  • Blend Style (= Determines the way light interacts with sprites.)
  • Color (= Use the color picker to change the color of light.)
  • Intensity (= Determines the brightness.)
  • Target Sorting Layers (= Determines which object can be affected by this light.)

We will leave most of these properties as a default state, but feel free to adjust the color and intensity to suit your taste.


Moonlight

Every object in the scene is faintly visible by the dim global light. Let’s create a Parametric light at the centre and make it look like moonlight by setting the properties as followings:

  • Sides: 5 → 48
  • Falloff: 0.5 → 6

Parametric light Moonlight


Stage lights

Now, let’s add another light component on the bottom left of the screen. This time we will create a Point light and move it to the left bottom of the screen.

We will change the light properties as such:

  • Inner Angle: 15
  • Outer Ange: 90
  • Outer Radius: 22
  • Falloff Intensity: 0.8
  • Intensity: 6

The light has now become brighter and cone-shaped. We can copy and paste (Ctrl+C, Ctrl+V) this gameObject as many times as we want, assign an identical colour to each and arrange its position like a stage.

URP stage lights


Normal Map

Normal Map is a texture that contains depth information of a surface. It can be used to create a more detailed shadow when lights reflect on the surface.

In this example project, we will apply a normal map to the mountain sprite.

You can create a normal map using a painting tool such as Photoshop, or using Normal Map Online. Link – https://cpetry.github.io/NormalMap-Online/

  1. Select the mountain sprite (Assets > Sprites)
  2. Click on ‘Sprite Editor’ (If the button is disabled, check if you have installed ‘2D Sprite Editor’ from Package Manager.)
  3. Expand ‘Sprite Editor’ menu.
  4. Click on ‘Secondary Textures’.
  5. Drag and drop the corresponding normal map (Assets > Texture) to ‘Texture’.


Applying normal map as a secondary texture

Now, let’s hit ‘Apply’ in the Sprite Editor and see how it changed our mountain.


2D Freeform Light

To see our normal maps in effect, we need to create a light that recognizes Normal Map.

Create a 2D light component, change its Light Type to Freeform, and tick the box next to Use Normal Map.

You can edit the shape of this light type in the scene view. Click on ‘Edit Shape’ button, and move the dot’s position with your mouse.

To add a dot, hover your mouse over a line of the shape and left-click. To remove a dot, select the dot and press ‘Delete’ on your keyboard.

We can clearly notice the difference between before and after using the normal map.

2D Freeform Light - Edit shape


Animating the 2D lights

The real beauty of lighting is when we start animating all these lights and change the static environment to a living world.

2D light and its properties can also be keyframed for animation as with any 2D sprites.

For example, we can create pulsing starlights in the sky simply by keyframing the intensity.

URP 2D Create a pulsing starlight


Copy and paste the star gameObject across the sky, change sizing and hit Play.

You will notice that all starlights are pulsing at the same time. You can randomize the starting point of each star’s animation, by attaching this script to each star gameObject:

public class StarScript : MonoBehaviour
{
    void Start()
    {
        GetComponent<Animator>().enabled = false;
        StartCoroutine(StarLightAnimation());
    }

    IEnumerator StarLightAnimation()
    {
        float random = Random.Range(0, 4);
        yield return new WaitForSeconds(random);
        GetComponent<Animator>().enabled = true;
    }
}

Synchronized > URP 2D - pulsing starlight

Randomized > URP 2D - Starlight randomized


That’s it for this tutorial. Feel free to experiment with the project and test your understanding.

URP 2D lighting - Final outcome

2D Lighting has never been easier with the new Universal Render Pipeline update in 2019.3.

I hope you can let your imagination run wild in your own games using the new 2D lighting feature. See you in the next post!

Reference/Links

Download Example Project - Unity 2019.3 2D Lights

Painted HQ 2D Forest Medieval Background by Super Brutal Assets – https://assetstore.unity.com/packages/2d/environments/painted-hq-2d-forest-medieval-background-97738

Space Shooter Redux by Kenneys – https://www.kenney.nl/assets/space-shooter-redux

For further information about today’s contents, visit Unity’s Documentation page:

  • Universal Render Pipeline – https://docs.unity3d.com/Packages/com.unity.render-pipelines.universal@7.1/manual/index.html
  • 2D Lights Properties – https://docs.unity3d.com/Packages/com.unity.render-pipelines.lightweight@6.7/manual/2DLightProperties.html

How to Detect Touch Input for Mobile

$
0
0

You can access the full course here: Mobile Game Development for Beginners

Touch Inputs

Create a new C# script called ColorChanger and attach it to the main camera. Open it up in Visual Studio.

In the Update function, we’re going to check for touch inputs. If the player has touched the screen, shoot a raycast at what we’re touching. If it hit something, change the color to a random color.

void Update ()
{
    if(Input.touchCount > 0 && Input.touches[0].phase == TouchPhase.Began)
    {
        Ray ray = Camera.main.ScreenPointToRay(Input.touches[0].position);
        RaycastHit hit;

        if(Physics.Raycast(ray, out hit))
        {
            if(hit.collider != null)
            {
                Color newColor = new Color(Random.Range(0.0f, 1.0f), Random.Range(0.0f, 1.0f), Random.Range(0.0f, 1.0f), 1.0);
                hit.collider.GetComponent<MeshRenderer>().material.color = newColor;
            }
        }
    }
}

If you want to test it out in the editor, we can have a version for the mouse.

#if UNITY_EDITOR

if(Input.GetMouseButtonDown(0))
{
    Ray ray = Camera.main.ScreenPointToRay(Input.mousePosition);
    RaycastHit hit;

    if(Physics.Raycast(ray, out hit))
    {
        if(hit.collider != null)
        {
            Color newColor = new Color(Random.Range(0.0f, 1.0f), Random.Range(0.0f, 1.0f), Random.Range(0.0f, 1.0f), 1.0f);
            hit.collider.GetComponent<MeshRenderer>().material.color = newColor;
        }
    }
}

#endif

If we go back to the editor and press play, we should be able to click on the ball or ground and change the color.

Transcript

Hey everyone, in this lesson, we are going to be setting it up so we can actually touch stuff on the screen. We’ll be detecting touch inputs, and then we’ll be shooting a ray cast towards what we touched and interacting with that object in some way. What we’re gonna be doing with the interaction is actually changing the color of whatever we touched to a random new color.

So what we’re gonna do now is go to our Scripts folder, I’m gonna right click here, I’m gonna create a new C# script called ColorChanger. And what I’m gonna do is also just attach this to our main camera here. And then we can open up the script inside of Visual Studio.

Okay, so to begin, we are going to actually just have one function, and that one function is going to be the update function, which gets called every single frame of the game. And this is actually the only function that we’re gonna be needing and using in this script. So, inside of the update function, what do we wanna do?

So the first thing I’m going to do in the update function is check are we touching the screen? So we can go if input to access the actual input class of Unity – which has many things such as keyboard inputs, mouse inputs, and, of course, touch inputs.

So it will go if input .touchCount if this touchCount is greater than zero, so if there are more than zero touches on the screen and the input.touches, now touch input.touches is a array of all the different touches that are currently on the screen, so to access the first or if there is only one touch on the screen, we can just access the zero element, the first element of the array. If that touch.phase, now there’s also a phase for a touch. And there are multiple different phases such as began, moved, stationary, released.

So if this touch phase equals equals, TouchPhase.Began, so, if there is more than one touch on the screen, and that touch has just begun, if this is the frame that this touch has just touched the screen, then what we’re going to do is create a ray cast from where we touched it on the screen first of all. So it will create a new ray here, and it’s gonna be equal to our Camera.main.ScreenPointToRay. And the point on the screen we want to create a ray cast from is going to be the Input.touches, the first touch .position. So this is gonna create a ray cast on the screen from where we touched, and it’s gonna be shooting at whatever we are pointing at.

Since we are gonna be hitting an object and we need to know information about that object, we also gonna create a RaycastHit object here, which is gonna store all the info of whatever we hit. And finally down here we can shoot the ray cast by going if Physics.Raycast we can enter in our ray. And then we wanna send this out to the hit of pretty much whatever we hit, we wanna send it to hit.

And so if we shoot that Raycast, what we wanna first check of all is, did we hit something? So, if hit.collider doesn’t equal null, if we did hit something, then what we want to do is change this object mesh renderer color. So I’m gonna create a color variable here, I’m just gonna call this our newColor. And this is just gonna be equal to a new Color and we’ll just give it a random red, green and blue values.

So I’ll just give it a Random.Range between 0.0 and 1.0 because this Color class here, it takes in its RGB and A values not as zero to 255 as it would be in the editor, it’s actually between zero and one. So we’ll do that. Then actually, I’ll just copy this Random.Range here and paste this for the green and blue values. And for the alpha, I’m just gonna set this to one and then I’ll flexor.

So now we have a new random color. That can really be anything on the color wheel and what we wanna do now is set this to the object we hit, we wanna set it to its mesh renderer. And for that, we can just go hit.collider.GetComponent, we wanna get the MeshRenderer component, which is pretty much the component that renders the mesh, applies the material and so on. And with this, we wanna just access the material variable, and access the color of that material and set this to be our new color. So great, that’ll all work.

But since we’re in the editor and not actually on a mobile device, we won’t actually be able to test this out. So what we can do is actually also down here, create a different version that will actually work on the desktop work inside the Unity editor. And for this, we’re just gonna be checking for mouse inputs.

So here we’ll just go if Input.GetMouseButtonDown. If the mouse button was zero, which is the left mouse button, so on the frame that we push our left mouse button down. We pretty much wanna do exactly the same as we done up here so I’ll just copy this, paste it in here and I just wanna change Input.touches to be Input.mousePosition all like so and something else you can do in Unity is make it so that only certain code is actually ran or actually is actually compiled depending on the platform that you’re playing it on.

So what we can do is actually just above this if statement here for the mouse inputs, we can go hashtag if and then a space, we can go UNITY_EDITOR and then after this if statement here we can just go #endif. Now what this does is basically makes it so everything between this hashtag if and this #endif will only be compiled so the game will only recognize this if we are in the platform of Unity editor. So once we build this to our mobile device, this code here weren’t even be looked, it won’t even exist really in the final game. It won’t be recognized. And this is a great way if you do have something like this because mouse inputs can also be detected on touch inputs. So this would be quite conflicting if this was included inside of the mobile build.

All right, so that script ready to go, we can go back to the editor, wait for that to compile, wait for our last to go, we can press play. And when we select a object, we should be able to change its color. So I’ll click on the ball here. And as you can see it changed. We can click on this over here, we get to click on a bunch of different things. And the color will change. So you can press play.

And actually what I’m gonna do is move the camera a bit closer since it is kind of far at the moment. So I’ll just move it down like so. And yeah, there we go.

So in the next lesson, we are gonna be testing this out on our device. We’ll be first of all building this to an Android device. And then the lesson after that will be for all you iOS users. We’ll be going over how to build this to iOS, how to set it up through Xcode and have it on your device. So I’ll see you all in the next lesson.

Interested in continuing? Check out the full Mobile Game Development for Beginners course, which is part of our Unity Game Development Mini-Degree.

Create 2D Lights with Unity’s Universal Render Pipeline

$
0
0

Unity 2019.3 is packed to the brim with new features to help improve your game development process!  Along with the release of a new graphics rendering pipeline called Universal Render Pipeline (formerly LWRP), there are a lot of new 2D aspects added in Unity 2019.3+, including 2D Worldbuilding tools, 2D PSD Importer, 2D Pixel Perfect package, and 2D lighting.  With new features, comes new skills to learn though of course!

In this tutorial, we will specifically be looking at how to set up Unity using the Universal Render Pipeline (URP) and explore various properties of 2D lights in detail.  In so doing, we will also set up our own 2D scene with various lights so that we can see URP in action!  So, are you ready to learn how to light up your 2D game worlds?

Before we begin, please note that this tutorial is only applicable to Unity 2019.3 or later.  If you’re using an older version of Unity, you will need to install a newer version.

Projects Files

You can download the project files for this tutorial here.

To use them, please follow the steps below:

  1. Unzip and open ‘Assets/Scenes/ExampleStart.scene‘.
  2. Download Painted HQ 2D Forest Medieval Background: https://assetstore.unity.com/packages/2d/environments/painted-hq-2d-forest-medieval-background-97738
  3. Follow Project Set-up Guideline
  4. Add the images from Painted HQ 2D Forest Medieval Background to your Sprites folder.

TABLE OF CONTENTS

PROJECT SET-UP

  • Installing a Universal Render Pipeline
  • Creating a Universal Render Pipeline Asset
  • Assigning the URP Asset in the Graphics settings
  • Creating and assigning a 2D Renderer data to the URP Asset

2D LIGHTS AND SHADOWS

  • Adding a 2D light component
  • Light types and properties
  • Normal Map for detailed shadows
  • Animating the 2D light components

REFERENCE/LINKS

PROJECT SET-UP

The set-up process is not required if you’re using the example project. You can skip this section if you already know how to set up a universal render pipeline.

1. INSTALLING A UNIVERSAL RENDER PIPELINE

To create a new project that uses Universal Render Pipeline, open up the latest version of Unity Hub. 

Go to Create > New Unity project > Choose ‘Universal RP Template’.

Creating a project with urp template

 If you wish to add the Universal Render Pipeline to an existing project instead, you will need to install it from the package manager.

 To do this, go to Package Manager > All Packages > Universal RP and make sure it is installed and up to date.

packagemanager_urp

2. CREATING A UNIVERSAL RENDER PIPELINE ASSET

 Once you have installed the Universal Render Pipeline to your project, you can create a URP asset that is used to configure the pipeline.

To do this, right-click in the Project window. Select Create > Rendering > Universal Render Pipeline > Pipeline Asset

how to create urp pipeline asset

This asset can be used to control various graphical features and quality settings.  When you click on ‘Pipeline Asset’, you will see that two asset files are automatically created:

  • UniversalRenderPipelineAsset.asset
  • UniversalRenderPipelineAsset_Renderer.asset

Note that the second asset (‘_Renderer’) is not needed as it will be replaced with a newly created 2D renderer after the next step.

3. ASSIGNING THE URP ASSET IN THE GRAPHICS SETTINGS

Creating a pipeline asset alone will not make our project use the URP straight away. We need to change the graphics settings by navigating to Edit > Project Settings > Graphics.

Within Graphics settings, you can drag and drop the UniversalRenderPipelineAsset into the Scriptable Render Pipeline Settings field.

Project settings-Graphics-Universal render pipeline

* Potential Issue *

 After changing the graphics settings, some of the objects in your scene might turn pink. This is because some of the built-in shaders are not renderable by UniversalRP Materials. 

To fix this issue, simply go to Edit > Render Pipeline > Universal Render Pipeline > Upgrade Project Materials to UniversalRP Materials.

(Note: This may take a while as Unity will attempt to update every single material in the Assets folder. Alternatively, you can manually select materials and upgrade the selected materials.)

Update Project Materials

4. CREATING AND ASSIGNING A 2D RENDERER DATA TO THE URP ASSET

Now the project is ready to use the Universal Render Pipeline, but we need to set up the URP asset first so that 2D lights can properly illuminate our scene. This can be done by creating a 2D Renderer Data by the same method we created the URP asset.

You can do so by right-clicking Project view and Create > Rendering > Universal Render Pipeline > 2D Renderer Data.

Once that is created, click on the UniversalRenderPipelineAsset that you created earlier. You can drag and drop the 2D Renderer Data into Renderer List in the Inspector, and set it to Default.

URP set 2d renderer default

2D LIGHTS AND SHADOWS

Congratulations! Now your project is all set up and ready to use 2D lightings. In this section, we will be looking at the various applications of 2D lights.

5. GLOBAL LIGHT

Your scene may have turned completely dark after the previous step. This is because the default (3D) light cannot illuminate our scene anymore.

We can light up the scene again by adding a 2D light to the scene. Click on any GameObject in the scene view, and go to ‘Add Component’ > Search ‘Light’ > Select ‘Light 2D (Experimental)‘.

Or alternatively, you can navigate to GameObject > Light >  2D.

Add 2D Light component

Note that 3D lights are not usable at this stage. Once you add a global light, your scene objects will be visible again.

Global Light On/Off comparison

  • Light Type (= Global light affects all rendered Sprites on all target sorting layers.)
  • Light Order (= Lower values are rendered first.)
  • Blend Style (= Determines the way light interacts with sprites.)
  • Color (= Use the color picker to change the color of light.)
  • Intensity (= Determines the brightness.)
  • Target Sorting Layers (= Determines which object can be affected by this light.)

We will leave most of these properties as a default state, but feel free to adjust the color and intensity to suit your taste.

6. PARAMETRIC LIGHT

Every object in the scene is faintly visible by the dim global light. Let’s create a Parametric light at the centre and make it look like moonlight by setting the properties as followings:

  • Sides: 5 → 48
  • Falloff: 0.5 → 6

Parametric light Moonlight

7. POINT LIGHT

Now, let’s add another light component on the bottom left of the screen. This time we will create a Point light and move it to the left bottom of the screen.

We will change the light properties as such:

  • Inner Angle: 15
  • Outer Ange: 90
  • Outer Radius: 22
  • Falloff Intensity: 0.8
  • Intensity: 6

The light has now become brighter and cone-shaped. We can copy and paste (Ctrl+C, Ctrl+V) this gameObject as many times as we want, assign an identical colour to each and arrange its position like a stage.

URP stage lights

8. NORMAL MAP

Normal Map is a texture that contains depth information of a surface. It can be used to create a more detailed shadow when lights reflect on the surface.

In this example project, we will apply a normal map to the mountain sprite.

You can create a normal map using a painting tool such as Photoshop, or using Normal Map Online. Link – https://cpetry.github.io/NormalMap-Online/

  1. Select the mountain sprite (Assets > Sprites)
  2. Click on ‘Sprite Editor’ (If the button is disabled, check if you have installed ‘2D Sprite Editor’ from Package Manager.)
  3. Expand ‘Sprite Editor’ menu.
  4. Click on ‘Secondary Textures’.
  5. Drag and drop the corresponding normal map (Assets > Texture) to ‘Texture’.

Applying normal map as a secondary texture

Now, let’s hit ‘Apply’ in the Sprite Editor and see how it changed our mountain.

9. FREEFORM LIGHT

To see our normal maps in effect, we need to create a light that recognizes Normal Map.

Create a 2D light component, change its Light Type to Freeform, and tick the box next to Use Normal Map.

You can edit the shape of this light type in the scene view. Click on ‘Edit Shape’ button, and move the dot’s position with your mouse.

To add a dot, hover your mouse over a line of the shape and left-click. To remove a dot, select the dot and press ‘Delete’ on your keyboard.

We can clearly notice the difference between before and after using the normal map.

2D Freeform Light - Edit shape

10. ANIMATING THE 2D LIGHTS

The real beauty of lighting is when we start animating all these lights and change the static environment to a living world.

2D light and its properties can also be keyframed for animation as with any 2D sprites.

For example, we can create pulsing starlights in the sky simply by keyframing the intensity.

URP 2D Create a pulsing starlight

Copy and paste the star gameObject across the sky, change sizing and hit Play.

You will notice that all starlights are pulsing at the same time. You can randomize the starting point of each star’s animation, by attaching this script to each star gameObject:

public class StarScript : MonoBehaviour
{
    void Start()
    {
        GetComponent<Animator>().enabled = false;
        StartCoroutine(StarLightAnimation());
    }

    IEnumerator StarLightAnimation()
    {
        float random = Random.Range(0, 4);
        yield return new WaitForSeconds(random);
        GetComponent<Animator>().enabled = true;
    }
}

Synchronized

URP 2D - pulsing starlight

Randomized

URP 2D - Starlight randomized

That’s it for this tutorial! As you can see, 2D Lighting has never been easier with the new Universal Render Pipeline update in 2019.3.  Not only does it offer you immense customization in how you can light your scenes (and render your graphics in general), but it offers a user-friendly workflow for artists and non-artists alike.  Of course, you can extend your skills far beyond what is covered in this tutorial for your own game projects, so feel free to experiment with the project and test your understanding

I hope you enjoyed this tutorial, and please let your imagination run wild in your games using the new 2D lighting feature for Unity. See you in the next post!

URP 2D lighting - Final outcome

REFERENCE/LINKS

Download Example Project - Unity 2019.3 2D Lights

Painted HQ 2D Forest Medieval Background by Super Brutal Assets – https://assetstore.unity.com/packages/2d/environments/painted-hq-2d-forest-medieval-background-97738

Space Shooter Redux by Kenneys – https://www.kenney.nl/assets/space-shooter-redux

For further information about today’s contents, visit Unity’s Documentation page:

  • Universal Render Pipeline – https://docs.unity3d.com/Packages/com.unity.render-pipelines.universal@7.1/manual/index.html
  • 2D Lights Properties – https://docs.unity3d.com/Packages/com.unity.render-pipelines.lightweight@6.7/manual/2DLightProperties.html

Zenva vs Udemy – 2020 Complete Comparison

$
0
0

Ready to learn, but aren’t sure whether Udemy or Zenva has the best online programming courses for 2020? While both platforms offer a wide variety of coding courses that let you learn coding online for multiple programming languages, there are some notable differences between them that can make or break your learning experience.

Today, we’re going to explore the pros and cons of each service in a Zenva vs Udemy battle using a number of categories in terms of video lesson quality, price, course relevance and variety, accessibility, mobile usability, and user testimonials.  In the end, you should be able to make a more informed decision about whether Udemy or Zenva is right for you as you start your eLearning!

Instructors and Quality Standards

It’s important that lessons are taught by knowledgeable instructors with good video production quality. Let’s delve into how Udemy and Zenva stack up when it comes to who teaches their courses.

Udemy:

On Udemy, anybody can become an instructor. Free courses have virtually no vetting, while premium courses involve only a slightly more stringent process. While this is great news for aspiring instructors, this has a downside for students.

Each instructor has their own quality standard, and, consequently, video production quality can be as variable as free videos on YouTube. This can especially be the case with audio quality, which can be terrible even on paid courses.

Ultimately, what Udemy gains in instructor choice, it sacrifices in video quality.

Instructors and Quality Standards - Udemy

Zenva:

Zenva only has a few handfuls of instructors producing the lessons. Thus, if there is an instructor you don’t like, this can be problematic.

What Zenva does offer, however, is a better vetting process. Instructors are hand-chosen to create courses, and each course is run through a variety of quality standard checks both before and after it’s published. As such, video lessons are mostly free of the usual issues that bring down the quality. To boot, the instructors are offered assistance at every step, ensuring that their work is the best it can be.

Instructors and Quality Standards - Zenva

Verdict:

Though Udemy wins in terms of instructor variety, Zenva stands taller with higher quality production focus and more experienced instructors.

Price

Many users are turning to eLearning due to its reasonable price-point in comparison with traditional institutions.  So, for this next part, we’ll explore whether Udemy or Zenva has better prices in the long- run.

Udemy:

The pricing on Udemy is extremely variable.  Some courses can cost well over $100 to obtain, whereas other courses can be obtained for as cheaply as $10.  As such, learning on Udemy can be extremely affordable if you shop for current deals.

While this is certainly fantastic for the short-term if you only need one or two courses, if you’re aiming to learn a whole development subject, such as Full-Stack web development, the costs will quickly add up as you will require multiple courses to explore the full scope of the topic.

Price - Udemy

Zenva:

The pricing structure on Zenva is based largely on its access plans.  With these access plans, students can learn from Zenva’s entire 200+ course catalog based on a remedial monthly or yearly fee.  In addition to opening up the entire course catalog, Zenva’s access plans also provide a multitude of other perks including in-house course support and free monthly updates.

While these sorts of plans are not everyone’s cup of tea, in the long-term it is very cost-effective – even if you only learn from 15 courses a month, you’ll be spending somewhere around $3/course.  In addition, Zenva does still allow for individual course purchases for a reasonable $50/course.

Price - Zenva

Verdict:

While Udemy does offer some amazing deals for users who only need a handful of courses, Zenva’s access plans offer a far more cost-effective strategy for learning programming and provide more value for your dollar.

Course Relevance

For educational programming platforms, it’s important to keep relevant with new frameworks and programming practices. In this section, we will see how up-to-date courses are on Udemy and Zenva.

Udemy:

Udemy’s instructors have a good amount of control over their courses. Once again, while this is great for instructors, this means students are left at their mercy as to whether the courses are up-to-date.

In fact, many courses on Udemy are now behind the times (for programming, at least). As a consequence, if you’re a beginner, you might wind up buying a course using an older framework or similar. This is not to mention instances where an instructor may have given misinformation. There is no guarantee this information will be fixed, so students may be out of luck with bugs.

Course Relevance - Udemy

Zenva:

Overall, Zenva makes an immense effort to update their courses as per their Course Update Policy – whether this means making notes about misinformation or remaking older courses entirely when a framework, library, or similar is updated in a major way.

For students with access plans, Zenva also pushes major course updates to students for free, including new courses for brand new engines or frameworks. Thus, students can continue to learn even as programming practices change. Additionally, course issues are addressed as quickly as possible, so there’s no worry if the instructor made a mistake somewhere or if a video is broken.

Course Relevance - Zenva

Verdict:

Though you can find updated courses on Udemy, Zenva’s guarantee and dedication to update all their courses makes them the better investment for the long term.

Course Variety

Of course, your choice of platform may come down simply to the topics Udemy and Zenva cover. Thus, the next thing we’ll take a look at is the course variety they both offer.

Udemy:

When it comes to variety, Udemy is the clear leader. Whether you want to learn programming, photography, or something else, Udemy probably has a course for it. As such, you can always find some new skill to learn.

That being said, the fact instructors have more control over the courses can present some uneven distribution on subject matters covered. For example, if you want to learn Herbalism, you have three pages worth of courses to choose from. On the other hand, if you want to learn Python, I get 94 pages worth.

This bias for certain subjects can also make it hard to pick, as most of the courses cover the same topic simply with a different instructor. Thus, without extensive research, it can be confusing as to which course should be picked.

Course Variety - Udemy

Zenva:

Zenva definitely does not have the variety that Udemy does. The platform focuses mostly on development and data science, so you can’t exactly go to Zenva to learn how to bandage someone’s arm.

By contrast to Udemy, though, this specialization can make it much more authoritative on the subject matters it does cover. Further, the Mini-Degrees and Academies are specifically tailored to build a guided experience. Whether you want to learn web development or game development, Zenva helps you learn the skills you need in an intuitive manner. Even for courses covering similar topics, Zenva uses different projects to illustrate the skills in a way that is new.

Course Variety -  Zenva

Verdict:

For the most part, it’s a tie and depends on what you want to learn. If you need to learn non-programming related subjects, Udemy is the platform to choose. For programming matters, however, Zenva’s focus allows it to provide a friendlier, more guided experience for beginners.

Accessibility

Both platforms deliver their content through video, but Udemy and Zenva do differ in terms of how accessible those videos are, whether in terms of disability or learning styles. So next, we will look at how welcoming both platforms are.

Udemy:

Whether you speak English, German, or something else, you have a high chance of finding something in your native language on Udemy. Thus, in terms of an international audience, this is a great boon.

Unfortunately, that’s where the accessibility stops. Most of the videos on Udemy do not feature Closed Captions, and many of those that do are inferior, auto-generated ones. Furthermore, if your learning style doesn’t suit videos, you don’t have many other options on Udemy for learning.

Accessibility - Udemy

Zenva:

When it comes to languages, Zenva courses are almost exclusively delivered in English, so you won’t find anything in your native tongue if you struggle with listening to English.

Fortunately, Zenva makes this up in other areas of accessibility. Not only do all the videos featured Closed Captions, but they are also manually generated to ensure high quality. Additionally, Zenva’s lessons come with written summaries, so if you learn better by reading, you have the option to do so.

Accessibility - Udemy

Verdict:

While multiple languages are nice, Zenva offers more accessibility options no matter how a student needs or prefers to learn.

Mobile Usability

Since more than half of internet usage comes from mobile devices, it’s always good to examine what the mobile experience is like. So, how do Udemy and Zenva stack up against each other?

Udemy:

As expected, Udemy’s website is fairly mobile-friendly, with only a few layout issues that don’t really hinder the mobile experience.

Where Udemy shines, though, is with its app. Not only is the app well-made, but it allows for offline video playback for any of the courses you’ve purchased. This makes it very easy to learn on the go regardless of your schedule, so it’s well-suited for anybody.

Mobile Usability - Udemy

Zenva:

For the most part, Zenva’s site is perfectly responsive, and there is quality assurance in place to make sure you can watch videos easily from any device and screen size.

Like Udemy, though, Zenva also shines much more when it comes to its Zenva app which is available for iOS and Android devices.  Not only does the app allow you to easily watch all your videos on the go, but it also supports offline playback.  In addition, Zenva has made sure students can also read the lesson summaries via the app, so even if watching a video isn’t possible, students can read along to follow the content.

Mobile Usability - Udemy

Verdict:

Ultimately, it’s a tie.  Besides responsive websites, both Udemy and Zenva have fantastic apps that make for a worthwhile experience for those who need to learn on the go – even in regards to offline playback.

User Testimonies

The last category we’re going to take a look at is the availability and abundance of user testimonies on Udemy and Zenva.

Udemy:

Udemy’s focus seems to be on their individual product pages, where you can find collections of reviews from anybody who bought the course. Much like other large online stores, these give you power as a consumer to decide a product’s value.

Yet, there seems to be no clear indication Udemy does anything with a course that receives numerous bad reviews (besides hiding it). This is not to mention that, like many reviews on larger online stores, it is up to the consumer to determine whether the review is legitimate or angry spam.

User Testimonies - Udemy

Zenva:

While Zenva lacks the public reviews on product pages, they do accept private reviews. Further, any course averaging below a 4 is replaced by a new course with higher quality. Thus, there is more clear evidence reviews matter on the platform.

Something that we immediately found on Zenva – and that we were unable to find on Udemy – was a section for learner success stories. These learner success stories feature in-depth interviews from people in multiple industries who used Zenva’s course to further their careers and goals. Ultimately, this adds a good sense of professional legitimacy.

Of a note, Zenva does have public reviews available on its Facebook page, which offer at least some record of what customers are thinking.

User Testimonies - Zenva

Verdict:

Udemy comes out a little bit ahead in terms of showcasing their consumer’s opinions. That being said, Zenva’s willingness to act on reviews and showcase successful individuals offers a professional legitimacy that Udemy is missing.

Overview:

Ultimately, your platform choice will depend on your learning needs. If what you want to learn is skills like crafting, DIY, or something akin to that, then Udemy is the better choice due to its course variety and ability to choose a course based on consumer backing.

However, if you’re interested in web development, game development, or data science, Zenva’s focus on quality beats Udemy by a lot. Further, with Zenva’s robust access plans to their entire catalog along with free updates, Zenva’s courses easily outlast those on Udemy and make a good long term investment for a professional career.

If you’re ready to experience Udemy’s variety, you can check out their class offerings here.

Alternatively, you can aim for the more focused coding route and check out Zenva’s courses here.

How to Improve Game Feel in Three Easy Ways

$
0
0

Game feel, or ‘game juice’ refers to the tactile sensation experienced when interacting with video games, which decides how fun or engaging the second-to-second play of the game is. It is often a combination of many different aspects, including how quickly your character’s animation plays in response to control input and how much audiovisual feedback you are provided for taking certain actions. Although these aspects are subtle, their impacts can be dramatic and make the difference in creating a memorable experience for your players!

In this beginner-friendly tutorial, we’re going to look at three easy and effective techniques to enhance game feel using just animation, sound, and camera manipulation!

Don't miss out! Offer ends in
  • Access all 400+ courses
  • New courses added monthly
  • Cancel anytime
  • Certificates of completion

ABOUT GAME FEEL

 Before we jump into a deeper discussion, let me introduce that this tutorial was inspired by these three talks:

My takes from these talks can be summarized into these 5 techniques:

  1. Emphasize the player’s success!
    • Throw confetti, play encouraging sounds, pause screen for 0.01 milliseconds, etc.
    • Combine all these effects to make a successful moment even more satisfying.
  1. Touch the player’s emotion!
    • Slow-motion, cinematic camera, ambient sound, meaningful phrase, etc.
    • Combine all these effects to give a more dramatic impact on a certain event (e.g. Death)
  1. Add randomness!
    • Less accuracy (in shooters), random AI behavior, random sound effects, etc.
    • A bit of randomness can spice up repetitive gameplay.
  1. Add permanence!
    • Explosion, debris, enemy corpses, smoke, blood, destroyed objects, etc.
    • Show the player the consequences of their actions. Make them feel like they’re interacting with the game world.
  1. Make the player avatar fun to control!
    • Long jump, triple jump, wall kick, stomach dives, etc.
    • Make more sensitive, nuanced reactions to player input. This allows players to express their intent to the system.

 In an effort to prove that such techniques can be applied in any game to enhance the game feel, we will be turning this simple flappy bird type game made by Unity, from this:

Unity Game feel tutorial - original game (compressed)

Hi… I’m just this boring game that I doubt you will ever have fun playing. Ever.”

… to this:

Unity Game feel tutorial - edited game (compressed)

“LOOK AT MY AMAZING FLAPS! I JUST PASSED THE PILLARS OF DEATH! WEEEEEEEEEEEEEEEEEEE!!!!!!!!!!!!”

For this tutorial, we’ll specifically learn how to use Camera, Animation, and Sound to improve game feel. Within the download project file, there are some more advanced techniques used such as coding controls and VFX for you to further investigate. Now, let’s begin the magic of transforming a limp and lifeless game into a spectacle and engaging one!

TABLE OF CONTENTS

PROJECT SETUP

KEY EVENTS ANALYSIS

ADDING JUICINESS

  • Adding Screen Shakes
  • Adding Impacts to Animation
  • Celebrating the player’s success using Particle System
  • Adding Random Sound Effects
  • Improving game feel with controls

REFERENCE/LINKS

PROJECT SETUP

‘Flappy Bird Style Example Game’ created by Unity Technologies

0. Play the game here! → https://avacadogames.itch.io/flappy-bird-style-example-game-unity (and come up with your own ideas on what can be improved)

1. Open up Unity and press Ctrl+9 to open the ‘Asset Store’ window.

2. Install ‘Flappy Bird Style Example Game’ by Unity Technologies:

Download→ https://assetstore.unity.com/packages/templates/flappy-bird-style-example-game-80330

Game feel tutorial - Asset Store Import

3. Import all and open Assets/Flappy Bird Style/_Scenes/Main.

4. Start following the tutorial or start adding game juice of your own!

To download the source code used in this tutorial, click here. Make sure the unity package is installed first, otherwise it may override the project file.

Key Events Analysis

There are three key events in this game:

  1. Bird flaps when player input is detected,
  2. Score increases when the player successfully passes the gap between the pillars, and
  3. The game ends when the player collides with objects. 

1. Player Input Bird Flaps

Game feel Unity tutorial - Bird flaps

 2. Player Scored Score Increases

Game feel Unity Tutorial - Score

3. Player Death ‘Game Over’ text pops up

Game feel Unity tutorial - game over screen

Let’s begin with adding impacts to the first event: when the player input is detected.

Adding Screen Shake

It is important to note that responsive and intuitive feedback is vital for a good game feel. When a player presses a key, they expect the corresponding action to be executed immediately, or at the very least expect to see a visual sign that it has started to execute. Having a slow response to the player’s input (‘Input delay’) makes the game seem laggy and disconnected. For the same reason, it helps to have some clear visual signs that the system has acknowledged the input. Screen shake is one of the most commonly used techniques to give immediate feedback to players.

To add a screen shake effect to our flappy bird example game, navigate to Window > Animation > Animation, or press Ctrl+6.

Game feel tutorial - Animation

Select ‘Main Camera’ in the Hierarchy, and create an Animator by clicking ‘Create’ in the Animation window.

An empty animation clip will automatically be created and set as the default state of the animator. We will name this clip as ‘MainCam_Idle’. We can create another clip by expanding the clip list in the top left corner and clicking on ‘Create New Clip…’. We will name this as ‘MainCam_Flap’.

Game feel tutorial - Animation Create Clip

Enable ‘Recording mode’ and slightly move the x, y position of the camera in each frame. 

Game feel tutorial - Animation Flap Record

Open Animator by navigating to Window > Animation > Animator.

Game feel tutorial - Animator

Right-click on the default state (MainCam_Idle) and click on ‘Make Transition’. Then, click on the ‘MainCam_Flap’ clip to create a new transition arrow.

Create a new trigger in ‘Parameters’ and name it ‘Flap’

Game feel tutorial - Animator Trigger

Click on the transition arrow and add a condition by clicking the ‘+’ button in the Inspector. Set the condition to our new trigger parameter, ‘Flap’.

Game feel tutorial - Animator Transition Arrow

Also, make sure to set the Transition Duration to zero. This means there will be no delay in the transition of the animation from the Idle state to the ‘Flap’ state. It is crucial to make the player’s input feel responsive, so it is best to avoid having a long transition duration.

Game feel tutorial - Animator Transition Duration

This time we will create another transition arrow that goes from ‘Flap’ to ‘Idle’ state, and again, set the Transition Duration to 0.

Game feel tutorial - Animator Transition Arrow

Now the animator is all set up to play the screen shake animation clip (MainCam_Flap), whenever our parameter trigger (Flap) is called.

As one last step, click on the animation clip (MainCam_Flap) and disable ‘Loop Time’ in the Inspector– unless you want the animation to be repeating endlessly.

Game feel tutorial - Loop Time

  • Open ‘Bird’ Script and add a variable:

public class Bird : MonoBehaviour
{
        //Reference to the Main camera's animator component.
        private Animator camAnim;
}

  • Within void Start() function, add the following line:

void Start() 
{ 
        //Get reference to the Animator component attached to main camera. 
        camAnim = Camera.main.GetComponent<Animator>();
}

  • Within void Update() function, there is a section where it detects player input.

//Look for input to trigger a "flap".
if (Input.GetMouseButtonDown(0)) 
{ 
       //Tell the animator about it 
       camAnim.SetTrigger("Flap"); 
}

Then your Bird script should look like this:

public class Bird : MonoBehaviour 
{
	public float upForce;					
	private bool isDead = false;            

	public Animator anim;                   
	public Rigidbody2D rb2d;               

	private Animator camAnim; //Reference to the Main camera's animator component.
	void Start()
	{
		//Get reference to the Animator component attached to main camera.
		camAnim = Camera.main.GetComponent<Animator>();
	}

	void Update()
	{
		
		if (isDead == false) 
		{
			//Look for input to trigger a "flap".
			if (Input.GetMouseButtonDown(0)) 
			{
				camAnim.SetTrigger("Flap");  //Tell the animator about it 
				anim.SetTrigger("Flap");
				rb2d.velocity = Vector2.zero;
				rb2d.AddForce(new Vector2(0, upForce));
			}
		}
	}
}

Now the screen will shake every time you click with the left mouse button. Nice!

Adding Juiciness to Animation

When we play games, we get a sense of immersion by seeing how objects interact with each other in the world. We get information such as the world’s gravity, the character’s weight, elasticity, momentum, and whatnot. In a platformer game like Celeste (2018), jumping isn’t only about the character going up and down. Madeline, the main character, initially gets stretched vertically when jumping and gets slightly squashed sideways as she lands on the ground. Her hair follows the body with a little bit of delay and dust forms on the ground as she lands. Every such little detail makes the jumping look much more fluid and alive.

What can we possibly do to make our bird’s action look more fun? What is it like when a bird flaps in reality? How can we exaggerate a certain aspect of it? What kind of feeling do you want players to experience? … with all those considerations in mind, we can move on to the second part: adding juiciness to animation.

First, we learned that having a clear visual sign upon player input helps to make the game feel more responsive and intuitive. Let’s make our bird to slightly scale up and also switch its color for a millisecond upon player input.

Press Ctrl+6 to open ‘Animation’ window. This time, select ‘Bird’ gameObject from the Project view. Open ‘Flap’ animation; it has only two keyframes at 0:00 and at 0:02.

Game feel tutorial - Flap Animation

  • Enable ‘keyframe recording mode’
  • Change Colour to grey, and the x,y scale to 1.2 at 0:01. 
  • Move to the next frame and reset the color to create a flashing effect. 
  • Reset the scale back to normal at 0:04 or the end of the animation.

Game feel tutorial - Flap Animation Keyframing Example

… feel free to adjust the values or add more as you like!

Unity Game feel tutorial - screen shake (compressed)

We can also create a visual effect like dust puffs, using Particle System.

Game feel tutorial - Particle system

Click on the Particle System and rename it. (e.g ‘Flap FX’)

If the particles are visible in the scene view but not in the game view, that is because sprites are set to be rendered behind the background by default.

Game feel tutorial - sprite sorting layer default example

We can change the order of rendering by going to Inspector > Particle System > Renderer > Sorting Layer ID and change Default → Midground or Foreground.

Game feel tutorial - sprite sorting layer

In the Inspector, you can change a lot of properties to make the desired look and feel. You can follow the settings I made below or try creating your own unique effect!

  • Renderer >Material > Sprites-Particle → Sprites-Default
  • Duration = 5 → 0.10
  • Looping = Enabled → Disabled
  • Start Lifetime = 5 →  (Random Between Two Constants) 0.5 to 1.5

To allow Random Between Two Constants, simply click on the tiny arrow next to the input field to view more options.

Game feel tutorial - Particles System Random Between Two Constants

  • Start Size = 1 → 0.5 to 1
  • Start Speed = 1 → 1 to 3
  • Start Colour = White → Yellow
  • Gravity Modifier = 0 → 0.5
  • Emission > Rate Over Time = 10 → 3
  • Emission > Bursts > Count > 5 to 15
  • Shape > Shape = Cone → Donut
  • Size Over Lifetime → Linearly Decreasing

Challenge!

Using the same techniques we learned today, try giving more emphasis on the other 2 key events: i.e. player scoring and death.

Tip 1: Try keyframing anything! For camera shake, you can keyframe not only the position but also z rotation and size of the camera.

Tip 2: Make sure to uncheck Loop Time of an animation clip, unless you want it to repeat itself.

Tip 3: Animator.Play(“AnimationName”, -1, 0); can also be used instead of Animator.SetTrigger(). The former forces animator to play the animation immediately disregarding conditions and transition settings, whereas the latter makes use of trigger parameters to set conditions and transition settings. For more information, Go to https://docs.unity3d.com/ScriptReference/Animator.Play.html

Adding Sound Effects

Our bird now has more visible impacts when we click the left mouse button and as we pass between two pillars. It already looks much more fun to interact with, but we’re still missing an important part of the game feel: Sound. To add a sound effect to the bird’s flap, select the Bird gameObject, click ‘Add Component’ in the Inspector and search for ‘AudioSource’.

Game feel tutorial - Audio Source

Once that is added, go to the ‘Bird’ Script and create a variable to get a reference to the AudioSource component.

public class Bird : MonoBehaviour
{ 
         private AudioSource audioSource;
         //Reference to the AudioSource component.
}

Within void Start() function, assign the AudioSource component to the newly created variable.

void Start()
{
	//Get a reference to the AudioSource component attached to this GameObject.
	audioSource = GetComponent<AudioSource>();
}

Let’s hit save and go back to Unity now. Drag and drop any of the sample sound clips that you want to play for flap action into ‘AudioClip’ section.

These sound effects were created using a free online SFX maker: Bfxr (https://www.bfxr.net/).  Make sure ‘Play On Awake’ is disabled.

Game feel tutorial - Adding Audio Clip to Audio Source

Now, let’s go back to our script and look for the section where it detects player input and add a line of code that makes our audioSource to play the assigned AudioClip.

//Look for input to trigger a "flap".
if (Input.GetMouseButtonDown(0)) 
{
	audioSource.Play();
	//This plays the audioClip attached to the AudioSource component.
}

That’s it! Simple, right? But what if we have multiple sound effects to be played for one identical trigger? In that case, we can add a range of sound effects to be played randomly every time the bird takes flapping motion. A bit of randomness helps reduce repetitiveness within the gameplay so… why not?

Let’s start by adding an array of AudioClip. (Arrays allow you to store multiple objects in a single variable, and it has square brackets [ ] after the type in C#).

public class Bird : MonoBehaviour 
{
	public AudioClip[] soundEffectList;
        //Holds a reference to the list of audioclips assigned in the inspector.
}

Save and go back to Unity. You will have noticed that ‘Flap Sound Effects’ is newly created in the Inspector with a little arrow next to it. You can drag and drop multiple audio clips into this.

Game feel tutorial - Adding Multiple Audio Clips to Audio Source

  • Within void Update() function, look for the section where it detects player input, and then add the following lines of code:

//Look for input to trigger a "flap". 
if (Input.GetMouseButtonDown(0)) 
{ 
         int randomSound = Random.Range(0, soundEffectList.Length); 
         //This returns a random value between 0 and the length of our sound effect list.

         audioSource.clip = (soundEffectList[randomSound]); 
         //This sets a random audioClip of our list to the AudioSource component. 

         audioSource.Play(); 
         //This plays the audioClip attached to the AudioSource component. 
}

Then, your Bird script should look like this:

public class Bird : MonoBehaviour 
{
	public float upForce;					
	private bool isDead = false;			
	private Animator anim;
        private Animator camAnim;					
	private Rigidbody2D rb2d;               

	public AudioClip[] soundEffectList;		//Holds a reference to the list of audioclips assigned in the inspector.
	private AudioSource audioSource;		//Reference to the AudioSource component.

				
	void Start()
	{
		anim = GetComponent<Animator> ();
		camAnim = Camera.main.GetComponent<Animator>();
		rb2d = GetComponent<Rigidbody2D>();

		//Get reference to the AudioSource component attached to this GameObject.
		audioSource = GetComponent<AudioSource>();
	}

	void Update()
	{
		if (isDead == false) 
		{
			//Look for input to trigger a "flap".
			if (Input.GetMouseButtonDown(0)) 
			{

				int randomSound = Random.Range(0, soundEffectList.Length);
				//This returns a random value between 0 and the length of our sound effect list.

				audioSource.clip = (soundEffectList[randomSound]);
				//This sets a random audioClip of our list to the AudioSource component.

				audioSource.Play();
				//This plays the audioClip attached to the AudioSource component.

				camAnim.SetTrigger("Flap");
				anim.SetTrigger("Flap");
				rb2d.velocity = Vector2.zero;
				rb2d.AddForce(new Vector2(0, upForce));
			}
		}
	}

	void OnCollisionEnter2D(Collision2D other)
	{
		rb2d.velocity = Vector2.zero;
		isDead = true;
		anim.SetTrigger ("Die");
		GameControl.instance.BirdDied ();
	}
}

Bonus: Improving Game Feel with Controls

In most Mario series, the faster the player is running the higher they jump. In Celeste, players can correct their position after a jump by dashing mid-air. These generous controls allow players to master the controls and enjoy overcoming challenges. On the other hand, our flappy bird only can only flap drawing a constant curve on a fixed velocity, and its movement heavily relies on the player’s keypress timing. There is little room for players to master the controls, it feels almost like the bird is out of control. But what if holding a key longer means the bird will fly higher?

Game feel tutorial - Player Control Curve

Bird flying with a fixed max-height

Game feel tutorial - Player Control Longer Key Press

Bird flying higher with a longer button press

This allows players to have more precise control over the bird and it greatly enhances the game feel. To do this, open up the Bird script and create a float variable that tracks the duration of the flight. This value will increase while the player is pressing on the mouse button.

public class Bird : MonoBehaviour 
{
        //Upward force of the flap.
	private float upForce = 3;

        //Duration of the flap.
	private float flapDuration;
}

And then I would create another float variable that sets up the limit for the first variable.

public class Bird : MonoBehaviour 
{
        //If flapDuration is greater than or equal to this value, the bird won't fly higher.
        private float maxDuration = 0.7f;
}

We could simply tell the bird to fly only when flapDuration is less than maxDuration as such:

void Update()
	{
		if (Input.GetMouseButton(0))
		{
			if(flapDuration < maxDuration)
			{
				flapDuration += Time.deltaTime;
				rb2d.velocity = Vector2.up * upForce;					
			}
		}
}

At some point, the flap duration must be reset. I will reset it whenever the player clicks the mouse button.

void Update()
	{
		//Look for input to trigger a "flap".
		if (Input.GetMouseButtonDown(0))
		{
			flapDuration = 0;
		}
	}

Quick Before vs. After

Unity Game feel tutorial - original game (compressed)
Unity Game feel tutorial - edited game (compressed)

On a side note, I also added a complimenting feature that makes the score display a random message like “Awesome!” while the player is on a high-score streak.

Game feel tutorial - High score text compliment

Here is the relevant source code:

if(score > 4 && score < 10)
		{
			scoreText.gameObject.GetComponent<Animator>().Play("ScoreText 2", -1, 0);
		} else if (score >= 10)
		{
			int random = Random.Range(0, 5);
			switch (random)
			{
				case 0:
					highScoreText.text = "Superb!";
					break;
				case 1:
					highScoreText.text = "Awesome!";
					break;
				case 2:
					highScoreText.text = "Excellent!";
					break;
				case 3:
					highScoreText.text = "Amazing!";
					break;
				case 4:
					highScoreText.text = "Fantastic!";
					break;
				case 5:
					highScoreText.text = "Terrific!";
					break;
			}

			scoreText.gameObject.GetComponent<Animator>().Play("ScoreText 3", -1, 0);

		}

Conclusion

In this lesson, we learned that responsive and intuitive feedback upon player input is vital for making a good game feel. This feedback may include bouncing ammo, flairs, knockback, heavy base shooting sound in shooters, and beyond. It can also be about controls, character animation, visual effects, and sound effects in platformers. All these little tweaks contribute to the game feel, yet they are often overlooked by many developers. These elements may be very subtle to be noticed individually, but when they are harmonized they add layers of satisfaction to the gameplay.  However, the best way to learn game feel is to experiment yourself and try new things – so we hope you expand upon the skills taught here.

I hope you enjoyed the tutorial today and become more confident in how to make a game more alive, responsive and fun!

Reference/Links

‘Flappy Bird Style Example Game’ by Unity Technologies:

Download→ https://assetstore.unity.com/packages/templates/flappy-bird-style-example-game-80330

Source Code  ‘Flappy Bird Style Example Game’:

Download → Link

Unity’s Documentation on:

Animation Transition – https://docs.unity3d.com/Manual/class-Transition.html

Sorting Layer – https://docs.unity3d.com/ScriptReference/SortingLayer.html

Animator.Play() – https://docs.unity3d.com/ScriptReference/Animator.Play.html

Other:

Free Online SFX Maker – Bfxr (https://www.bfxr.net/)

Play Original ver. – https://avacadogames.itch.io/flappy-bird-style-example-game-unity

Play Edited ver. – https://avacadogames.itch.io/flappy-bird-style-example-game-edited-game-feel-tutorial-zenva

How to Make a HTML5 Game

$
0
0

What exactly is a HTML5 game

Let’s start from total zero. What is HTML5? that’s a tricky question. There is a official definition of HTML5, which simply stands for the latest revision of HTML (the markup language used all over the world to build websites), and the more hyped definition (what most people understand when HTML5 is mentioned) which is all the “new” features of the web technologies that have come out in the last few years (JavaScript API’s like the Canvas or WebAudio, semantic HTML tags, etc).

For our purpose we’ll use bits of the two. HTML5 is HTML in it’s latest version, which includes a whole bunch of cool features that make the web technologies an open standard with endless possibilities combining HTML, CSS and JavaScript.

Having HTML along with all these super powers that go beyond making a simple website allows us to make, among other things, games. These are HTML5 games.

Don't miss out! Offer ends in
  • Access all 400+ courses
  • New courses added monthly
  • Cancel anytime
  • Certificates of completion

 Building blocks

The very basic building blocks of a HTML5 game are those of the web:

  • HTML
  • CSS
  • JavaScript

Similarly to what happens with HTML5, when people talk about CSS3 they usually refer to the new things that come with CSS’s latest specifications, but in an analog manner, CSS3 is simply the latest CSS. Ignoring for a second the semantics of these definitions and thinking of the hyped versions of these terms, we also may need, in order to make HTML5 games:

  • HTML5 (JavaScript API’s)
  • CSS3

With the above you can make awesome games that will run on modern web browsers on mobile and desktop, but some games might require more features, so there are more building blocks that you can add.

For instance, you may want to make 3D games. If that is the case there is also WebGL, which is a JavaScript API to render 2D and 3D graphics on the browser, using the GPU for greater performance.

Server side

If you want your games to saved data remotely you’ll need a server-side for your game. You can develop your own backend using any server-side language, you’ll need well a server in this case.

  • JavaScript (NodeJS)
  • PHP
  • Java
  • Python
  • Ruby

Or you can use a third-party Backend-as-a-Service provider such as Firebase. Some have free versions you can use and they’ll start charging you once you surpass certain limits. Some of these providers are particularly focused on games, some are mostly conceived for mobile apps but can be used for games too.

How to distribute a HTML5 game

The easiest way to distribute a HTML5 is to simply put it out there! By being built as a website, you can just embed it in on a page and publish it. Just like that.

If you want to distribute it through proprietary platforms you have to go through a process called wrapping. Basically you create a native app for the platform you wanna distribute it to (iOS, Android, etc) and put your game inside so that this app acts like a web browser and “runs” your game.

Phonegap is a popular tool used for this purpose which supports several platforms. It also gives you access to more advanced phone API’s so that for instance you can access the phone contacts or calendar from your HTML5 game.

For desktop platforms such as Windows, Mac or Linux there is a tool called node webkit that allows you to pack your HTML5 games for these platforms.

HTML5 game frameworks

Most games share some concepts, that of sprites (graphic elements that represent enemies, players, elements in your game), scenes or stages, animations, sound, loading graphic assets, etc. Since most game developers want to focus on their actual game and not in creating this whole abstraction layer, it is recommended you use a HTML5 game frameworks.

HTML5 game frameworks and libraries that contain building components you can use to create your own games. These libraries are Open Source projects created and maintained by people who want to contribute to the HTML5 gamedev environment. In many cases they created the frameworks for their own games, and after realizing that other people would want to not only use it but also contribute to it they released them as Open Source code, so everybody wins.

Picking what game engine to use is an important decision, so make sure you do proper research before making your choice. No matter what engine you pick, you will have to get familiar with its code and inner working if you want to use properly, so they shouldn’t be treated as black boxes.

What can help you make your choice:

  • Is your game for desktop, mobile or both?
  • Do they have an active community?
  • Are there many people using the framework nowadays?
  • Is it being maintained or the Github page looks like an abandoned town?

Sometimes looking at real games gives you more insight than just words. This project compares different engines by making the exact same Breakout game in all of them.

Some popular free frameworks are:

HTML5 game development courses

Video courses are a great way to learn new technologies. The main difference between a video course and just watching YouTube videos is that there is more structure. Good courses have a clear goal and build on to it step by step. Below a list of courses by Zenva that can give you the tools you need to create HTML5 games.

Phaser

WebGL & WebVR

HTML5 Skills:

Server-Side Development (to make a backend for your games)

HTML5 game tutorials

At the GameDev Academy, as you know already we have a bunch of HTML5 game development tutorials, mostly on Phaser, LimeJs, Quintus and BabylonJS. There are other great places to find good quality HTML5 gamedev tuts:

HTML5 gamedev communities

You can find plenty of active communities on the Internet, some focus on gamedev in general and some others just in HTML5 gamedev.

Web:

Facebook:

Google Plus:

HTML5 gamedev challenges

  • One Game a Month is one of the most active initiatives on the web for starting game developers. It consists on a pledge of making 1 game per month, no matter how basic or ugly. You make one game, you move on. It’s a great community and I recommend you check it out.
  • j13k competition: Contest to make a HTML5 game of only 13 kb, quite a challenge! the 2013 competition is over but don’t miss out 2014’s!

 HTML5 gamedev podcasts

I just know Lostcast, a podcast created by the guys from Lost Decade Games (whom we’ve interviewed in the past). In the podcast episodes they talk about they HTML5 games and game development in general.


Are we missing interesting resources in this article? Do you wanna help us out? Feel free to use the comments section bellow


Unity Reflect Tutorials – Complete Guide

$
0
0

Meet Unity’s newest technology set to enhance the workflow for building designers, architects, and engineers: Unity Reflect.

For the construction industry, BIM, or Building Information Modeling, has increasingly become a standard during all phases of creating a building – from planning the design all the way to completing the actual project in real-life.  BIM models allow designers to easily track the physical characteristics of every aspect of their building project, while also allowing stakeholders and project managers to quickly make decisions to improve on the integrity of the structure, the overall infrastructure, and more.  Ultimately, the workflow drastically decreases building costs, results in fewer errors, and increases communication at all levels – thus increasing demands for this technology in the industry.

Unity Reflect, however, is set to take BIM to a whole new and exciting level.  Teaming up with Autodesk, the creators of the popular Revit software used for creating BIM models, Unity’s new Unity Reflect product will allow users to view their buildings in real-time 3D.  With only a single click in Revit, designers, managers, and more can transfer their models to Unity Reflect for easy viewing.  Additionally, as the models are live-linked in real-time, multiple designers can make changes to the model in Revit and see this immediately reflected in their Unity Reflect viewers.

Beyond this, Unity Reflect can also be used for virtual reality and augmented reality experiences, allowing close-up and very hands-on 3D experiences with the buildings before they’re even built!  As a bonus, with Unity Pro, businesses will be able to brand and customize their Unity Reflect views, creating a more personalized experience for their clients.

Overall, Unity Reflect is set to drastically change how designers, engineers, construction workers, project managers, and stakeholders communicate building project concepts, making it easy to make on-demand changes.  The high-fidelity environments that can be created also allow for enhanced views that give all team members a better idea of the final result, allowing advanced planning and important business decisions to be made early on in the project’s lifespan.  All in all, Unity Reflect is a game-changing feature that can take the benefits of BIM and further enhance them in all areas, which for developers will only increase the demand for the skillset.

If you’re interested in Unity Reflect and are prepared to upskill with this new and fascinating technology, we’ve created a list below with helpful links to more information and tutorials to get you started!

Links

What is Unity Reflect?

How Unity Reflect Works


Unity XR Interaction Toolkit Tutorials – Complete Guide

$
0
0

Unity’s new XR Interaction Toolkit allows developers to implement interactivity into their AR and VR experiences without needing to code. The toolkit is available for Unity 2019.3 and can be downloaded from the Package Manager. It features a number of components which can be attached to different GameObjects in order to give them certain interactive properties. These are systems which typically need to be scripted or downloaded from external libraries. Now built into Unity, these systems are going to make developing an XR app faster and more stable.

Let’s now have a look at what’s available for both VR and AR.

VR Interactions

  • Interactivity with objects: hover over, select, grab, throw and rotate.
  • Ability to interact with UI elements using your VR hands.
  • VR locomotion: teleportation, snap turning.
  • VR rigs for stationary and room-scale experiences.
  • Haptic feedback through the controllers.
  • Cross-platform XR controller input.

AR Interactions

In order to use the AR interactions, AR Foundation is required. This is a Unity framework you can download from the Package Manager.

  • AR gestures for interacting with objects in the world: tap, drag, zoom and pinch.
  • Object placement.
  • UI interactions.
  • AR annotations to inform users about objects placed in the world.

XR (extended reality) is a blanket term for both virtual reality (VR) and augmented reality (AR). The toolkit covers both systems because although they function differently, many of the systems are the same. Tracking the rotation and position of a camera in 3D space (headset for VR, phone for AR) and interacting with objects (grabbing, selecting, etc).

Unity is also really good at platform independent development. You’ll notice that there’s no Oculus Interaction Toolkit, or Windows MR Interaction Toolkit. This is because on the surface, you’re developing for an XR interface and not any specific device. The same goes for AR. You don’t need to worry if the device you’re developing for is the iPhone X or 11. You’re developing for AR or VR inside of Unity and the engine does all of the translation between the different platforms behind the scenes.

As of late, Unity is putting more time into developing their XR systems. With the announcement of the new XR Plugin Framework earlier this year and now the XR Interaction Toolkit – developing VR for Unity is becoming easier and more accessible.

If you’re interested in trying out the new XR Interaction Toolkit, check out the tutorials below to give you a full overview on how these new systems work and how to add them to your project.

Links

Tutorials

Unity Havok Physics Tutorials – Complete Guide

$
0
0

Havok, is a popular physics engine which can be found in many AAA games, and now it’s coming to Unity. So what does this mean? Well for many years, people have been asking for an alternative to Unity’s built in physics system. It can be limiting for some developers, who want better performance from larger and more accurate physics simulations.

Announcing Unity and Havok Physics for DOTS - Unity Technologies Blog

Havok Features

Havok is designed to handle the performance of many complex games which require many physics interactions.

  • Stable stacking of physics bodies
  • Better accuracy of fast-moving bodies
  • Better simulation performance (twice as fast as the existing system)
  • Higher simulation quality
  • Deep profiling and debugging

Although Havok and the existing Unity physics may seem quite different, switching between the two can easily be done on runtime. This is because in the back-end of Unity, both physics systems run off the same data.

How To Add Havok to Your Project

Right now, Havok physics is in preview on the Package Manager with a minimum version of Unity 2019.3 required.

Links

Make a Game with Unity’s Navigation Components – Part 1

$
0
0

Introduction

One of the most incredible things about game design is the ability to do things that are impossible in reality. A chief example of this is the idea of the orthographic view.

Unity orthographic view demonstration

Computers have the ability to construct a perspective that does not even exist in real life. This has some fascinating consequences when it comes to creating video games. Exploring ways to utilize this unique perspective will generate a quite intriguing game.  Not only will it be unique, but it also adds another dimension of design possibilities. This look is also quite similar to certain popular video games on the mobile app stores.

In this tutorial, we will learn how to use orthographic view to create a puzzle game in Unity. From generating an orthographic projection, to creating a character, we will explore all aspects of this novel perspective for game development. Simultaneously, we will also be learning about Unity’s Navigation component system and how we can manipulate that to work in this multi-faceted view.

So, without further ado, let’s get started and create an illusion game!

Don't miss out! Offer ends in
  • Access all 400+ courses
  • New courses added monthly
  • Cancel anytime
  • Certificates of completion

Assets and Project files

You can download the completed project files for this tutorial here: source code.

We will also be using the Navigation Component system which can be obtained for free from Unity’s Github (https://github.com/Unity-Technologies/NavMeshComponents). Download it to your computer and save it in a file near your Unity projects. We are going to be accessing this later.

Creating the Illusion

Select your camera and change the perspective to “Orthographic.”

Switching the Camera to Orthographic in Unity

The way this view works is it takes all depth information and flattens it. This way, the size of objects in the scene is their “true size,” meaning that far away objects do not look smaller and closer objects do not look larger. This, you can imagine, is essential when it comes to creating this illusion.

We can create this illusion using only cubes, so go ahead and add one in.

Adding in a cube to the scene

Our camera isn’t in the right position; we need to fix that. The position isn’t as important as the rotation. We want it to be rotated around the X and Y axis so that we can essentially see three faces of the cube at the same time. Here are the final position and rotation I landed at:

The transform of the Camera in Unity

It is super important to never change the transform of the camera! Once you have a value, lock it in, do not change it. Do not write scripts moving the camera. Do not make animations moving the camera. In order for the illusion to work, we need the camera to always stay in one single position.

Once the camera is set up, we need to create an illusion we can work with. Scale the cube so that it is fairly long on one axis

A scaled cube and its transform

Next, you’re going to want to duplicate the cube and rotate the duplicate 90 degrees on the Y-axis. Position it so that it looks like this:

The cube duplicated and rotated

Bring it up above the original cube a good distance for reasons we will see later.

Repositioning the top cube

Reposition everything so that the final result looks like this:

View size on Orthographic camera

You may have to either change the position of both cubes or change the “Size” on our orthographic camera. Also, disable shadows on the directional light. This is another important part of creating the illusion.

Framing the objects in the scene

Cleaning Up The Environment

I have a couple of complaints with our current setup. First, everything is so bright! 

A material-less scene requiring sunglasses to avoid blindness

Let’s add in some materials. Create a new folder called “Materials” and create a new material called “Blue.” Change the Albedo value to blue and drag this material onto both of our cubes.

Adding a material to our cubes

That looks much better! The second thing we need to change is our hierarchy.

A disorganized and inefficient hierarchy

It looks so un-organized. Plus, the scale of our cubes will present problems later on if we try and animate them. So first, let’s create an empty game object called “Environment” and place our cubes in that.

The Environment object parenting all the cubes

Next, let’s further parent our cubes into empty game objects called “PlatformTop” and “PlatformOccluded” so that they’ll each have a uniform scale of 1.

The Cubes parented to newly created Gameobjects

The scale of each cube's parent

There we are! A nicely setup scene that we can work with. As a very final step, create a capsule called “Character” and place it on our cubes.

A capsule which will serve as our character

Since this is going to be our character, you might consider changing the size of the environment (change the scale of the children, not the parents which must stay at 1). The character should easily fit under both of these cubes

Properly placing objects to make space for the character

Setting Up Navigation

Agents and Nav-Meshes

In your project files, create a new folder called “Navigation Components.” Navigate to where you stored your downloaded Navigation Components from Github and drop the “NavMeshComponents” folder into your project tab (this is located in “NavMeshComponents-master -> Assets”). There are some examples in the entire folder that are worth checking out in a separate, dedicated Unity project. When the folder is done importing, you’ll notice the presence of a few more scripts in the “Navigation” category of the components.

Newly imported navigation scripts

If you’d like a more in-depth look at what exactly these components do, check out the tutorial on the Game Dev Academy about Unity’s native navigation tools (https://gamedevacademy.org/learn-unitys-navmesh-by-creating-a-click-to-move-game/). For now, assign a “Nav Mesh Agent” to our character capsule.

The navigation Agent component

A “Nav Mesh Agent” is a game object which traverses a nav mesh. Basically, this is the game object that’s going to be doing the path-finding. Most of the settings in the agent component are fairly intuitive. I suggest, in order to better understand what each of these settings do, fiddle with these values when we’ve got the character on a working nav mesh. What I mainly want to highlight here is the cylinder shape surrounding the capsule.

The Collider on our character

In addition to the capsule collider (which should be set to “trigger” by the way), we’ve got an extra boundary being created. The size and radius of this cylinder is the size and radius that Unity will think the navigation agent is. This isn’t a value we can’t edit this value on the Nav Mesh Agent, rather, when we get to it, we will actually be editing this on the nav-mesh itself.

But what is a Nav Mesh exactly? A nav-mesh is an actual mesh generated by Unity which allows the agent to make paths on its geometry. Any place where there is a nav-mesh is a place where the nav-mesh agent can generate a path. Having said that, we’re going to want a nav-mesh on both our cubes. Select the parent of each cube and add a “Nav Mesh Surface” component to each.

A Nav-Mesh Surface component added to each cube

The settings for this component are worth looking at. First, you’ll notice that there is an “Agent Type” field. This is set to “Humanoid” by default. The idea behind this value is that you could set different types of nav-mesh agents (things like animals, enemies, etc.) if you wanted them to path-find differently. Since “Humanoid” is what our character is, we’re going to leave this at the default value.

“Collect Objects” determines which surfaces are going to have a nav-mesh baked onto them. In our case, we want this set to “children” since that is where are cubes are. “Includes Layers” allows you to determine what render layers you want to be involved in the nav-mesh calculation. And “Use Geometry” allows you to set whether you want the geometry or the physics colliders belonging to the game object to be considered viable nav-mesh surfaces. Finally, there is a “Bake” and “Clear” button at the end of the component. Hit “Bake” for each of the components we created. Unity will then generate the nav-meshes and your viewport will look like this:

Our scene with baked nav-meshes

That little blue sliver is our nav-mesh. Let’s test to see if it’s working! Create a new folder called “Scripts” and create a new script called “PlayerController.”

A newly created script in a newly created folder

In that script, we’re going to write out a simple bit of code that sends out a ray-cast, checks to see if it’s on a nav-mesh, and sets the clicked position to be the destination of the agent if the click was indeed on a nav-mesh.

using System.Collections;
using System.Collections.Generic;
using UnityEngine.AI;
using UnityEngine;

[RequireComponent(typeof(NavMeshAgent))]
public class PlayerController : MonoBehaviour
{
    private NavMeshAgent agent;
    private RaycastHit clickInfo = new RaycastHit();

    // Start is called before the first frame update
    void Start()
    {
        agent = GetComponent<NavMeshAgent>();
    }

    // Update is called once per frame
    void Update()
    {
        if (Input.GetMouseButtonDown(0))
        {
            var ray = Camera.main.ScreenPointToRay(Input.mousePosition);
            if (Physics.Raycast(ray.origin, ray.direction, out clickInfo))
                agent.destination = clickInfo.point;
        }
    }
}

Drag and drop this script on to our capsule character. Hit play and watch the magic!

The character navigating the occluded cube

Our character now moves where we click! Note this, because we have the nav-mesh as a component, it exists on that game object meaning we can move the game object and our nav-mesh follows. This will be handy when it comes to animating the platforms.

Off Mesh Links

The entire purpose of this illusion was to make it so that surfaces that seem connected can be navigated by the player. As such, we want these two surfaces to be connected somehow.

An apparent surface connection

This is where Off-Mesh Links come in. Just like their name implies, they are a way to link two nav-mesh surfaces. Create a new empty game object called  “Link1” and place it in the Environment.

Link in the hierarchy

Add a “NavMeshLink” component (not an “Off-Mesh Link”) to this game object.

Off-mesh link component

As you can see, we get two transforms. These are, intuitively, the start and end positions of our link. We need to place each transform on the occluded cube and another on the top cube. You will see a circle form when the transform is over a viable nav-mesh surface.

A viable off-mesh link

Now here is where the uniqueness of the illusion comes in. We need to strategically place these off-mesh links in such a way so that they align in the game view. This causes a disconnect in world space but an apparent connection in orthographic space.

The illusion preserved in the game view

If you don’t see any of this in the game view, enable “Gizmos” in the top right corner. Our player now has the ability to navigate both cubes!

Navigation with links

Cleaning things up

Right now, the mechanic works. Our player can navigate two disconnected surfaces. However, it looks all wrong. There is too much of a translational delay. We need it to be as seamless as possible. Now, we realize that it won’t look 100% seamless simply because we’re using a navigation system that wasn’t really built for what we’re using it for. This link system was designed for things like ladders or teleportations, not necessarily illusion upholding linkage. Nevertheless, we can make an exponential improvement to this atrocious way of crossing platforms. As soon as the player is on a link, we don’t want it to interpolate between the positions (causing a delay). Instead, we can make it instantaneously teleport through the link. To do this, we’re actually going to write a bit of code with our own method of crossing links. In the “PlayerController” script, we need to add this if-statement to our update function,

void Update()
    {
        if (Input.GetMouseButtonDown(0))
        {
            var ray = Camera.main.ScreenPointToRay(Input.mousePosition);
            if (Physics.Raycast(ray.origin, ray.direction, out clickInfo))
                agent.destination = clickInfo.point;
        }

        if (agent.isOnOffMeshLink) //New logic statement
        {
            agent.CompleteOffMeshLink();
        }


    }

“CompleteOffMeshLink” is a method we call on the navigation agent. It will instantaneously move the character through the off-mesh link whenever it is called. In our case, we’re calling this method whenever we’re on an off-mesh link.

To test it out, make sure that “Auto Traverse Off Mesh Link” is disabled.

Nav-Mesh Agent with "auto traverse" disabled

Hit play and let’s have a look!

An improved interpolation between platforms for the illusion

This actually is only a slight improvement. It’s much too sudden. It looks weird because the character just appears right in the middle of the platform. This is because our navigation mesh is right in the center of our platform.

A nav-mesh surface only covering part of the cube

We can fix this by changing the agent size of the nav-mesh agent. Go to the Navigation tab and change the radius of the character to be a very small value.

Agent radius in Unity

Go over our nav-mesh surfaces and rebake each of them. This will make the navigation surface cover the top of most of the cubes.

A rebake of the nav-mesh so that it covers everything

Notice, however, we have an error message.

A warning message on the nav-mesh surface component

Basically, it’s saying that the navigation surface may not be accurate for such a small agent radius. To fix this, open “Advanced Settings,” check “Override Voxel Size.” Set it to the recommended size of 0.022. We need to do this on each surface component and then bake it as well. The error will be cleared when each surface has finished baking.

We need this navigation surface to cover as much of the platform as possible. To increase the precision of our linkage system, we can scale the top cube ever so slightly to be underneath all of the navigation surface.

The navigation surface covering all of the top of the cube

And now, it’s just a matter of strategically placing the links so that one of them is on the edge of the top cube.

Repositioning the link on the edge

Now, hit play and test it!

Our final interpolation system

As you can see, this isn’t 100% seamless but it is an improvement to the previous look. To improve the “seamlessness” of the link, try repositioning the start and end points. It’s just a matter of fiddling with values. Even though it doesn’t completely uphold the illusion, it will certainly suffice for prototyping and level testing.

Conclusion

Whew!  We’ve covered a lot of ground here and learned quite a bit about using Unity’s Navigation component system and orthographic views to create a game.  Not only did we get our systems set up for our illusion game, but we also got our character moving!

However, while, we’ve got the ability to navigate disconnected platforms, it isn’t as seamless we can get.

In the next tutorial, we’re going to write a custom algorithm for interpolating between points. We’re also going to be animating platforms and giving the player the ability to trigger these animations from in-scene actuators. This might all sound a bit complicated, but worry not as we will walk you through each step to get it done!

Let’s continue this exploration of perspective as we…

Keep making great games!

Unity ML-Agents Tutorials – Complete Guide

$
0
0

Unity ML-Agents, is an open source toolkit developed by Unity to enhance a game’s AI with machine learning. Typically when developing an AI for a game, you’d check to see if a certain condition is true (i.e. can you see the player?) and then execute a certain action (i.e. attack). This form of AI works, but at the core of things it can be predictable and limiting.

Machine learning allows agents (enemy, AI car, anything you want to have an AI) to automatically learn through reinforcement learning, imitation learning and many other learning types. What this means, is that you’re not specifically telling the agent what to do. Instead, you’re developing their brain overtime in order for them to determine how to go about a certain task with a number of given inputs.

Let’s Look at an Example

Let’s go over an example of training an ML agent (this is from a Unity ML-Agents sample project). We have an agent who can move and turn on a flat surface. Their objective is to push a block into the end goal. We can train this agent’s brain, so that no matter the starting position of the block or goal, it will always be able to complete it. The agent can also detect the surrounding world with 14 raycasts shooting out from all directions. This can give info about what the agent can see and how far away.

Most likely, the first session will start with the agent standing still or moving around in a random direction. If we continue to run these simulations many, many times, eventually the agent will hit the block and maybe even accidentally move it into the goal. This is where agent rewards come in handy. Whenever the agent does something that progresses its learning (i.e. moving the block into the goal), we give it +1 reward. In general, this means the rewarded behaviour will carry over to future simulations and overtime the agent will gather more knowledge on where to stand relative to the block, the direction it needs to push, etc. After hundreds (maybe even thousands) of simulations the agent’s brain should be developed enough so that it can push the block (no matter the starting position) into the goal every time.

Here’s a look at the push block example we just went over.

ML-Agents Package

Right now, ML-Agents is still in development but it can be downloaded from the Unity GitHub page here. Furthermore, since it’s still in development and since the training is done through Python, there are additional things you need to download and setup but the provided tutorials will go through that. ML-Agents also includes 15+ example environments, showing many different game types and how those are trained.

Links

Tutorials

Demos

Don't miss out! Offer ends in
  • Access all 400+ courses
  • New courses added monthly
  • Cancel anytime
  • Certificates of completion

Make a Game with Unity’s Navigation Components – Part 2

$
0
0

Introduction

It has been my persistent perception that video game design is at a unique junction of art and technicality. If one manages to mesh impeccable code with sublime artistry, the results can be quite novel – and the fluid nature of this junction creates limitless possibilities. One is never sure when one skill is employed or whether it is merely encapsulated and derived from the other. It is just this junction that makes game design such an intriguing world to explore. What new combination of art and technicality will we see today?

In this tutorial, we will be building on the previous project we made in Part 1 using the orthographic view and Unity’s Navigation Components. For Part 1, the artistic side of our game was ruined by our poor technical handling of interpolation. We were not able to seamlessly transition between occluding platforms and as such, the illusion fell apart. We will be fixing that in this tutorial.

Additionally, we will be making triggers and moving platforms. It simply couldn’t be called an “Illusion Puzzle Game” if we didn’t have this component. The end result is not just a functioning project, but a system in which we can use to build a complete game.

Project Files

You can download the complete project from this tutorial via this link: Source Code.

Don't miss out! Offer ends in
  • Access all 400+ courses
  • New courses added monthly
  • Cancel anytime
  • Certificates of completion

Fixing interpolation

Let’s start off this tutorial by first examining the way in which we are interpolating between platforms.

Our broken interpolation :-(

Likely, you already know what the problem is. This method of interpolation is much too sudden. Instantaneous movement isn’t going to uphold the illusion. Instead, we need a way to work out some sort of movement across the off-mesh links rather than straight “teleportation”. However, since we’re using Unity’s native navigation tools, we’re not going to get it 100% perfect, but we can get it 99% accurate.

The LERP Function

It is at this point we realize we need something called “Linear Interpolation.” In math, Linear Interpolation is used to approximate things like curves by taking two points and connecting them with a straight line (hence the term “linear”). In Unity, it’s a bit more specific. We can use a Liner Interpolation function (called “LERP” functions for short) to move an object someplace in between two points. Doing this recursively means we can interpolate an object between two points in a smooth manner. In our code, we’re going to use the “Vector3.Lerp” function to accomplish this. Go to your “PlayerController” script and let’s create a new method called “CompleteLink” where we will put all of our code for our interpolation algorithm.

using System.Collections;
using System.Collections.Generic;
using UnityEngine.AI;
using UnityEngine;

[RequireComponent(typeof(NavMeshAgent))]
public class PlayerController : MonoBehaviour
{
    private NavMeshAgent agent;
    private RaycastHit clickInfo = new RaycastHit();

    // Start is called before the first frame update
    void Start()
    {
        agent = GetComponent<NavMeshAgent>();
    }

    // Update is called once per frame
    void Update()
    {
        if (Input.GetMouseButtonDown(0))
        {
            var ray = Camera.main.ScreenPointToRay(Input.mousePosition);
            if (Physics.Raycast(ray.origin, ray.direction, out clickInfo))
                agent.destination = clickInfo.point;
        }

        if (agent.isOnOffMeshLink)
        {
            agent.CompleteOffMeshLink();
        }
    }

    void CompleteLink()
    {

    }
}

Let’s have a closer look at this “CompleteLink” method.

void CompleteLink()
    {

    }

The very first thing we’re going to want to do is to assign a couple of variables. We’re going to need the start and end positions of the off-mesh link, we’re going to need to offset this slightly to match the size of our character, and then we’re going to need the distance between those two points. This works out in our code like this,

void CompleteLink()
    {
        Vector3 startLink = agent.currentOffMeshLinkData.startPos;
        Vector3 endLink = agent.currentOffMeshLinkData.endPos;
        float linkDistance = Vector3.Distance(startLink, endLink);
        endLink.y = agent.currentOffMeshLinkData.endPos.y + 1;
    }

By using some variables in the nav-mesh agent, we’re able to capture and offset the start and end positions. We’re offsetting the y-axis on “endLink” because we do not want the character interpolating to a position exactly on top of the platform, it must be offset above it.

Now, we need to go up to the top of our script and declare a few variables there as well. We’re going to need two public float variables called “interpolantValue” and “disconnectMargin.” Second, we’re going to need a private Vector3 named “storedTarget.”

using System.Collections;
using System.Collections.Generic;
using UnityEngine.AI;
using UnityEngine;

[RequireComponent(typeof(NavMeshAgent))]
public class PlayerController : MonoBehaviour
{
    public float interpolantValue = 100;
    public float disconnectMargin = 1.5f;

    private Vector3 storedTarget;

Go ahead and give these variables the default value shown. I’ve experimented with this a bit and found these values to be the best combination.

Next, we’re going to want to assign the “storedTarget” variable immediately in the update function.

// Update is called once per frame
    void Update()
    {
        storedTarget = agent.pathEndPosition;

This will constantly update our Vector3 with whatever position the player has clicked on. Now, in the “CompleteLink” method, we’re going to actually do the LERP function now. The way it works out is like this:

void CompleteLink()
    {
        Vector3 startLink = agent.currentOffMeshLinkData.startPos;
        Vector3 endLink = agent.currentOffMeshLinkData.endPos;
        float linkDistance = Vector3.Distance(startLink, endLink);
        endLink.y = agent.currentOffMeshLinkData.endPos.y + 1;

        transform.position = Vector3.Lerp(transform.position, endLink, linkDistance / interpolantValue);  //The format is "startPosition", "endPosition", percentage between them
    }

We’re setting the position of our player equal to a Vector3 which is being generated between two points (“transform.position” and “endLink”). By the very last argument, we are telling the function where we’d like this position to be between those two points. If we put a simple 1 as the last argument, we would have a similar result to what we have now. Our player would just teleport instantly across. If we set it to 0.5, we would move the character halfway between those two points, then halfway between the remaining distance, then halfway between that distance, etc. The way we have it now takes into account the world space distance between the points and divides it by some constant value (which we have defined).

Let’s test this out now! Replace the “CompleteOffMeshLink” method with our “CompleteLink” method.

if (agent.isOnOffMeshLink)
        {
            CompleteLink();
        }

Save your script, head over to Unity, and hit play.

LERP being used on an off-mesh link

As you can see, it is a massive improvement to our previous method of interpolation. It is smooth, it is at the right speed, there is just one problem, it never actually reaches the end of the link! This is actually an excellent illustration of a classic math riddle. “If you’re standing some distance away from a door, and you halve the distance between you and the door each second, how long will it take before you reach the door?” The answer is, never! And we can confirm this by logging the distance between the player and the end link.

Console view of the distance between the end link and the player

The distance becomes very small but it never equals zero! And so here is where we employ our variable “disconnectMargin.” We’re going to create an if-statement that will simply set the transform of the player equal to the end link position when the distance between them becomes less than “disconnectMargin.”

void CompleteLink()
    {
        Vector3 startLink = agent.currentOffMeshLinkData.startPos;
        Vector3 endLink = agent.currentOffMeshLinkData.endPos;
        float linkDistance = Vector3.Distance(startLink, endLink);
        endLink.y = agent.currentOffMeshLinkData.endPos.y + 1;

        transform.position = Vector3.Lerp(transform.position, endLink, linkDistance / interpolantValue);

        if (Vector3.Distance(transform.position, endLink) < disconnectMargin)
        {
            agent.Warp(endLink);
            agent.SetDestination(storedTarget);
        }
    }

We’re using a function on the nav-mesh agent called “Warp” which simply “warps” the player to the position. And then we are setting the target equal to our previously-stored variable. Save your script and hit play in Unity.

A working link system in Unity

There we are. Finally, a way of interpolating that upholds the illusion. Fantastic!

Animated Platforms

At this point, we’ve got a good mechanic. But as it is, all we’ve got is something that says, “Hey, look what we can do.” We need one more mechanic in order to be in a position to actually design playable levels. Here is where we introduce “Animated Platforms.” Not only do we need this mechanic, but we need it to be generalized so that we can use it in multiple scenarios.

Creating the Animation

It is preferable to use animations because it allows more control over how and where the platforms move. In this case, we’re going to need two animations, one in an “OnTop” position (which we will call “active” position) and one where it is off to the side (the “inactive” position). Create a new folder called “Animations.”

Animation folder in Unity

Select the top platform and open up the animation tab.

Opening the animation tab in Unity

Create a new animation clip for the “active” position. It’s a good idea, if you’re going to build more on to this level, to develop some sort of nomenclature to keep things organized. Since this is the only animated platform in my scene, I’ll just name it “OccludingPlatformActive.”

Newly created animation in Unity

This only needs to be one frame long with the current rotation and position as the only keyframes. Add a position and a rotation property which will create two new keyframes with the current position and rotation.

Adding rotation and location properties

Drag these keyframes so that there is no frame between them.

Key frames separated by a large amount of frames

Those Key frames brought together

Next, we’ll create a new animation called “OccludingPlatformInactive.”

Creating a new animation clip in Unity

The new "OccludingPlatformInactive" animation clip

Create a rotation and position property, hit the record button, and reposition the platform like this:

Animating the inactive position

This will create a keyframe which we can then duplicate with Ctrl-C and Ctrl-V (Command-C/Command-V for Mac users) and place at the end.

Duplicating the keyframe with copy and paste

Dragging these together completes this animation.

Inactive keyframes brought together

Now, we need to go to the Animator tab and configure these states.

The Animator window in Unity

For a deeper look at the Unity Animator, check out this tutorial on the Game Dev Academy (Unity Animator Comprehensive Guide). Here, we’re not going to go very in-depth. The “OccludingPlatformActive” should be orange. This means it will play as soon as the game is started. Create a new boolean parameter called “Active.”

Different types of parameters in the Unity Animator

The "Active" boolean in the Unity Animator

Create two transitions, one going from “OccludingPlatformActive” to “OccludingPlatformInactive” and one going the other way around.

Right-click on the state allows you to create a transition in the Unity Animator

States with transitions on them in the Unity Animator

Select the first transition (the one going from the active to inactive animations) and make its condition to be when the parameter “Active” equals false. Diable “Has Exit Time” as well.

"Active" to "Inactive" transition settings in the Unity Animator

We need this transition to be considerably long. Open up “Settings” and change “Transition Duration” to about one second long.

Transition duration on the active to inactive transition

Do the exact same for the other transition except change the condition from “false” to “true.”

Inactive to active transition settings

Test to see if this is working by hitting play and toggling the “Active” boolean.

Testing the transition by toggling the animator parameter

Fantastic! It’s working! Now, we have to trigger this via game objects in the scene.

Scripting a Trigger

There’s a couple of challenges when it comes to this sort of animation. The first is triggering it through in-game objects. The second is making sure the player doesn’t fall off when it’s moving. We overcome the first problem by simply using colliders. We can solve the second by some strategic parenting.

But first, let’s set up a trigger object. Create a new cube (called “trigger”) and place it on the top platform. This ought to be parented to the top cube so that it moves wherever the platform is rotated.

The new trigger object on the top platform

The trigger looks too bright. Create a new material to fix that.

Coloring the trigger so it looks nice :-)

Now, create a new C# script called “Trigger” and drag it onto the trigger game object.

Assigning the trigger with a "trigger" script

Where we start coding, however, begins in the “PlayerController” script. We’re going to create two new public methods called “EnableCleanMove” and “DisableCleanMove.” They have the following code in them:

//To be called by the environment when motion is triggered

    public void EnableCleanMove(Transform parentTransform)
    {
        transform.SetParent(parentTransform);
        agent.enabled = false;
    }

    //When the motion is ended

    public void DisableCleanMove()
    {
        transform.SetParent(null);
        agent.enabled = true;
    }

This basically parents the player to whatever game object is moving (or whatever is supplied to “parentTransform” to be precise) and disables the navigation agent so that no path calculations take place during the transition.

Next, we need to populate the “Trigger” script. Basically, what we need this to do is to trigger the transition when the player is overlapping the trigger, call “EnableCleanMove” on the “PlayerController,” and reverse all of that when the animation is done transitioning. To do this, we’re going to need access to five different variables.

using System.Collections;
using System.Collections.Generic;
using UnityEngine;

public class Trigger : MonoBehaviour
{
    public GameObject target;
    public string triggerVariable;

    private PlayerController player;
    private Animator targetAnimator;
    private bool isPlayerRestored;

The use of these will become clear in a moment. Right now, we need to assign the private variables:

void Start()
    {
        targetAnimator = target.GetComponent<Animator>();
        player = GameObject.FindGameObjectWithTag("Player").GetComponent<PlayerController>();

        if (triggerVariable == null)
        {
            Debug.LogWarning(name + " has no supplied trigger variable. Nothing will be triggered");
        }
    }

The warning is so that the designer knows whether there is a loose connection between the trigger and the platform. After this, let’s create two new methods in the “Trigger” script called “TriggerAction” and “RestorePlayer.”

void TriggerAction()
    {

    }

    void RestorePlayer()
    {

    }

The code for each method looks like this:

void TriggerAction()
    {
        bool targetVar = targetAnimator.GetBool(triggerVariable);
        targetAnimator.SetBool(triggerVariable, !targetVar);

        player.EnableCleanMove(target.transform);
        isPlayerRestored = false;
    }

    void RestorePlayer()
    {
        player.DisableCleanMove();
        isPlayerRestored = true;
    }

“TriggerAction” is toggling the animator parameter we created and calling the player’s “EnableCleanMove” method while telling the player to parent itself to the moving game object. This will make the player “stick” to the platform as it moves. The “RestorePlayer” method basically just reverses everything “TriggerAction” did.

“TriggerAction” is the natural choice when it comes to choosing a method to call when the player overlaps the trigger. We can call this method through an “OnTriggerEnter.”

private void OnTriggerEnter(Collider other)
    {
        if (other.CompareTag("Player"))
        {
            TriggerAction();
        }
    }

We’re almost done scripting! The last thing we need to do is to determine whether the animation is done transitioning. To do this, we use a special update function called “LateUpdate.” This function is the last update function to be called. This is perfect for determining whether the player is ready to be enabled. This works out in our code like this:

private void LateUpdate()
    {
        if (targetAnimator.IsInTransition(0))
        {
            Debug.Log("Player activated trigger " + name);
        }
        else
        {
            if (!isPlayerRestored)
            {
                RestorePlayer();
            }
            else
            {
                Debug.Log("Player is restored by " + name);
            }

        }

    }

Implementing The Trigger System

A couple of things need to happen before this code will work. The first is that our player needs to have a “Player” tag. We need to create one and tag our player with it.

Adding a new tag on the player

Creating a new "Player" tag in the tag and layers manager

The capsule Character tagged with a "Player" tag

Second, we need to make sure the player has a Rigidbody component. It will not be detected by the trigger if it does not. Make sure “Use Gravity” is disabled and “is Kinematic” is enabled.

Searching for a rigidbody in the components

Player's rigidbody with gravity disabled and "isKinematic" set to true

Third, the trigger’s collider must have “trigger” enabled.

Enabling "Trigger" on the trigger's collider

And finally, we need to populate the field’s on the Trigger script. Set “Target” equal to the “Platform Top.”

Populating the "Target" field on the trigger with the top Platform

This field is supposed to contain whatever object has the Animator component. Next, we need to supply a trigger variable. This is the name of the parameter in the Animator. In our case, it is the “Active” boolean. Type the name into the field and that will finish our trigger system.

Specifying which animator parameter will be toggled by the "Trigger" script

Hit play and test it out!

A gif of the final navigation system with triggers

Conclusion

That’s it!  We now have our complete illusion game complete with moving platforms, triggers, and more!

I think the end result looks quite satisfactory. It’s amazing how close we can get by simply using built-in tools. Of course, this was also made possible with the help of not only our orthographic view, but Unity’s Navigation component system as well.  I hope through Part 1 and Part 2 of this tutorial series, you’ve learned how to not only use the Unity Navigation system but also how to tailor it to unique situations. For sure, the navigation components were never designed to be used like this, but they hold up quite well, and these ideas can be expanded for your own projects!

Use these principles well to…

Keep making great games!

Unreal Engine Blueprints Tutorials – Complete Guide

$
0
0

The Unreal Engine, is a game engine which is accessible to both triple-A game developers and beginners. When creating a complex and large scale game, you’d most likely use Unreal’s built in C++ support to have deep rooted control over the engine’s systems. Although for a beginner, programming can be seen as a daunting task, especially if they also need to learn the engine. That’s where blueprints come in handy. Blueprints, is Unreal Engine’s visual scripting system.

What is Visual Scripting?

Visual scripting is where you can create logic for your game (just like programming) but in a visual form. In Unreal, blueprints use nodes connected to each other. These nodes can be events (i.e. when ever you press the space bar), actions (i.e. move the player here), conditions (i.e. is this equal to this?), etc. Nodes can also have inputs and outputs. You give a node some input values, it will calculate what it needs then return some outputs for you to use.

Example of flow control with Unreal blueprints.

One import concept of blueprints, is flow control. In programming, the code is read from the top down, computing everything along the way. It’s the same with blueprints, although we can guide the progression of flow. Nodes can have an input, output or both for the flow to pass through. In the image below, you’ll see that we have a number of different nodes, connected by white lines. These white lines control the flow and tell the compiler which nodes to trigger next. Think of this as electricity, and the white lines are powering nodes along its path.

You’ll see that some nodes also have these colored connectors on the left/right. These are the input and output values. Nodes can take in data to use, such is with the DestroyActor node. This node takes in a Target and destroys that object. Some nodes also have both inputs and outputs. It takes in some values, uses those to calculate something, then outputs a result.

A number of nodes connected in Unreal Engine's blueprint system.

You can connect a large number of these nodes together, setup loops, functions and events just like you would in a programming language.

Blueprints vs Programming

In Unreal, we have the choice between using blueprints and C++ programming, but which should you use? When starting out with the engine, using blueprints can be a great way of getting into game development without needing to learn programming. Although if you ever wish to create a more complex/large scale game or intend to work in the industry, learning to program may be the next step.

If there’s something you want to create in Unreal, then most likely it can be done using blueprints. Player controllers, AI enemies, cars, etc. The blueprint system is quite powerful and boasts a large number of nodes for you to use. What you can create is only limited by what you don’t know, so I recommend you just play around with the engine and try creating some blueprints of your own. A great way to get started would be to look at the template projects that come with Unreal. There are a number of different games, each with their own systems – all created with blueprints!

Links

Tutorials

Don't miss out! Offer ends in
  • Access all 400+ courses
  • New courses added monthly
  • Cancel anytime
  • Certificates of completion

Free Course – Game Development for Kids with Unity Playground

$
0
0

Begin developing your first game with the free tutorial above using Unity Playground – the perfect, no coding solution for kids and those young at heart!  You can also extend the material covered here by checking out the full course below!

Game Development and Coding for Kids

About

Through this Unity tutorial created by Pablo Farias Navarro, you’ll learn to work with Unity Playground, a 2D framework with a variety of premade assets, physics, and more to make game designing without any code possible.  In a little over 20 minutes, this free course will show you the fundamentals of setting up a 2D platformer complete with tile-based platforms and a character with platformer-oriented movement.  Not only will you learn how to work within the Unity engine, but it is also the perfect choice for beginners of all ages who want to take their first critical steps into the world of game development.

Prefer offline tutorials? Consider getting the Zenva app for Android and iOS to download other free courses, including our Unity 101 course, for offline viewing!


Best Game Engines of 2020

$
0
0

When it comes to game development, choosing the right game engine for your game can make or break the entire experience.  There are also a lot of factors to consider:

  • What kind of game are you trying to make?
  • Is your game 2D or 3D?
  • How experienced are you?
  • How vibrant is the engine or framework’s community?
  • What sorts of resources are available for the engine?

With all these factors to consider, it can be a real challenge to make sure you pick the right foundation to work from.  This is especially true in today’s age where technology evolves constantly, meaning new engines and updates are coming out all the time with novel innovations.

To make the choice just a slight bit simpler, though, we’ve compiled a list of the best game engines in 2020, along with the strengths and weaknesses of each engine based on some of the factors mentioned, to help you along with the process.

1. Unity Unity Editor overview

Having been developed since 2005, the Unity game engine has become a staple of the indie game industry.  With constant updates and new, major features, such as Unity Reflect, being added every year, the support for the engine is unbelievable.  The engine is not only well-suited for both 2D and 3D games of any type, but it is also a popular choice for VR and AR development as well thanks to many companies and developers creating convenient SDKs for the engine.  Beyond this, Unity also has a sizeable community, with an active Asset Store with both free and pay-to-use assets at your fingertips.  As it’s such a robust engine and free for developers earning less than $100K/year, it is a fantastic choice for beginners regardless of what they want to make.

This being said, if you are looking to develop an entire game studio around Unity, the licenses can be costly – though they do come with more features.  Additionally, Unity can be heavier on your system if you’re running some of the higher-end tech demos to bring out the full capabilities of the engine.  Lastly, it’s worth mentioning that as Unity updates so often, it can be easy to miss new features or be a struggle to find old ones as the UI and system for accessing them might change.

Below you can check out a short film created with the Unity engine using Unity’s High Definition Rendering Pipeline to see the full capabilities of the engine.

Strengths:

  • Free for beginners earning less than $100K
  • Great for 2D and 3D games
  • VR and AR SDK availability
  • Asset Store with tons of free assets

Weaknesses:

  • Costly licenses for professionals
  • Higher-end tech demos require better computers
  • Many UI changes

Examples of Games Made with Unity

Is Unity for you?  Check out some Unity courses created by Certified Unity Developers to get started!

2. Unreal Engine

Editor overview of the Unreal Engine

Due to its robust graphical capabilities with lighting, shaders, and more, Unreal Engine is the power-house behind many of the most popular, triple-A games out there today.  Given its rampant use in that sector, the engine has been developed very specifically to handle a lot of complicated tasks more efficiently than other engines.  Like others on this list, the engine is also open-source, meaning the community is constantly improving the engine as well.  Along with its visual blueprinting so even non-programmers can develop their games, Unreal truly is a power-house that is capable of just about anything – including VR.  Did we also mention that, like Unity, there is also a Marketplace where you can get free assets?

However, many developers do report that Unreal Engine is better suited for larger projects and projects you intend to work on as a team.  Additionally, as the program is heavy on the graphics end, many people will find it requires a more powerful computer compared to other engines like Unity.  Beyond this, it is also noteworthy that while Unreal Engine can create 2D games in addition to 3D games, the engine is not necessarily the best suited for the task.

The video below represents just some of the amazing things students around the world have created with Unreal Engine.

Strengths:

  • Great for high-end graphics
  • More performant than other engines
  • A top choice for VR
  • Visual blueprinting for non-programmers
  • Sizeable marketplace with free assets

Weaknesses:

  • Not the best for simple or solo projects
  • High-end graphics require more powerful computers
  • Better for 3D than 2D games

Examples of Games Made with Unreal Engine

If Unreal Engine sounds like the engine for you, check out this tutorial to get started with your Unreal game development projects!

3. Godot

Godot Editor overview

Even though Godot has been around since 2014, it’s only recently that the engine has truly picked up in popularity.  The Godot game engine is fantastic if you’re looking for something free and open-source, meaning you can alter the engine and sell your games however you would like.  The engine supports both 2D and 3D capabilities, so it is well-rounded for any sort of game you’re trying to make.  Godot also takes a unique approach with its node and scene architecture to represent specific game functions, setting it apart from similar competitors and which may be easier for many users.  Add a passionate community surrounding the engine, and you’ve got a real winner on your hands!

As for weaknesses, Godot does use its own personal language for scripting, called GDScript.  While the language works fantastically and is reminiscent of Python (a favorite language for many developers), as it was specifically designed for Godot, experienced developers may consider it tedious to adapt to yet another language.  Additionally, as Godot is not as well known as some other engines here, there aren’t as many resources available compared to a staple engine like Unity or Unreal.

Looking for examples?  Below is a showcase of just some of the games being made for mobile using the Godot game engine!

Strengths:

  • Works for 2D and 3D games
  • Free and open-source – even commercially
  • Passionate community
  • Unique architecture for game development

Weaknesses:

  • Experienced developers may not like GDScript
  • Not as many resources as other engines

Examples of Games Made with Godot

If you’re interested in this open-source engine, we recommend checking out the following courses to get you started with your learning!

4. Phaser

Phaser RPG project

Phaser began its life around 2013, though the most recent version, Phaser 3, has only been around since 2018.  Even so, this hasn’t stopped the framework from being extremely popular, especially for those who want to make mobile or browser-based games.  As the technology behind Phaser is largely based on the same technologies used for web development, it is also a framework that is relatively stable even as different versions come out.  Beyond this, Phaser comes with physics and the other sorts of additions any engine is expected to have, meaning you can make any number of games with it – including MMORPGs – with the right additions!

Overall, though, Phaser is a 2D based framework, so it may not be the best suited if you’re trying to make a 3D game.  Additionally, while the framework is cross-platform, as it is mostly geared for browsers, it comes with some limitations that more powerful, stand-alone engines don’t have.

Below are some examples of various games made with Phaser, links to which you can find in the examples below!

Magickmon opening sequence Gems N' Ropes Gameplay Pickem's Tiny Adventure opening sequence

Strengths:

  • Great for browser and mobile games
  • Extremely stable
  • Easily expanded with web technologies

Weaknesses:

  • Geared specifically for 2D games
  • More limited than other engines

Examples of Games Made with Phaser

If you’re ready to expand your HTML5 game development skills with Phaser, check out these courses!

5. GameMaker Studio 2

GameMaker Studio editor overview

This popular game engine created in 2017 is the newest version of GameMaker Studio, which has been around since 1999 through many iterations and names.  GameMaker is widely supported across multiple platforms, even including the Nintendo Switch.  It is also a very friendly choice for those who have no experience with coding, as it primarily uses a drag-and-drop visual scripting language of its own creation to allow all skill levels of users to create their dream games.  For those who prefer coding, though, it also offers its GameMaker Language to program custom behaviors that extend beyond what the visual programming can cover.  Overall, the engine is very beginner-friendly and opens up game development to just about everyone.

Unlike many of the other engines and frameworks on this list, though, GameMaker Studio 2 is proprietary, so it may not be a great choice for those looking for something on a budget.  Additionally, like Phaser, this engine is geared specifically for 2D games.  While it does have limited 3D capabilities, it is nowhere near anything like Unity, Unreal, or Godot can do.

Check out the showcase below of games made with GameMaker Studio!

Strengths:

  • Supported on tons of platforms
  • Easy drag-and-drop programming
  • Extremely beginner-friendly

Weaknesses:

  • Oriented more for 2D games
  • Costs money to obtain

Examples of Games Made with GameMaker Studio 2

Conclusion

All in all, these five engines/frameworks above are just some of the many engines available to develop your games.  However, as these engines and frameworks power some of the most popular indie and big-budget games, you can be sure of their quality and ability to handle almost any game you may want to create.  Each has its strengths and weaknesses, of course, but all have stood the test of time and remain top contenders for the year 2020 for best game engine.

Whatever you decide, we can’t wait to see the games you create!

Don't miss out! Offer ends in
  • Access all 400+ courses
  • New courses added monthly
  • Cancel anytime
  • Certificates of completion

Godot 4.0 Tutorials – Complete Guide

$
0
0

Godot 4.0 is the next major update for the Godot game engine. In January 2018, Godot 3.0 was released which introduced many new features such as a new rendering engine and improved asset pipelines. With the release of Godot 4.0 being aimed for mid-2020, similar major advancements are to be expected.

Vulkan Rendering Engine

One of the major features for 4.0, is the Vulkan rendering engine. It was introduced to the master branch of the engine back in February, although OpenGL ES 3.0 is still supported. Godot 4.0 will feature full implementation of the Vulkan engine. So why make the change? Well right now Godot is using OpenGL which is supported on many platforms, but as tech is moving forward compatibility becomes much less of an issue. Vulkan is also much more “lower-level” than OpenGL, allowing it to perform better and faster.

Core Engine Improvements

Godot 4.0 is also going to feature some major updates to the core of the engine. With an update like this, it’s given the developers an opportunity to make these much-needed changes. Here’s a few things we can expect:

  • Support for multiple windows
  • General cleanup of the API
  • Renaming of nodes and servers

Godot multiple windows.

New Lightmapper

Godot’s new lightmapper for 4.0 is so much of an improvement, that the devs are going to back-port it to Godot 3.2 as well. Lightmapping is pre-calculating the light for a game scene. This provides the benefit of having realistic lighting at a low computational cost. Here’s how the new lightmapper improves upon the older one while also making the experience easier for you as a developer.

  • GPU based – allowing for faster bake times
  • Easy to use – minimal number of parameters
  • Lightprobes
  • Automatic UV unwrapping

Conclusion

To sum it all up, the aim of Godot 4.0 is not necessarily to introduce a large number of new features, but to improve upon the rendering and engine performance in order to bring it up to the same level as other game engines out there.

Links

Godot Blog Posts

Videos

Don't miss out! Offer ends in
  • Access all 400+ courses
  • New courses added monthly
  • Cancel anytime
  • Certificates of completion

Beginner’s Guide to Game Development with Unreal Engine

$
0
0

Introduction

Are you ready to start developing FPS games, RPGs, retro-style games, and more with the amazing Unreal Engine?  You’re in for quite a treat, then!

Unreal Engine 4 is one of the most popular engines out there for game development – powering everywhere from indie games like Dead by Daylight to AAA games like Gears 5.  Its powerful graphical features allow developers to create visually stunning games, while the Unreal Engine blueprinting system creates an environment that makes it easy for programmers and non-programmers alike to create the game of their dreams.  To boot, the engine is completely free until you earn $1 million with your product, making it a great choice for any aspiring developer.

Before you get intimidated by the power of the engine, though, remember that everyone starts somewhere – and this tutorial is just the place to get started.

In this tutorial, we’ll be guiding you through your initial steps as you create your first game inside of the Unreal Engine. This game will be a 3D platformer game with collectible gems and enemies to avoid. We’ll be going many of Unreal’s features such as level creation, blueprints, creating logic with nodes, and even creating a UI.

All in all, we’ll provide you with the foundations to get started, so if you’re ready to go, let’s get started with creating our Unreal Engine platformer!

3D platformer created with Unreal Engine

Don't miss out! Offer ends in
  • Access all 400+ courses
  • New courses added monthly
  • Cancel anytime
  • Certificates of completion

Project Files

For this project, we’re going to be using some pre-made models and materials.

You can also choose to download the complete project to see what the finished product looks like.

What is the Unreal Engine?

The Unreal Engine is a game engine created by Epic Games. With the focus on powerful 3D graphics, this engine has been used to create many popular AAA games, including: Fortnite, Bioshock, Rocket League, and many more.

Installation

To install the Unreal Engine, we need to download the Epic Games launcher. You may already have this, but if you don’t just go to the Epic Games website, and click on the Get Epic Games button in the top-left.

Epic Games Store screen

Go through the installation process and when it prompts you to login, do so. This can be done by creating an Epic Games account, or by logging in with your Google account.

Once you’ve logged in and have the launcher open, navigate over to the Unreal Engine page. Here, you want to go to the Library screen and click the install button. I’ve already installed the engine, so you’ll just see one version appearing.

Unreal Engine selected in the Epic Games Library window

This may take some time as the engine can be around 15 GB in size.

Creating a New Project

Once that’s complete, click on the yellow Launch button to open it up. Here we can choose what we want to create. Select Games then click the Next button.

Create New Project screen for Unreal Engine

The next screen allows us to select a template. These are a really good learning resource to see how certain systems can be created in the engine. For now though, select Blank and hit next.

Select Template window for Unreal Engine

Finally, we have the project settings. There’s a few things we need to make sure we have selected.

  1. Make sure Blueprint is selected rather than C++.
  2. Make sure With Starter Content is selected rather than No Starter Content.

Down at the bottom, we can choose the location to store our project (it will be around 800 MB) and the name. Once you’ve done all that, click on the Create Project button to open up the editor.

Quick Note: When the editor opens you may see a Steam VR window popup. We can just close that since we’re not working in VR.

 Editor Overview

Welcome to the editor. This is where we’ll be creating our game! It may look daunting at first with all the windows, buttons and options – but let’s go ahead and try make some sense out of it all.

Defualt Unreal Engine for new project

This is the level editor and the main screen that appears when opening Unreal. The engine is split up into a number of different editors (material editor, blueprint editor, animation editor, etc). Each serve a specific purpose to help us create games. The level editor here is what we use to build our levels. Place down objects, setup the lighting and overall manage the project.

Unreal Engine with various viewports circled

  1. First, we have the Content Browser. This is like a file explorer and shows us all of the assets (models, sound effects, textures, materials, etc) for our game and the folder structure.
  2. Next, we have the Viewport screen. Here we can see into our level, move the camera around, select and move around objects.
  3. This is the World Outliner and it shows us all of the objects in our current level.
  4. The Details panel shows us the inner workings of a selected object. Try selecting an object in the viewport window and you’ll see that various properties such as the position, rotation, scale, rendering, etc appears for that object.
  5. This is the Modes panel. Here we can create primative 3D models, create lights, triggers, VFX, etc.
  6. Finally, the Toolbar. This is where we can test out the game, build it, save the game, etc.

We’ll be going over more about each panel as we get there in the tutorial.

Creating a New Level

In Unreal Engine, we have the concept of levels. Levels are what splits a game up. Different stages, areas, etc. Right now, we’re in one of the starter levels that comes with the starter content. Let’s now go ahead and create a new one.

  1. Go File > New Level
  2. Select the Default level

Unreal Engine New Level window

This will create us a brand new level with a few things already in it.

Over in the World Outliner you’ll see that we have a floor model, a light, a player start and a few skybox objects. These help build the scene we see here.

Unreal Engine with World Outliner circled

Before we continue, let’s go down to the Content Browser and create 4 new folders to store our future assets (right click and select New Folder).

  • Blueprints (to store our blueprints such as the player, gems, enemies, etc).
  • Levels
  • Materials
  • Models

Unreal Engine Content Browser window

We can now save our level (CTRL + S) to the Levels folder. Give it the name of MainLevel.

Unreal Engine Save Level As window

If we open the levels folder, you’ll see that we have the MainLevel asset there. If we ever want to open the level, we can just double click on it.

Quick Note: To make navigation easier, click on the Show Sources Panel button. This will give us an overview of the folder structure.

Unreal Engine Content Browser window with MainLevel

While we’re here, let’s also import our intro assets. These are a few 3D models and materials we’ll be using and can be downloaded here. Inside of the .ZIP file, there will be a Models and Materials folder. Place the contents in their respective counterparts in the Unreal editor content browser. It may pop-up with some import options, just click import on all of them.

Creating the Player

Now it’s time to create our player! We’ll be able to move around and jump on platforms. But before we jump in, let’s set up the controls, because we need to know which buttons are for moving and which are for jumping.

Open up the Project Settings window (Edit > Project Settings). On the left hand side list, select Input to go to the input options. We have actions and axis‘. Actions are single button inputs (i.e. press a button and something happens). Then we have axis inputs which change a value based on the given input (i.e. a controller joystick).

First, let’s create a new action called Jump. Set the key to be the space bar.

Unreal Engine Project Settings window with Jump Action

Next, let’s add two new axis mappings. An axis for moving forward and back as well as an axis for moving left and right. Make sure to set their scale as seen in the image.

Unreal Engine Project Settings with Axis Mapping highlighted

Now that we’ve got our inputs setup, let’s go back to the main level window (tab at the top of the screen) and create our player blueprint. In the Unreal Engine, blueprints are objects that we can have in our games which each have their own properties, scripting and various other things. Think of the player, enemies, gems, etc. These are all blueprints. They have their own logic and they can be created/destroyed. To create a blueprint, let’s go to our Bluerints folder, right click and select Blueprint Class.

It will ask us to choose a parent class. In Unreal, we’ve got a number of base classes we can expand upon depending on what we want to create. Select the Pawn. As the player we can possess a pawn so that it will receive our inputs. Call the blueprint: Player.

Unreal Engine Player in Content Browser

Now double click on the blueprint to open it up in the Blueprint Editor. It may prompt you to open it in the full editor. If so, click the button.

So here we have the Blueprint Editor. Here, we can create our player object by doing many things.

  • We can give the player models, lights, effects and other various objects to build them up.
  • We can use the blueprint graph to create logic for the player.
  • We can tweak the player’s properties to our liking.

Unreal Engine Player in viewport as a sphere

First thing we need to do is give our pawn (the type of class the player is) the ability to move. Or give it the knowledge of how to do so. For this, we can click on the Add Component button and search for FloatingPawnMovement. This will add the component to our component list.

Unreal Engine Player window with Add Component circled

Next, we need to give the player some physical presence. Click Add Component again and search for StaticMesh. This is basically a 3D model.

Unreal Engine StaticMesh added to Player

To assign the model, select the StaticMesh and over in the Details panel, set the Static Mesh field to be Shape_Sphere.

Unreal Engine player with Static Sphere mesh added

Quick Note: You can move the camera around in the center viewport. Hold right-click and use WASD to fly around.

A plain white sphere doesn’t look that good, so let’s also change the Material to M_Metal_Chrome. When we set up lighting later on this will reflect it all and look pretty good.

Unreal Engine player with metal chrome material added

The final component is going to be a camera. Because we need a way of looking into the world and following the player. Add a new Camera component. In the Details panel…

  • Set the Location to -780, 0, 566
  • Set the Rotation to 0, 330, 0

Unreal Engine platformer with camera added

Select the StaticMesh and enable Simulate Physics. This will give us gravity and the ability to collide with things.

Unreal Engine with Simulate Physics checked

We also need to enable Simulation Generates Hit Events. This will allow us to detect collisions.

Unreal Engine with Simulation Generates Hit Event checked

To prevent the player from rolling on its own, let’s open the Constraints tab and enable Lock Rotation on the X, Y and Z axis’.

Unreal Engine with Lock Rotation checked for all axes

Finally, let’s make the static mesh the root node. To do this, click and drag the static mesh on top of the DefaultSceneRoot. This will replace it and make the camera a child.

Unreal Engine with Camera made a child to StaticMesh

Let’s now test this out in our level. Back in the level editor (click on the MainLevel tab), we need to first create a game mode blueprint. This will tell the game what object the player is, etc. In the Blueprints folder, create a new blueprint of type Game Mode Base and call it MyGameMode.

MyGameMode Blueprint added to Unreal Engine project

Double click on it to open up the blueprint editor. In the Details panel, we just want to set the Default Pawn Class to be our Player.

Unreal Engine with Default Pawn Class set

Save that, then return to the level editor. In the Details panel, click on the World Settings tab and set the GameMode Override to be our new MyGameMode.

Unreal Engine World Settings with MyGameMode added

Now if you click the Play button, you’ll see that the center viewport turns into the game and our player spawns in!

Unreal Engine with in progress game demo

Assigning Logic to our Player

Now that we’ve got all of the components for our player, let’s begin by giving them logic. In the Player blueprint, click on the Event Graph tab. This will take us to the node graph. In Unreal, we can create logic by creating these graphs. They basically consist of nodes with connections. Certain connections will trigger when certain things happen. We can also have conditions, so when something happens, we can check if it was a or b then do something based on that.

You’ll see that there are three nodes already there. These are event nodes (the red ones) and trigger when something happens.

  • BeginPlay triggers once right at the start of the game
  • ActorBeginOverlap triggers when we enter the collider of another object
  • Tick gets triggered every frame

Unreal Engine Event Graph for player character

Let’s test this out. Right click and search for a node called Print. When triggered, this node can print something to the screen.

You’ll see that each node has these white arrows. These are how we connect nodes and power them. Some such as print have an input and output, white begin play only has an output. This means that when print is powered, it can then move onto another node. Click and hold the BeginPlay node’s output and drag that to Print‘s input.

UnrealEngine with Print String added to Event Graph

So now when BeginPlay is triggered (once at the start of the game), the print node will trigger – printing hello to the screen. You can go back to the level editor and test it out.

Print String connected to Event BeginPlay in Unreal Engine

Now let’s get started on moving our player around. Select all of the nodes and delete them (delete key). You can also move around with right mouse button and zoom with the scroll wheel.

Right click and create a new node called InputAxis Move_ForwardBack. You’ll notice that this is one of the inputs we created. So when or is pressed, this will trigger. It also has this green Axis Value thing outputting as well. Nodes can have both input and output values. For us, the axis value is just the scale value from -1 to 1.

InputAxis added to Unreal Engine Event Graph

Drag out the node’s flow output (the white arrow) and release it. We can then search for the Add Movement Input node and it will automatically connect. This node does all the hard work of actually moving the player, with a few given inputs. Since we’ve already got the scale value, drag our Axis Value output into the Scale Value input.

InputAxis added to Add Movement Input in Event Graph

Finally, we just need to give it the world direction that it will move in. For this, right click and create a new node called Get Actor Forward Vector and plug that into the World Direction input.

Get Actor Forward Vector added and connected in Event Graph

At the top of the screen we can now press the Play button and test it out! You may notice the player is a bit fast. Select the FloatingPawnMovement component and set the Max Speed to 500.

Unreal Engine Event graph overview

Now we can setup the horizontal movement. This time with the InputAxis Move_LeftRight node which is triggered with the A and D keys. For the world direction, we want to use the actor right direction.

Unreal Engine Event Graph with more InputAxis windows added

Now you should be able to play the game with the WASD keys.

Next is jumping. For this though, we need to know when we’re standing on the ground. Let’s begin by creating a new variable. In the My Blueprint panel, create a new variable called Grounded. Over in the Details panel, set the Variable Type to Boolean. A boolean variable can be true or false.

Unreal Engine with Variable Type chosen

In our graph, create a new node called Event Hit. This gets triggered whenever we enter the collider of another object (i.e. the ground). There are many outputs, but we’re just going to use one.

Event Hit window added to Event Graph in Unreal Engine

Connect the output flow to a new node called Branch. This is a very special node which allows us to split up the flow depending on a given condition. When we collide with another object, we don’t know if it’s above, down or to the side. So we only want to be grounded when we’re colliding with an object below us.

Event Hit connected to Branch in Unreal Engine

To do this, we’re going to create a new node called Equal (Vector). This node takes in two vectors (property containing a X, Y and Z) and compares them. If they’re the same, it outputs true, otherwise false.

Connect the Event Hit’s Hit Normal output to the node, and set the other input to 0, 0, 1. What we’re checking here is if the object we hit, has a collision normal (direction the collision point is facing) of up. If so, this means we’re standing on something. Connect the node to the Branch.

Unreal Engine with Hit Normal connecting to Condition

Next, on the branch node we have two flow outputs. One for if the condition is true and one for if it’s false. Create a new node called Set Grounded and connect that to the branch’s true output. Make sure to also tick the grounded input. This means that when we collide with an object, we’ll check to see if we’re standing on something. If so, set the Grounded variable to true.

Unreal Engine with Set window connected to True Branch

You may soon notice that the graph can look quite convoluted. A way around this is by categorising different parts. So select all of the movement related nodes, right click and select Create Comment From Selection. You can then give it name.

Unreal Engine with Movement blueprint grouped

Now that we can detect the ground, let’s implement jumping. To begin, we can create a new variable called JumpForce. Set the variable type to Float. This is a floating point number (i.e. decimal number like 5.2, 100.1, etc).

Float selected for Variable Type in Unreal Engine

This is what the jumping will look like.

  • The InputAction Jump node gets triggered when we press the Space button.
  • This goes into a branch where we’re checking the condition of the Grounded variable.
  • If we are grounded, we’re going to add force to the static mesh.
    • Enable Accel Change.
  • The force, is going to be Vector up multiplied by the jump force.
  • Then finally, we’re setting Grounded to false.

Unreal Engine with Force logic added to Event Graph

Next, click the Compile button to compile the graph. This will allow us to set the default value for the jump force variable. Set it to 70,000. We can then press play and test out the jumping.

Unreal Engine with Compile button highlighted

Building the Level

Back in the level editor, our game looks quite bland. Start by selecting then deleting the existing ground. In the Models folder, drag in the Platform0 model.

  • Set the Location to -10, 0, 0
  • Set the Material to M_Rock_Marble_Polished

Quick Note: You can use the move gizmo (red, blue and green arrows) to move around a selected object. You can toggle between the rotate (press E), scale (press R) and move (press W) gizmos.

Unreal Engine with Platform level object added to scene

We also need to move the Player Start object up a bit so it’s standing on the platform.

Unreal Engine with player moved up above platform

Next, we’ll add in some water which will kill the player if they touch it.

In the Modes panel, drag the cube object.

  • Set the Location to -1800, -2000, 20
  • Set the Scale to 10, 10, 1
  • Set the Static Mesh to Floor_400x400
  • Set the Material to M_Water_Lake

Unreal Engine with large platform added

After this, we can go through and add in some more platforms.

Unreal Engine with completed 3D platformer level design

Inside of the StarterContent/Props folder, we have a SM_Rock model. Drag that into the scene, position/scale/rotate it. We can then copy and paste it and move it around to look like the image below. This will be a good background for the level.

Unreal Engine with rock objects added for background

Now let’s make it night time. Select the Light Source.

  • Set the Y Rotation to 90
  • Set the Intensity to 0.2

Unreal Engine with light source adjusted

Select the Sky Sphere.

  • Disable Colors Determined By Sun Position
  • Set the Zenith Color, Horizon Color and Cloud Color to Black
  • Set the Overall Color to White
  • Set the Stars Brightness to 0.4

Unreal Engine with starry night sky field added

It’s not dark though. To fix this, we can click on the arrow near the Build button and select Build Lighting Only. This will build our lighting, causing the scene to become dark.

Unreal Engine Build window with Build Lighting Only selected

We don’t want the scene to be totally dark though. In the Modes panel, go to the Lights tab and drag in a Directional Light.

  • Set the Name to MoonLight
  • Set the Rotation to 0, 313, 290
  • Set the Intensity to 6
  • Set the Light Color to a dark blue (Hex Decimal: 0A0B15FF)
  • Enable Use Temperature

Unreal Engine with Direction Light parameters

Optionally, we can also create some Rect Lights of different colors to add some color. But don’t go overboard, as our enemies and gems will also be emitting light.

Unreal Engine with RectLight added to scene

Collectable Gems

To guide the player through the level, we’re going to have some gems for them to collect. In the Blueprints folder, create a new blueprint with a parent class of Actor. Call this blueprint: Gem.

Unreal Engine with new Gem content created

Double click on the blueprint to open up the editor. First, we need to add a Static Mesh component and drag it onto the scene root to make it the main component.

  • Set the Scale to 0.5, 0.5, 0.5
  • Set the Static Mesh to Gem
  • Set the Material to GemMaterial

As a child of the mesh, add a new Point Light component.

  • Set the Light Color to Yellow

Unreal Engine with Gem object created with model

Selecting the static mesh, let’s go to the Details panel.

  • Enable Simulation Generates Hit Events
  • Set the Collision Presets to Trigger
    • This means the gem can go through the player and detect a collision with them

Unreal Engine collision window for gem

Now let’s go over to the Event Graph. Here, we want to setup the ability for the gem to rotate over time.

  • Event Tick gets called every frame
  • It triggers the AddWorldRotation node which will add a rotation to our existing one
  • The rotation is going to be along the Z (vertical) axis, 90 degrees a second

Gem Event Tick logic for Unreal Engine platformer

Save that, then go back to the level editor. Here, we can drag in the blueprint to create a new object. Place the gem on top of the platform like this.

Unreal Engine with glowing gem added to scene

We can then press the Play button and see that it rotates!

Now we need the gems to give the player some sort of score. Inside of the gem’s blueprint graph, let’s create a new variable called ScoreToGive of type Integer (whole number). Also enable Instance Editable. This means that when we create one of these gems in the level, we can set the score to give individually. Each gem can have a different score from the rest. Click the Compile button to make these changes appear in the level editor.

Unreal Engine Event Graph for gem object

We don’t have any score to add to yet. So let’s go to the Player blueprint and create a new integer variable called Score.

Unreal Engine Score with Integer selected for Variable Type

Next, let’s create a new function (click on the + next to Functions in the My Blueprint panel) and call it AddScore. A function is basically a bunch of logic that can be triggered whenever we want. So from the gem script, we could call the AddScore function, and the logic in that blueprint will trigger.

AddScore Blueprint node

Functions can have inputs and outputs. For add score, we want an input on the amount of score to give to the player.

Event Graph Details window with Inputs window highlighted

What we want to do in this function is add the Score to Give to our Score.

Add Score logic in Unreal Engine Event Graph

Back in the Gem blueprint, let’s implement the ability to collect it.

  • The Event ActorBeginOverlap node gets triggered when another object has entered our collider.
  • We then take the object that collided with us and try to cast it to the Player class.
    • This basically converts the reference to a player blueprint so we can access the player specific things.
  • If the cast was successful, we’re going to call the AddScore function on the player.
  • Then the DestroyActor node will destroy the gem.

Unreal Engine Actor logic for gem collection

Let’s now go back to the level editor. Select the gem and you should see a Score to Give property in the details panel. Set that to 1.

Score to Give in Unreal Engine property panel

Let’s also create multiple gems of different values. Copy and paste a gem…

  • In the Details panel, select the Static Mesh component
    • Set the Material to GemMaterial_Green
  • In the Details panel, select the Point Light component
    • Set the Light Color to green

We can also change the score to give value.

Green glowing gem added to Unreal Engine project

Resetting the Player

Right now when the player hits the water, nothing happens. What we want to do, is reset the level when the player “dies”. So in the Player blueprint, create a new function called Die.

Dying logic in Event Graph for Unreal Engine

This function will reset the current level.

  • We first get the name of the current level.
  • Then we trigger the Open Level node, inputting the level name.

Dying blueprint logic for player in Unreal Engine

Back in the level editor, let’s call this function when the player hits the water.

  1. Select the water object
  2. In the Details panel, click Blueprint/Add Script
  3. A window will popup, select the Blueprints folder, rename the blueprint and click Create Blueprint

Unreal Engine Create Blueprint window

This will open up a new blueprint editor. Select the static mesh component.

  • Enable Simulation Generates Hit Events
  • Enable Generate Overlap Events
  • Set the Collision Preset to Trigger

Unreal Engine water element with dying blueprint added

Click on the Event Graph tab as we’re going to setup a few nodes.

  • Event ActorBeginOverlap gets triggered when an object enters the water collider
  • We’re then going to cast the colliding object to the Player class
  • If it was the player, then call the Die function

Dying logic added to player in Unreal Engine logic

Back in the level editor we can press play and test it out!

Enemy Blueprint

Now it’s time to create the enemy blueprint. This enemy will move back and forth between two positions. If the enemy hits the player, the Die function will be called. So to begin, let’s create a new actor blueprint called Enemy.

  1. Create a new Static Mesh component and make that the parent component.
    1. Set the Static Mesh to Enemy
    2. Set the Material to EnemyMaterial
  2. Create a new Point Light component and make it the child of static mesh
    1. Set the Color to red
    2. Set the Intensity to 3000

The component layout is very similar to the gem.

Enemy object created in Unreal Engine

Select the Static Mesh component.

  • Enable Simulation Generates Hit Events
  • Set the Collision Presets to Trigger

Enemy collision logic parameters in Unreal Engine

Next, we can head over to the Event Graph and begin to create the logic. We’ll start with the variables.

  • MoveTime (Float) the time it takes to move to a point.
  • StartPosition (Vector) starting position of the enemy.
  • EndPosition (Vector) position to move to.
  • TargetPosition (Vector) position the enemy is currently moving to.

Click the Compile button so we can set some variable properties in the Details panel.

  • MoveTime – enable Instance Editable
  • EndPosition – enable Instance Editable

My Blueprint window in Unreal Engine

To begin, we’ll set the initial values for the Start Position and Target Position.

Enemy movement logic for Unreal Engine platformer

Continue the flow into a Move Component To node. This node takes in a few inputs and moves the object towards a certain location.

  • Set the Component input to our Static Mesh component
  • Set the Target Relative Location input to our TargetPosition variable
  • Set the Over Time input to our MoveTime variable

Move Component To node for Unreal Engine project

When we’ve arrived at the target position, the Completed output flow will trigger. Here, we want to switch the TargetPosition variable to the start position and vice versa so that it bounces between the two.

Move Component To with various connections in Event Graph

The movement is finished! Now let’s work on colliding with the player. This is basically the same as the water blueprint.

Logic for player collision in Unreal Engine

Hit the Compile button. Then back in the level editor, we can drag in the Enemy blueprint.

  • Set the Move Time to 2
  • Set the End Position to the location where you want the enemy to move to

If you press play, you’ll see that it will bounce between the two points! And if you hit it, the scene will reset.

Enemy added to Unreal Engine project

Score UI

Finally, let’s setup our user interface (UI). This is going to be text on-screen which will display the player’s score. In the Blueprints folder, right click, hover over User Interface and select Widget Blueprint. Call this ScoreUI.

Unreal Engine menu with User Interface selected

When you double click on it, it will open up in widget editor. Here, we can setup the UI elements and apply some logic to them.

In the Palette panel, we can see all the different UI components we can use. Drag in the Text component. You can click and drag to move it around and resize it by clicking and dragging on the white circles.

Text object added to Unreal Engine UI

In the Details panel…

  • Set the Anchors to top-center
    • Anchors are there for attaching the UI component to a point on the screen. This means when we resize the screen, the text will always be at the top center.
  • Set the Text to Score: 0 (different from image below)
  • Set the Font – Size to 50
  • Set the Justification to Center

Various settings for Unreal Engine UI text

Also, change the name to ScoreText and enable Is Variable. This will allow us to modify it with nodes.

ScoreText assigned to detail for UI text in Unreal Engine

At the top right of the screen, click on the Graph button. This will switch us over to the event graph.

  1. Create a new function called UpdateScore
  2. Give it an integer input called NewScore
  3. Layout the graph like in the image below

What we’re doing here, is creating a new string (text) with two elements. First a “Score: ” string combined with the new score. Then the score text is set to this new text.

Unreal Engine Event graph with adjustments for UI

Now we need to hook this up to the player. In the Player blueprint, create a new variable of type ScoreUI called ScoreUI.

ScoreUI added as Variable Type in Unreal Engine blueprinting

Let’s then create the Event BeginPlay node which gets called when the game starts. We’re going to create a new widget, add it to the viewport and then set that as our ScoreUI variable.

ScoreUI variable added to event logic for gem collection

In the AddScore function, let’s call the UI’s UpdateScore text function.

Update Score node added to Event Graph

You can now press play and see that when we collect gems, our score goes up!

Conclusion

There we go!  We’ve completed our first game in the Unreal Engine – just like that.

Over the course of this Unreal Engine tutorial, we’ve covered a lot.  Not only did we learn how to make and add a variety of objects to compose our 3D platformer level, but we learned extensively how to work with Unreal Engine’s blueprinting system to compose every bit of logic of our game (without manually coding anything!).

From here you can choose to expand the existing game – adding in new features or upgrading the graphics. Or you could choose to take your new skill set and apply it to a totally new game. There are many different features and editors available in the Unreal Engine, so have a look at them all. There are also many online resources that go over each aspect of the engine, what each node does, and how to do specific things that you may want.  Either way, the foundations you’ve developed here will provide a great starting point for you to become an expert Unreal Engine developer!

We wish you the best of luck with your future games!

Unreal Engine 3D platformer complete project

How to Make a Game

$
0
0

So you want to learn game development and don’t necessarily know where to begin? With the games industry constantly evolving, it may be overwhelming on knowing where to start. This guide will hopefully give you a good understanding of your options in the industry. What game engine should I use? Where’s the best place to publish my game? How do I even begin to create a game? Well let’s find out…

In game development, there is a general cycle which many projects follow.

  1. Thinking of an idea
    1. Developing an idea in your head of what you want the game to be
  2. Designing the game
    1. Developing that idea further, creating documents and formulating each of the systems, levels, art style, etc.
  3. Creating a demo of the game
    1. This is where you begin to create the game. Many people like to develop a very simple version of their game with basic graphics to quickly get a feel for how it will play.
  4. Testing the game
    1. Showing the game to other people. As the developer, you already know everything about the game, so in order to know if the game works, is fun to play, easy to understand, etc – you need people testing it out. This process should also be done regularly as new changes to the game might change how people play it.
  5. Finalizing the game
    1. In a sense, no game is ever finished. You either run out of time or money. Eventually you need to, or feel you need to, finish up on the game and get it out there.
  6. Publishing the game
    1. This is when you publish your game for everyone in the world to see.

Thinking of an Idea

Everyone has an idea of what their dream video game would be, but not many people can actually make that a reality. If you’re wanting to learn game development, it may seem tempting to just jump in and create your game with all the amazing technology that’s available. But I don’t recommend you do that. When creating a game, you need to think about scope. Ask yourself: how long will this take to make? Do I have all the skills required to make this game? Do I have an understanding of the game?

Understanding your game is the most vital part. You may have the story in your head, the setting, or some of the mechanics – but to understand your game, you need to know every aspect. How each of the systems interact, what the player can/can’t do, the goal, etc. This may seem like a lot of stuff to keep track of, but do remember that large games are created by large companies.

As a solo developer, I’ve found the best way of creating a manageable game with an appropriate scope, is this method:

  1. Think of a core mechanic.
    1. e.g. Mario’s jumping, grappling hook in Just Cause.
  2. Develop the game around that core mechanic.
    1. Every feature of the game should encourage use of the core mechanic.

Let’s take Mario for example. Mario’s core mechanic is jumping. Pretty every aspect of the game required the player to jump.

  • Jumping on enemies
  • Jumping up to punch blocks
  • Jumping over gaps
  • Jumping on the flag at the end of the level

This is part of the reason why the Mario games (especially the earlier ones) were so successful. The developers focused on building the game around one core mechanic to make it as fun, polished and versatile as possible. Here’s a list of resources to help you develop a game idea and figure out a core mechanic:

Designing the Game

So you’ve got an idea and need to develop it further. If you’ve got a small game with one or two mechanics then you could probably just keep that in your head, but if it’s any larger or especially if you’re working in a team – you need to document it. A game design document is what you can use in order to layout: the idea of the game, how it works, the goal, the player, interactions, art style, theme, etc. You should be able to give a GDD (game design document) to two people and have them both develop a fairly similar game. If you’re working in a team, then this is necessary. Here’s some helpful resources to do with game design documents:

Now in terms of actually designing the game – that’s up to you. Game design is one of those fields where there’s no 100% way to do something. There’s no formula for creating a unique and fun game. This doesn’t mean there’s no good practices or guidelines you should follow. Knowing game design can help you develop a game that’s engaging and easy for the player to understand. Here’s some online resources which can help you in game design:

What Type of Game Do You Want to Create?

When thinking of a game to make, you probably also know what type it’s going to be. Here’s a list of different types of games and platforms you can develop for.

  • 2D is what most game engines provide and is generally the best step for beginner game developers.
  • 3D is what many of the most popular game engines provide and is also a great first step for beginners.
  • Mobile can open you up to an entirely new market and user interface with touch controls.
  • Virtual Reality is a rapidly growing sector of the games industry and allows for immersive experiences.
  • Augmented Reality is a technology that has uses both in and out of the games industry.

Beginning Development

Which game engine do I use? Which programming language should I learn? These are all questions you may ask yourself, but there is no one answer. What to learn will depend on the types of games you want to create, your current skills and whether or not you even want to learn programming. So what is a game engine? A game engine is a piece of software or a framework which allows you as a developer to create games. It provides a platform to structure your game, build levels, assign logic to objects and build it to your specified platform. There are a large number of game engines out there, with each of them providing different features and specialities.

Below is a list of some popular game engines, the type of games you can create with them and the skills you’ll need to learn. We have a detailed blog post about the various different game engines of 2020 you can read here.


Unity

Unity, is the most popular game engine out there on the market right now, with many online learning resources to get you started. Unity prides itself on being very accessible, allowing almost any type of game to be created.

What types of games can I create? Unity is one of the most versatile engine, allowing you to create: 3D, 2D, VR, AR and multiplayer games on a large number of platforms.

Do I need to learn a programming language? Unity uses the C# programming language, although there are many visual scripting plugins available to purchase, along with an integrated solution coming soon to the engine.

Links

Tutorials


Unreal Engine

Unreal Engine, is developed by Epic Games and features powerful 3D graphics. Alongside Unity as one of the most popular game engines, Unreal is also used by many AAA game studios.

What types of games can I create? Unreal is primarily a 3D game engine although it does support 2D. You can also develop VR, AR and multiplayer games.

Do I need to learn a programming language? Unreal Engine features a powerful integrated visual scripter, which is ideal for beginners. The engine can also be used with C++.

Links

Tutorials


Godot

Godot, is an open source game engine which can be used to create 2D and 3D games. Since the engine is open source, there is constant fixes and features being added, along with customized versions made by developers.

What types of games can I create? Godot can be used to create 2D and 3D games, with many new upcoming features to their 3D engine.

Do I need to learn a programming language? Godot primarily uses their GDScript language (similar to Python), but also has support for visual scripting, C# and C++.

Links

Tutorials


Phaser

Phaser, is an open source, 2D framework for making HTML5 games. Unlike the previously mentioned engines, Phaser does not have a user interface. Instead, it provides you with a game engine library you can use while programming.

What types of games can I create? With Phaser, you can create 2D games for desktop and mobile.

Do I need to learn a programming language? Phaser uses JavaScript.

Links

Tutorials

Testing Your Game

Testing your game is an important part of development. How do you know if something is going to be obvious to the player? Will they know where to go? What to do? For you it may seem obvious, but for someone who has never seen the game before – things might be very different. This is why it’s important to test your game all throughout development. Here’s some resources for learning more about testing your game:

Finalizing Your Game

Some game developers will say that the first 90% of your game will take 10% of the time, and the last 10% will take 90% of the time. This is a bit of an over-statement, but the idea is still the same. This is where you’re ironing out the bugs, adding in the final art style, polishing everything and doing some final testing. Here’s some resources to help you get through the final step of finishing your game:

Publishing Your Game

With your game now complete, you probably want to show some people. Luckily, we live in a time where putting your game out there is easier than ever before. There are many online platforms to publish to. Some are free and some are paid. Here’s a list of those platforms, the requirements and how you can get started:

Desktop

  • Itch.io is a popular platform for indie developers. It’s free to publish your game here.
  • Game Jolt is another popular platform for indie developers, allowing you to publish your game there for free.
  • Steam is the largest distributor of PC and VR games. $100 through Steam Direct.
  • Epic Games Store is a relatively new and growing PC game distributor, similar to Steam. Complete a form for Epic to consider your game.

Mobile

Console

Virtual Reality

Here’s a list of resources which can help you publish and market your game:

Conclusion

Developing a game is hard work and takes some time. Learning these skills won’t come to you overnight, but the best way to improve – is by making games. Learning the theory is one part, but understanding what it takes to make a game is another thing. Start making games the first day you begin your learning journey, as I can guarantee it will excel your learning tremendously. There’s a lot of technology out there for you to use, so don’t hesitate to try different ones in order to find what serves you best. Good luck out there, and I wish you the best of luck with your game development journey!

Unity Device Simulator Tutorials – Complete Guide

$
0
0

The Device Simulator, is a package for Unity which can display your game on a number of different devices. This is so when your developing your game, you can see how it looks on mobile devices, consoles, and various other devices. The default Unity game window already has the ability to change the resolution and aspect ratio, but not all devices are an exact rectangle. Some have curved edges, notches and other screen designs which may get in the way of UI or important game details.

Here’s an overview of the device simulator as written in Unity’s official blog post. The package features:

  • An extended Game View, which allows you to turn Simulation Mode on and off and to select devices
  • An extensible device database that stores the device and phone configurations and characteristics that will drive API shims’ return values
  • API shims that return device-specific API’s results (screen resolution, device model, orientation, etc.) when used in Editor Play Mode

Each device also has a safe area defined (which you can modify) and this shows the bounds of where your UI will fit. This especially helps when developing mobile apps, as notches and beveled edges are becoming more common place.

device simulator safe area

Links

Tutorials

Don't miss out! Offer ends in
  • Access all 400+ courses
  • New courses added monthly
  • Cancel anytime
  • Certificates of completion

Viewing all 1620 articles
Browse latest View live