Quantcast
Channel: GameDev Academy
Viewing all 1620 articles
Browse latest View live

How to Create a First-Person Shooter in the Unreal Engine

$
0
0

Introduction

Whether you’re a fan or not, there’s no denying that first-person shooters are a popular game genre.  Thus, it can be beneficial to know how to make one, whether it’s just to round out your own skills or to create that FPS game idea you’ve had haunting your dreams.  It can be even more beneficial to learn how to do this with Unreal Engine, the popular and graphically stunning engine behind a ton of popular games.

In this tutorial, we’re going to show you how to create a first-person shooter game inside of the Unreal Engine. The game will feature a first-person player controller, enemy AI with animations, and various shooting mechanics.  We will also cover the Unreal Engine blueprinting system for the logic, so no other coding knowledge is needed to jump in!

Before we start though, it’s important to know that this tutorial won’t be going over the basics of Unreal Engine. If this is your first time working with the engine, we recommend you follow our intro tutorial here.

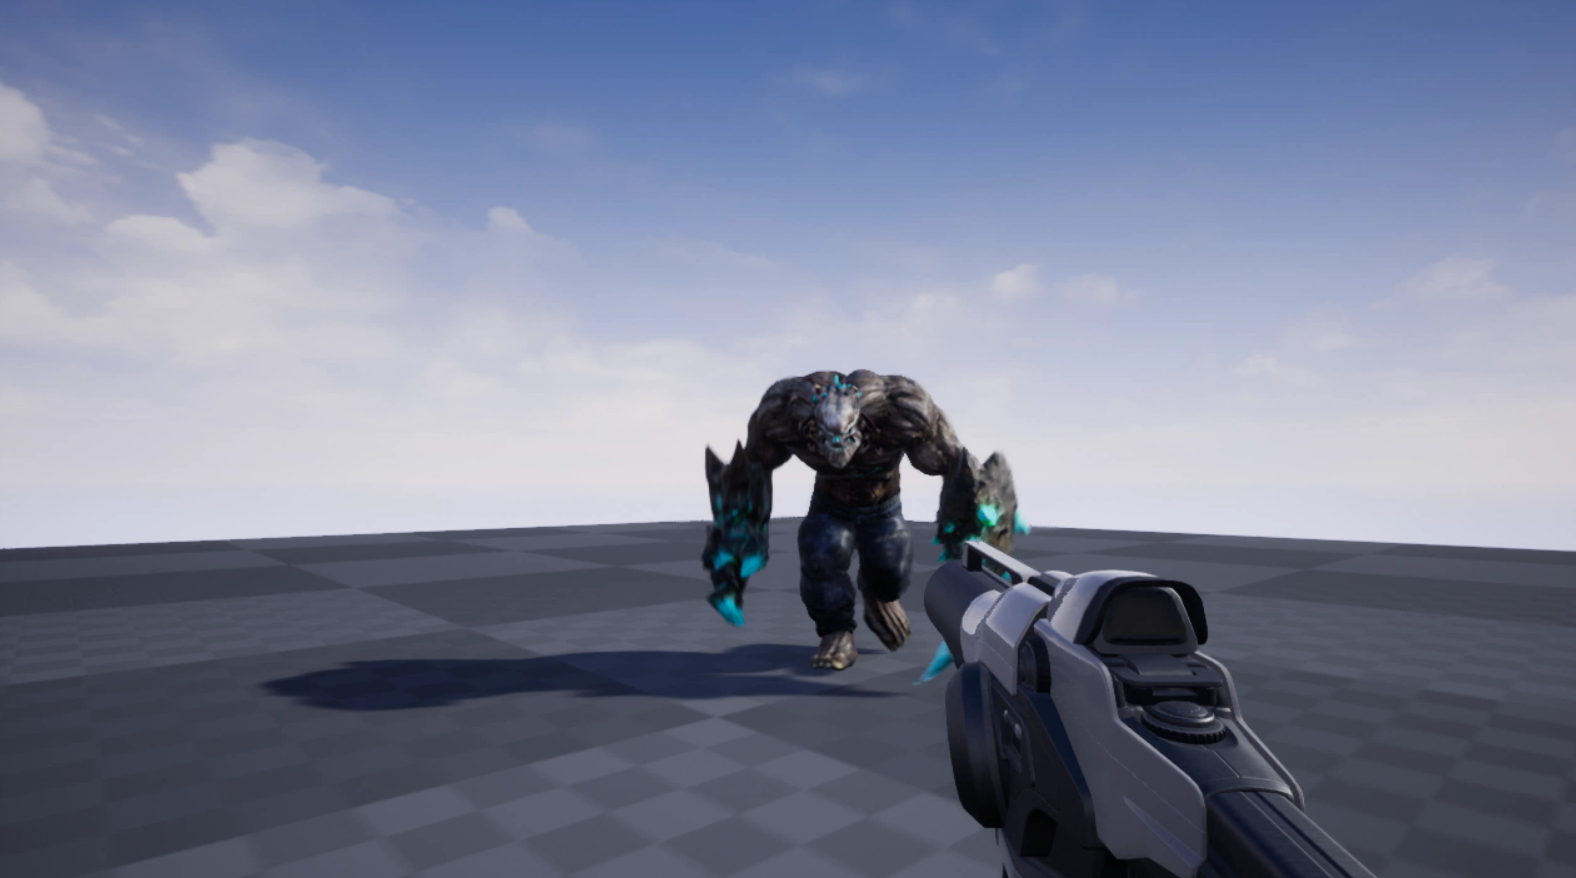
Unreal Engine FPS game in GIF form

Don't miss out! Offer ends in
  • Access all 400+ courses
  • New courses added monthly
  • Cancel anytime
  • Certificates of completion

Project Files

There are a few assets we’ll be needing for this project such as models and animations.  You can also download the complete Unreal project via the same link!

Project Setup

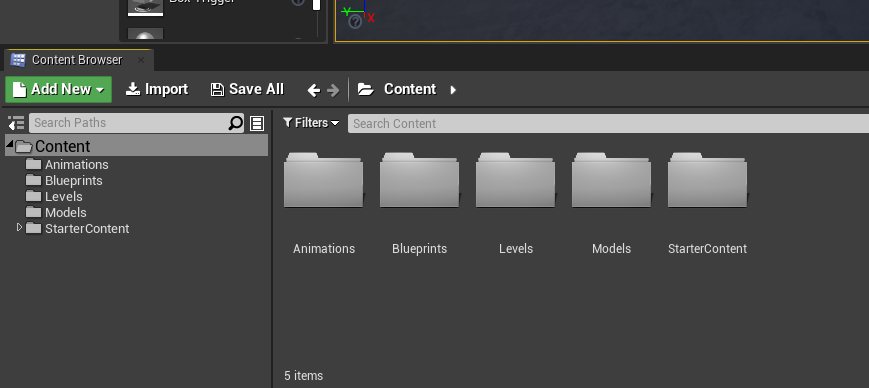
To begin, create a new project making sure to include the Starter Content. This should then open up the Unreal Engine editor. Down in the Content Browser, create four new folders.

  • Animations
  • Blueprints
  • Levels
  • Models

Unreal Engine Content Browser window

Next, download the required assets (link at the start of tutorial). Inside the .ZIP file are three folders. Begin by opening the Models Folder Contents folder and drag all the folders inside of that into the Models folder in the Content Browser. Import all of that.

Then do the same for the Animations Folder Contents. When those prompt you to import, set the Skeleton to mutant_Skeleton. The mutant model and animations are free from Mixamo.
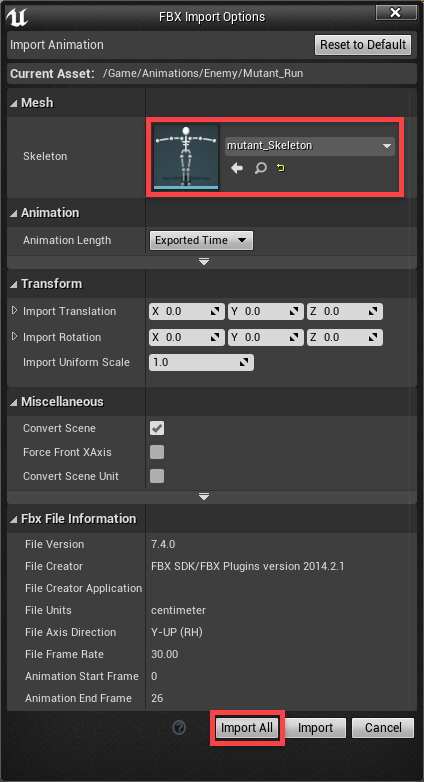
Unreal Engine Import Options with mutant skeleton selected

Finally, drag the FirstPerson folder into the editor’s Content folder. This a is a gun asset that comes from one of the Unreal template projects.
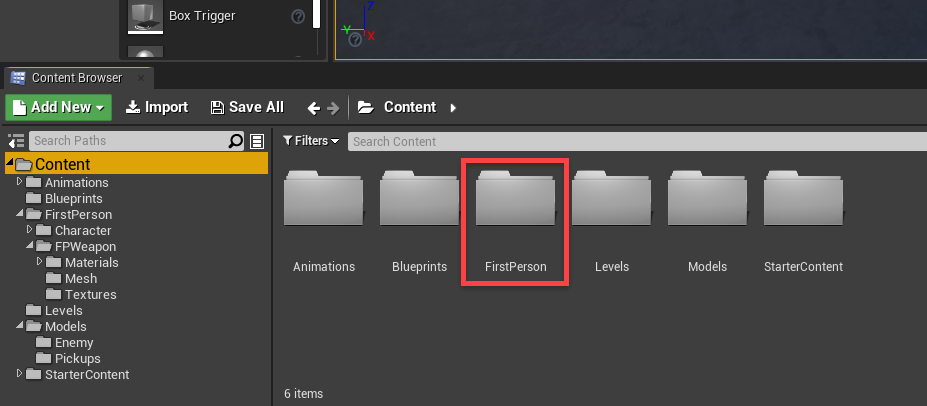
Unreal Engine with FirstPerson folder added to Content Browser

Now we can create a new level (File > New Level) and select the Default level template. When the new level opens, save it to the Levels folder as MainLevel.
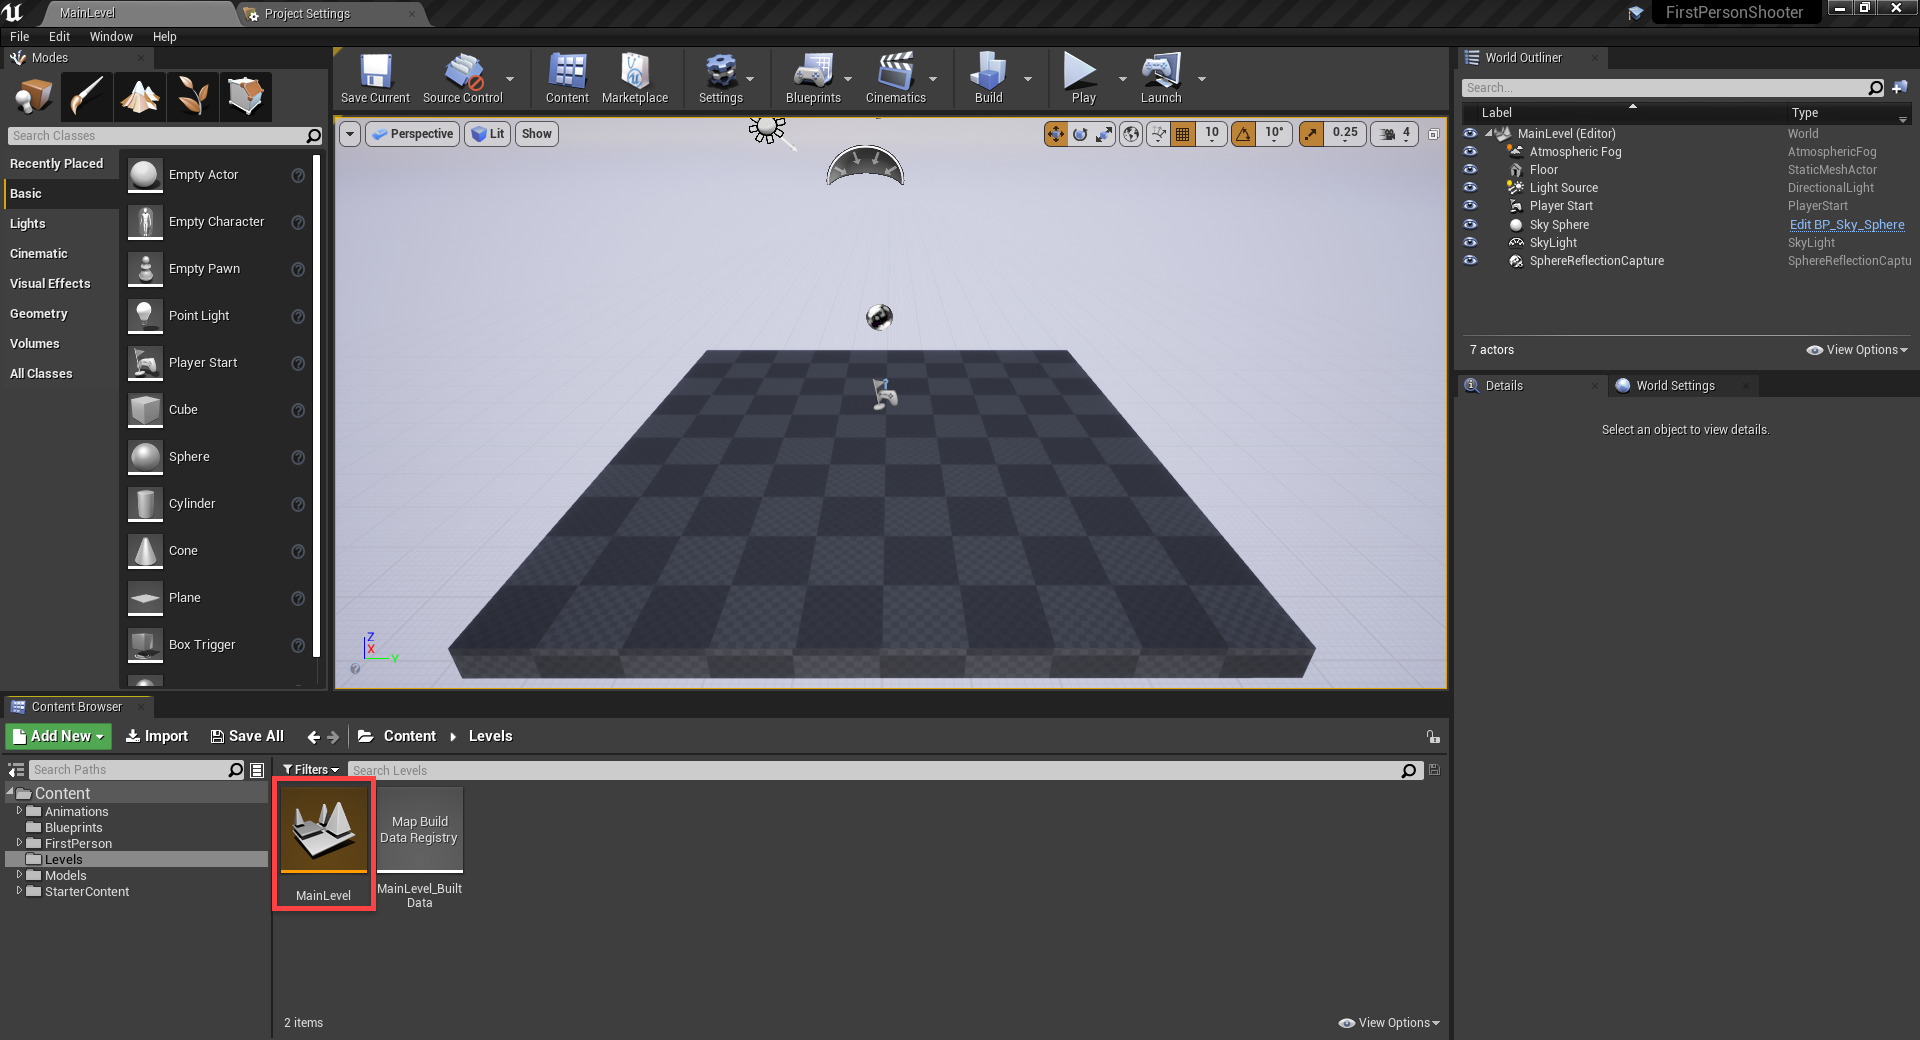
Unreal Engine with new level scene

Setting Up the Player

Let’s now create the first-person player controller. In the Blueprints folder, create a new blueprint with the parent class of Character. Call it Player. The character parent includes many useful things for a first-person controller.
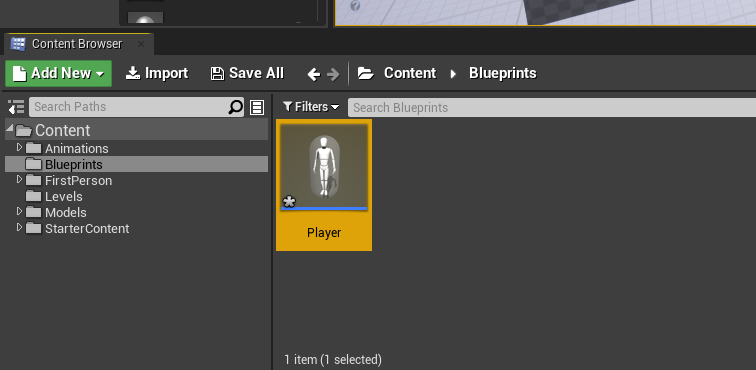
Unreal Engine with Player blueprint added to content

Double click it to open the player up in the blueprint editor. You’ll see we have a few components already there.

  • CapsuleComponent = our collider
    • ArrowComponent = forward direction
    • Mesh = skeletal character mesh
  • CharacterMovement = movement, jumping, etc.
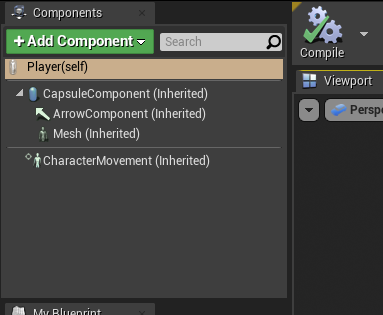
Unreal Engine components for Player object

We can start by creating a new Camera component. This allows us to see through our player’s eyes into the world.

  • Set the Location to 0, 0, 90 so that the camera is at the top of the collider.
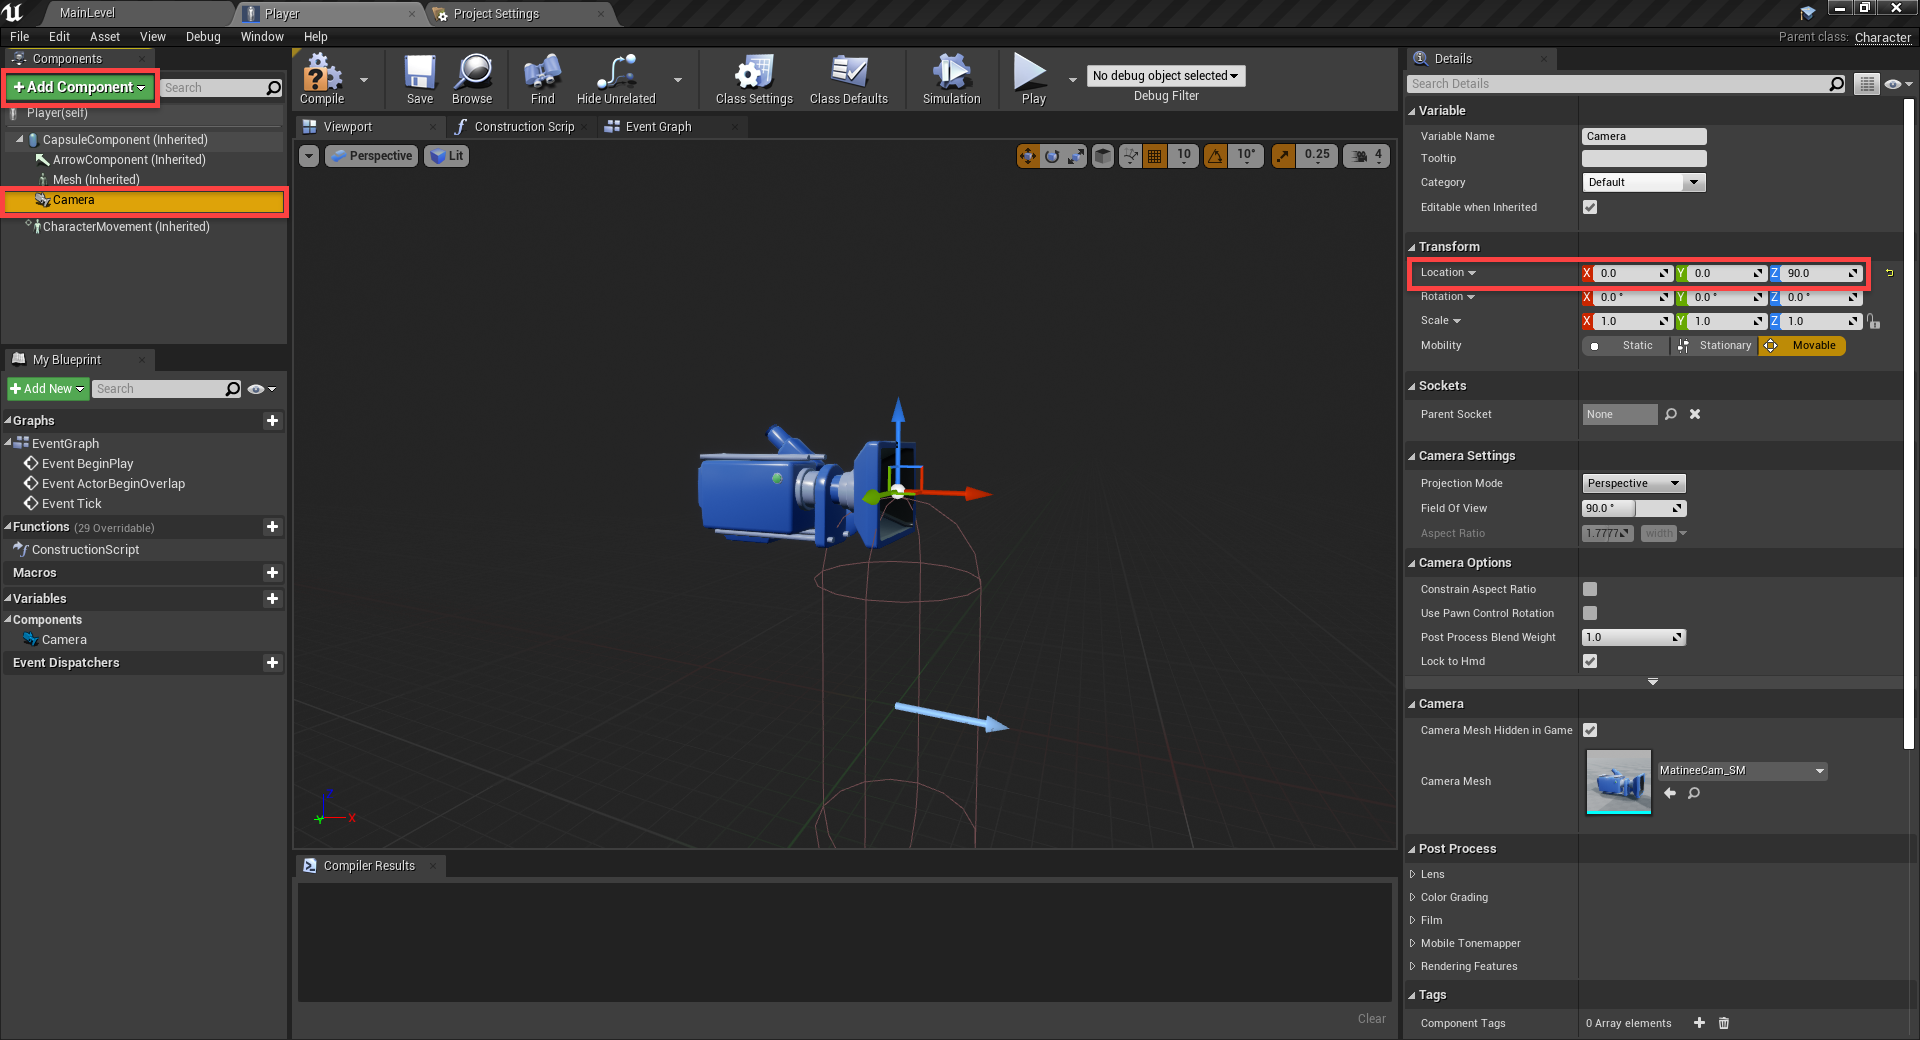
Unreal Engine camera for FPS player

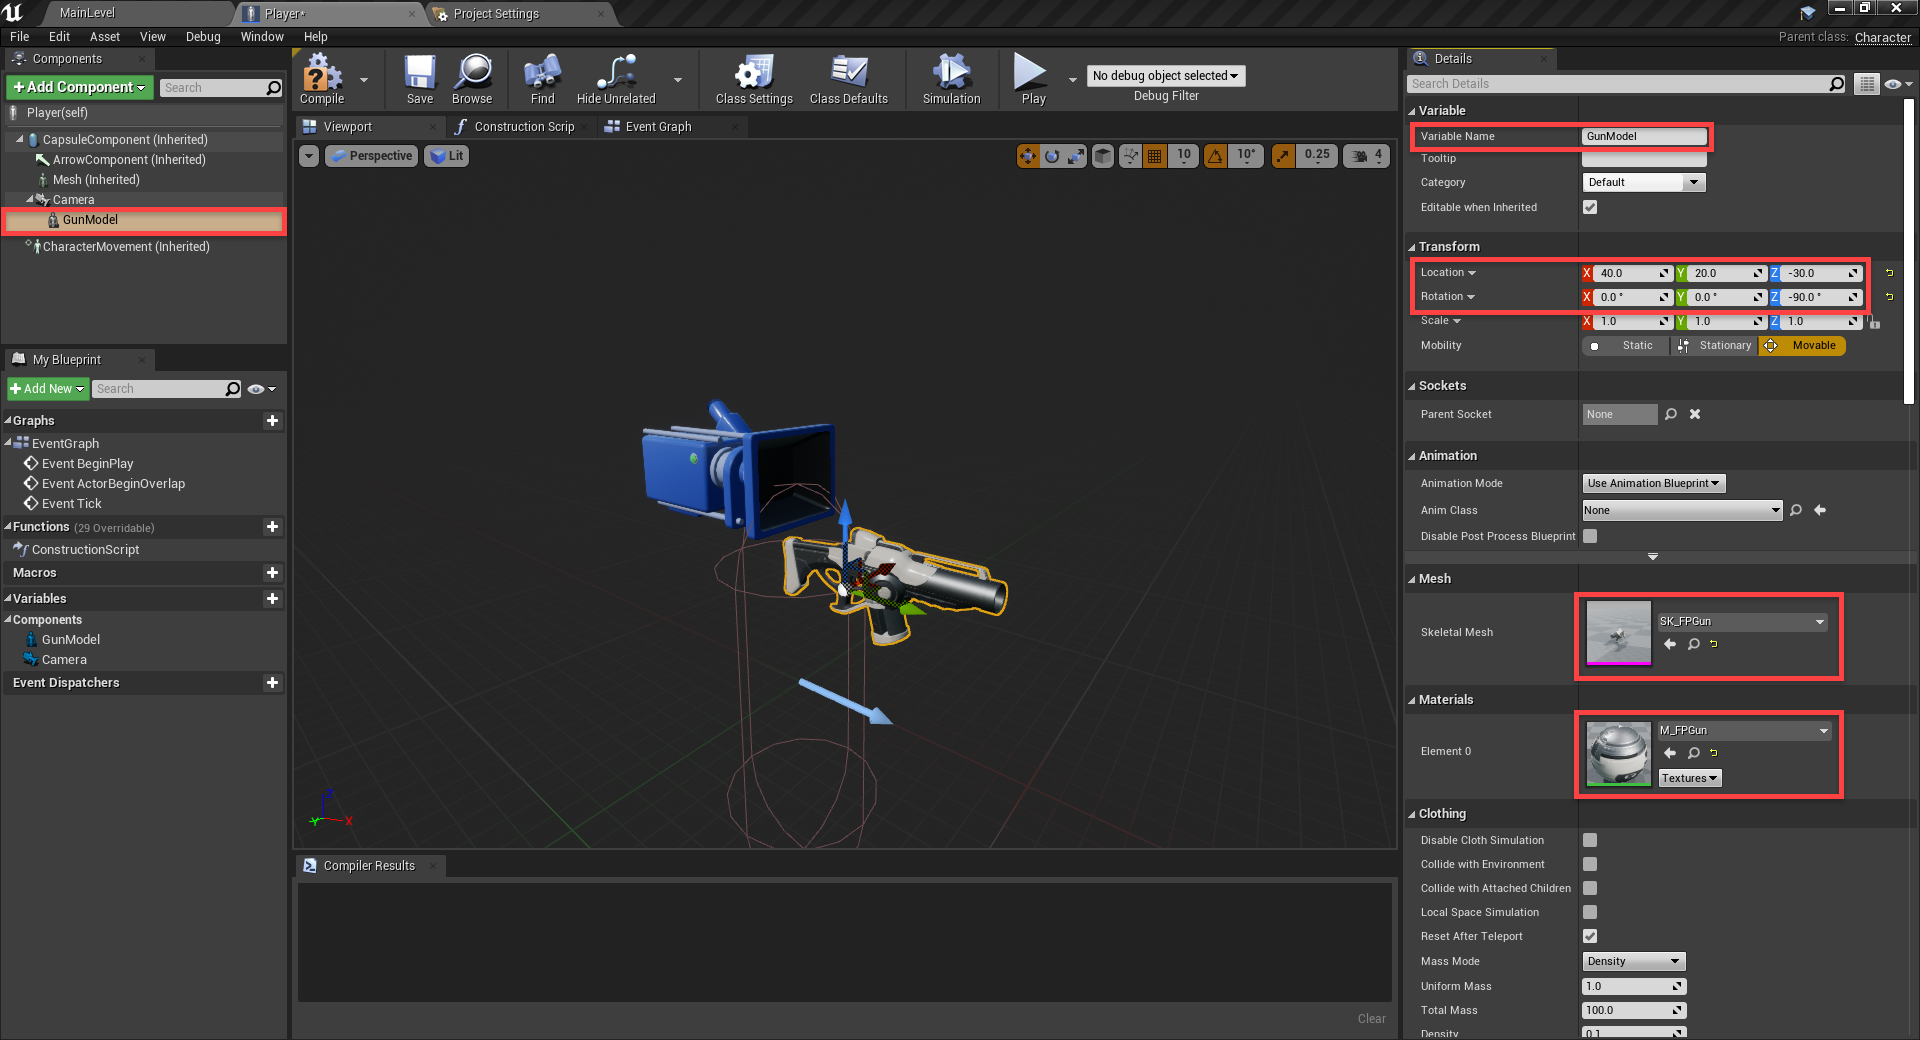
For the gun, create a Skeletal Mesh component and drag it in as a child of the camera.

  • Set the Variable Name to GunModel
  • Set the Location to 40, 0, -90
  • Set the Rotation to 0, 0, -90
  • Set the Skeletal Mesh to SK_FPGun
  • Set the Material to M_FPGun

Unreal Engine with gun object added for FPS

Finally, we can create the muzzle. This is a Static Mesh component which is the child of the gun model.

  • Set the Variable Name to Muzzle
  • Set the Location to 0, 60, 10
  • Set the Rotation to 0, 0, 90

We’re using this as an empty point in space, so no model is needed.
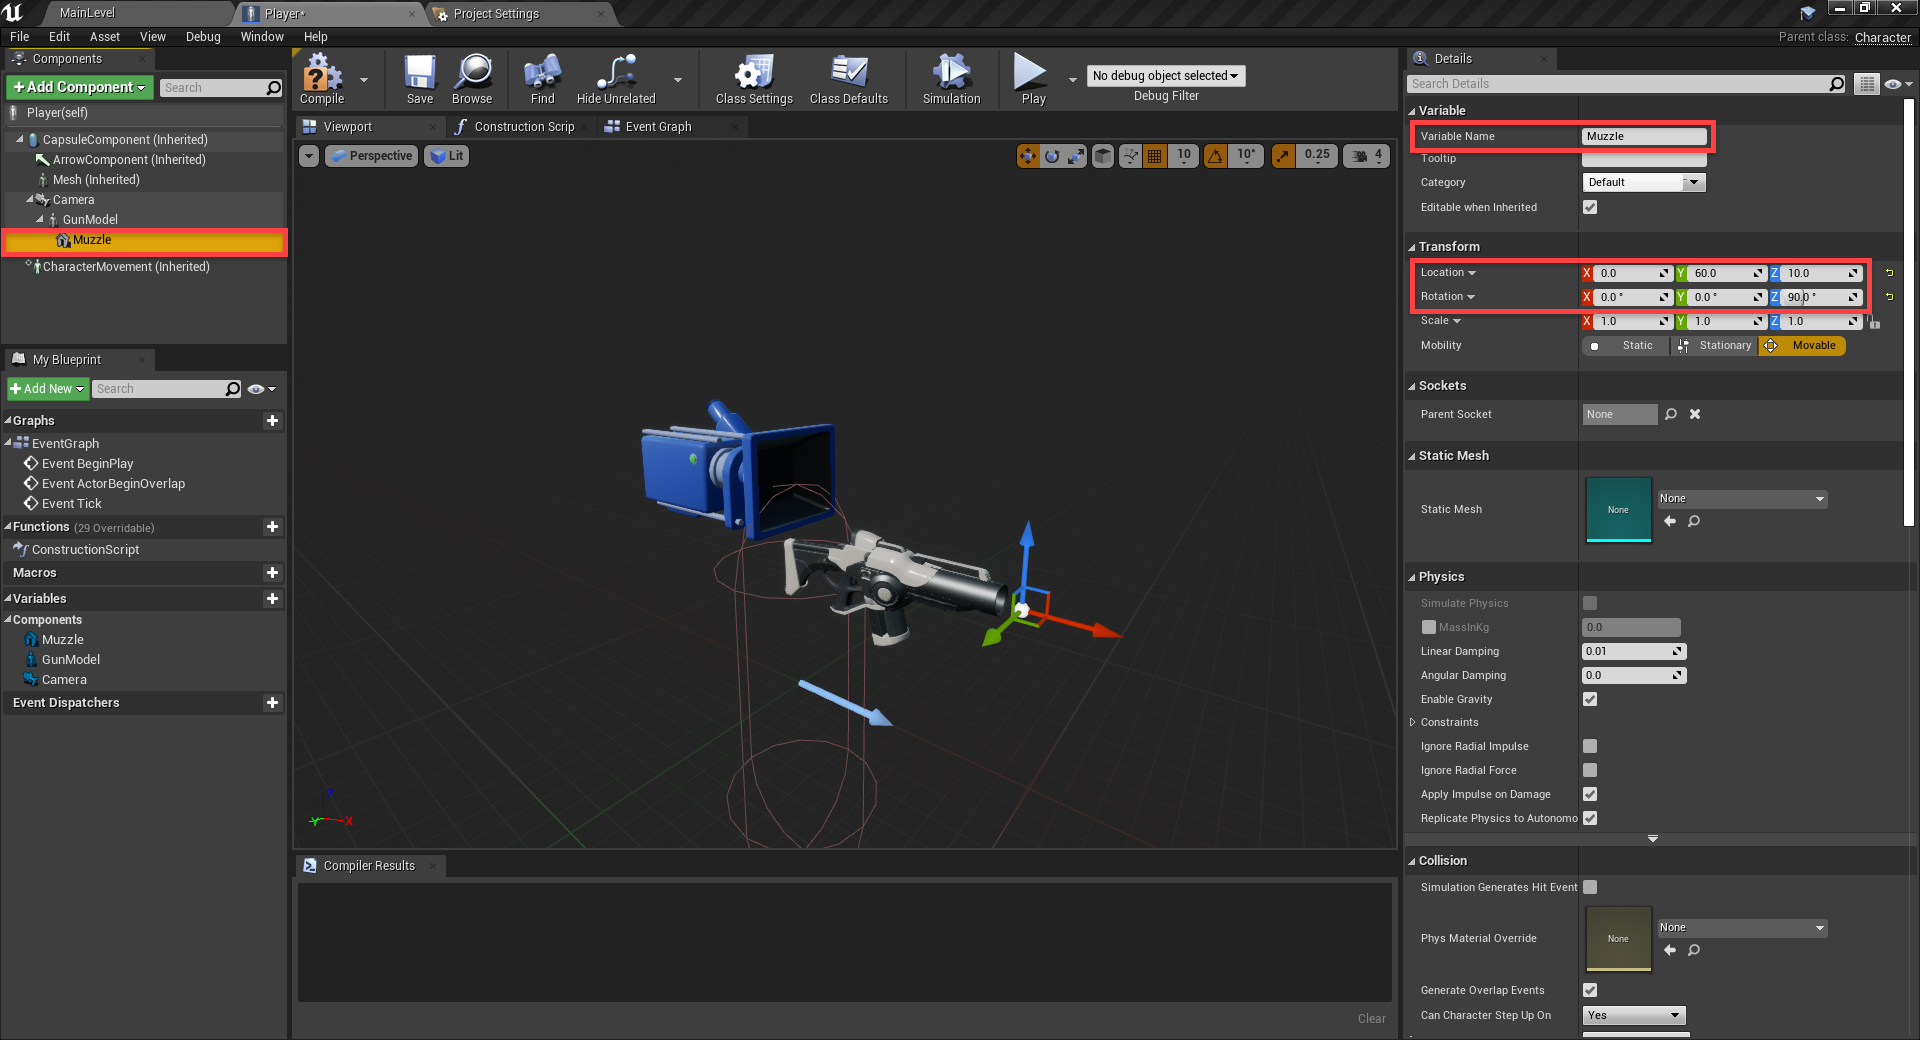
Unreal Engine Details for gun object

That’s it for the player’s components! In order to test this out in-game, let’s go back to the level editor and create a new blueprint. With a parent class of Game Mode Base, call it MyGameMode. This blueprint will tell the game what we want the player to be, etc.

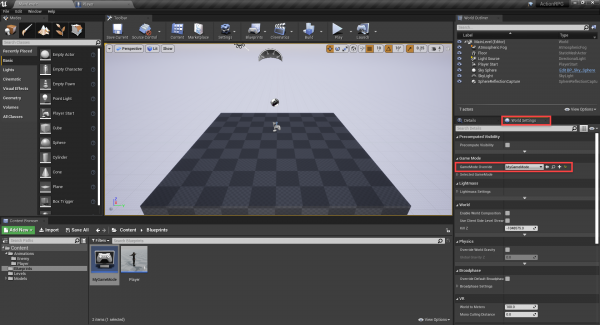
In the Details panel, click on the World Settings tab and set the GameMode Override to be our new game mode blueprint.
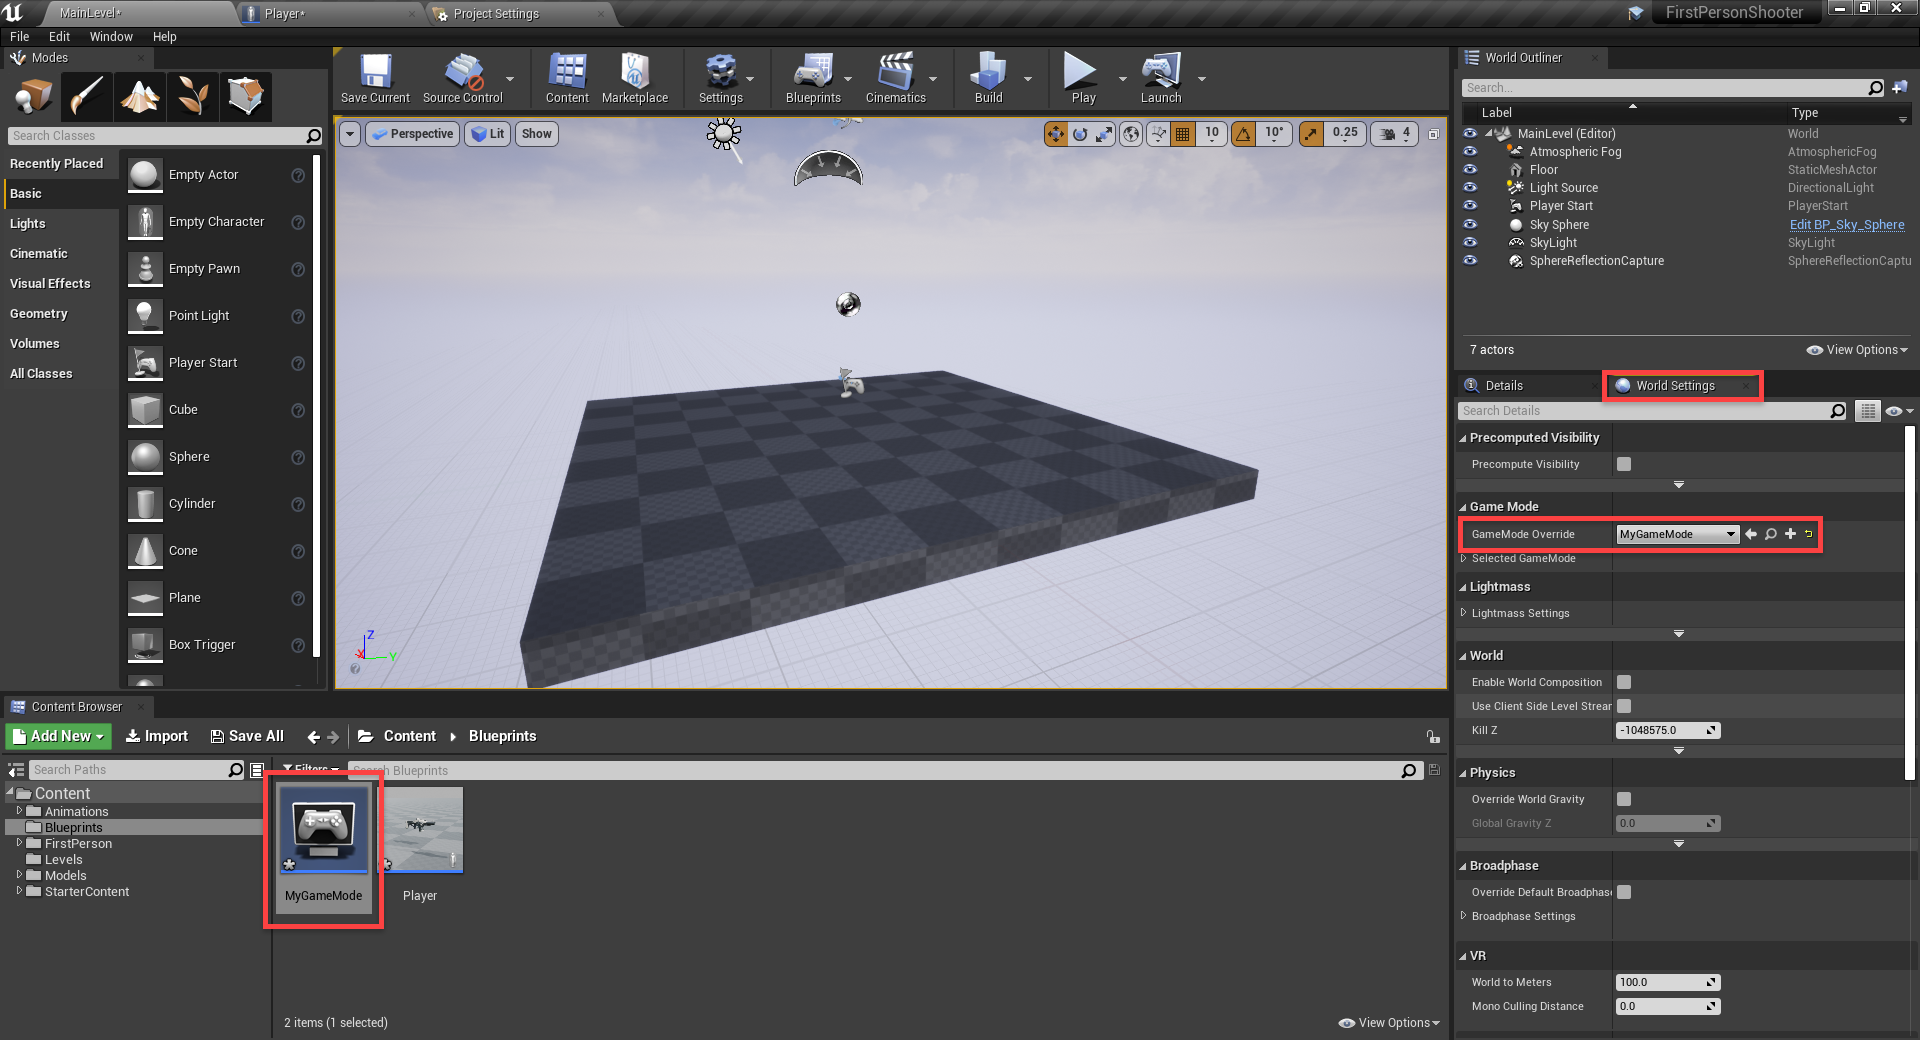
Unreal Engine World Settings windows

Next, double-click on the blueprint to open it up. All we want to do here is set the Default Pawn Class to be our player blueprint. Once that’s done: save, compile, then go back to the level editor.
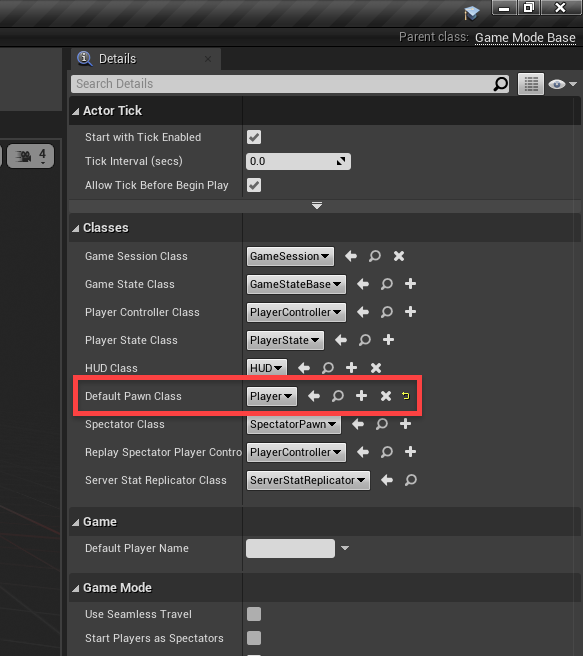
Unreal Engine with Default Pawn Class attached to Player

One last thing before we start creating logic for the player, and that is the key bindings. Navigate to the Project Settings window (Edit > Project Settings…) and click on the Input tab.

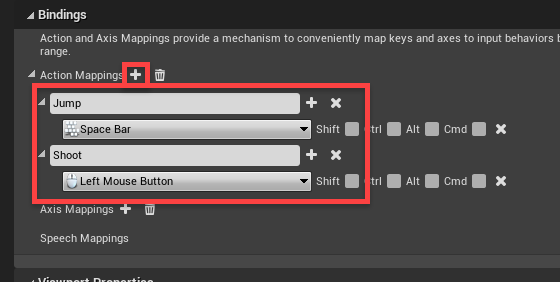
Create two new Action Mappings.

  • Jump = space bar
  • Shoot = left mouse button

Unreal Engine Action mapping for FPS

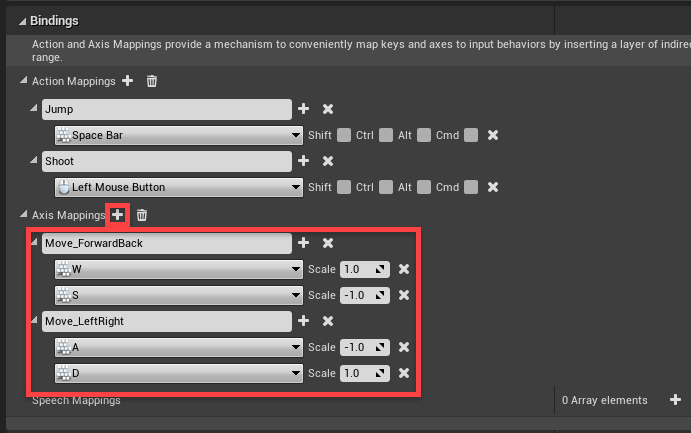
Then we want to create two Axis Mappings.

  • Move_ForwardBack
    • W with a scale of 1.0
    • S with a scale of -1.0
  • Move_LeftRight
    • with a scale of -1.0
    • D with a scale of 1.0

Unreal Engine Axis Mapping for standard movement

Player Movement

Back in our Player blueprint, we can implement the movement, mouse look and jumping. Navigate to the Event Graph tab to begin.

First we have the movement. The two axis input event nodes will plug into an Add Movement Input node, which will move our player.
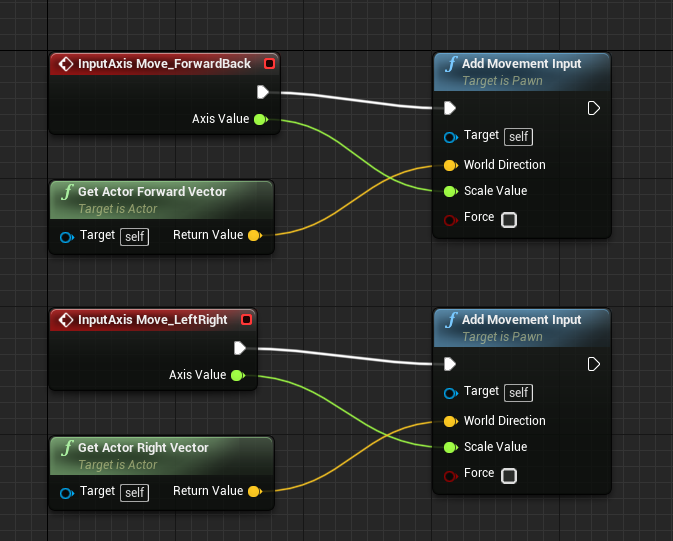
Player Movement Event Manager blueprinting in Unreal Engine

We can then press Play to test it out.

Next up, is the mouse look. We’ve got our camera and we want the ability to rotate it based on our mouse movement. We want this to be triggered every frame so start out with an Event Tick node.

This then plugs into an AddControllerYawInput and an AddControllerPitchInput. These nodes will rotate the camera along the Z and Y axis’. The amount will be based on the mouse movement multiplied by 1 and -1. -1 because the mouse Y value inverts the camera movement.

Event Manager to rotate camera with Player

If you press play, you’ll see that you can look left to right, but not up and down. To fix this, we need to tell the blueprint that we want to the camera to use the pawn’s control rotation. Select the Camera and enable Use Pawn Control Rotation.
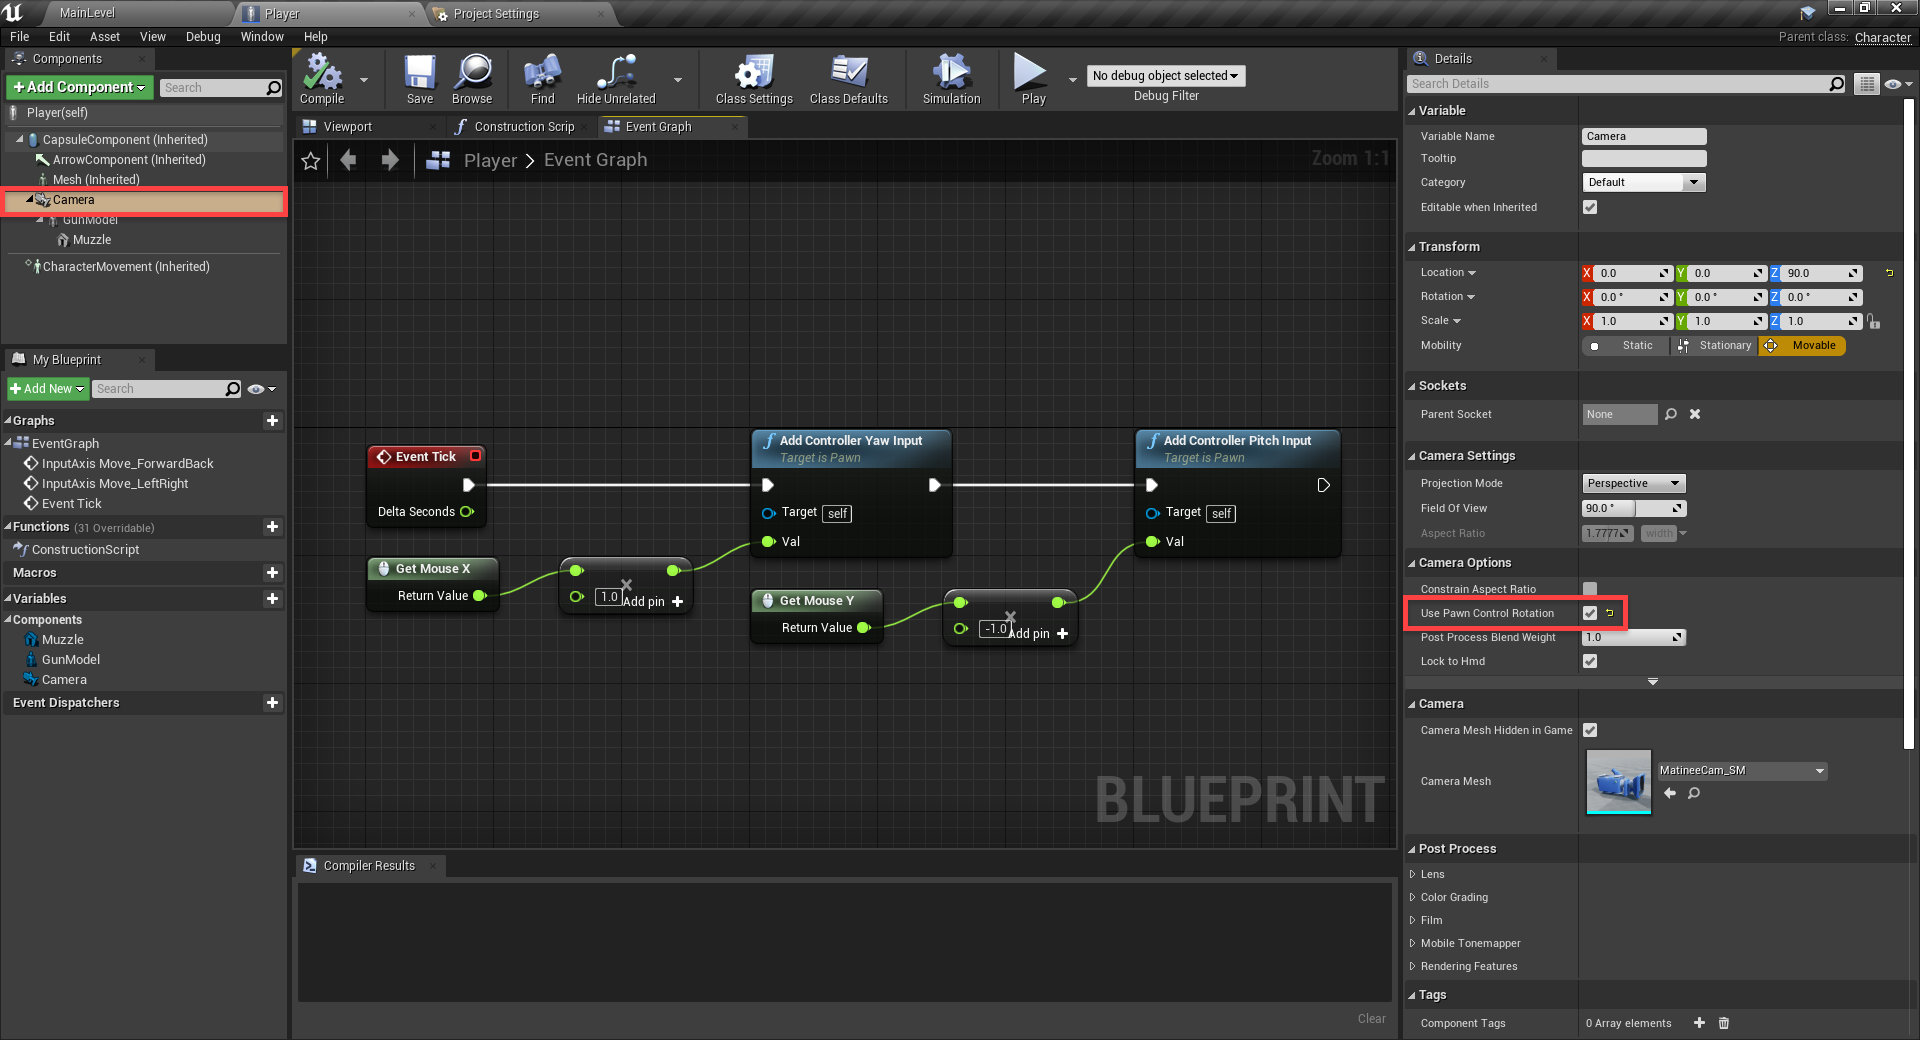
Camera Event Graph overview

Now when you press play, you should be able to move and look around!

Jumping is relatively easy since we don’t need to manually calculate whether or not we’re standing on the ground. The CharacterMovement component has many build in nodes for us to do this easily.

Create the InputAction Jump node which is an event that gets triggered when we press the jump button. We’re then checking if we’re moving on ground (basically, are we standing on the ground). If so, jump!

Jumping logic for FPS player in Unreal Engine

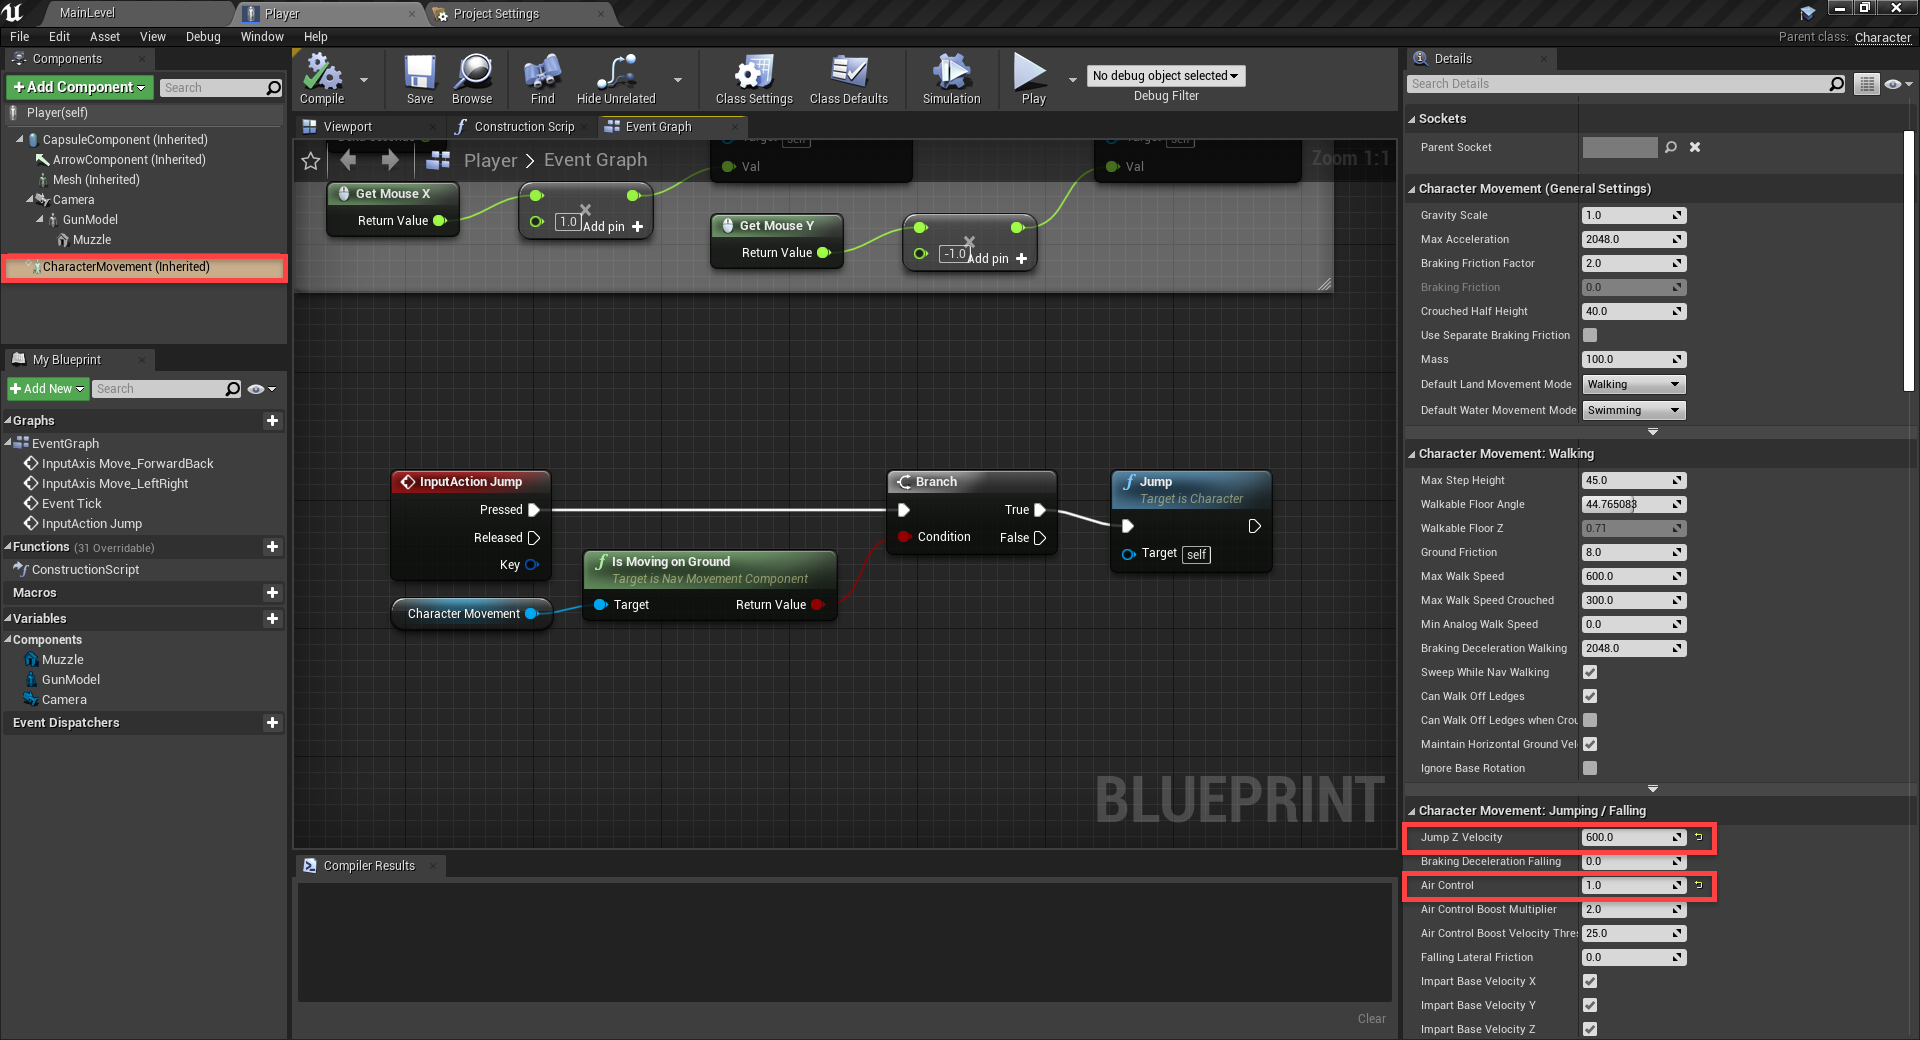
We can change some of the jump properties. Select the CharacterMovement component.

  • Set the Jump Z Velocity to 600
  • Set the Air Control to 1.0

Event Graph overview for character movement

You can tweak the many settings on the component to fine tune your player controller.

Creating a Bullet Blueprint

Now it’s time to start on our shooting system. Let’s create a new blueprint with a parent type of Actor. Call it Bullet.
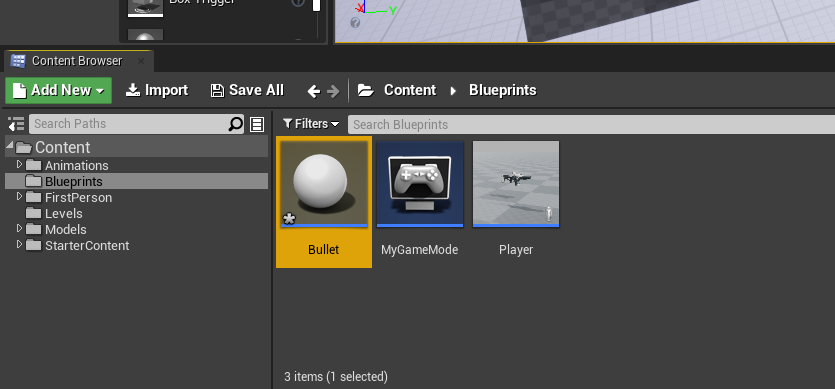
Bullet Blueprint created in Unreal Engine

Open it up in the blueprint editor. First, let’s create a new Sphere Collision component and drag it over the root node to make it the parent.
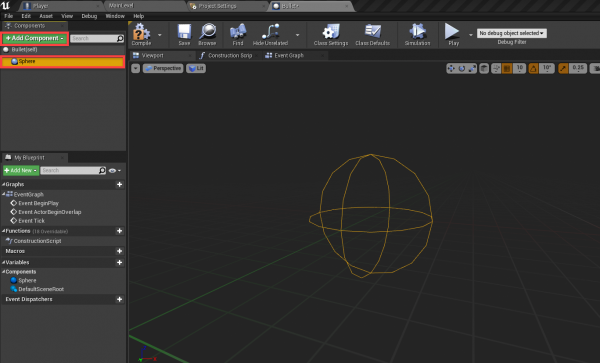
Sphere collision shape added to bullet in Unreal engine

In the Details panel…

  • Set the Sphere Radius to 10
  • Enable Simulation Generates Hit Events
  • Set the Collision Presets to Trigger

Now we have the ability to detect collisions when the collider enters another object.
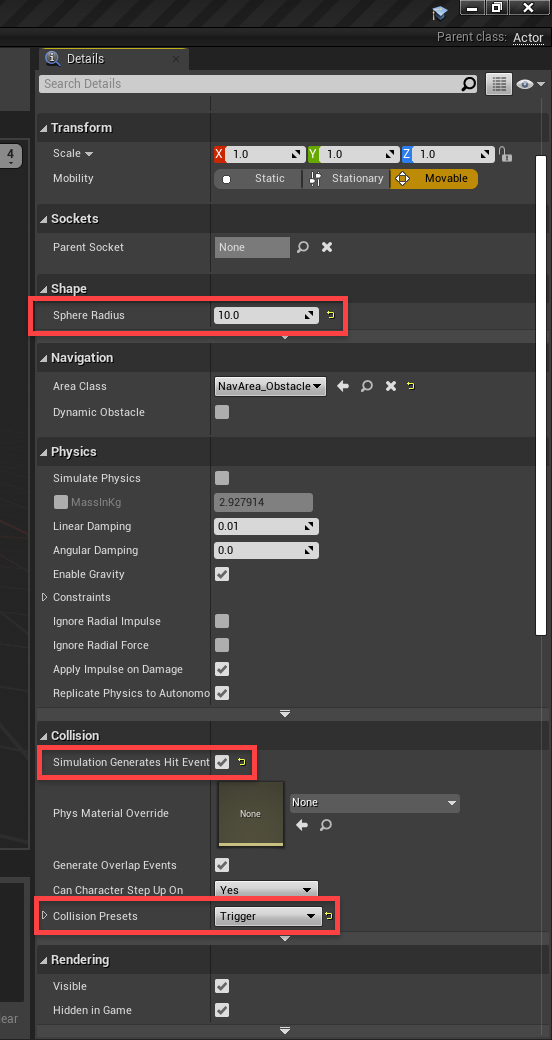
Details for Bullet in Unreal Engine

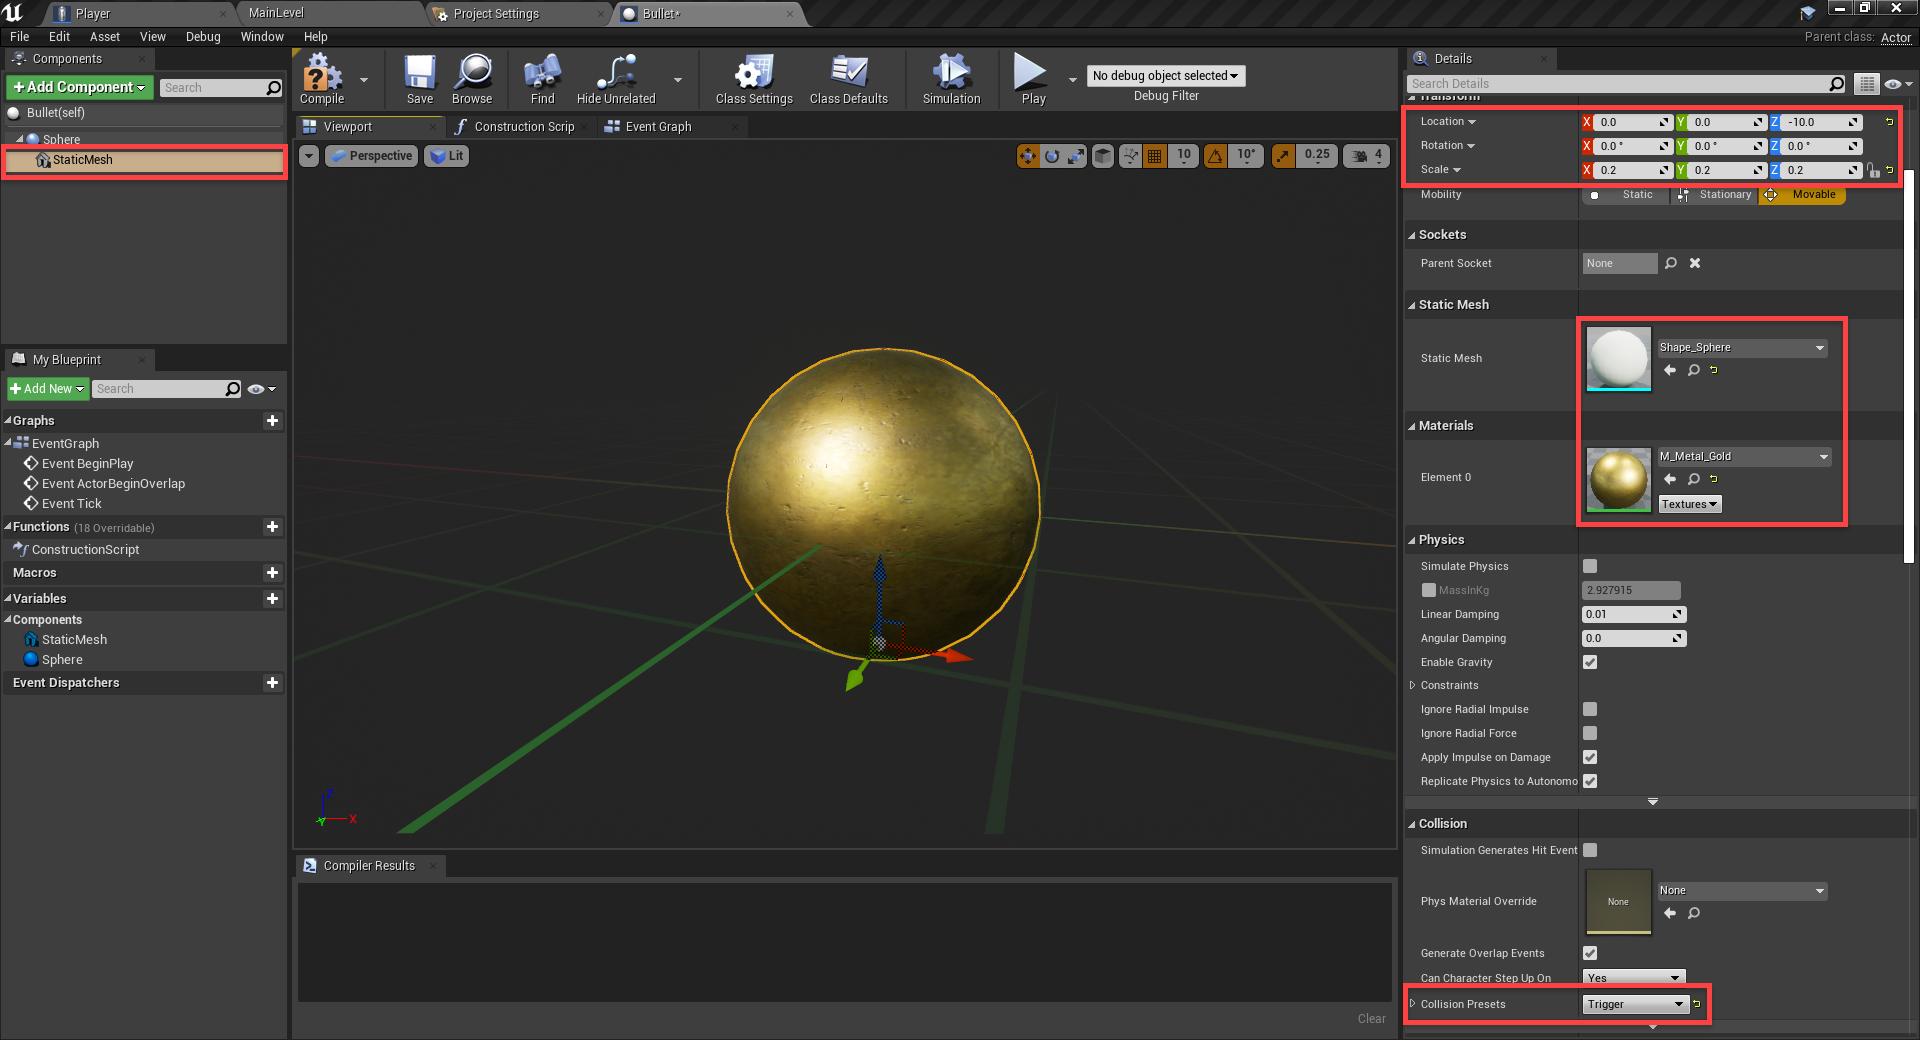
Next, create a new component of type Static Mesh.

  • Set the Location to 0, 0, -10
  • Set the Scale to 0.2, 0.2, 0.2
  • Set the Static Mesh to Shape_Sphere
  • Set the Material to M_Metal_Gold
  • Set the Collision Presets to Trigger

Gold metallic material added to FPS bullet

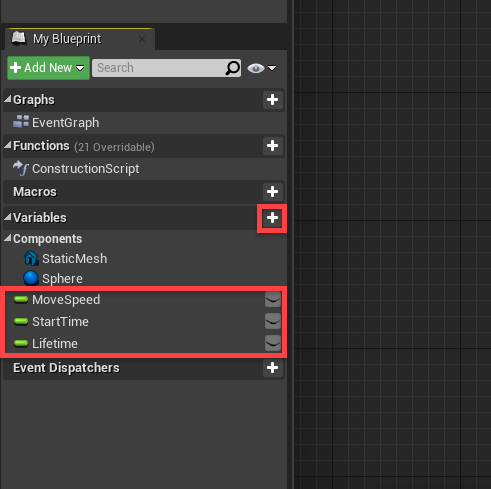
Go over to the Event Graph tab and we can begin with out variables.

  • MoveSpeed (Float)
  • StartTime (Float)
  • Lifetime (Float)

Then click the Compile button. This will allow us to now set some default values.

  • MoveSpeed = 5000.0
  • Lifetime = 2.0

Components for bullet blueprint in Unreal Engine

We want our bullet to destroy itself after a set amount of time so that if we shoot the sky, it won’t go on forever. So our first set of nodes is going to set the start time variable at the start of the game.
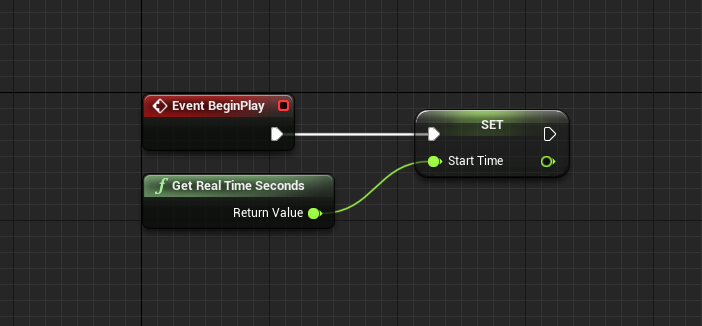
Event Graph for Bullet blueprint in Unreal Engine

Over time, we want to move the bullet forward. So we’ll have the event tick node plug into an AddActorWorldOffset node. This adds a vector to our current location, moving us. The delta location is going to be our forward direction, multiplied by our move speed. You’ll see that we’re also multiplying by the event tick’s Delta Seconds. This makes it so the bullet will move at the same speed, no matter the frame rate.
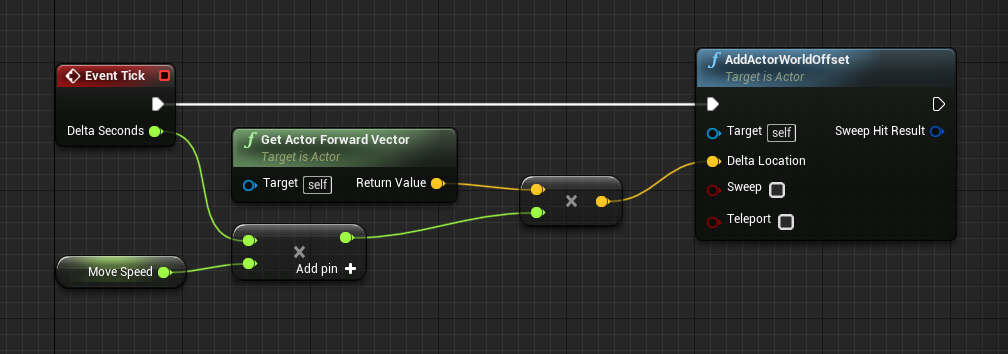
AddActorWorldOffset node for Bullet shooting logic

Connect the flow to a Branch node. We’ll be checking each frame if the bullet has exceeded its lifetime. If so, we’ll destroy it.
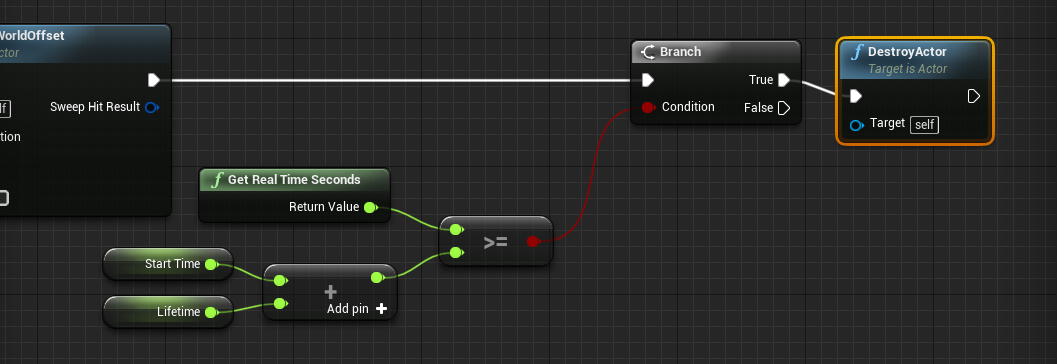
DestroyActor node for Bullet blueprint

All the bullet needs now, is the ability to hit enemies. But we’ll work on that once enemies are implemented.

Shooting Bullets

Back in our Player blueprint, let’s implement shooting. First, we need to create an integer variable called Ammo. Compile, and set the default value to 20.
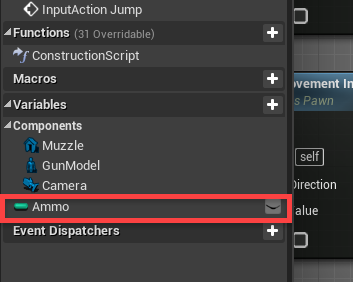
Ammo component added in Unreal Engine

To begin, let’s add in the InputAction Shoot node. This gets triggered when we press the left mouse button. Then we’re going to check if we’ve got any ammo. If so, the SpawnActor node will create a new object. Set the Class to Bullet.

Spawn logic for bullet in Unreal Engine

Next, we need to give the SpawnActor blueprint a spawn transform, owner and instigator. For the transform, we’ll make a new one. The location is going to be the muzzle and the rotation is going to be the muzzle’s rotation. For the owner and instigator, create a Get a Reference to Self node.
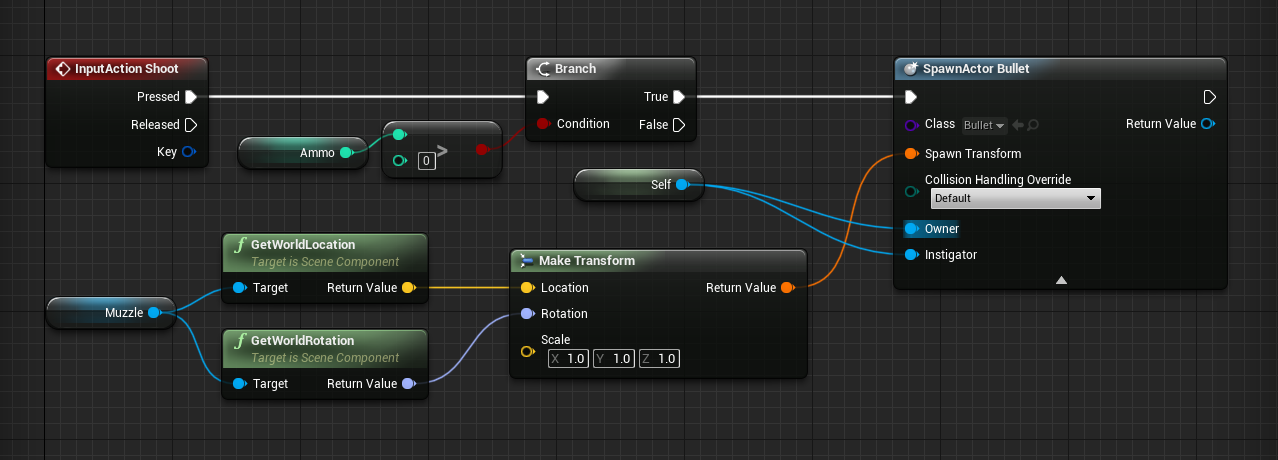
Spawn location logic for bullet in Unreal Engine

Finally, we can subtract 1 from our ammo count.
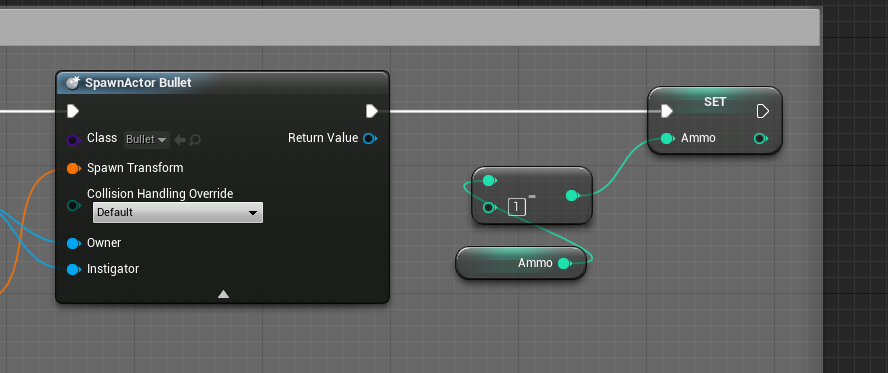
Ammo subtraction logic for FPS Unreal Engine project

We can now press play and see that the gun can shoot!

Creating the Enemy

Now it’s time to create the enemy and its AI. Create a new blueprint with the parent class of Character. Call it Enemy.
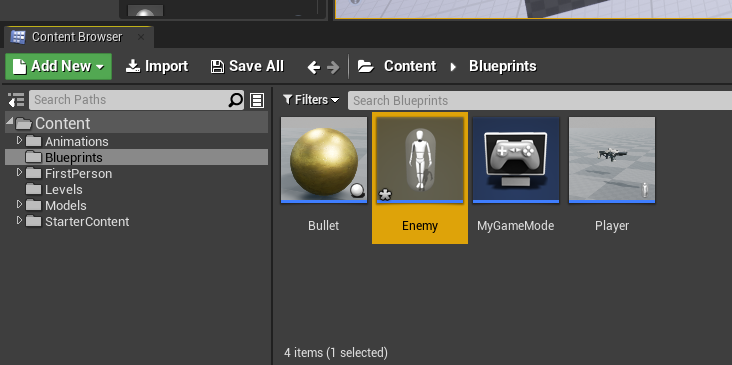
Enemy blueprint created for Unreal Engine FPS

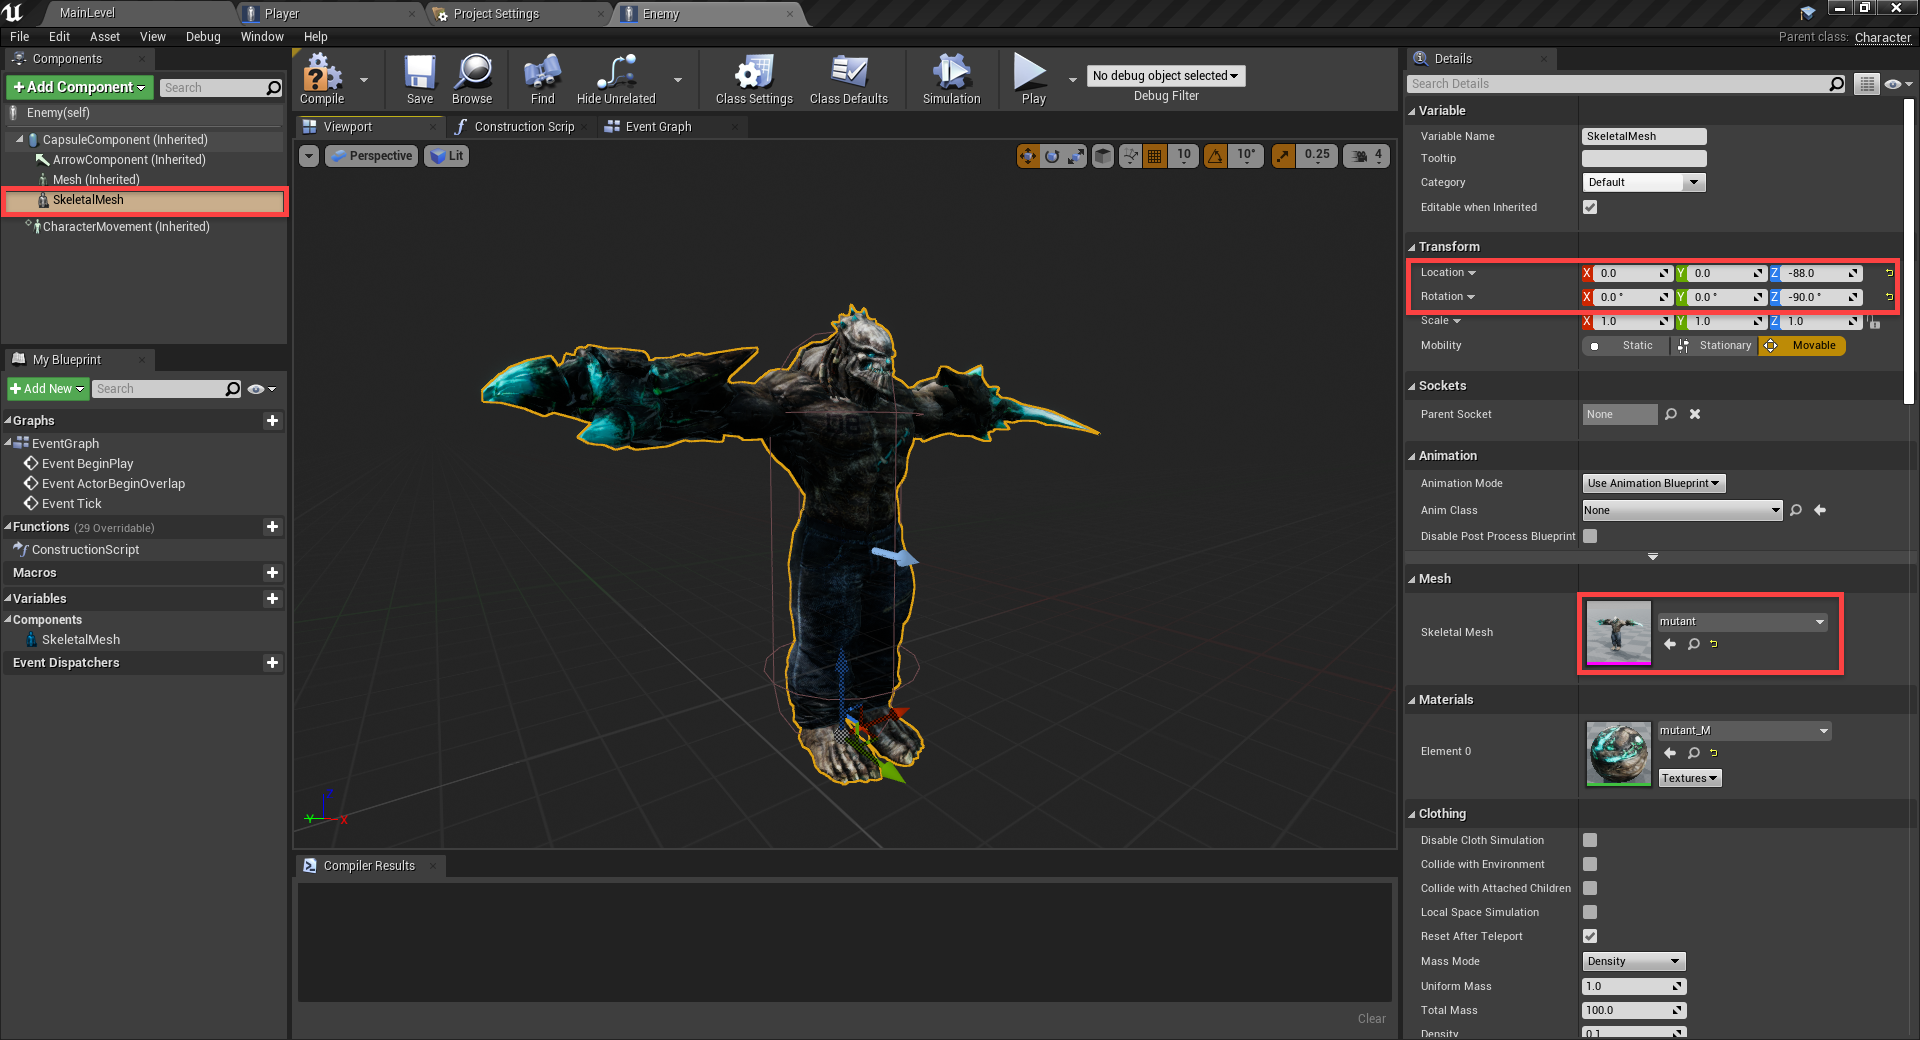
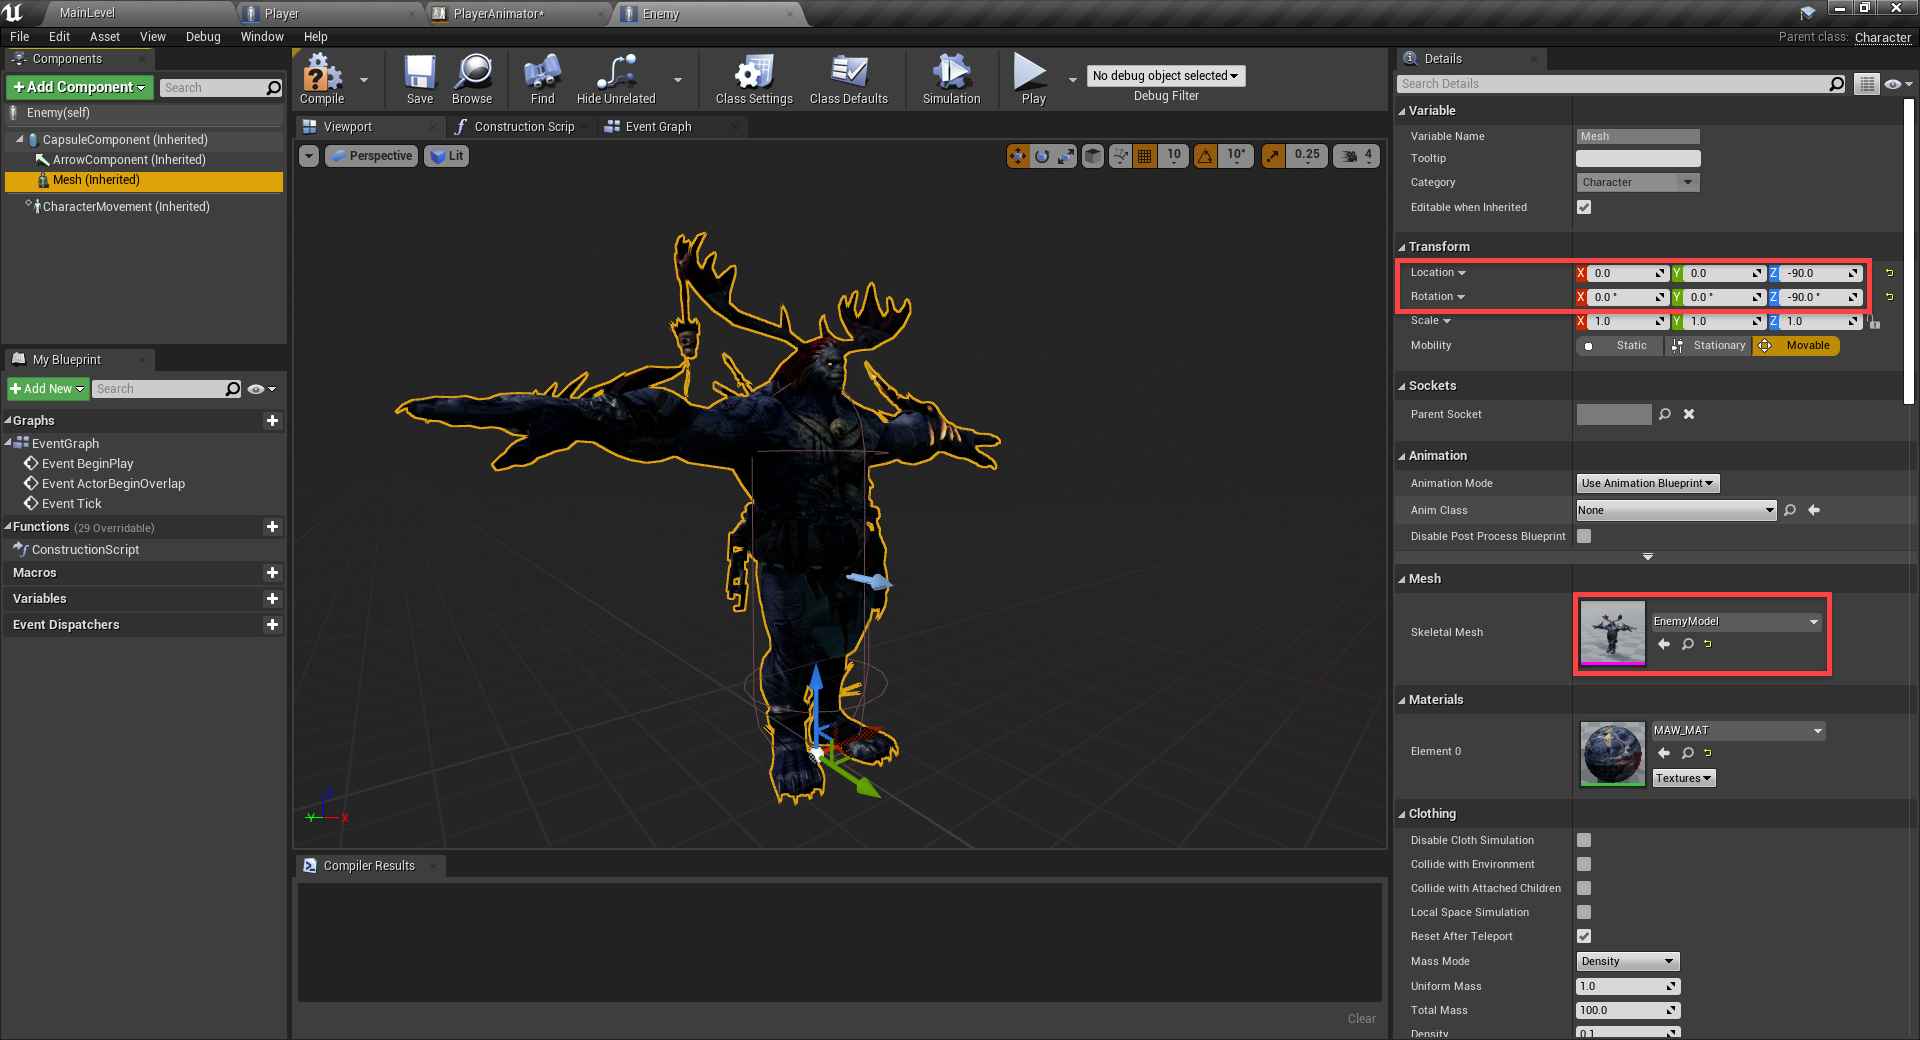
Inside of the blueprint, create a new Skeletal Mesh component.

  • Set the Location to 0, 0, -88
  • Set the Rotation to 0, 0, -90
  • Set the Skeletal Mesh to mutant

Enemy mesh settings in Unreal Engine

Select the CapsuleComponent and set the Scale to 2. This will make the enemy bigger than the player.
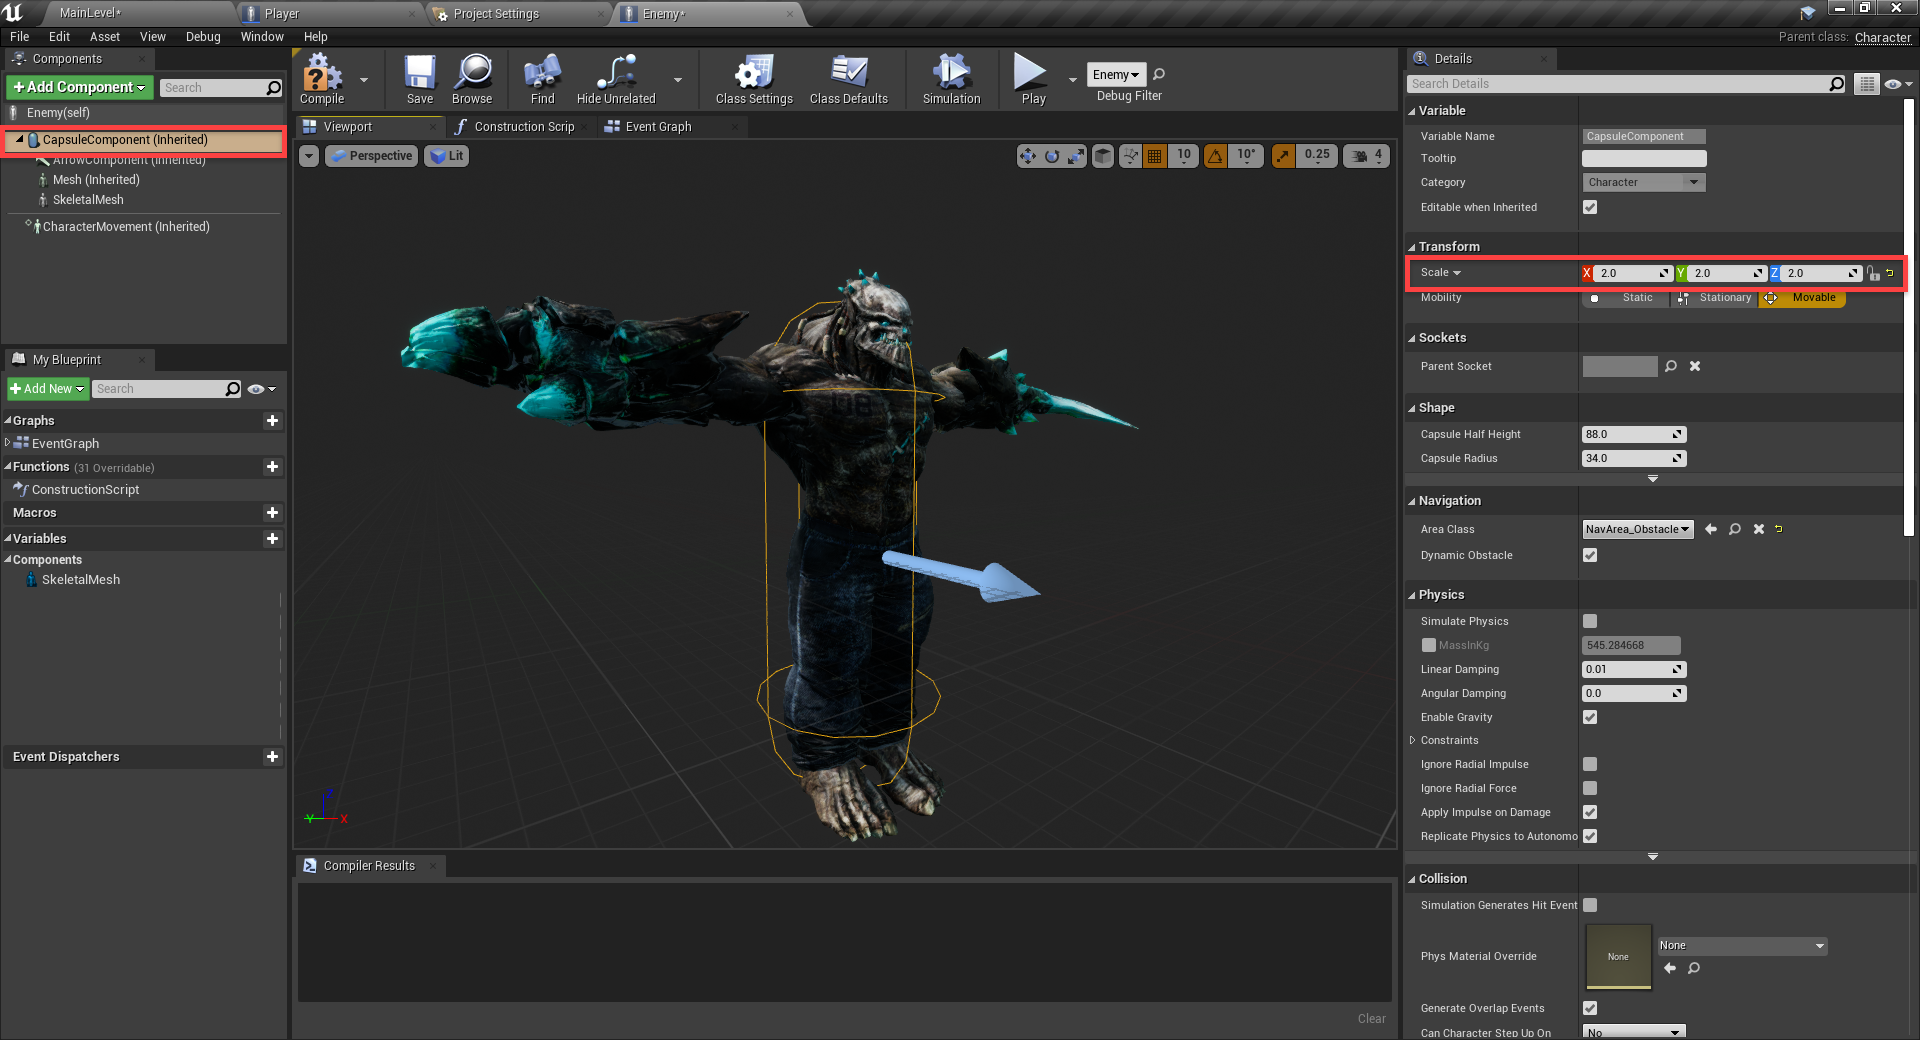
Unreal Engine with capsule collision box added

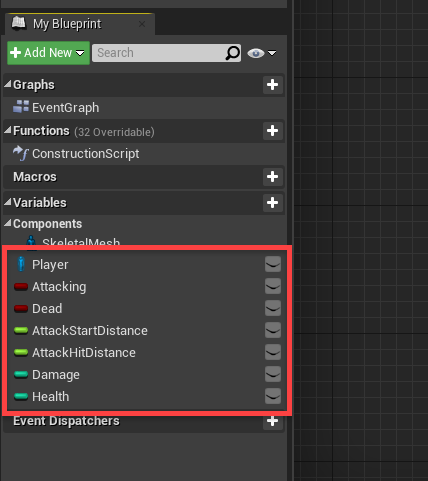
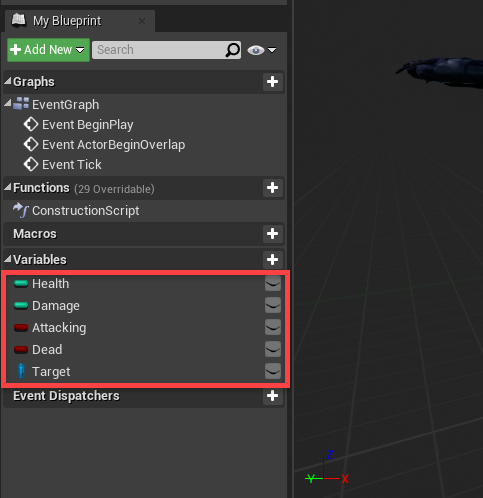
Next, let’s go over to the Event Graph and create our variables.

  • Player (Player)
  • Attacking (Boolean)
  • Dead (Boolean)
  • AttackStartDistance (Float)
  • AttackHitDistance (Float)
  • Damage (Integer)
  • Health (Integer)

Hit the Compile button, then we can set some default values.

  • AttackStartDistance = 300.0
  • AttackHitDistance = 500.0
  • Health = 10

Unreal Engine components for Enemy blueprint

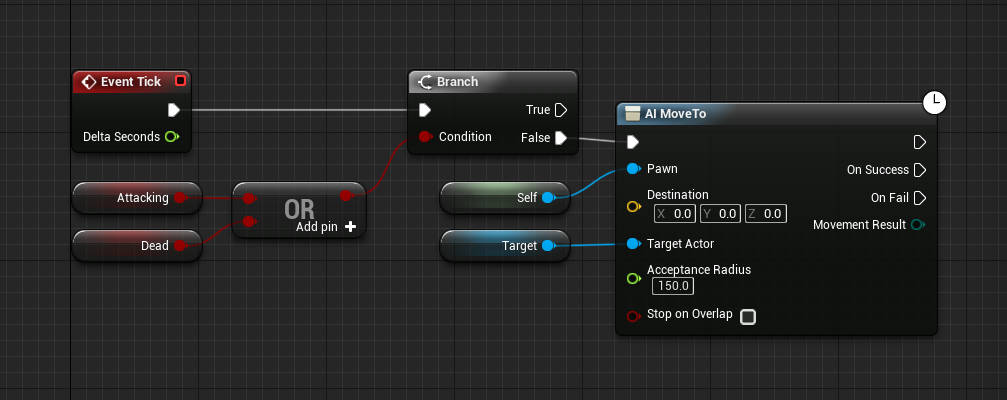
Let’s get started. First, we want to be using the Event Tick node which triggers every frame. If we’re not dead, then we can move towards the player. Fill in the properties as seen below.
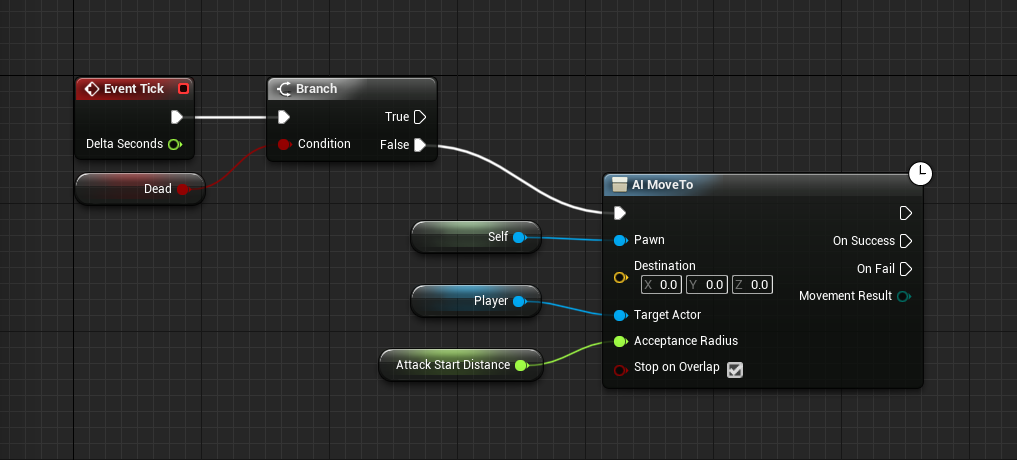
Enemy Event Graph logic for moving towards the player

Back in the level editor, we need to generate a nav-mesh for the enemy to move along.

  1. In the Modes panel, search for the Nav Mesh Bounds Volume and drag it into the scene
  2. Set the X and Y size to 1000
  3. Set the size to 500

You can press P to toggle the nav-mesh visualizer on or off.
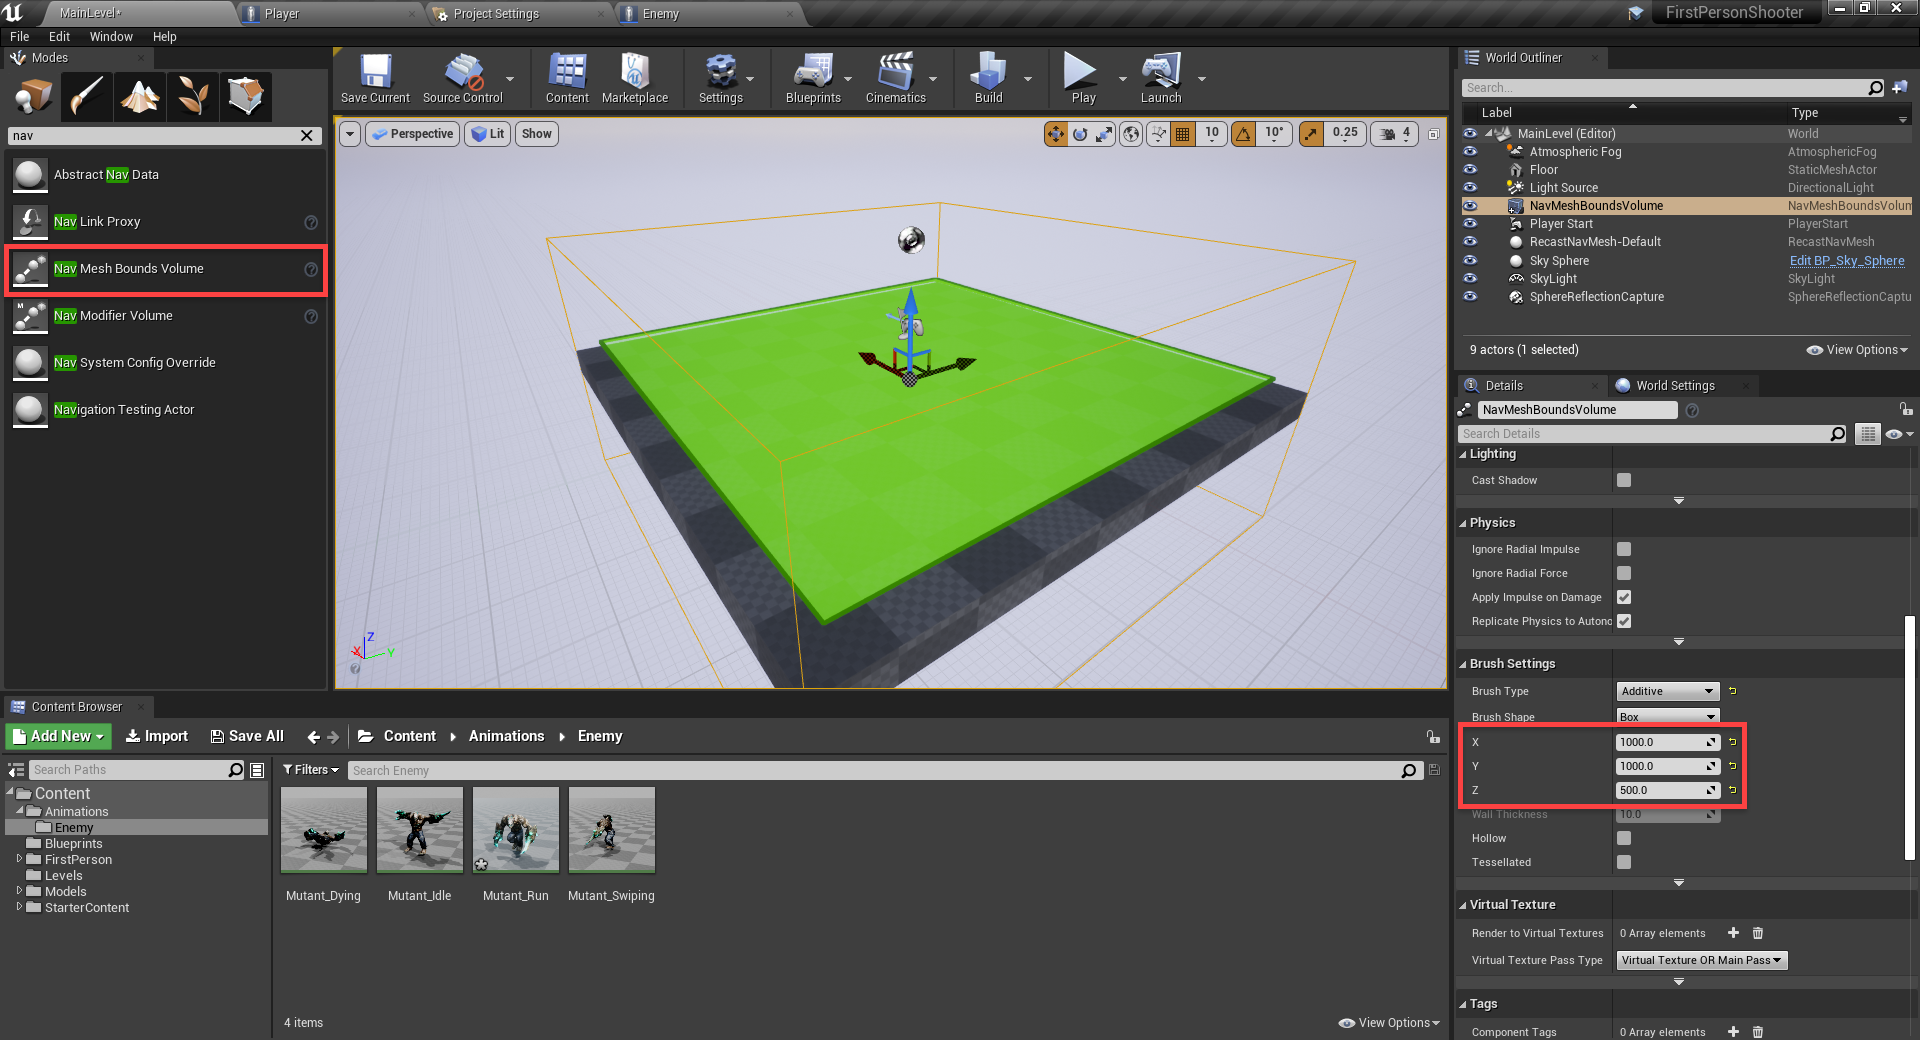
Unreal Engine with nav-mesh visualized for Enemy

You can also increase the size of the platform and nav mesh bound. Back in the enemy blueprint, let’s make it so when the game starts, we set our player variable.
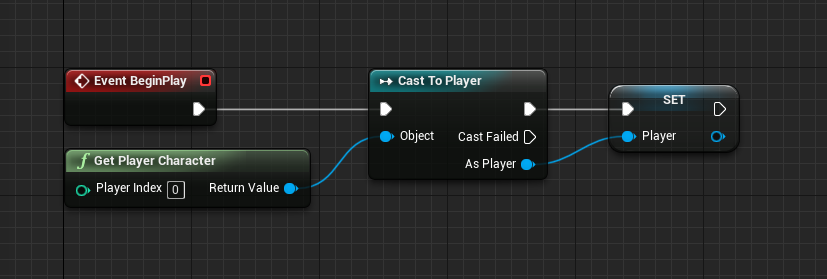
Event Graph with Player variable set

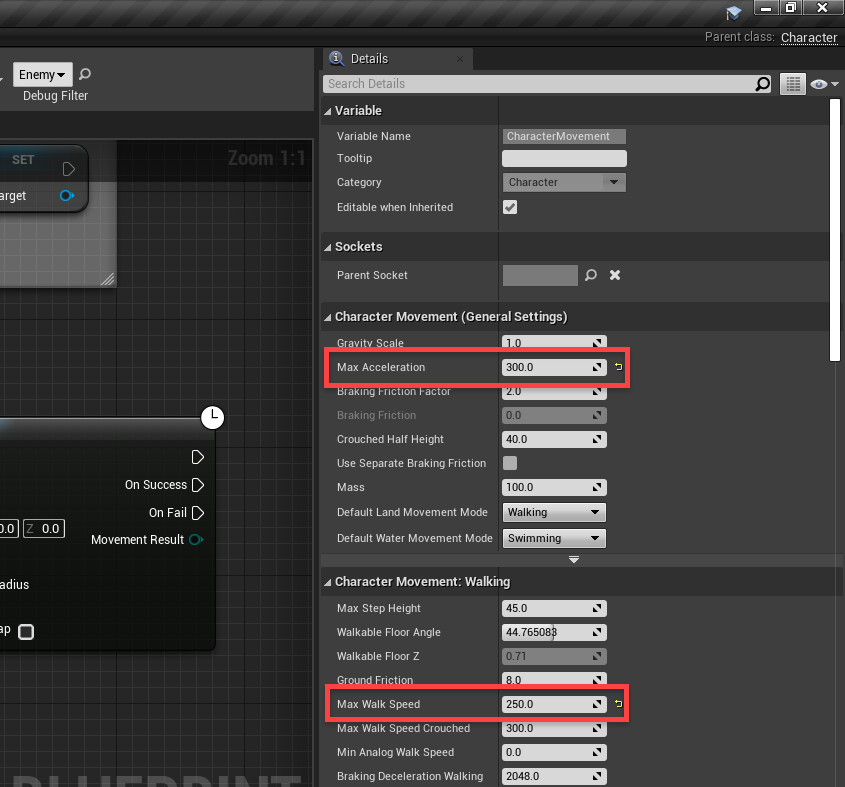
Finally, let’s select the CharacterMovement component and change the Max Walk Speed to 300.
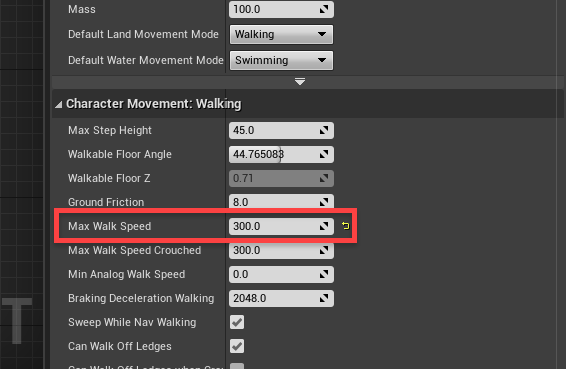
Character walking movement with max walk speed circled

Back in the level editor, let’s increase the size of the ground and nav mesh bounds.
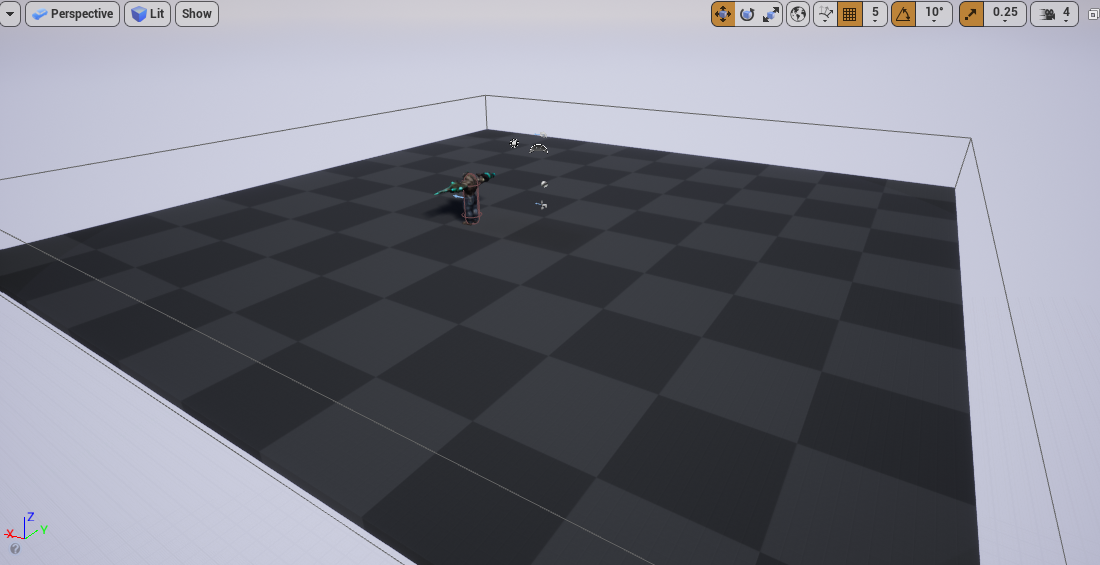
Unreal Engine editor showing navmesh bounds

Let’s set some default values for the variables.

  • AttackStartDistance = 300.0
  • AttackHitDistance = 500.0
  • Damage = 1
  • Health = 10

Enemy Animations

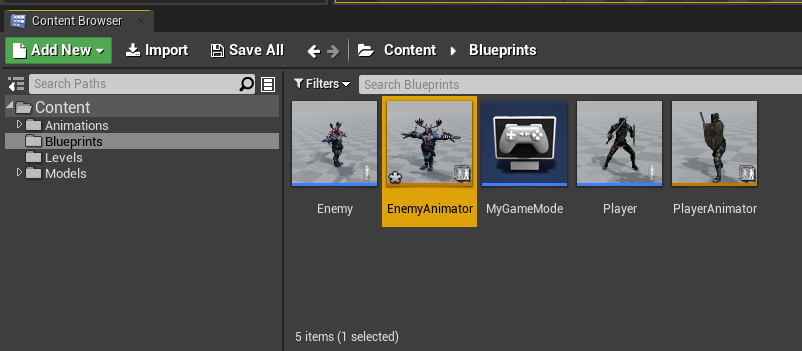
Next, is to create the enemy animations and have those working. In the Blueprints folder, right click, select Animation > Animation Blueprint. Select the mutant for our skeleton, then click Ok. Call this blueprint: EnemyAnimator.
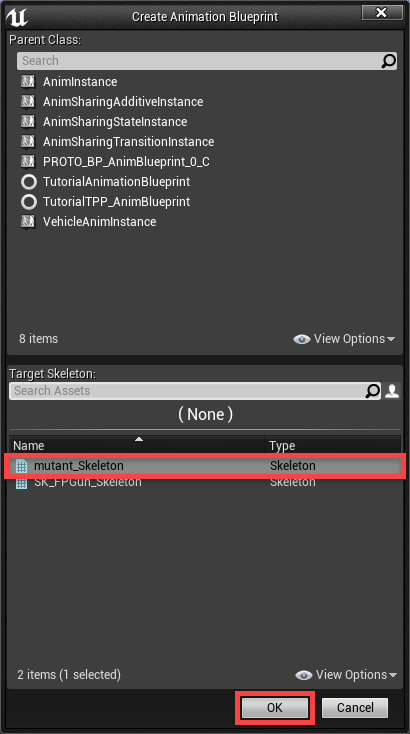
Animation blueprint for enemy

Double-clicking on it will open up the animation editor. On the top-left, we have a preview of our skeleton. At the bottom-left, we have a list of our 4 animations. You can open them up to see a preview in action.
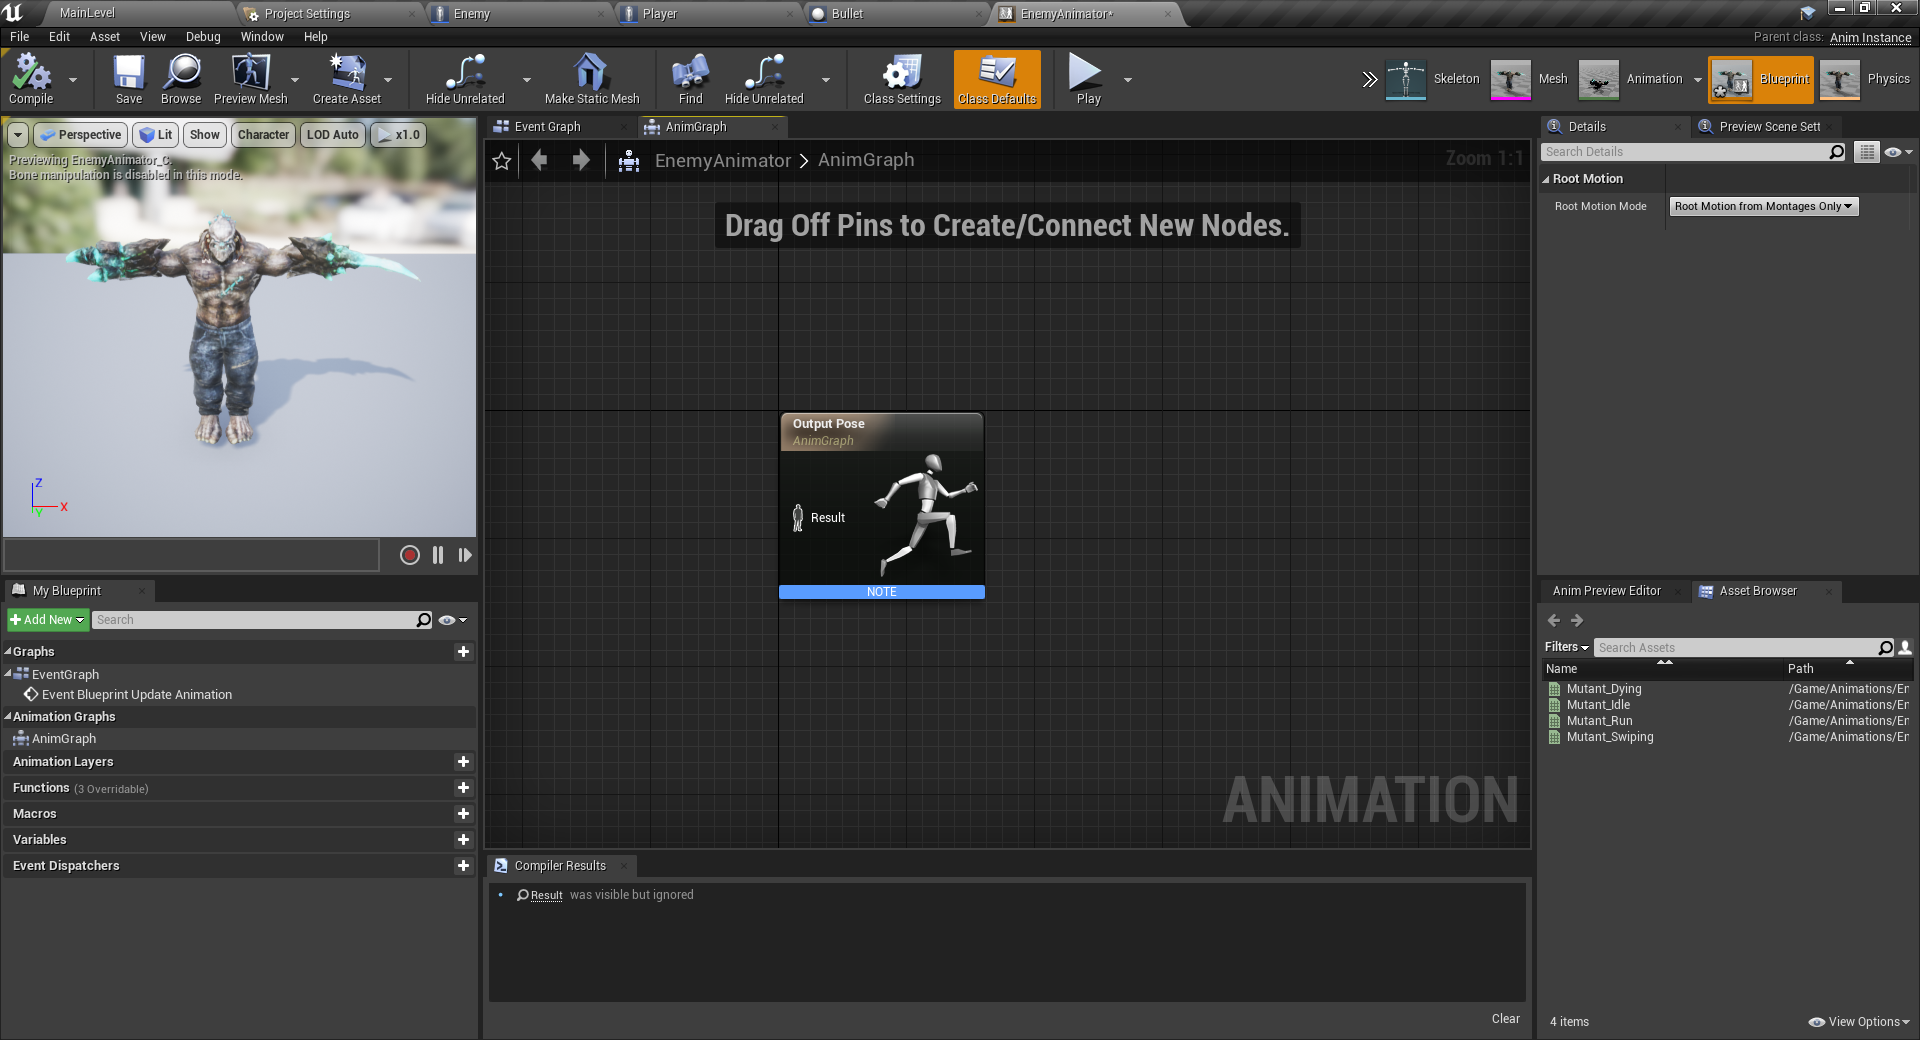
Unreal Engine AnimGraph window

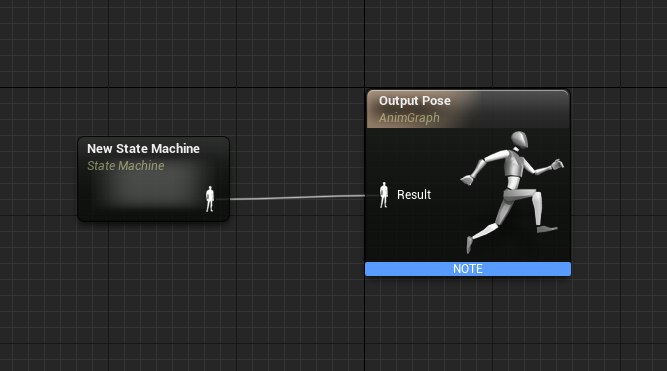
What we want to do now, is in the center graph, right click and create a new state machine. A state machine is basically a collection of logic to determine what animation we currently need to play.
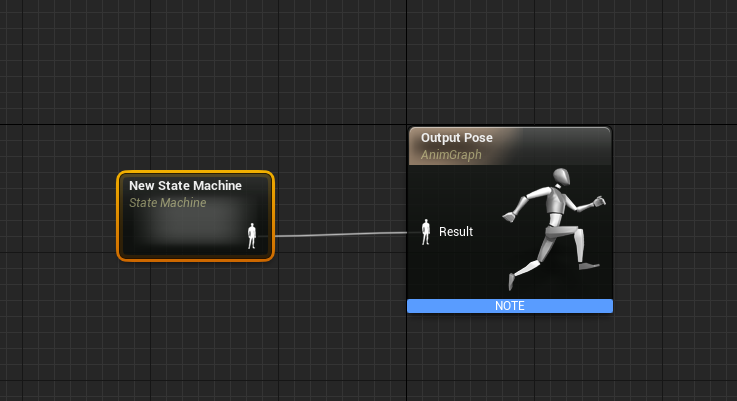
New State Machine node for AnimGraph

You can then double-click on the state machine to go inside of it. This is where we’re going to connect our animations so that the animator can move between them in-game. Begin by dragging in each of the 4 animations.
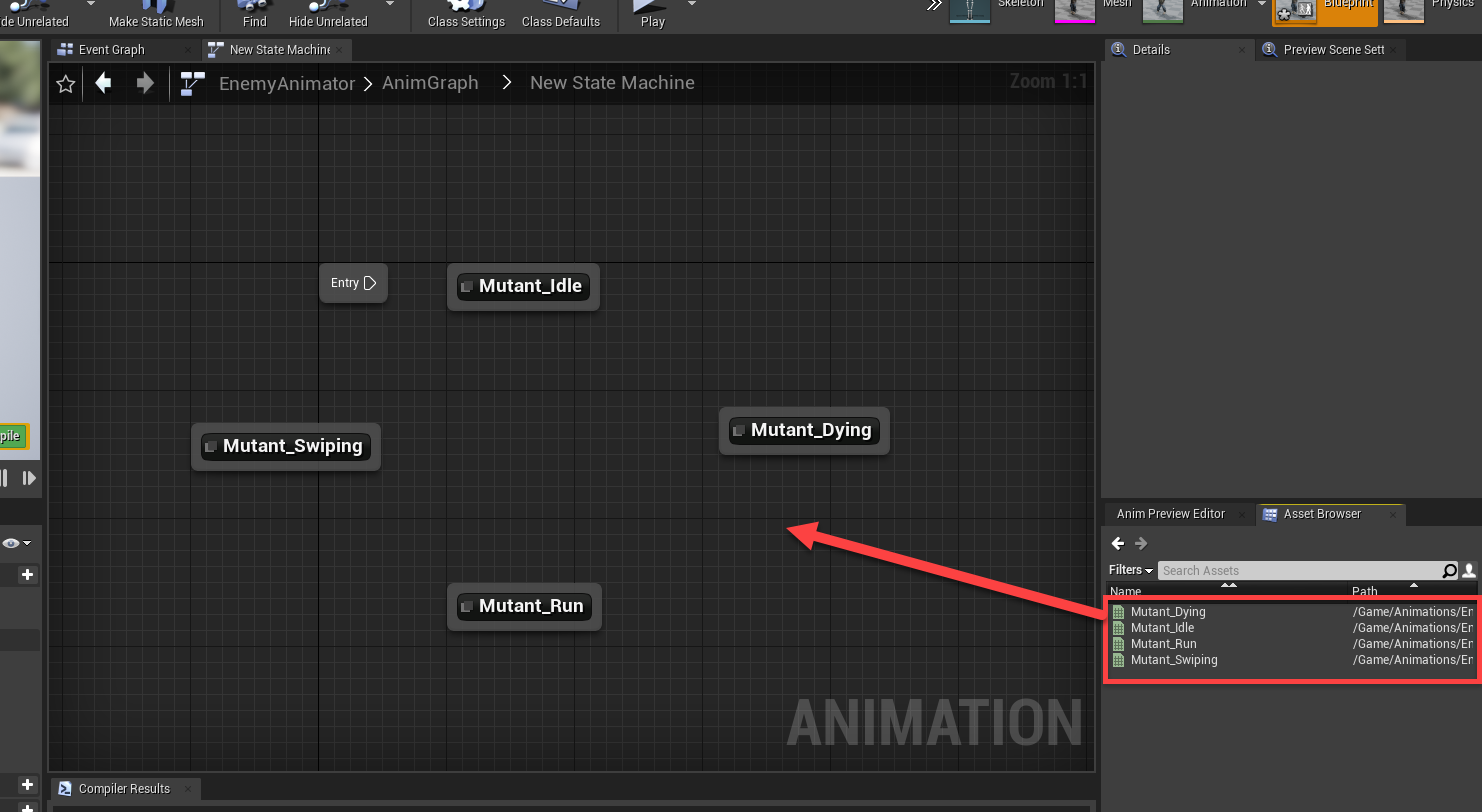
Animation assets added to Enemy State Machine

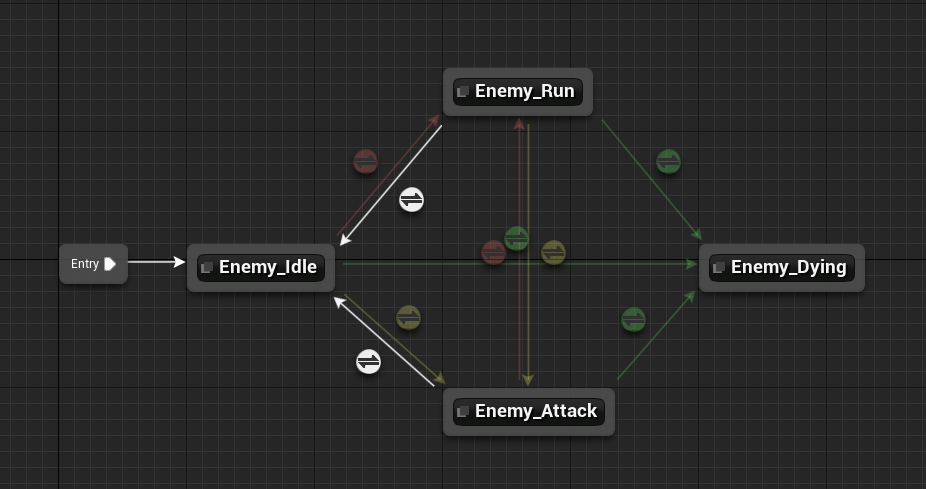
Then we need to think… If we’re idle, what animations can we transition to? All of them, so on the idle state, click and drag on the border to each of the three others.
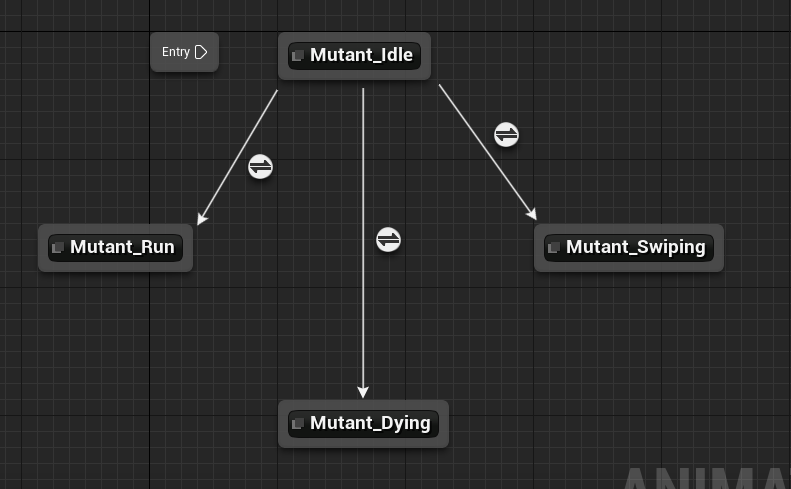
Animation state machine with various connections

We then need to do the same with the other states. Make the connections look like this:
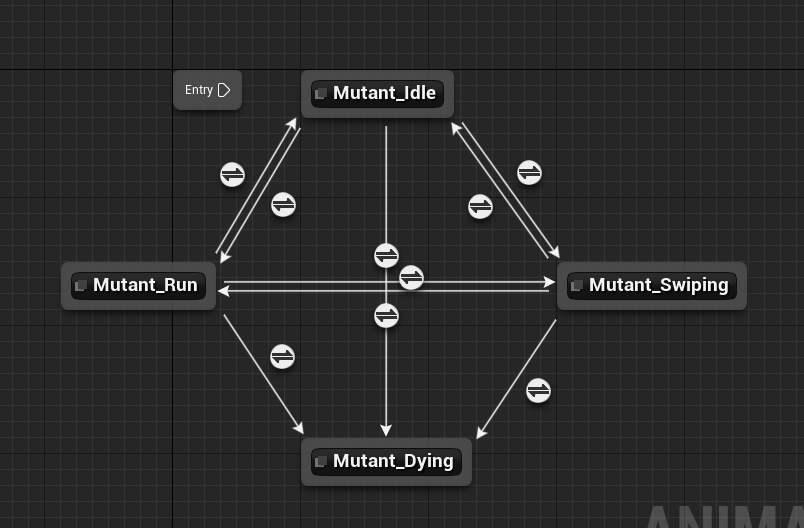
State machine with various other connections for enemy animations

In order to apply logic, we need to create three new Boolean variables. Running, Attacking and Dead.
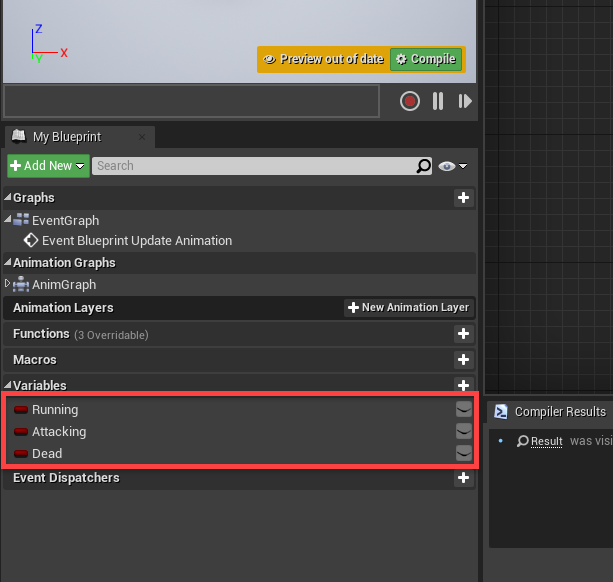
Variables available for Enemy in FPS Unreal project

You’ll see that next to the state transition lines is a circle button. Double-click on the one for idle -> run. This will open up a new screen where we can define the logic of moving along this transition. Drag in the Running variable and plug that into the Can Enter Transform node. So basically if running is true, then the transition will happen.
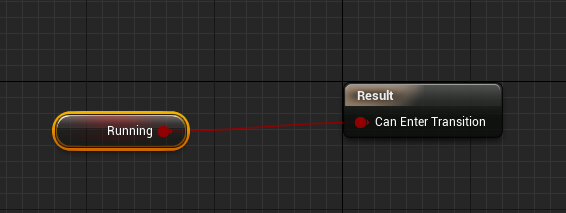
Running variable node added for Enemy

Back in the state machine open the run -> idle transition. Here, we want to do the opposite.

NOT node to project state machine logic in Unreal Engine

Go through and fill in the respective booleans for all of the transitions.

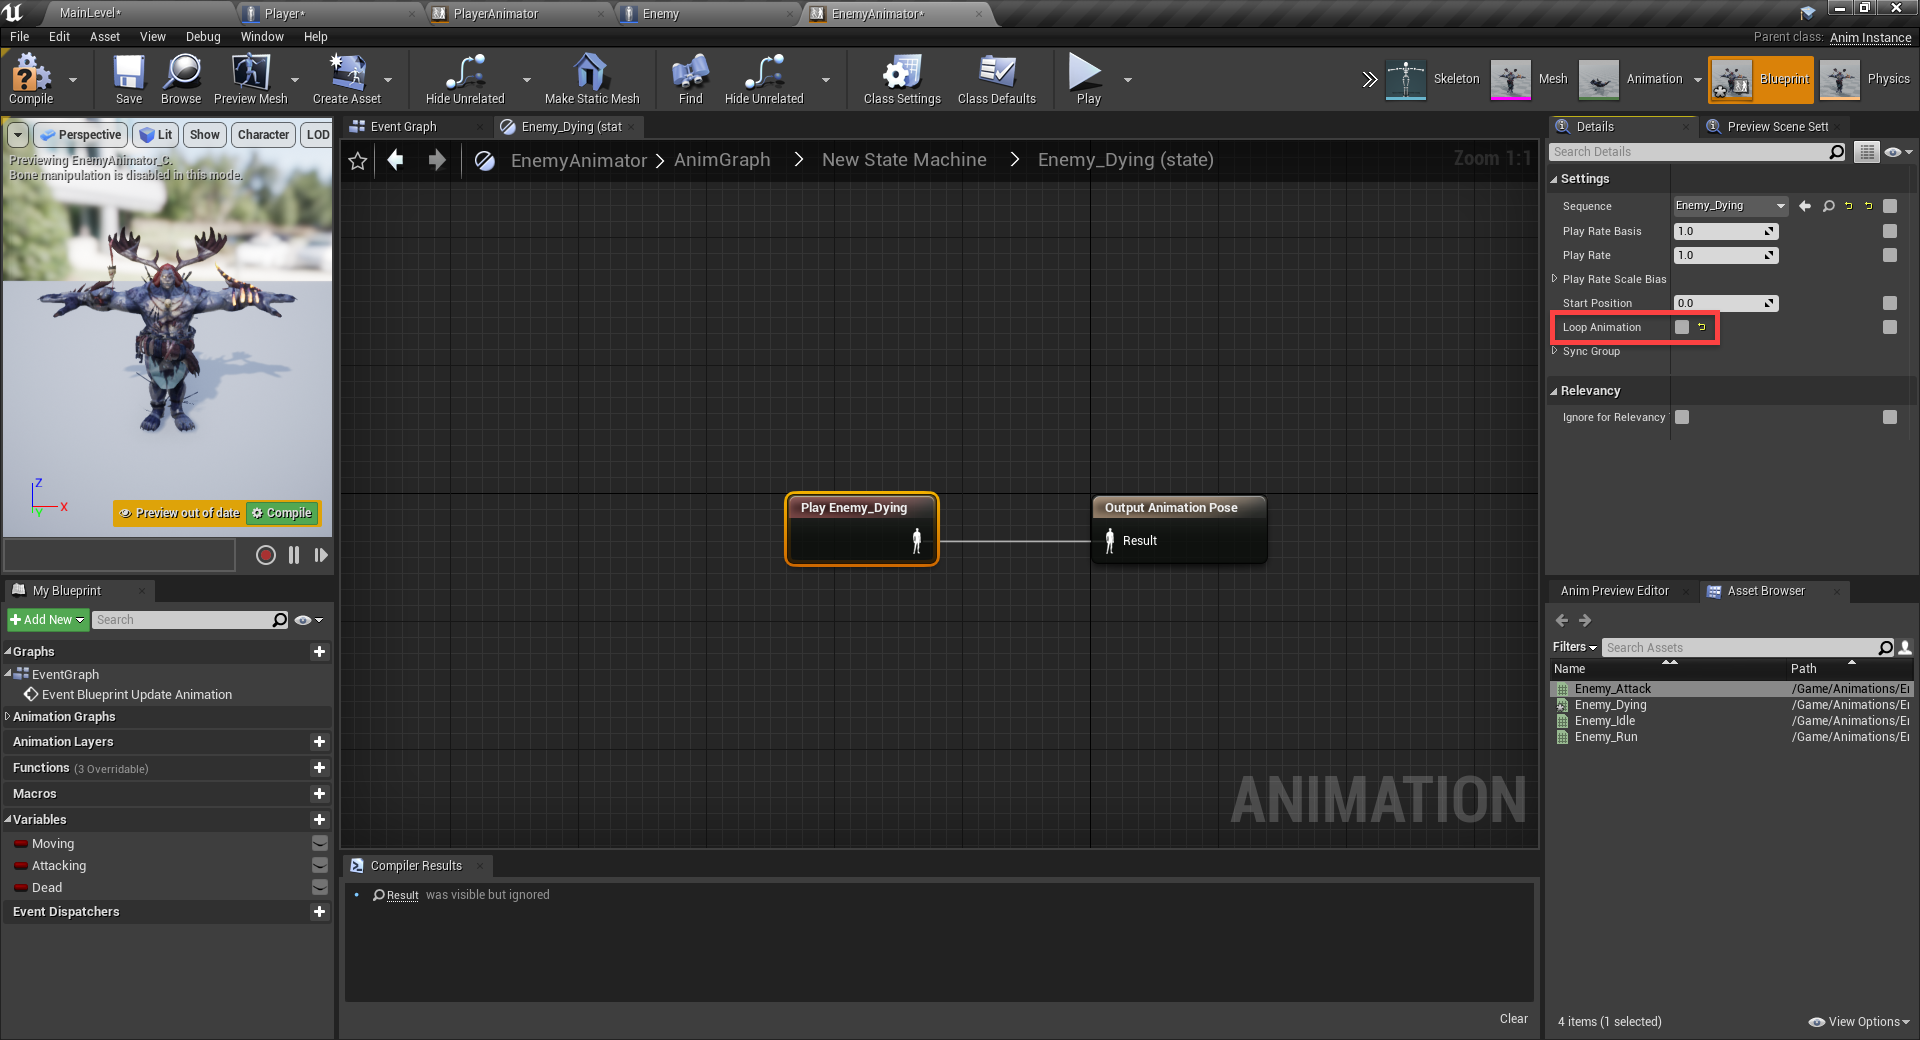
While we’re at it, let’s double click on the Mutant_Dying state, select the state and disable Loop Animation so it only plays once.
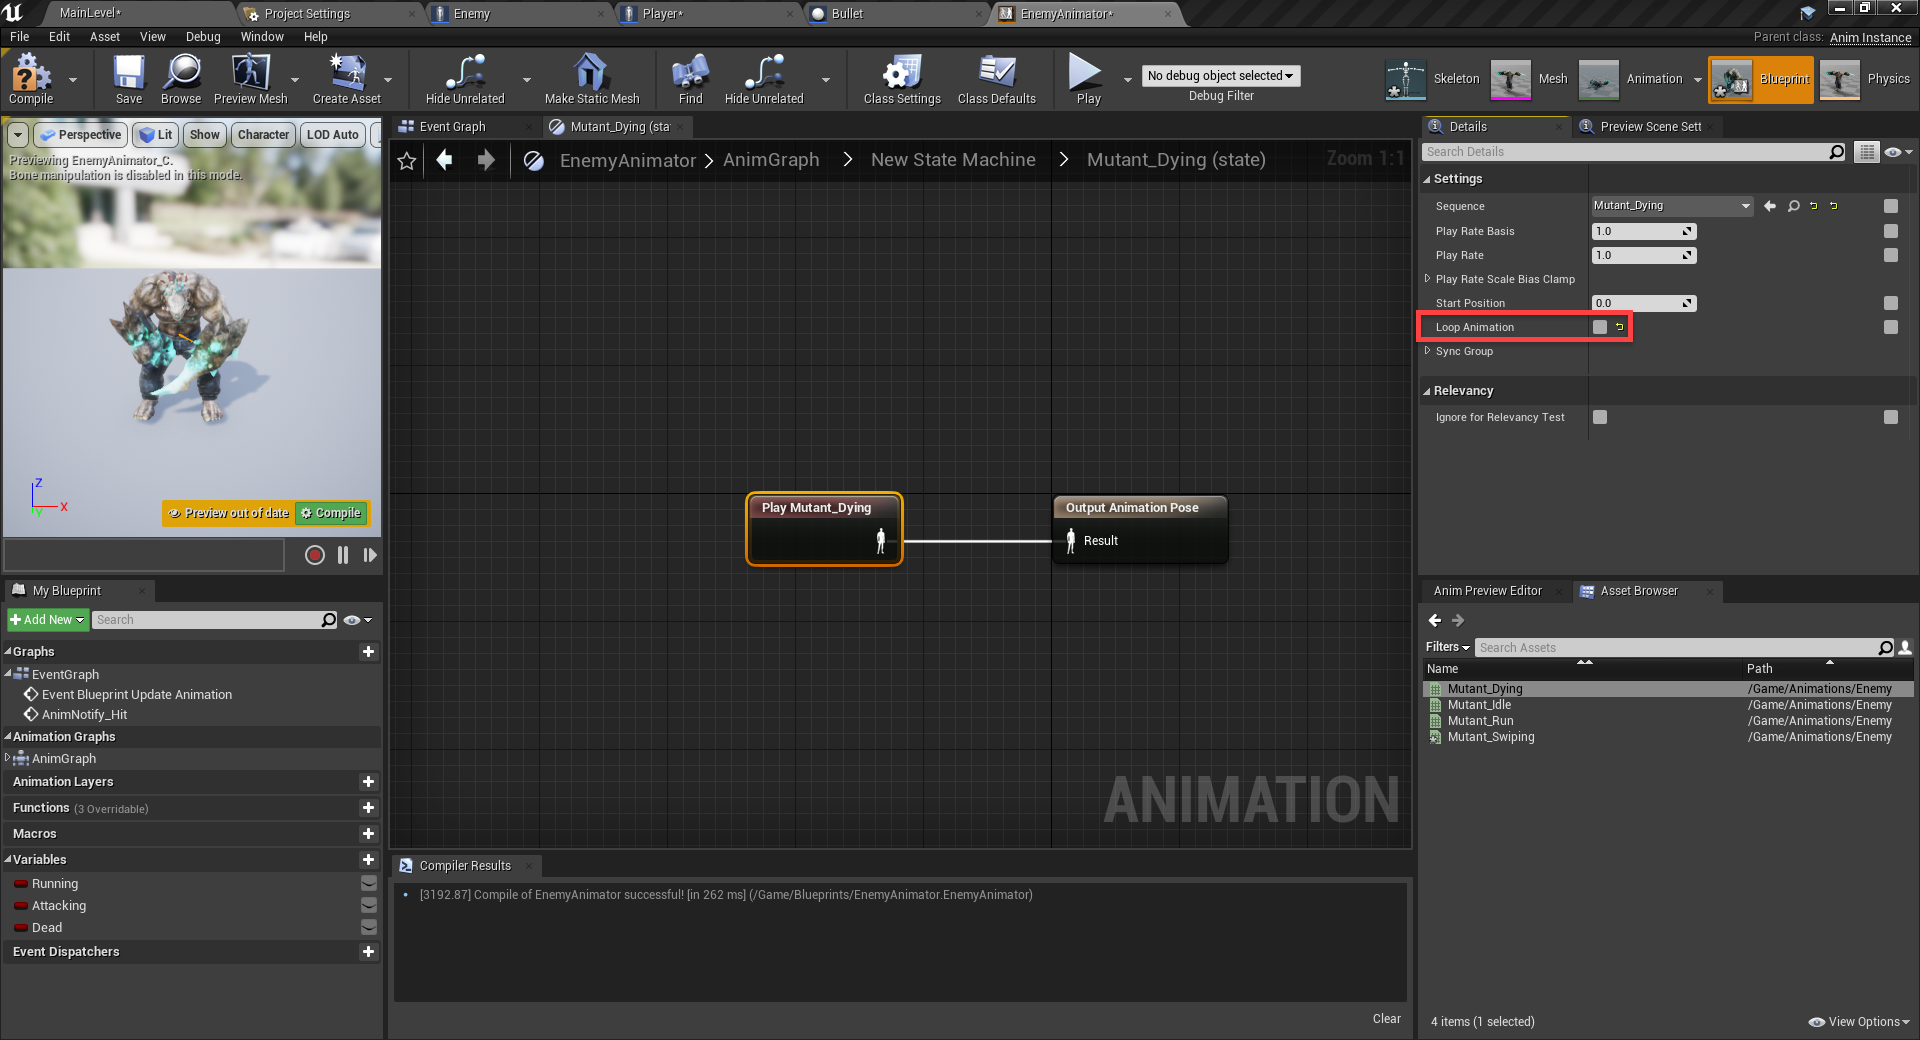
Enemy dying logic added to state machine

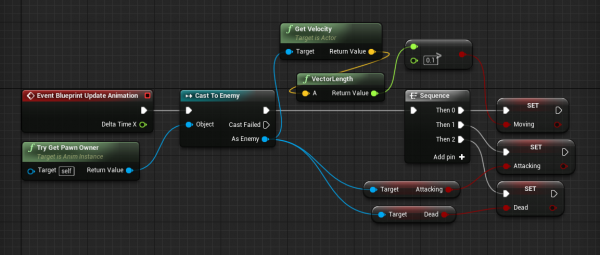
At the top of the state screen is an Event Graph tab. Click that to go to the graph where we can hook our three variables up to the enemy blueprint. First, we need to cast the owner to an enemy, then connect that to a Sequence node.

Event Graph for enemy with animation nodes

To set the running variable, we’re going to be checking the enemy’s velocity.

Logic to check enemy velocity

For attacking, we just want to get the enemy’s attacking variable.

Logic to check if enemy is attacking

The same for dead.

Logic to check if enemy is dead

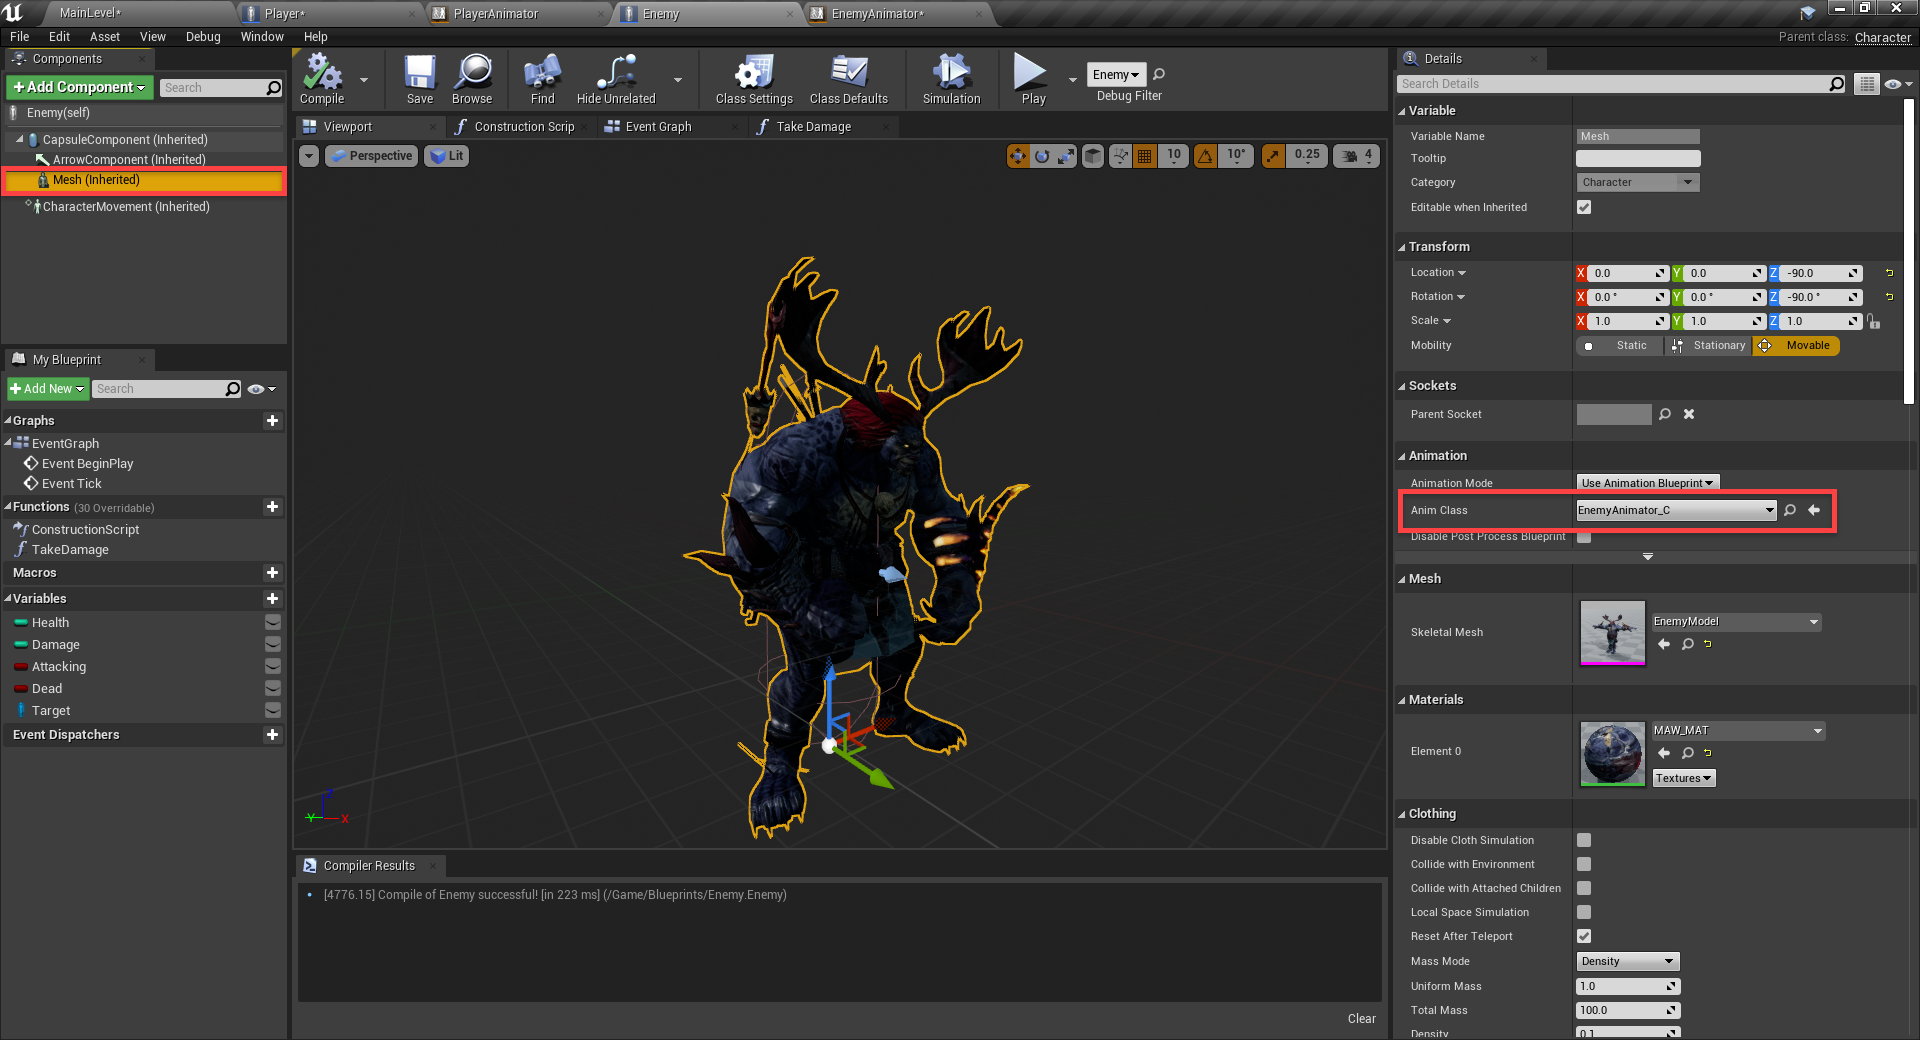
Back in the Enemy blueprint, select the SkeletalMesh component and set the Anim Class to be our new EnemyAnimator.
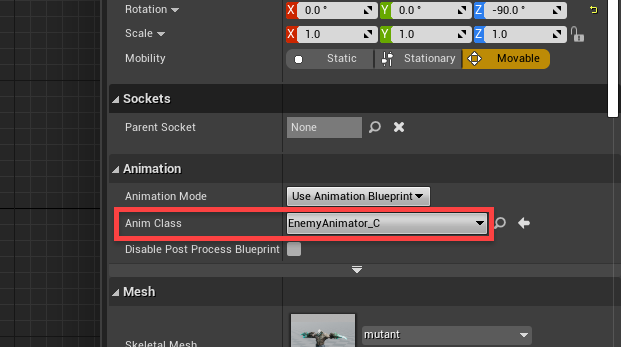
Enemy with Anim Class added in Unreal Engine

Press play and see the results!

Attacking the Player

In the Enemy blueprint, let’s continue the flow from the AIMoveTo component’s On Success output. We basically want to check if we’re not current attacking. If so, then set attacking to true, wait 2.6 seconds (attack animation duration), then set attacking to false.

Attack logic for enemy to attack FPS player

If you press play, you should see that the enemy runs after you, then attacks. For it to do damage though, we’ll first need to go over to the Player blueprint and create two new variables. Compile and set both default values to 10.
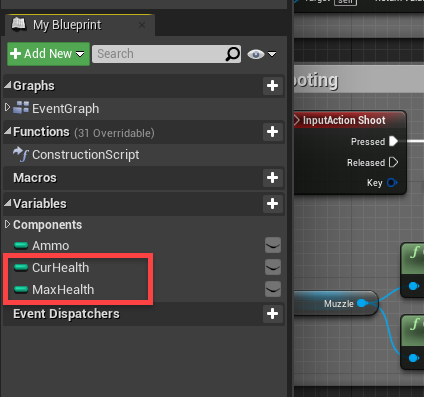
Unreal Engine components for Health

Next, create a new function called TakeDamage.
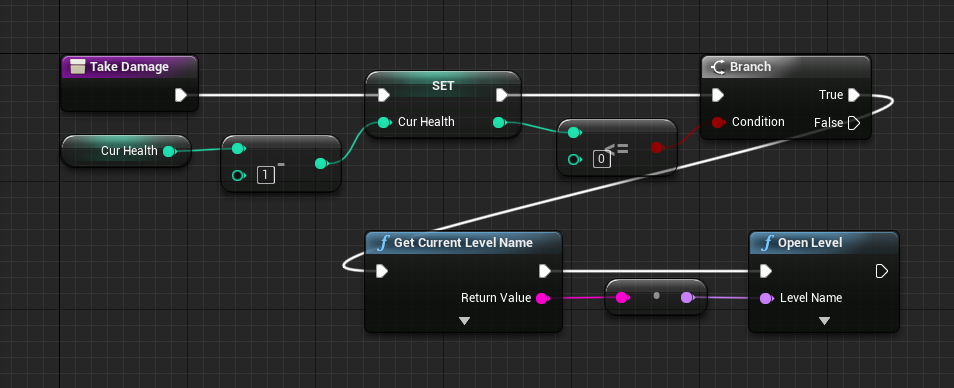
Logic to take damage for FPS Unreal Engine project

Back in the Enemy blueprint, create a new function called AttackPlayer.
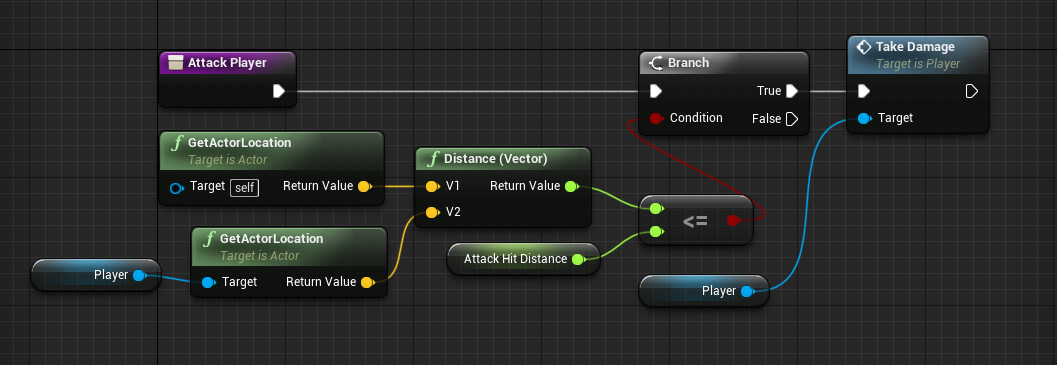
Enemy logic for attacking the player in FPS

To trigger this function, we need to go to the enemy animation editor and double-click on the swiping animation in the bottom-left. Here, we want to drag the playhead (bottom of the screen) to the frame where we want to attack the player. Right click and select Add Notify… > New Notify…

Call it Hit.
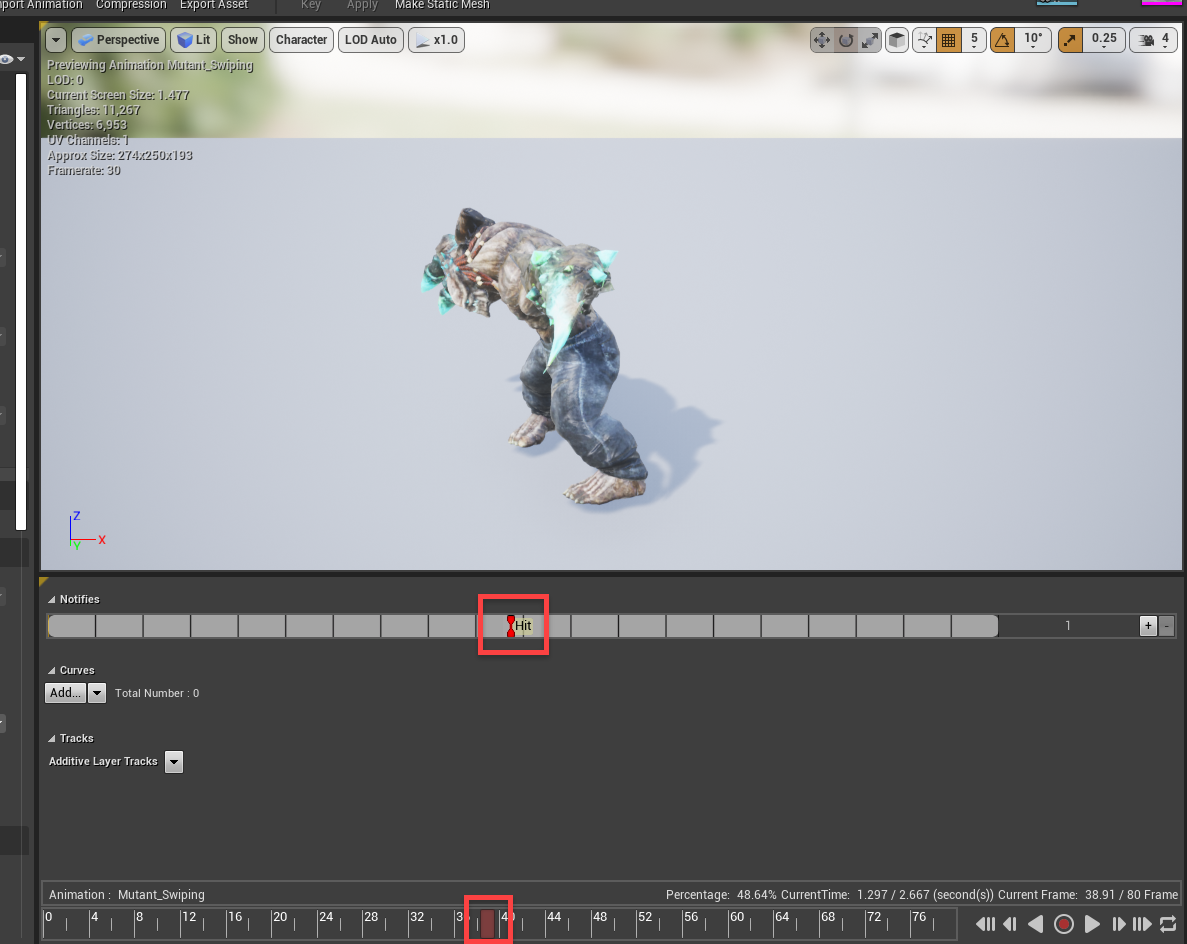
Hit trigger added to enemy attack

Then back in the animator event graph, we can create the AnimNotify_Hit event. This gets triggered by that notify.
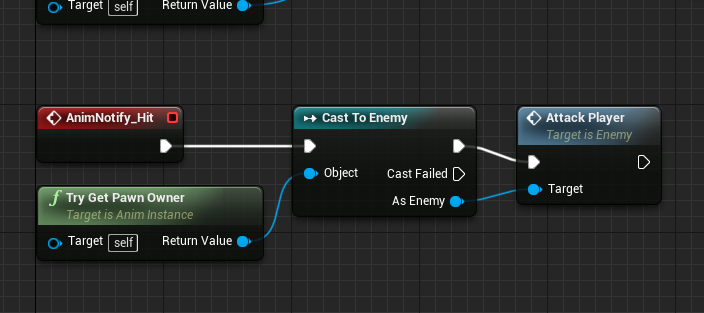
AnimNotify Hit node added to Event Graph

Now you can press play and see that after 10 hits, the level will reset.

Shooting the Enemy

Finally, we can implement the ability for the player to kill the enemy. In the Enemy blueprint, create a new function called TakeDamage. Give it an input of DamageToTake as an integer.
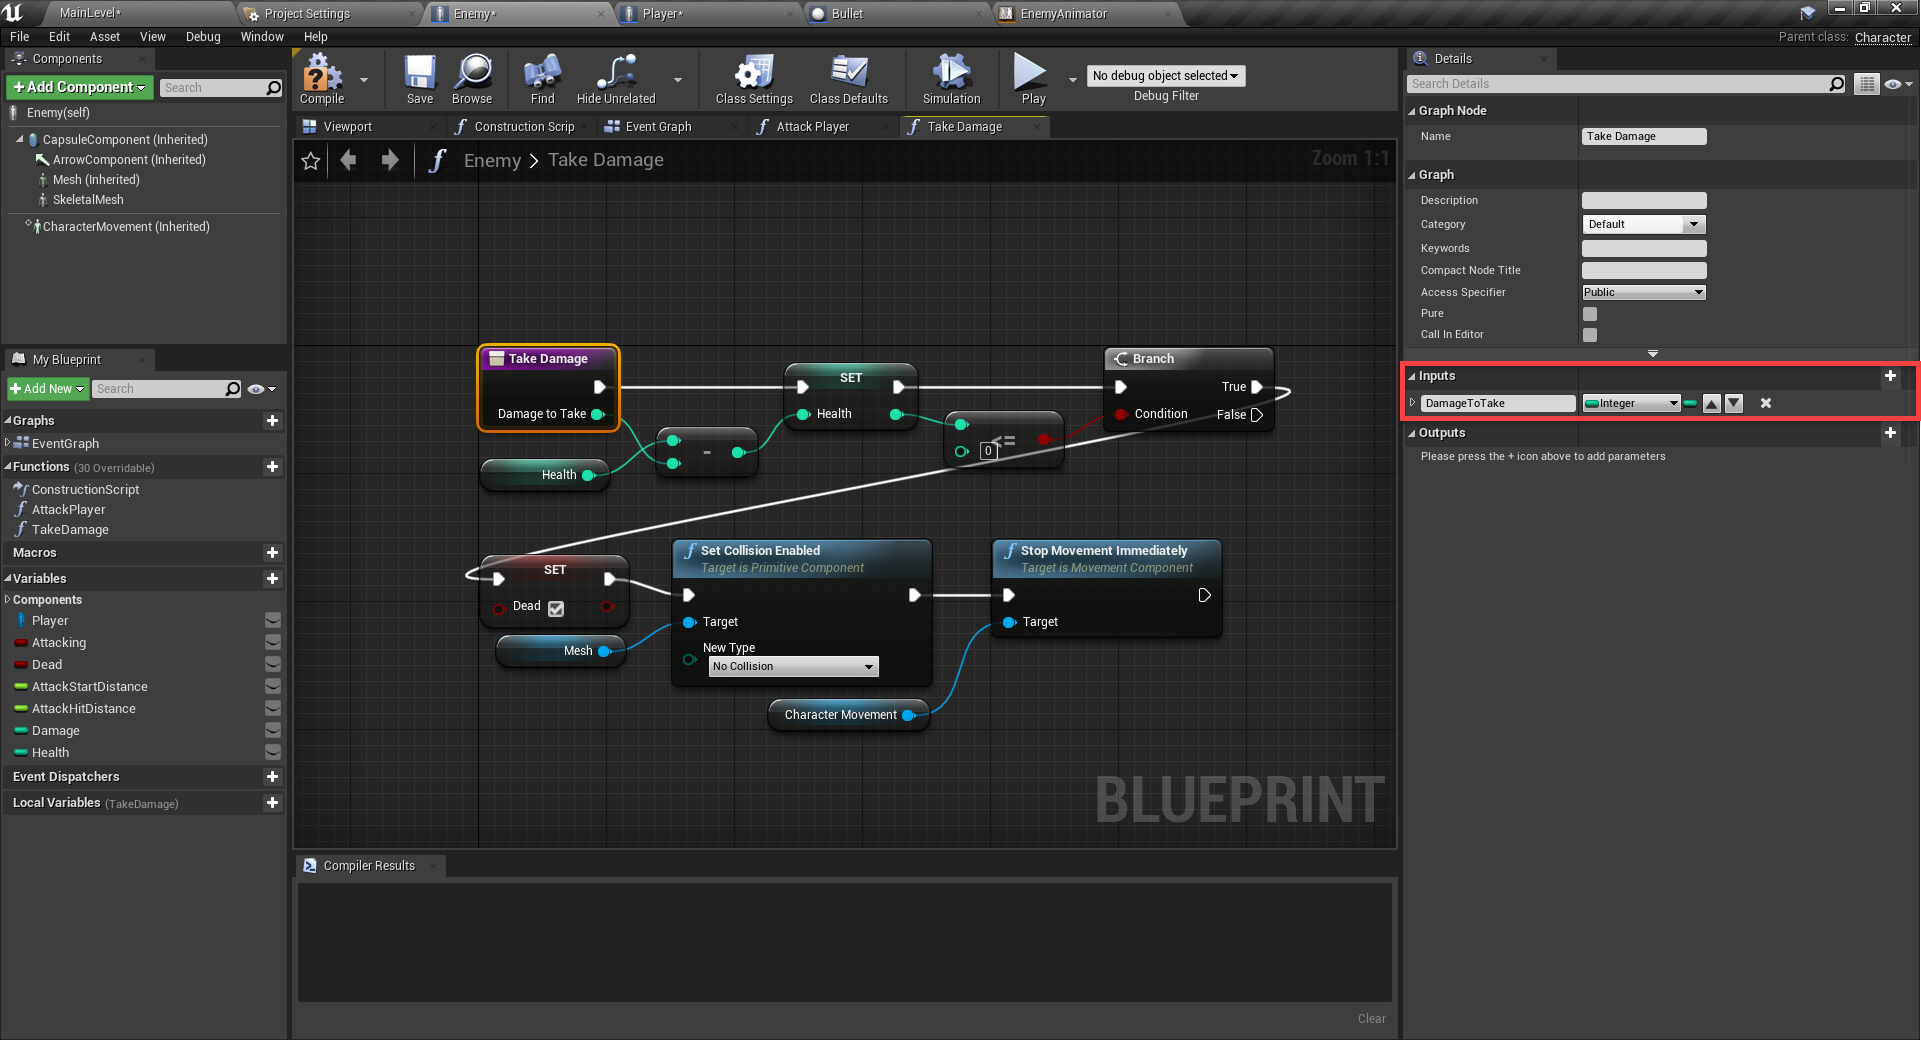
Inputs Details circled in Unreal Engine Event Graph

Then in the Bullet blueprint, we can check for a collider overlap and deal damage to the enemy.

Bullet blueprint checking for collider in Unreal Engine

If you press play, you should be able to shoot the enemy and after a few bullets, they should die.

Conclusion

And there we are!

Thank you for following along with the tutorial! You should now have a functional first-person shooter with a player controller and enemy AI – complete with animations and dynamic state machine!  Not only will your players be able to dash about the stage jumping and shooting at their leisure, but the health mechanics create a challenge to stay alive.  You’ve accomplished this and more with just Unreal Engine’s blueprinting system as well, learning how to control nodes to provide a variety of functionality.

From here, you can expand the game or create an entirely new one.  Perhaps you want to add more enemies, or create an exciting 3D level where enemies might be just around that shadow-y corner!  The sky is the limit, but with these foundations you have all you need to get started with robust FPS creation in Unreal Engine.

We wish you luck with your future games!

Unreal Engine FPS game project


Creating an Arcade-Style Game in the Unreal Engine

$
0
0

Introduction

Complex games can be a lot of fun, but sometimes all players want to do is sit back and relive the retro days where simple mechanics and goals were the reigning champs.  As a developer, not only might you want to create your own retro, arcade-style types of games (with some modern flair), but it can also be a great beginner’s project to start your game development skills!

As such, in this tutorial, we’ll be creating a road-crossing arcade game in the Unreal Engine. The game will feature a player controller, coins, cars, and an end goal – capturing the sorts of straight-forward mechanics you’d expect.  Additionally, we’ll be working heavily with Unreal Engine’s unique Blueprinting system, so no coding from scratch is necessary!

If this is your first time using the Unreal Engine, we recommend you follow our intro to Unreal Engine tutorial first, as this one won’t be going over the basics of the engine itself.

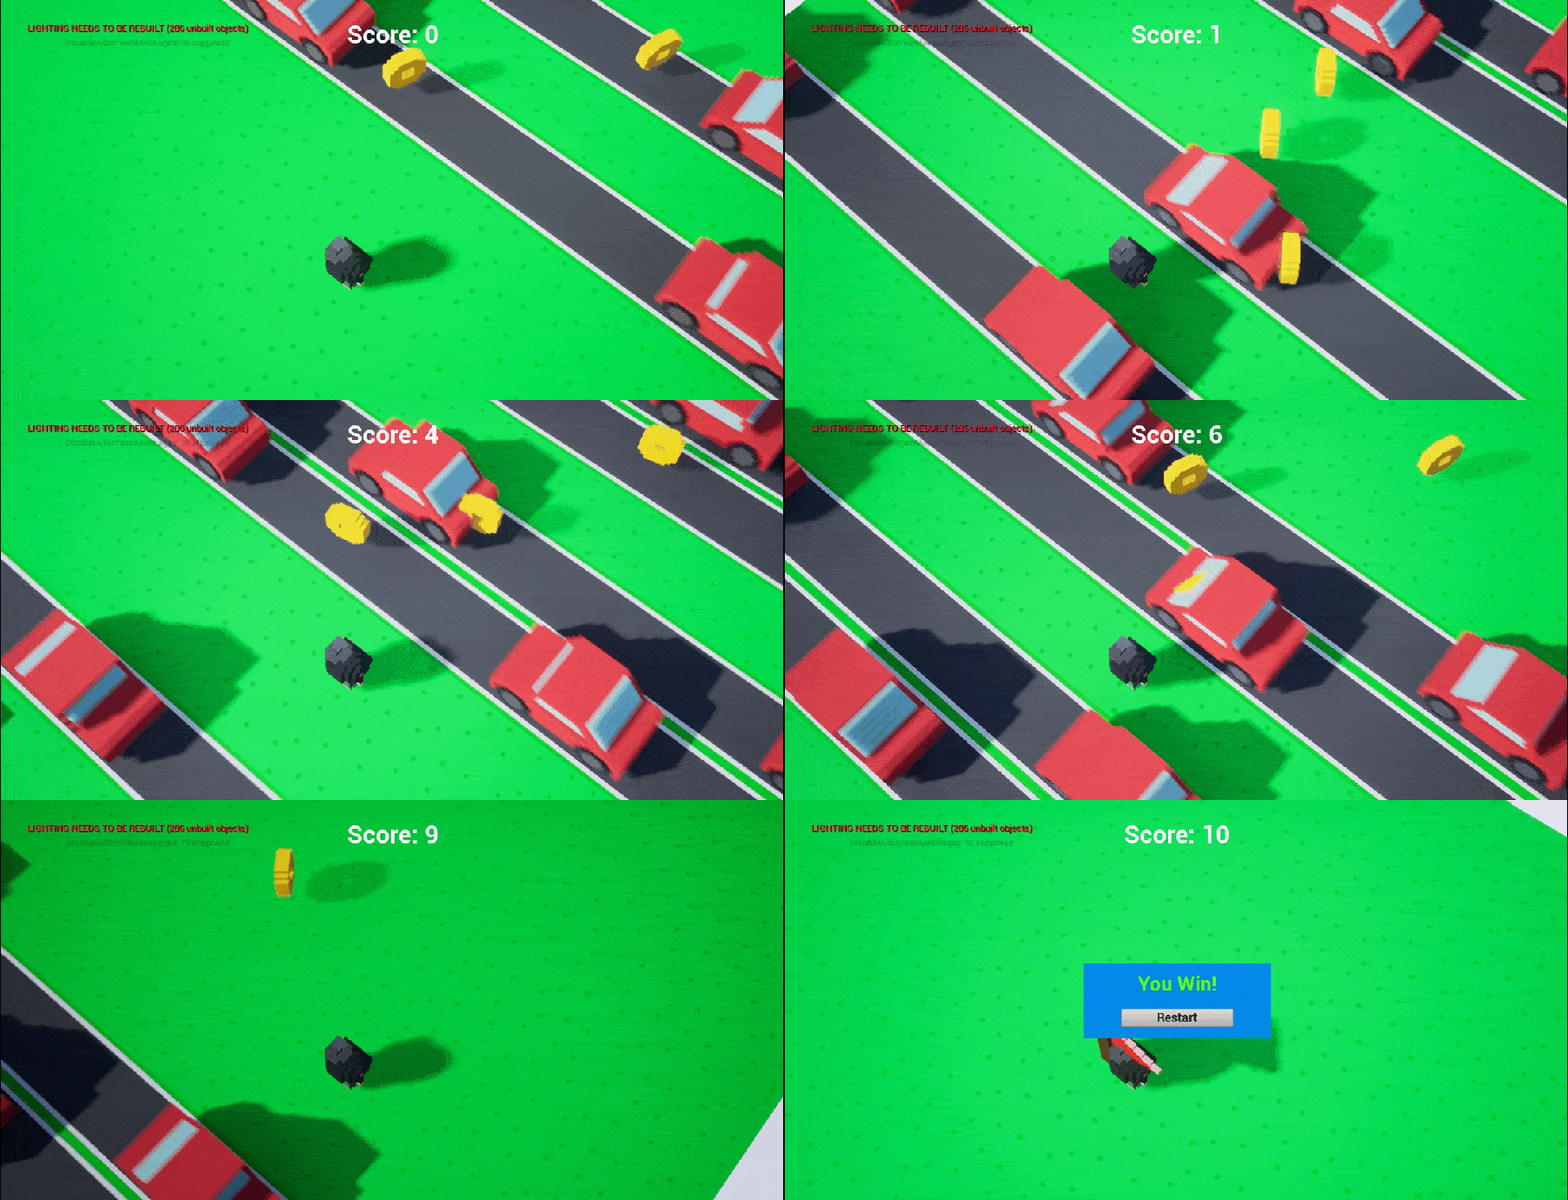
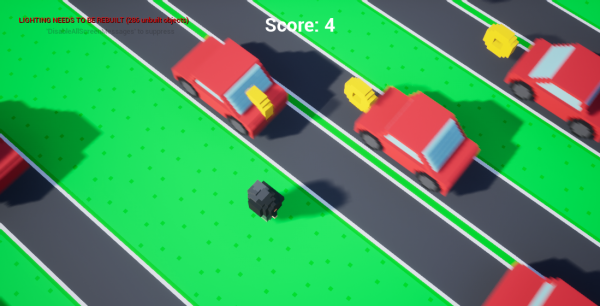
GIF of road-crossing style game in Unreal Engine

Don't miss out! Offer ends in
  • Access all 400+ courses
  • New courses added monthly
  • Cancel anytime
  • Certificates of completion

Project Files

For this project, we’ll be needing some 3D models made in MagicaVoxel.

You can also download the compete project with all the blueprints, levels, settings and models.

Creating the Project

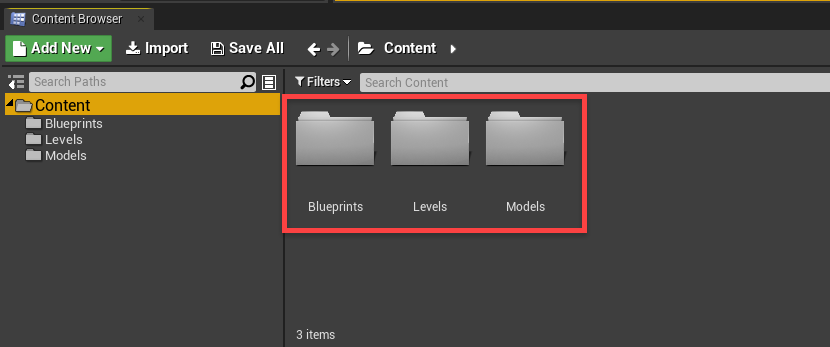
To begin, create a new project (no starter content needed). Then we’re going to create three new folders in the Content Browser.

  • Blueprints
  • Levels
  • Models

Unreal Engine Content Browser

Next, save the open level to the Levels folder as MainLevel.

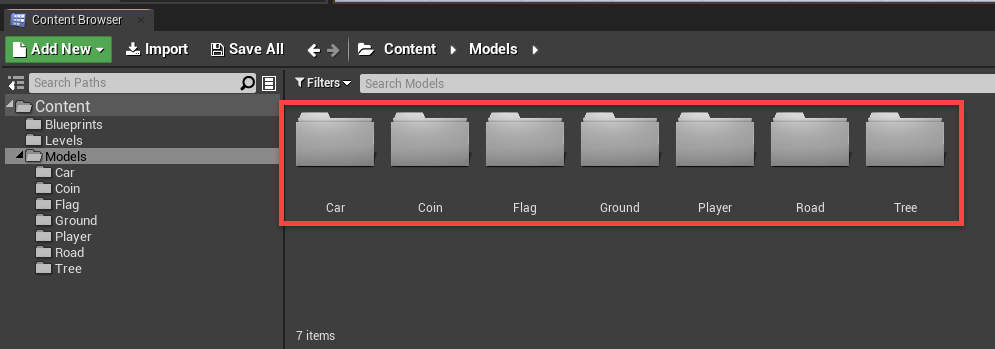
We’ll be using some pre-made 3D models from MagicaVoxel, so download the included assets (top of the tutorial) and drag the contents inside of the Models folder, into the Content Browser in our Models folder. Like so:

Unreal Engine Content Browser with game project assets added

Creating the Player

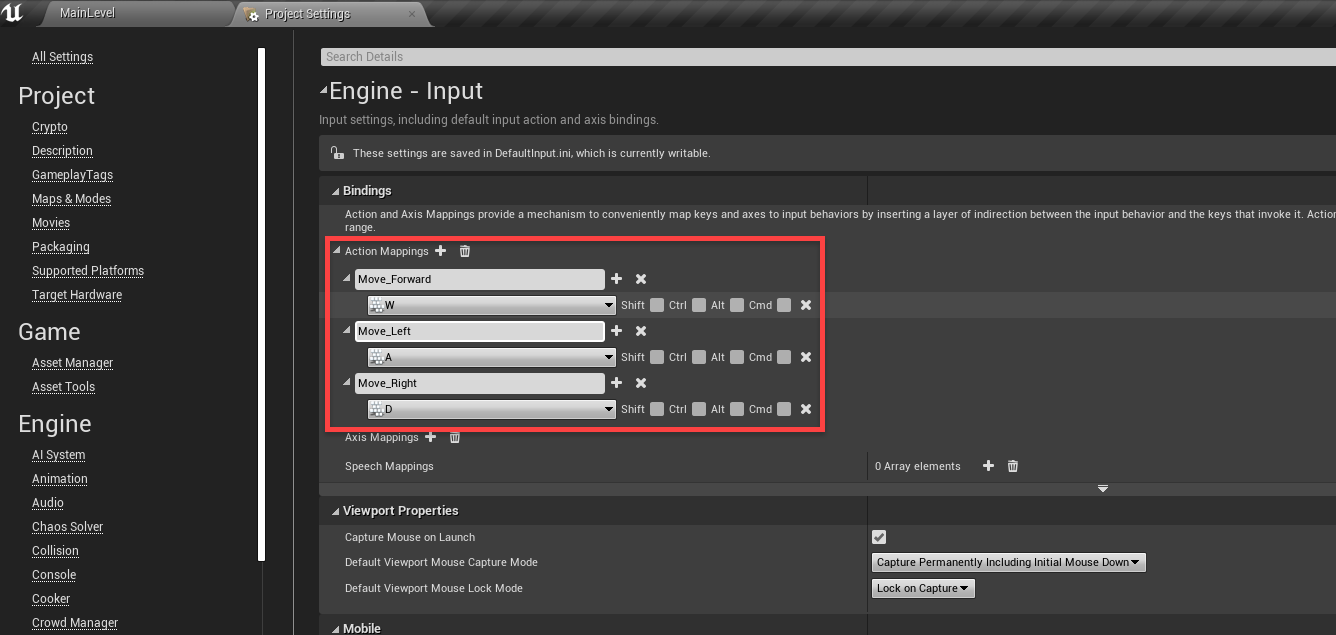
Now we can create our player. This player will be able to move forwards, left and right. To begin, we need to setup our key bindings. Go to the Project Settings window (Edit > Project Settings…) and navigate to the Input tab. We want to create three new action mappings.

  • Move_Forward = W
  • Move_Left = A
  • Move_Right = D

Unreal Engine Project Settings window

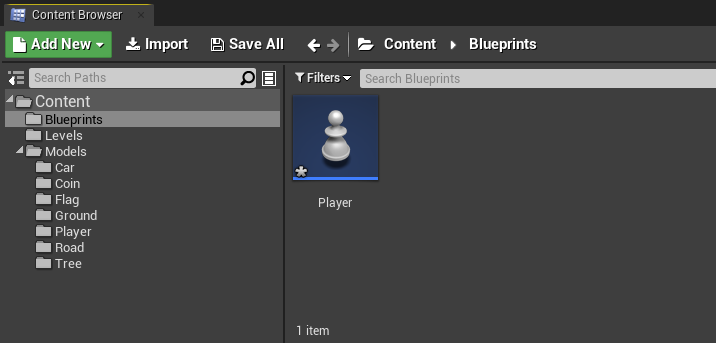
Back in the level editor, we can navigate to our Blueprints folder and create a new blueprint for our player. Make it’s parent class a Pawn and call it Player.

Player blueprint created in Unreal Engine

Open it up and we can begin.

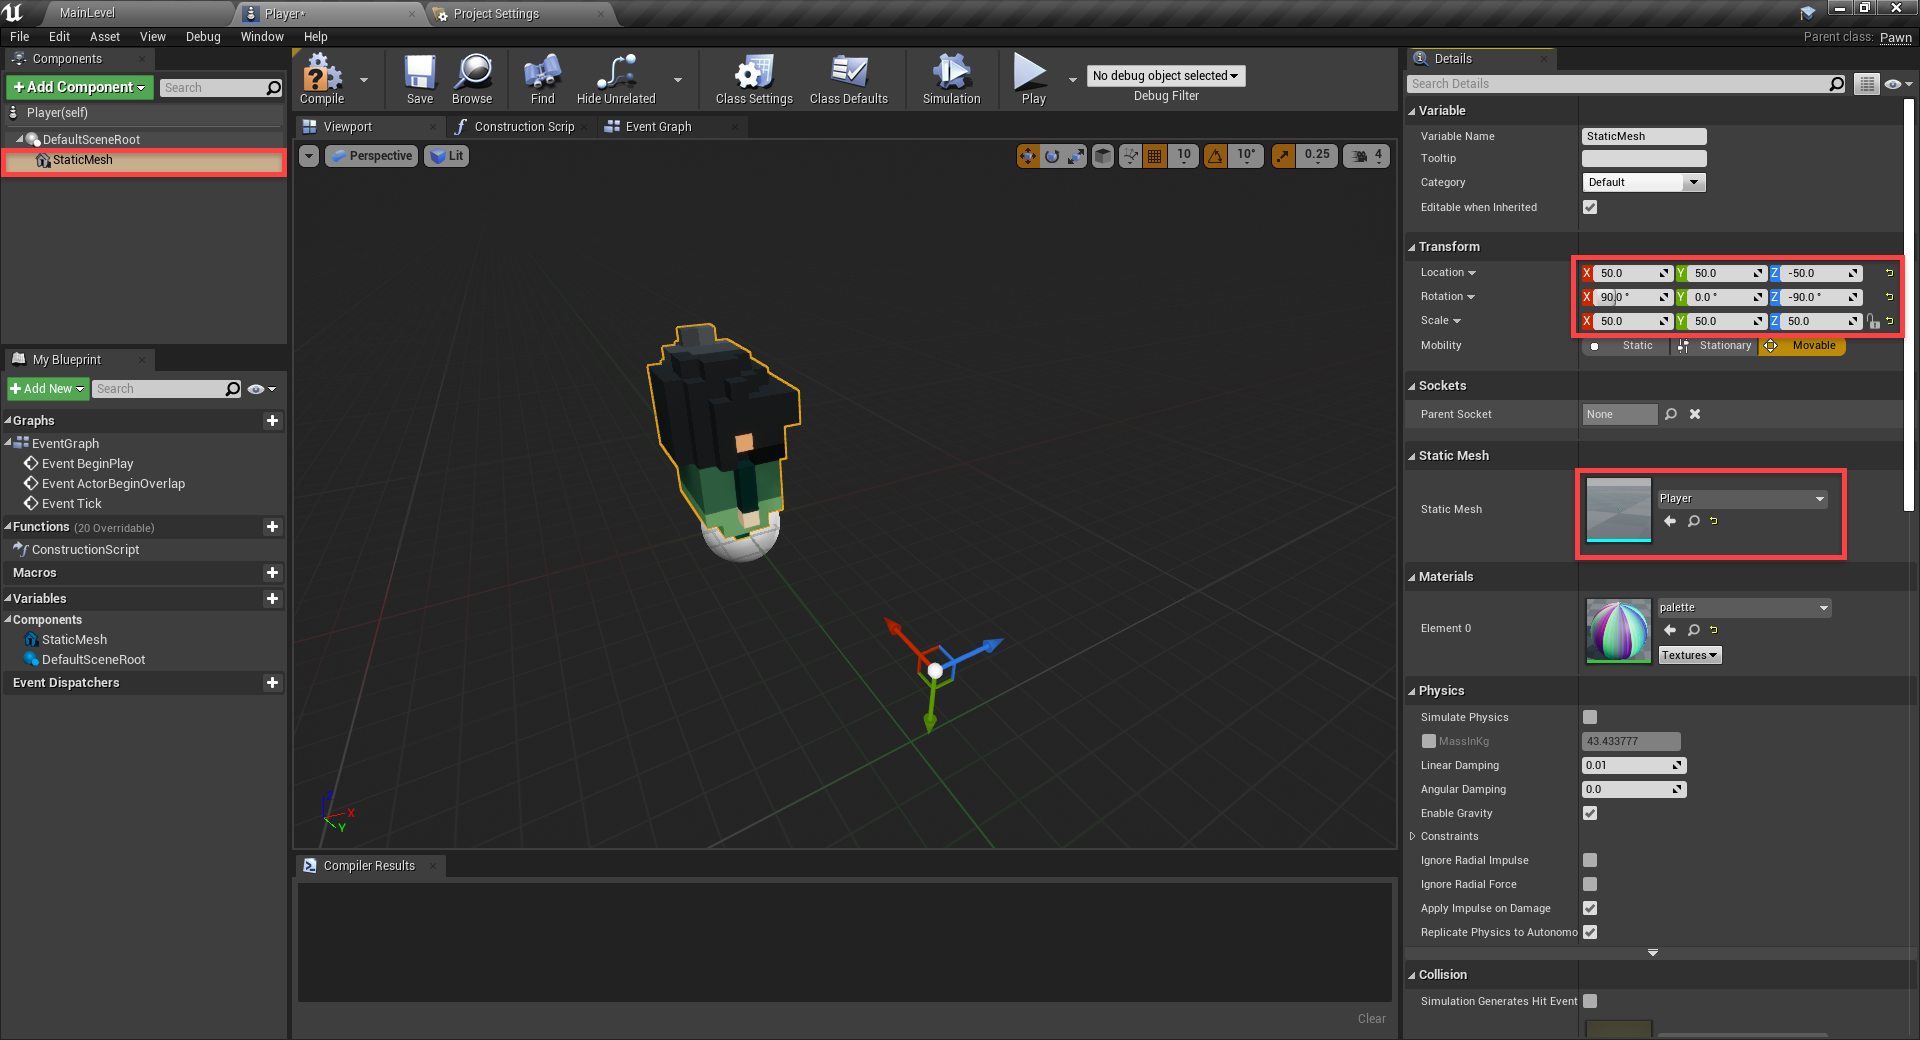
First, create a new Static Mesh component.

  • Set the Static Mesh to Player
  • Set the Location to 50, 50, -50
  • Set the Rotation to 90, 0, -90
  • Set the Scale to 50, 50, 50
  • (not pictured) Disable Generate Overlap Events

Player overview in Unreal Engine

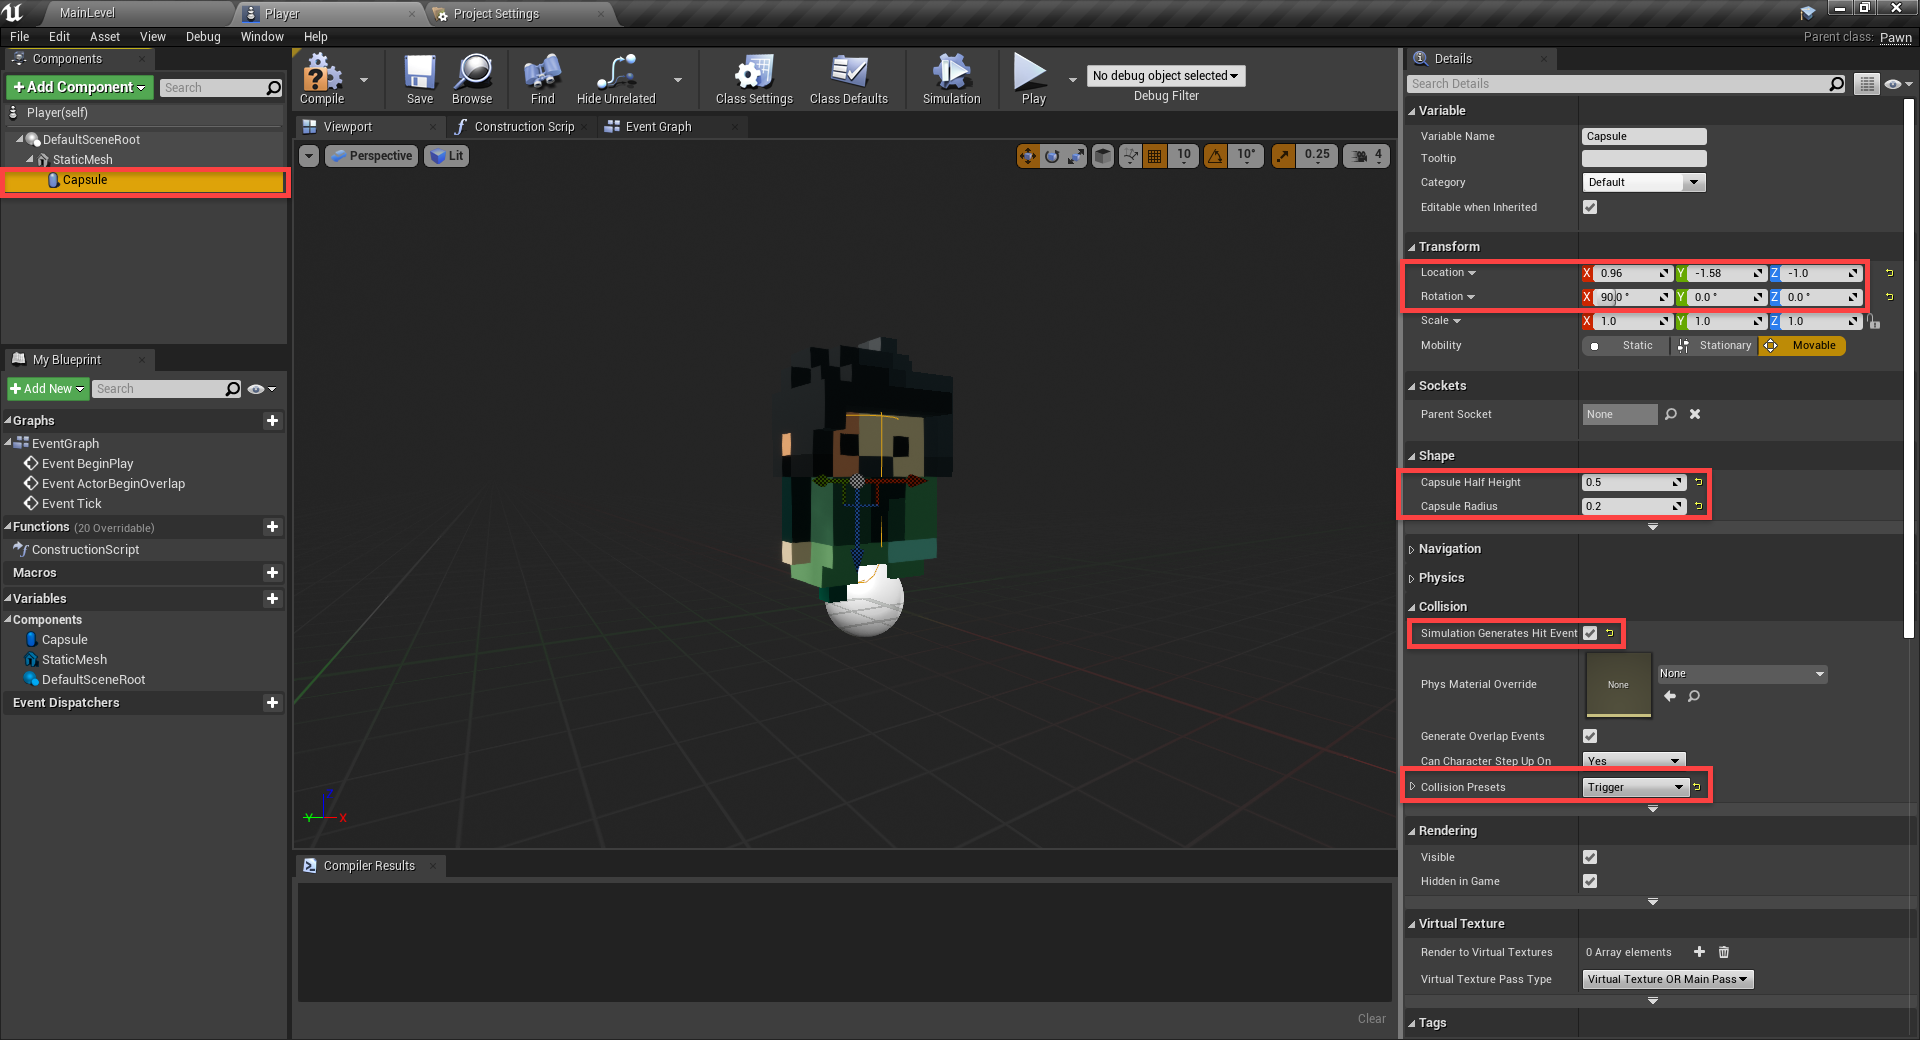
Next, create a Capsule Collider component as a child of the static mesh.

  • Set the Location to 0.96, -1.58, -1.0
  • Set the Rotation to 90, 0, 0
  • Set the Capsule Half Height to 0.5
  • Set the Capsule Radius to 0.2
  • Enable Simulation Generates Hit Events
  • Set the Collision Presets to Trigger

Player in Unreal Engine with Details window open

Finally, we have the camera setup. Create a new Spring Arm component as the child of static mesh. This component will hold our camera in place, even if we’re rotating.

  • Set the Socket Offset to 100, 0, 0
  • Set the Target Offset to 0, 227, 820

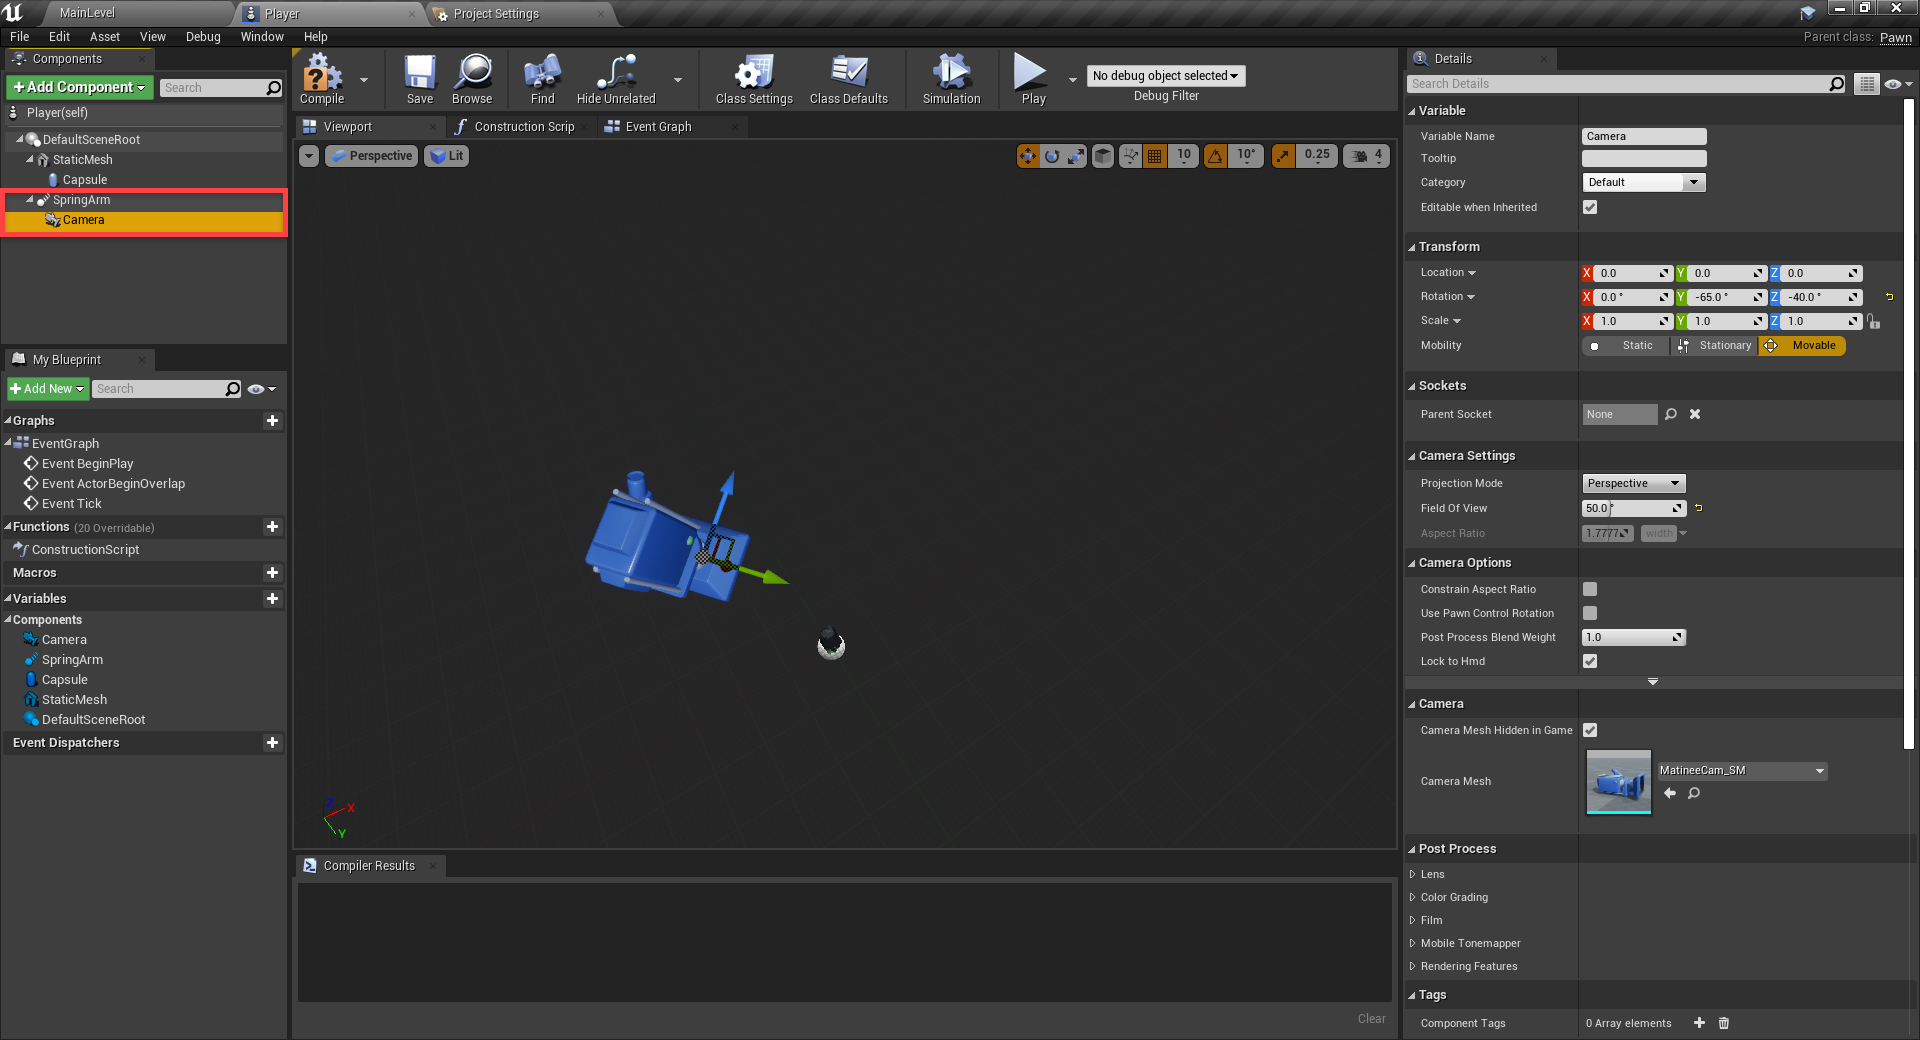
Then, create a Camera component as a child.

  • Set the Rotation to 0, -65, -40
  • Set the Field Of View to 50

Unreal Engine camera added to project

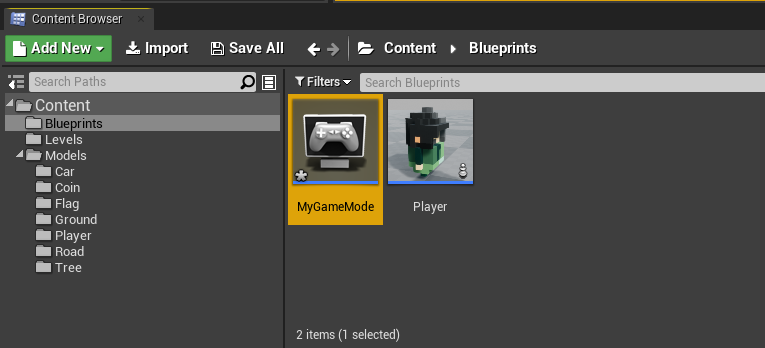
Let’s now go back to the level editor and in order to play as the player, we need to create a game mode blueprint.

Unreal Engine MyGameMode blueprint added to Content Browser

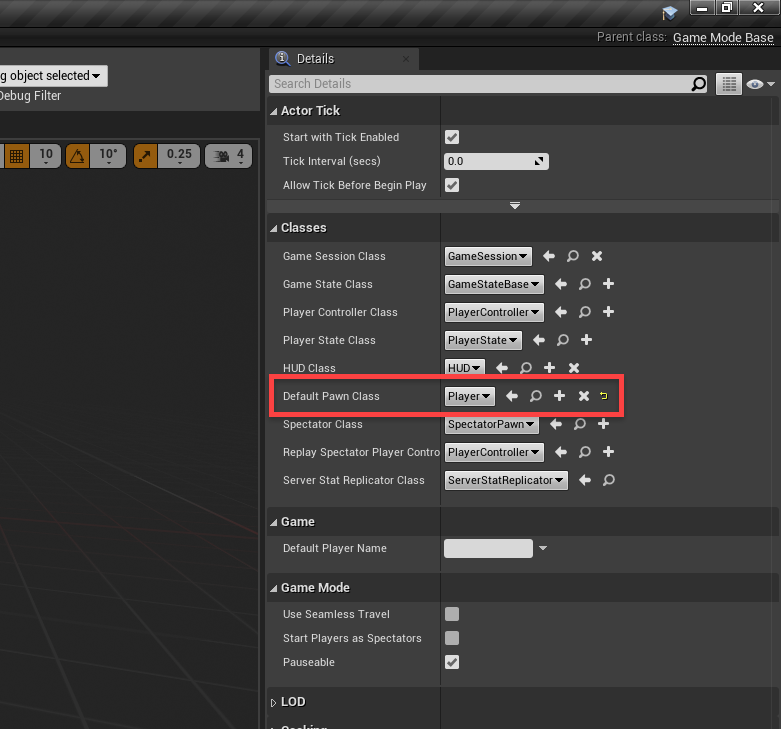
Open it up and all we need to do, is set the Default Pawn Class to our Player blueprint.

Unreal Engine with Default Pawn Class set to Player

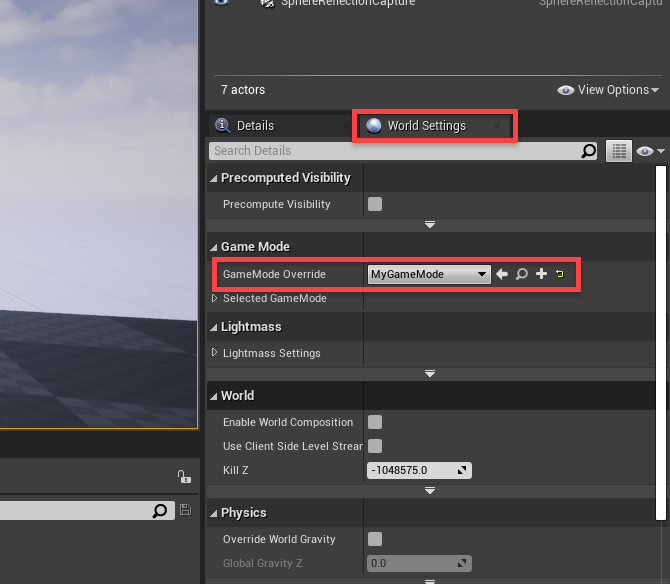
Save and compile it. Back in the level editor, go to the World Settings panel and set the GameMode Override to our new game mode.

Unreal Engine World Settings window

Now if you press play, you’ll see the player appearing with the camera above them.

Moving the Player

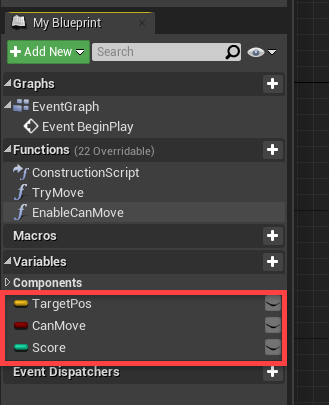
Back in the Player blueprint, we can begin to implement the movement. First, we’ll need to create the variables.

  • TargetPos (Vector)
  • CanMove (Boolean)
  • Score (Integer)

Click Compile and set some default values.

  • CanMove = true

Unreal Engine with various Components added to blueprint

In the Event Graph, we can begin by resetting the player position. The Target Pos variable is where the player is moving to, so we’ll set it to our position first.

Unreal Engine Event Graph for player

Next, we’ll need to do pretty much the same thing for moving forward, left and right. To bypass just having three copies of the same code, we’re going to create a new function called TryMove. Create a new input for the function called Direction and make that of type Vector.

What we’re doing here, is checking if we can move. If so, add the direction to our TargetPos and then disable can move. But we want to be able to move eventually, so we’re going to call a function with a delay. The EnableCanMove function is what we’ll call after 0.3 seconds.

Unreal Engine Blueprinting logic for a Timer and movement

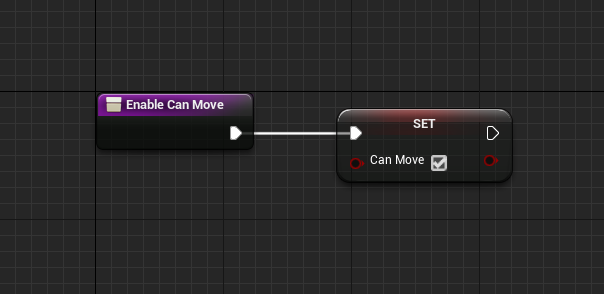
Let’s now create that EnableCanMove function. All we’re doing here is enabling the can move function.

Unreal Engine Enable Can Move node

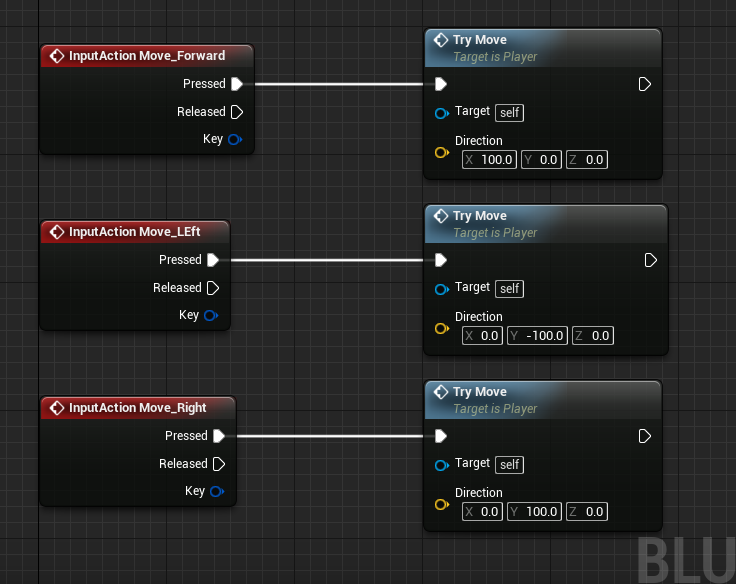
Back in the main event graph, let’s now setup our movement input to call the TryMove function. Make sure to fill in the respective Direction inputs.

Unreal Engine logic for player trying to move

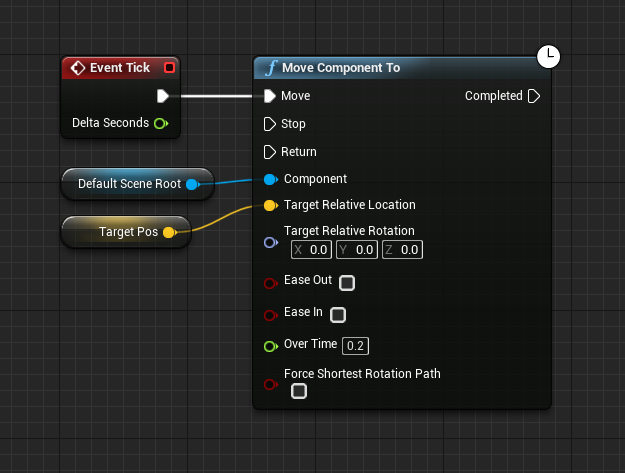
Next, we need to actually move the player. So every frame (event tick node), we’re going to trigger the Move Component To node which moves a component to the requested position.

Unreal Engine Event Graph that moves player to position

You can now press play and test it out!

Level Layout

Before we continue with the rest of the game’s systems, let’s create our level. So in the level editor begin by deleting the floor object.

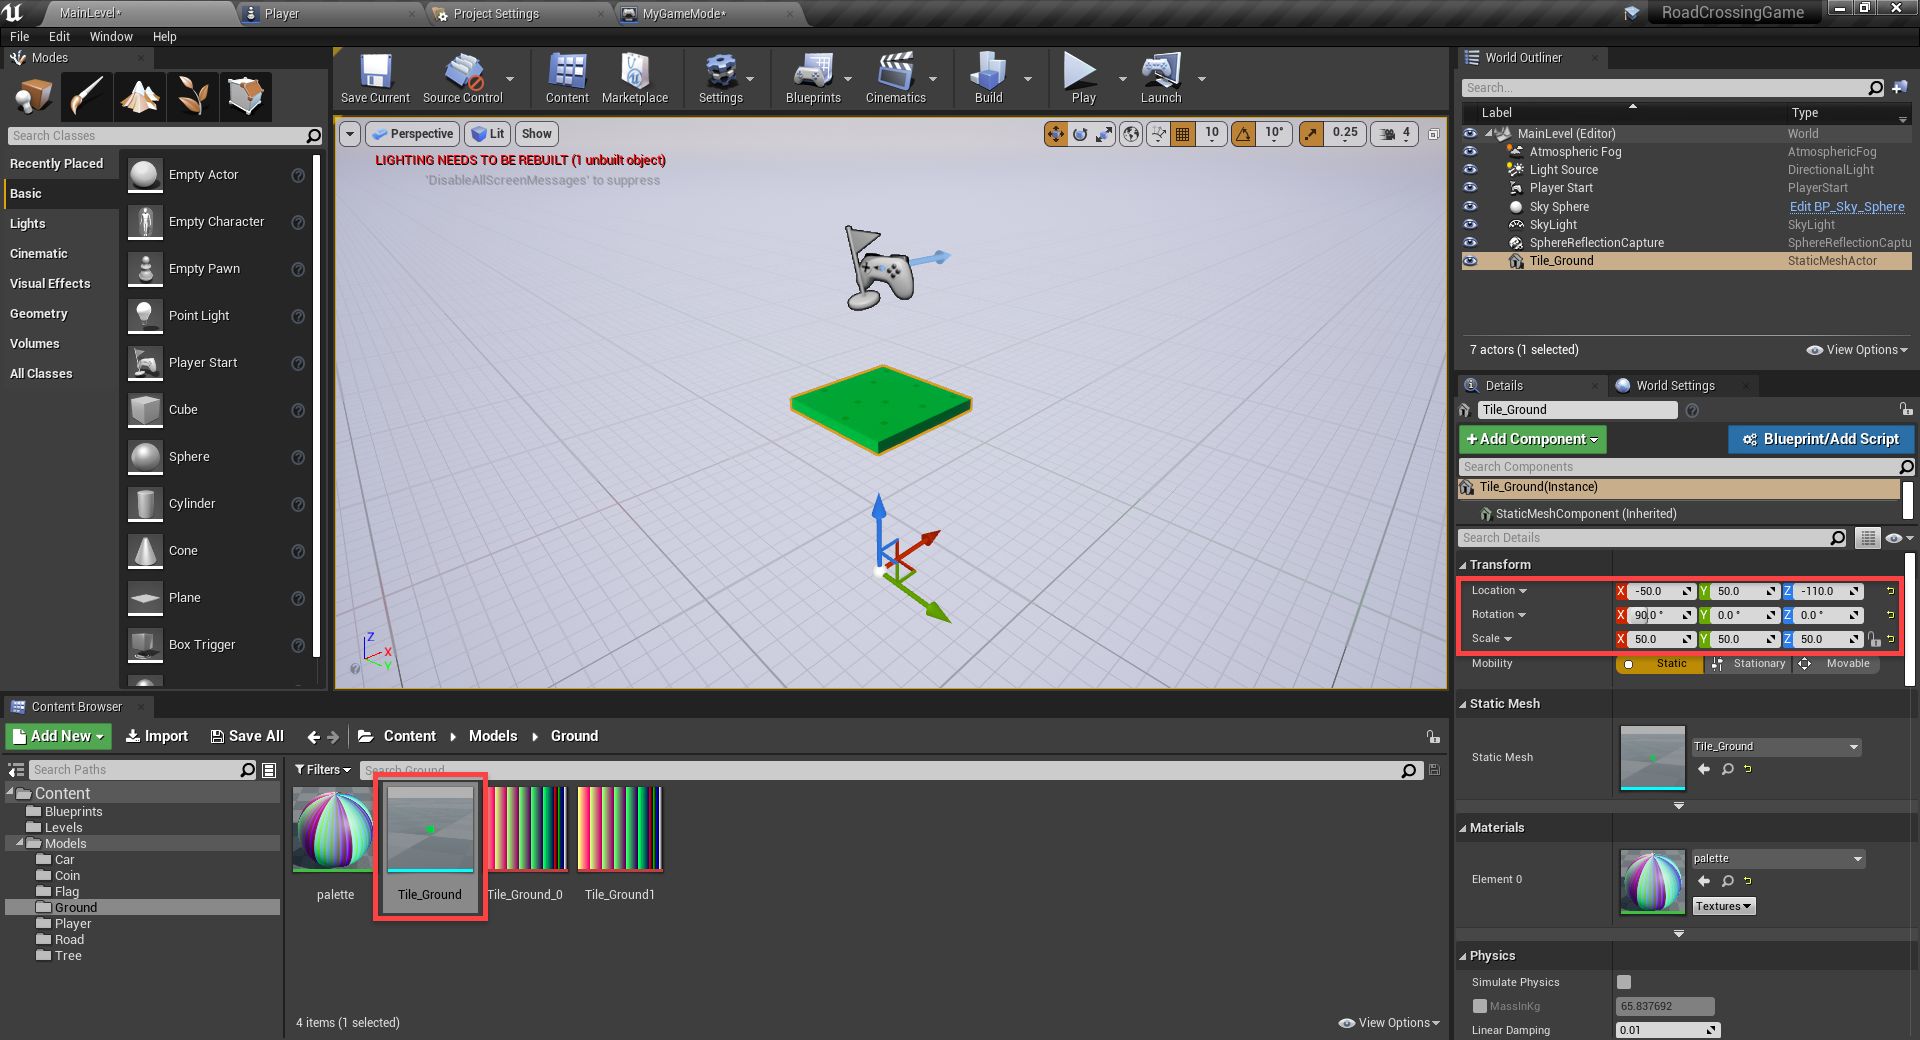
Then, in the Models/Ground folder, drag in the Tile_Ground model.

  • Set the Location to -50, 50, -110
  • Set the Rotation to 90, 0, 0
  • Set the Scale to 50, 50, 50

Unreal Engine with tile mesh added for level

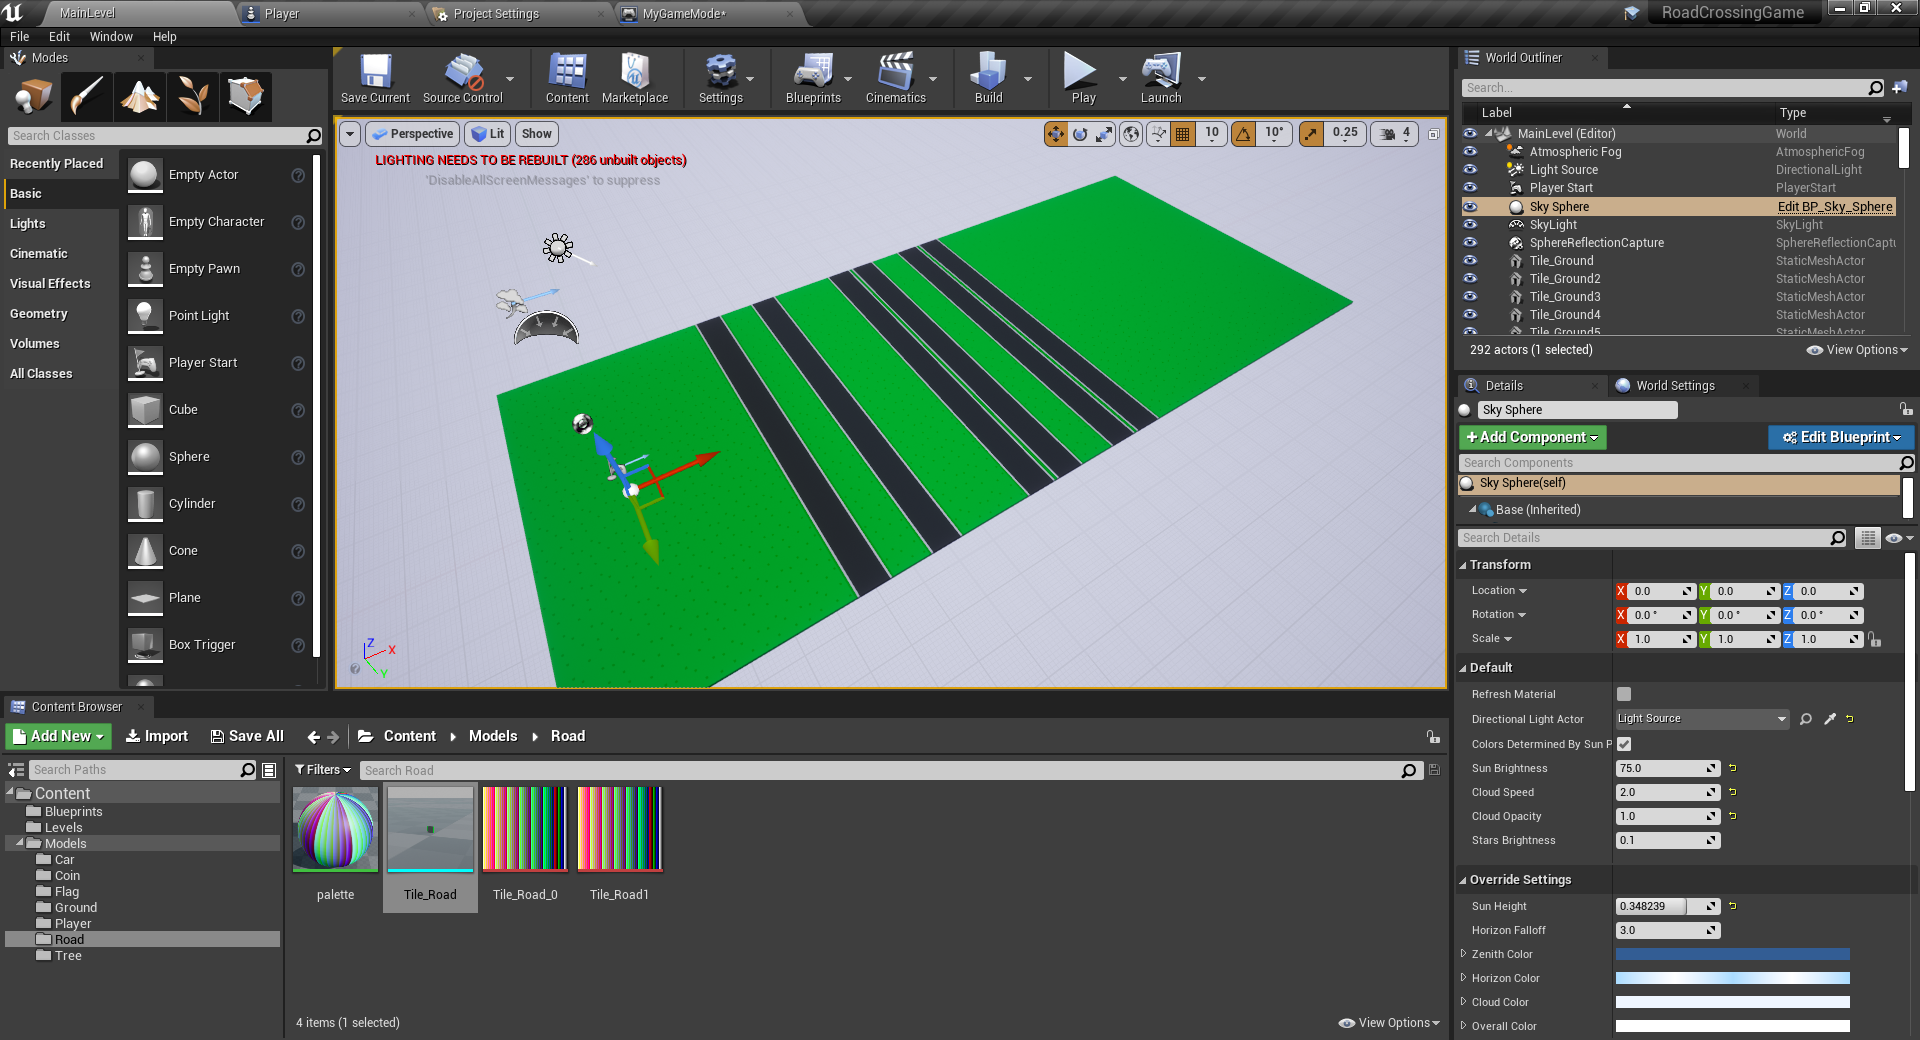
Combining the ground and road tiles, create a layout like the one below.

Tile combination in Unreal Engine to create road layout

Collectable Coins

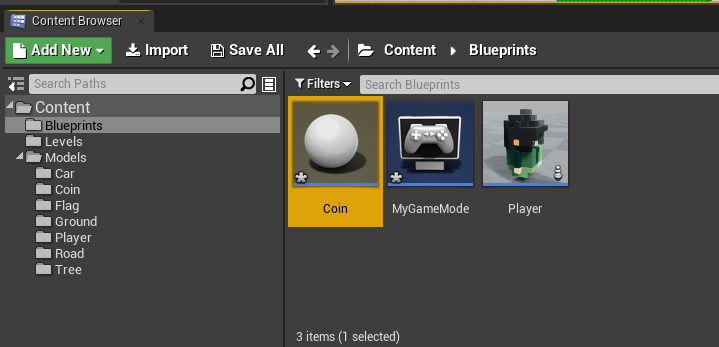
When playing the game, players can collect coins to increase their score. Create a new blueprint (parent class of Actor) and call it Coin.

Coin blueprint added in Unreal Engine Content Browser

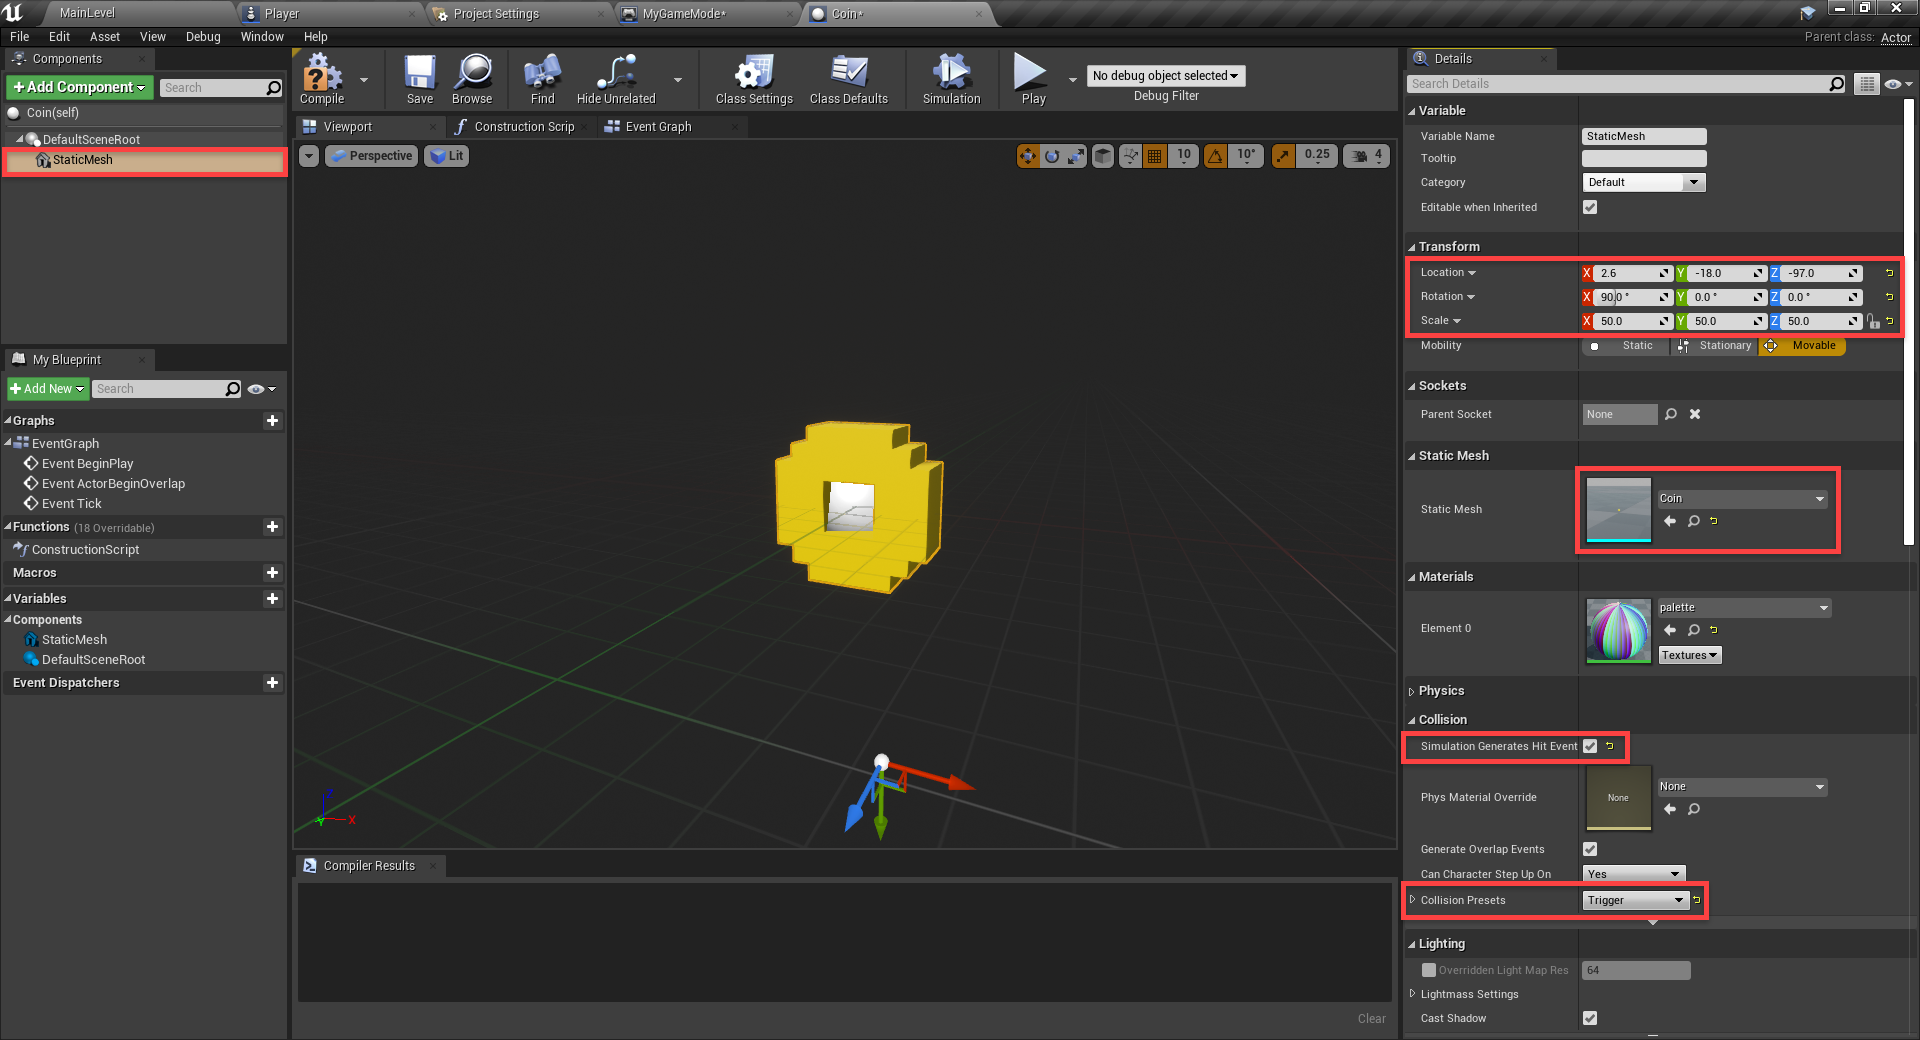
All we’re going to do component wise, is create a new Static Mesh component.

  • Set the Static Mesh to Coin
  • Set the Location to 2.6, -18.0, -97.0
  • Set the Rotation to 90, 0, 0
  • Set the Scale to 50, 50, 50
  • Enable Simulation Generates Hit Events
  • Set the Collision Presets to Trigger

Overview of coin object in Unreal Engine

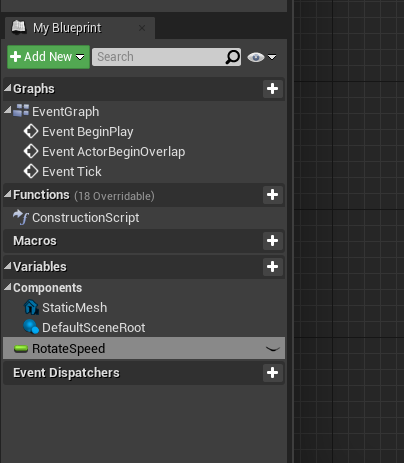
Create a new variable of type Float and call it RotateSpeed. Compile and set the default value to 90.

Unreal Engine with RotateSpeed added to Components for coin

In the event graph, we’re first going to set it up so the coin rotates over time. We’re multiplying by the delta seconds so that the coin rotates in terms of degrees per second and not degrees per frame. This will make it the same across any frame rate.

Logic for Coin spin in Unreal Event Graph

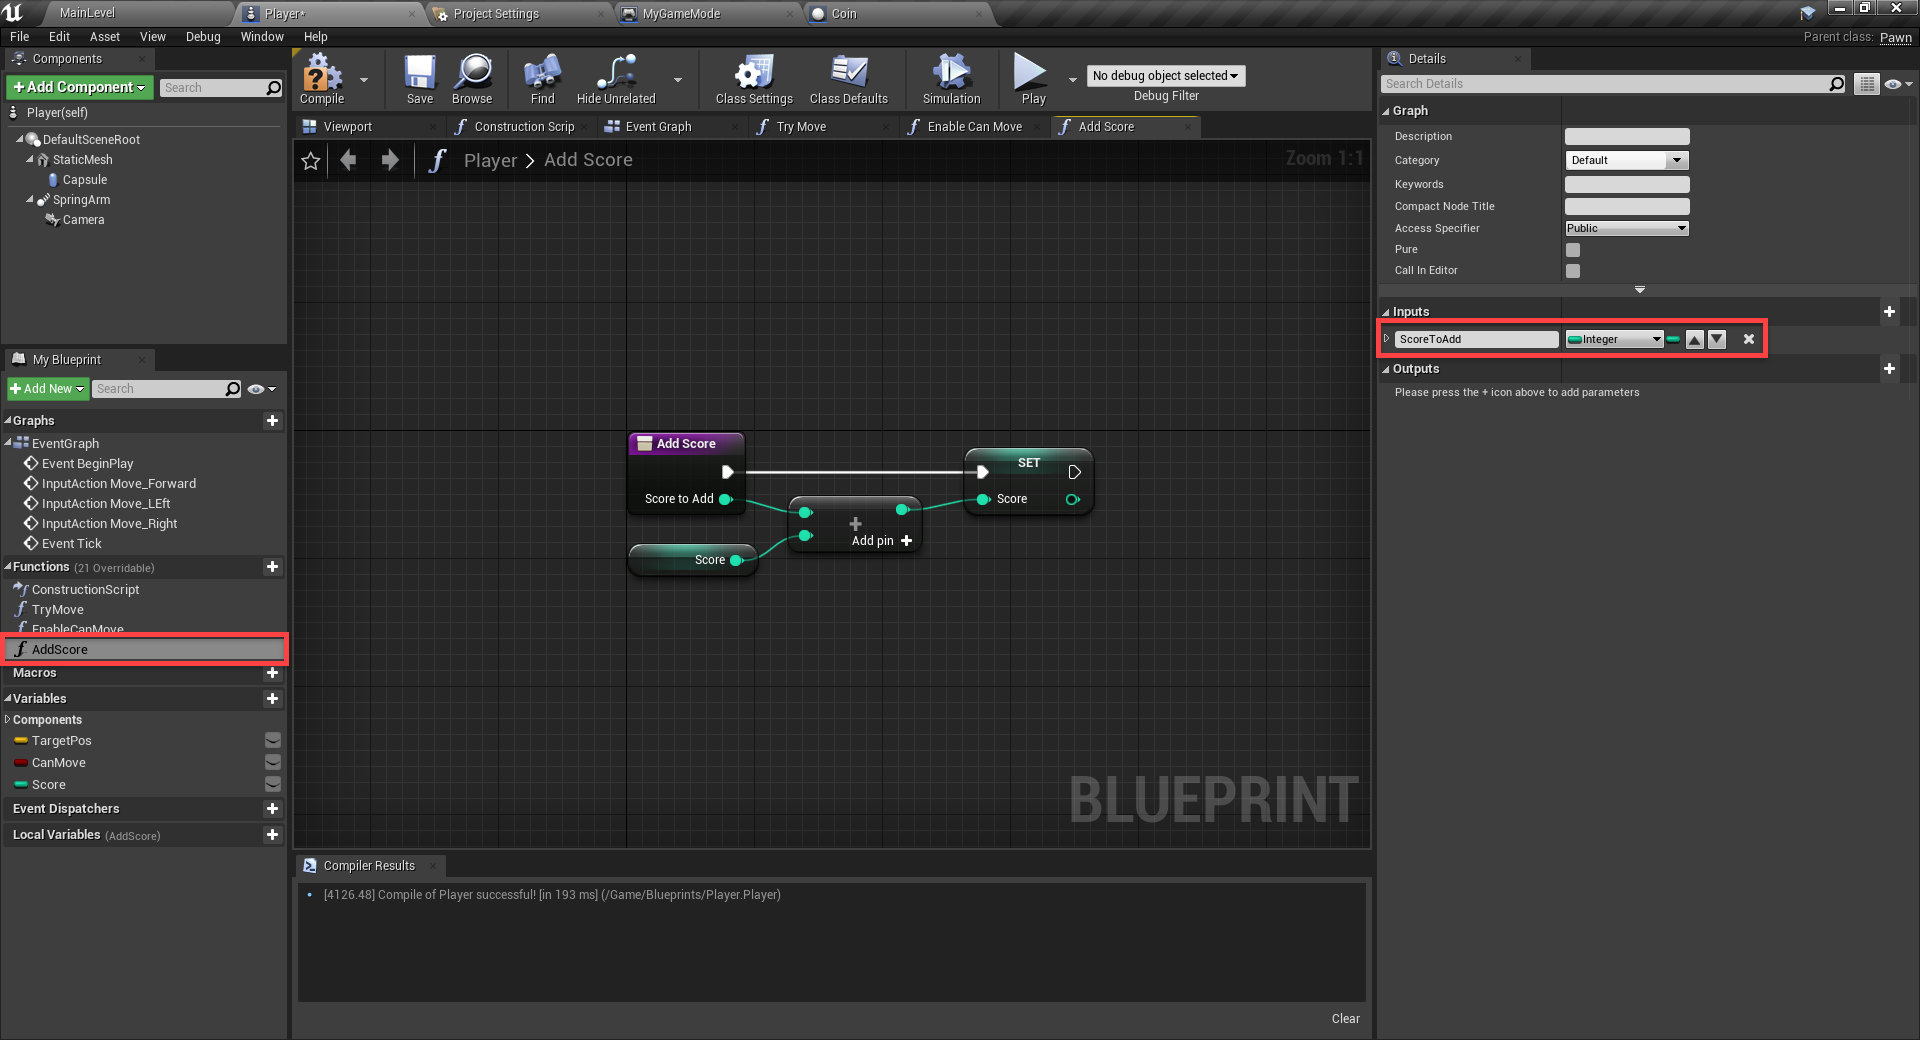
Next, we need to add the score to the player when they collect the coin. First, go to the Player blueprint and create a new function called AddScore.

  • Create an input for the function called ScoreToAdd of type Integer

This function will just add to the existing score.

Unreal Engine with AddScore script added to Blueprint

Back in the Coin blueprint, let’s create the logic so that when the player collides with the coin, we add to their score and get destroyed.

Collision logic for player and coin in Unreal Engine project

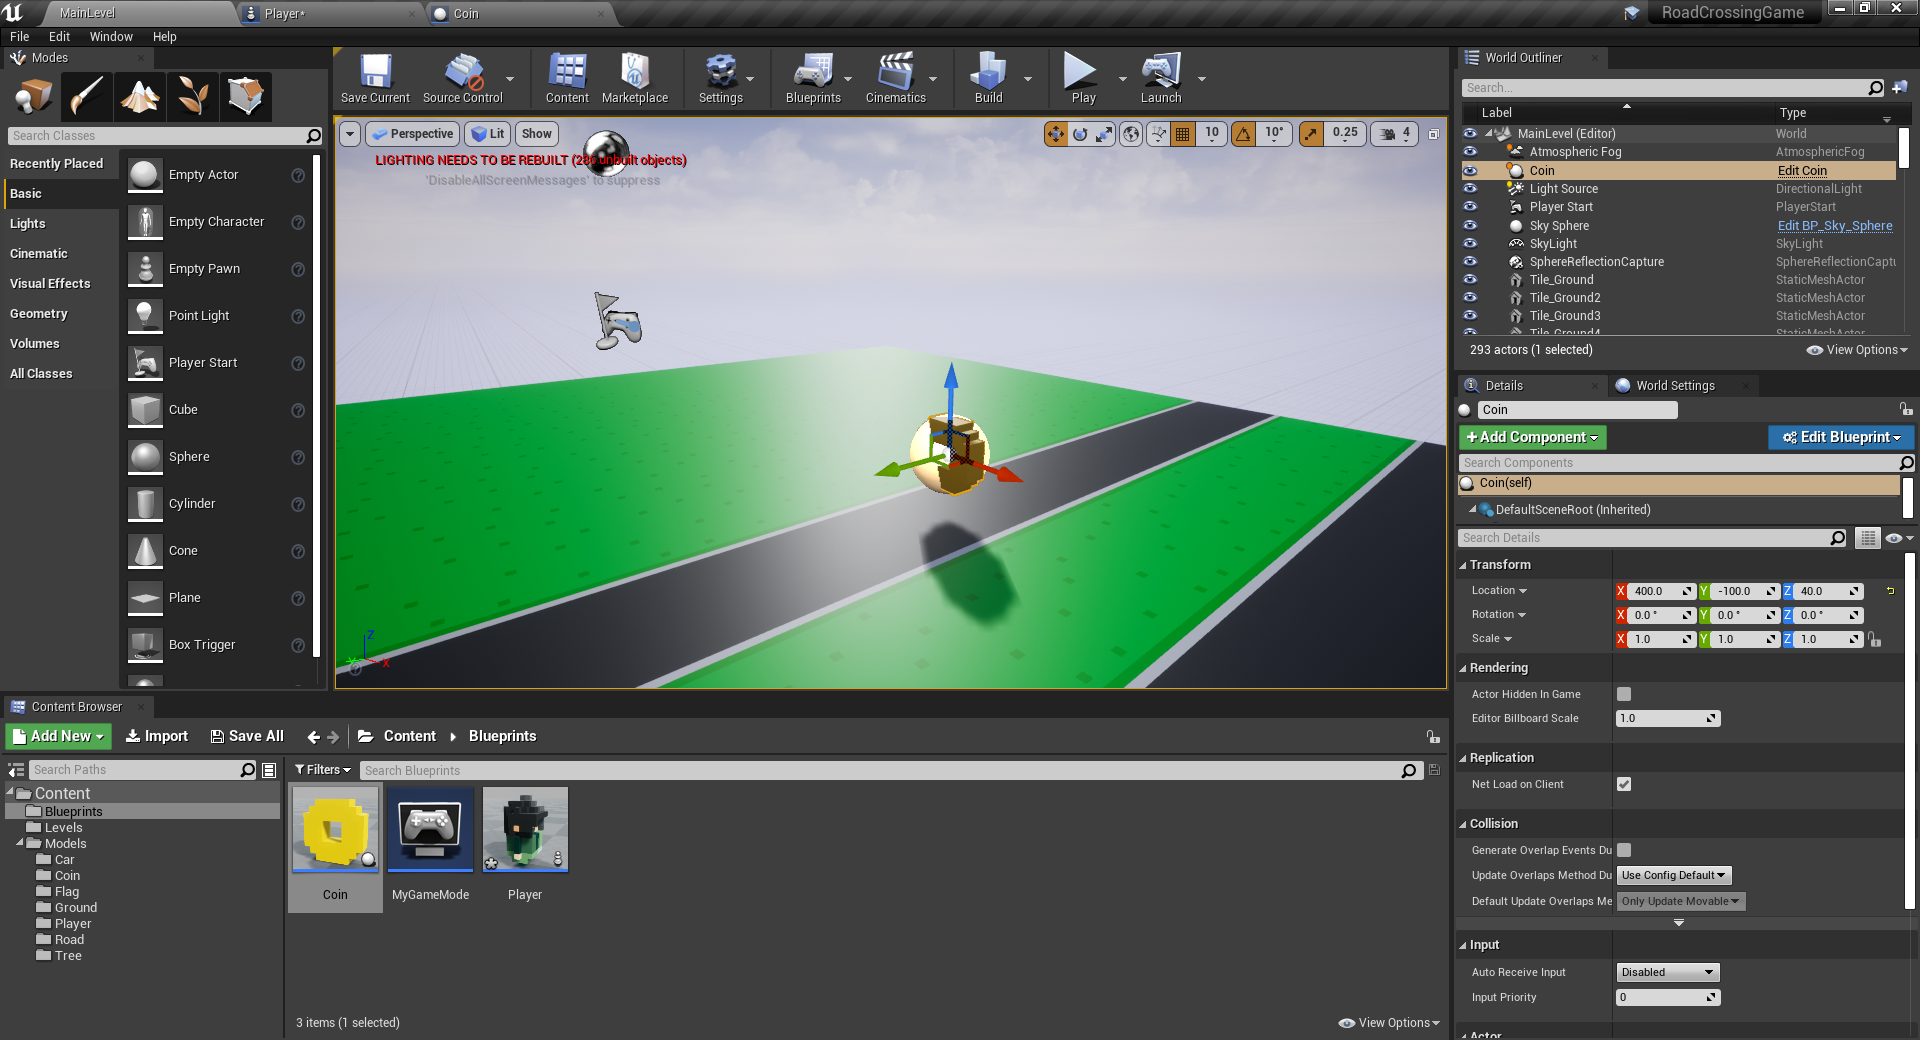
In the level editor now, we can drag in the coin blueprint and position it where we want. If you press play and collect the coin, you should see that it gets destroyed.

Coin blueprint added to Unreal Engine arcade game

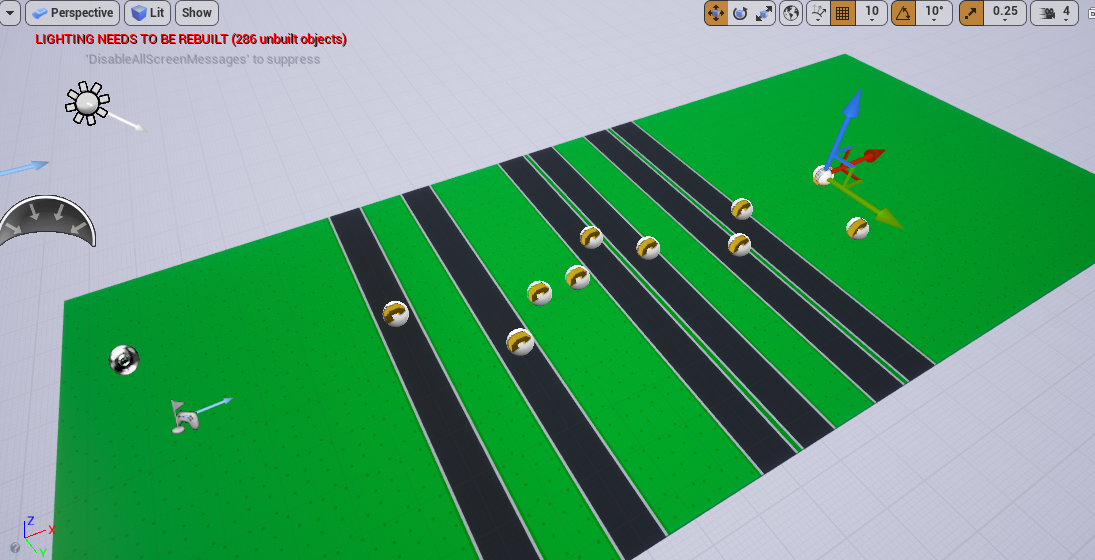
We can also then add in the rest of the coins.

Unreal Engine project with several coins added

Creating the Cars

The cars are going to be the player’s main obstacle. Hitting them will cause the game to restart.

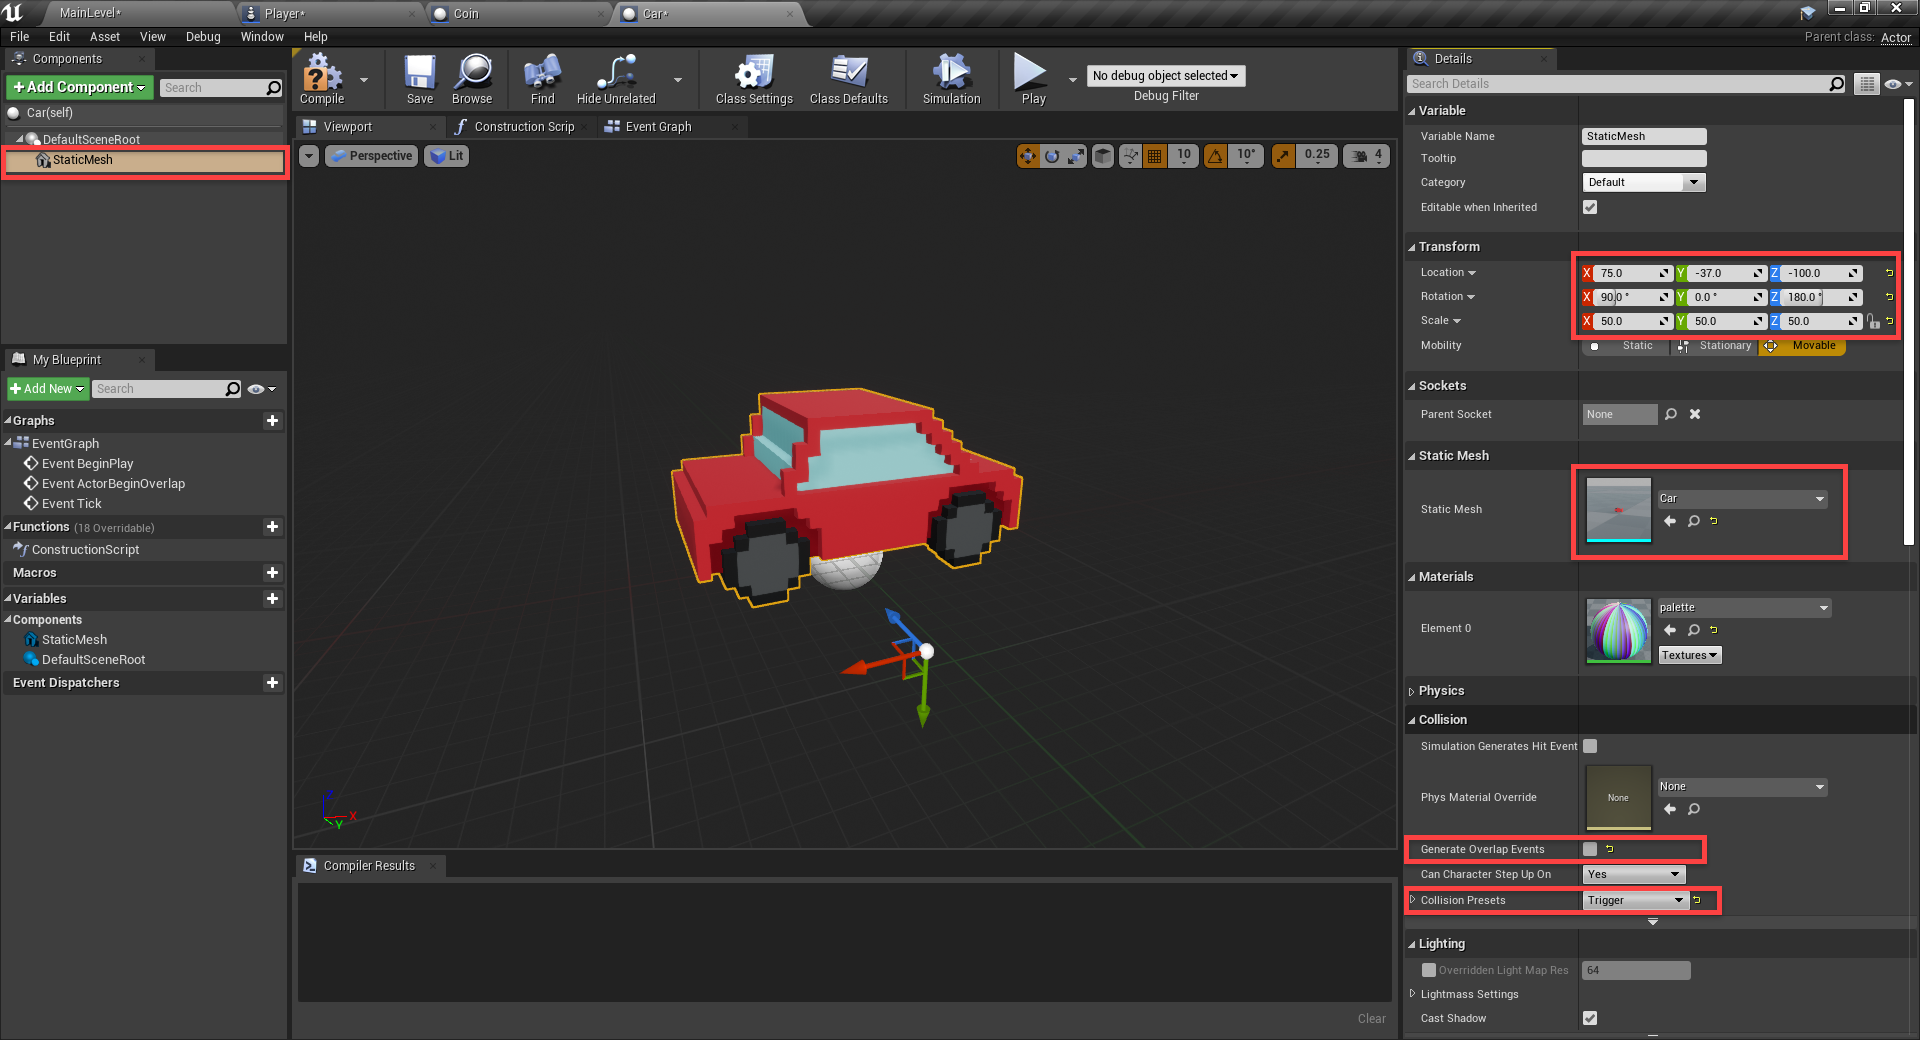
Create a new blueprint (parent class of Actor) and call it Car. Open it up and we’ll start by creating a static mesh component.

  • Set the Static Mesh to Car
  • Set the Location to 75, -37, -100
  • Set the Rotation to 90, 0, 180
  • Set the Scale to 50, 50, 50
  • Disable Generate Overlap Events
  • Set the Collision Presets to Trigger

Unreal Engine with car object model for new blueprint

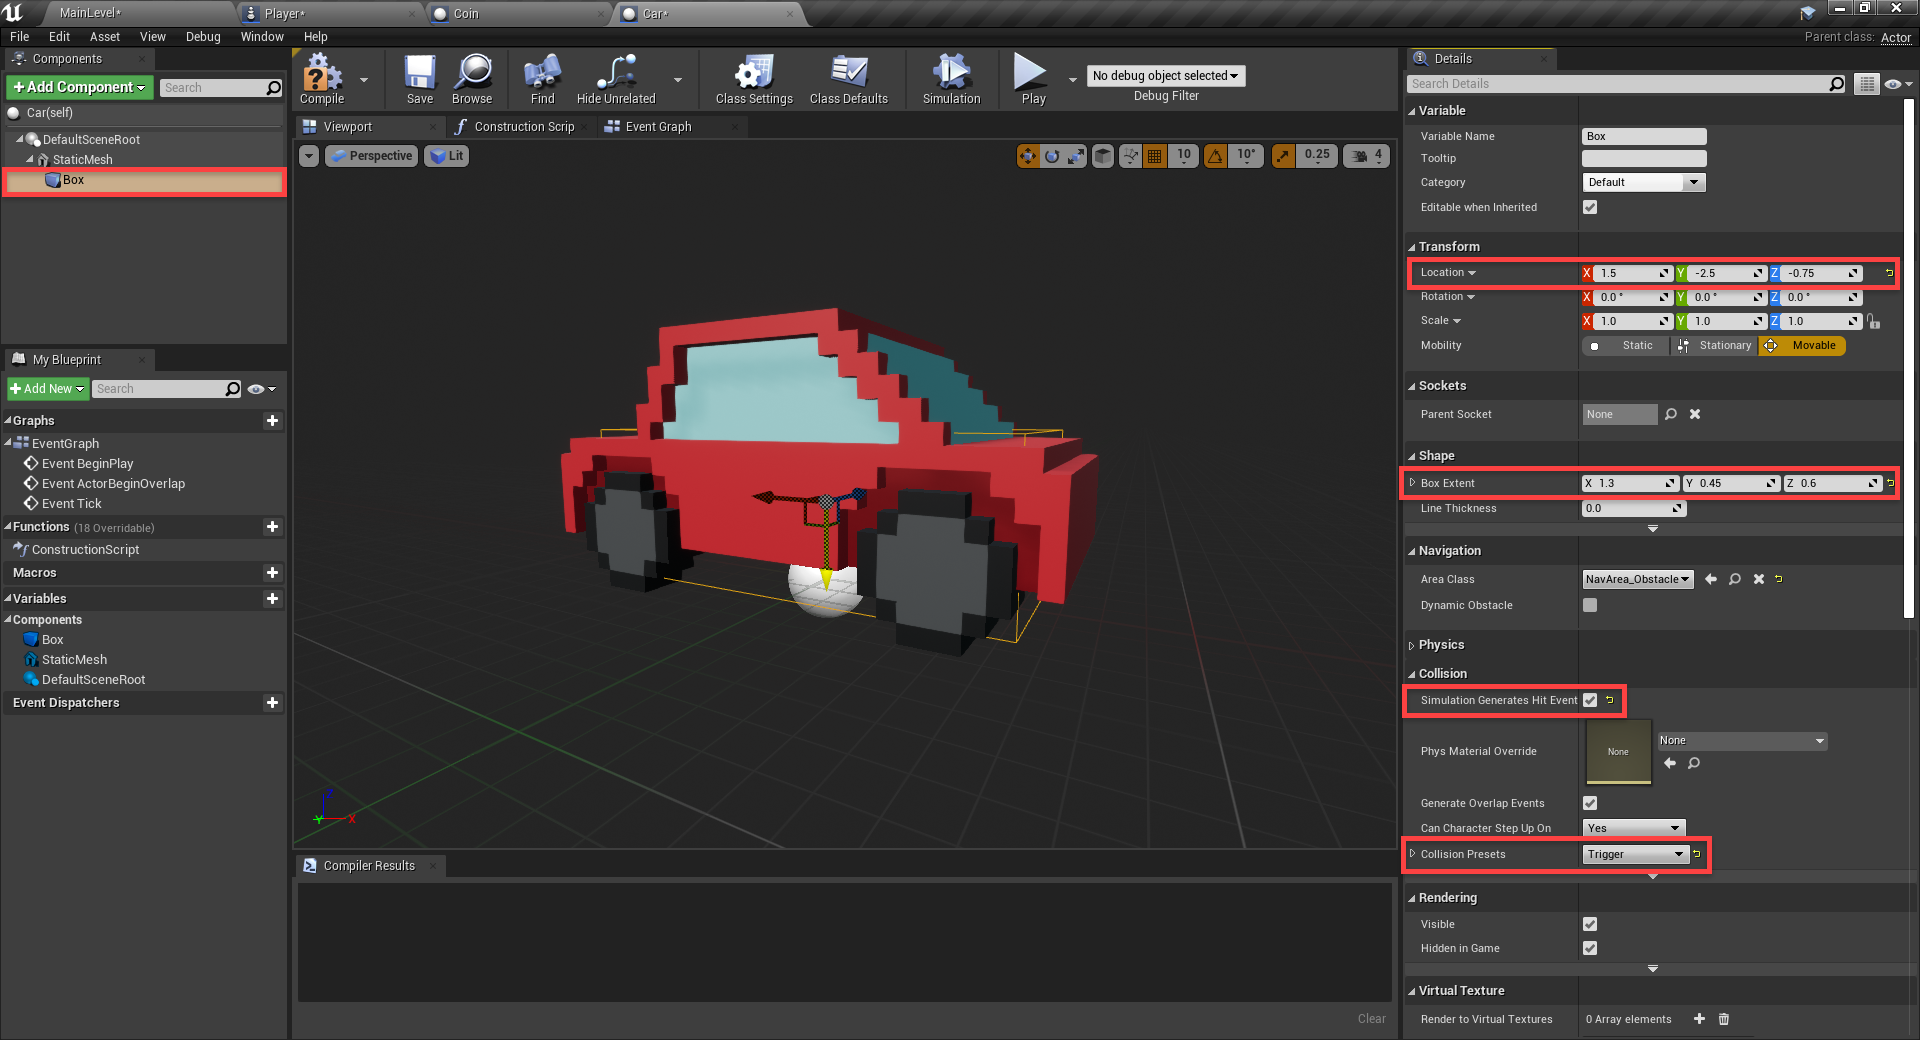
Next, create a Box Collider component.

  • Set the Location to 1.5, -2.5, -0.75
  • Set the Box Extents to 1.3, 0.45, 0.6
  • Enable Simulation Generates Hit Events
  • Set the Collision Presets to Trigger

Unreal Engine with Details window open for car blueprint

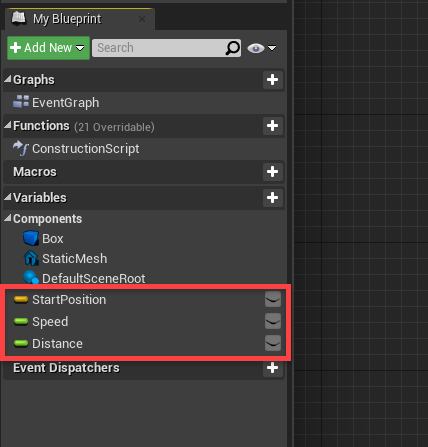
Let’s now head over to the Event Graph where we’ll begin by creating some variables.

  • StartPosition (Vector)
  • Speed (Float)
  • Distance (Float)

Compile, then for each variable, enable Instance Editable so we can change the values in the level editor. But for the speed, let’s set that to a default value of 400.

Car blueprint components added in Event Graph

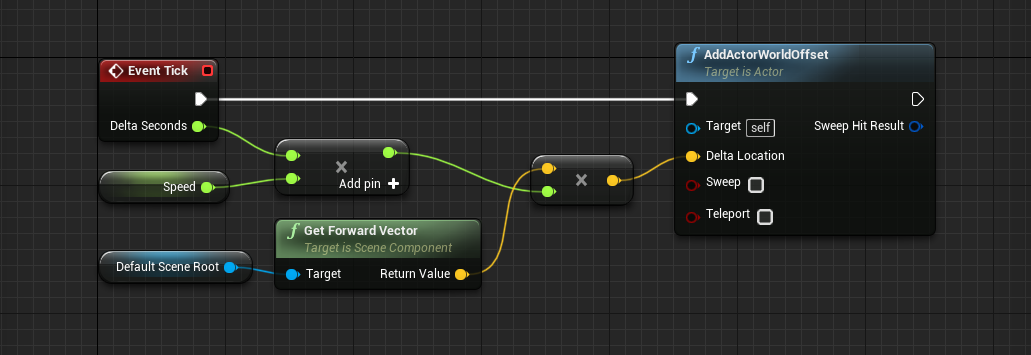
Now for the nodes. Each frame, we’re going to be moving in our forward direction.

Logic for forward car movement in Unreal Engine

We’re also wanting to check each frame if we’ve driven as far as the distance variable. If so, then reset our position to the start position.

Logic to reset car based on distance traveled

Finally, we’re going to check for an overlap of the player collider. If so, we’ll restart the scene.

Logic to check for car player collision

Back in the level editor, let’s place down our first car.

  • Set the Location to 400, -550, 0
  • Set the Rotation to 0, 0, 90
  • Set the Start Position to 400, -550, 0
  • Set the Distance to 1100

Now if you press play, you should see the car move down the road, then reset its position once it reaches the end.

Car blueprint added to Unreal Engine project

Go ahead and create many more cars to fill in the roads.

Various cars added to Unreal Engine arcade game

Game UI

Now we’re going to create some UI for the game. We’re going to have two elements. A win screen and a score text so the player can see their current score. In the Blueprints folder, right click and select User Interface > Widget Blueprint. Call it GameUI. Double-click to open the UI editor window.

First, drag in a new Text component.

  • Set the Name to ScoreText
  • Enable Is Variable
  • Set the Anchors to Top-Center
  • Set the Position X to -250
  • Set the Position Y to 60
  • Set the Size X to 500
  • Set the Size Y to 80
  • Set the Text to Score: 0
  • Set the Size to 50
  • Set the Justification to Center

Unreal Engine text UI for score

Next, we want to create the win screen. Drag in a canvas panel component. This will be the contents of the win screen. Populate it with a header text and button to restart the game. Make sure that the canvas panel has Is Variable enabled.

Win popup for Unreal Engine arcade project

We then want to select our restart button, and in the Details panel create an On Clicked event.

Unreal Engine Details panel with focus on Events

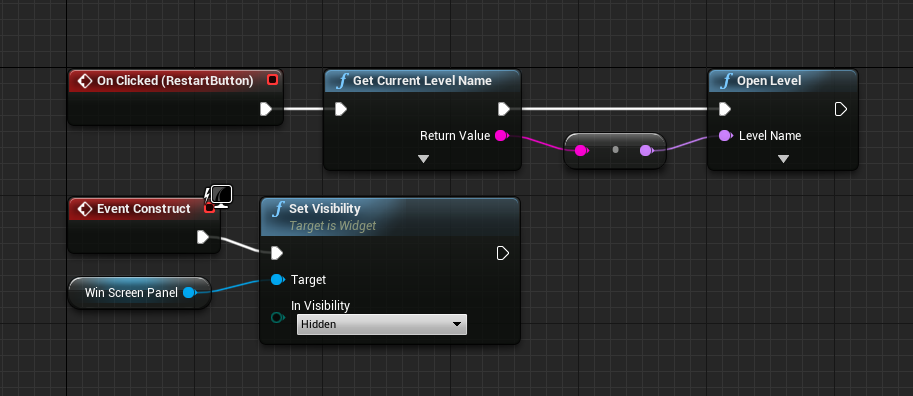
This will create an OnClicked node in the graph. All we want to do with this, is when triggered – restart the current level. Also, we’ll add the EventConstruct node which gets called when the UI is created. All we’re doing here, is disabling the win screen panel.

Event Graph logic to restart the game

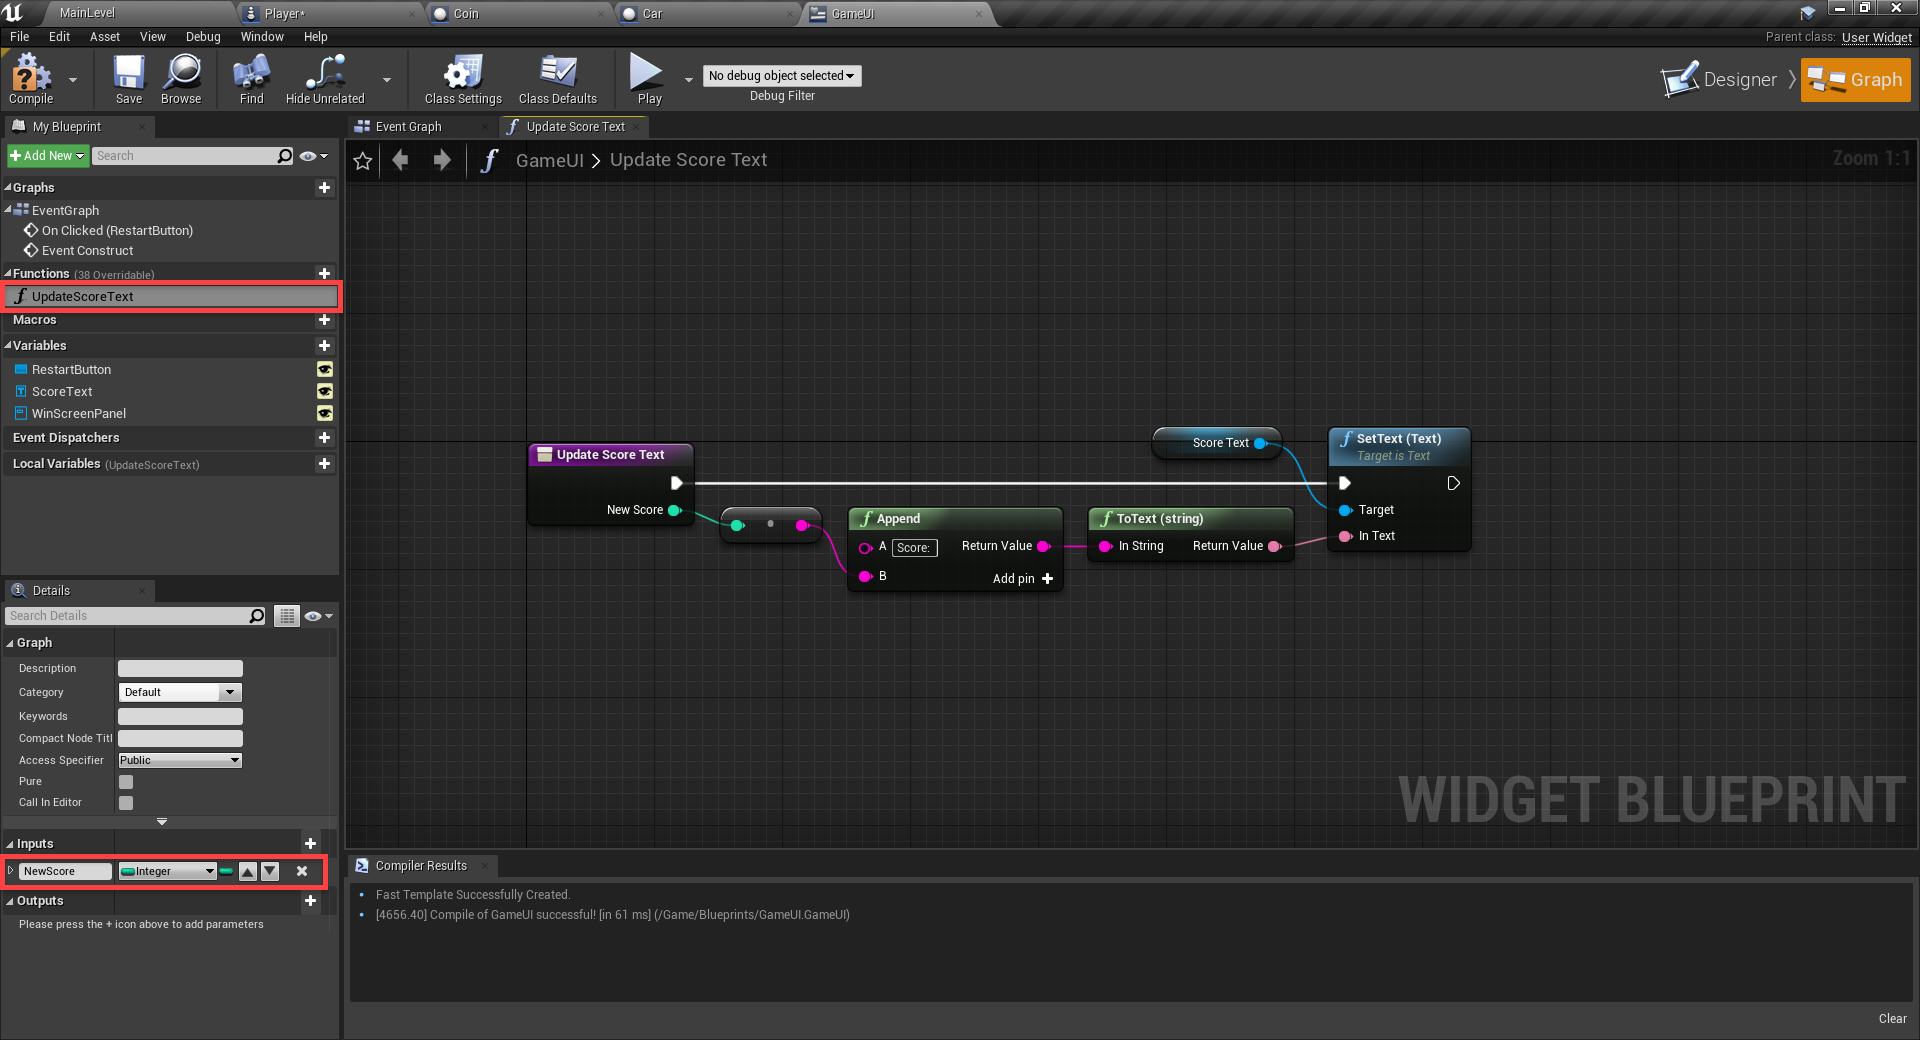
Next, we’ll create the UpdateScoreText function. This gets called when we collect a coin. Add an input of type Integer and call it NewScore.

Event Graph logic to update score UI text

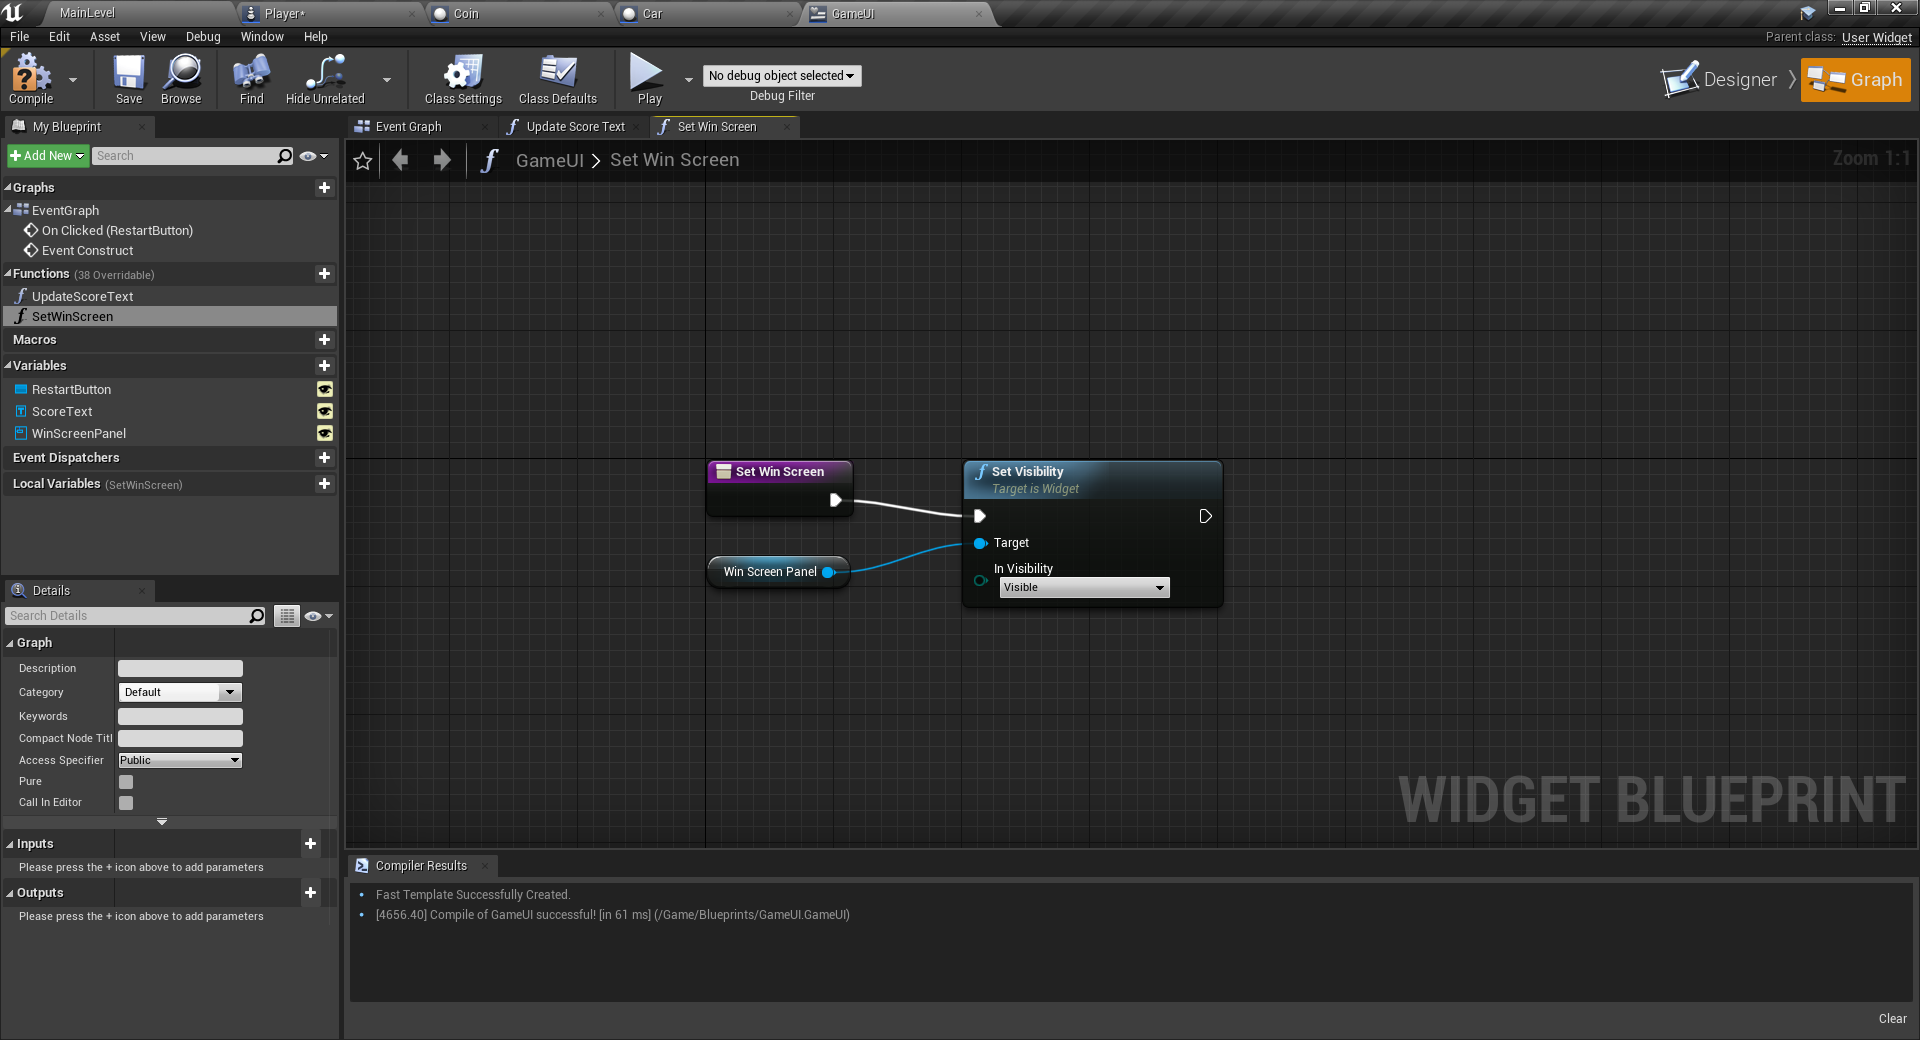
Then we have the SetWinScreen function which just sets the win screen panel to be visible.

Logic to notify player of winning in Unreal Engine

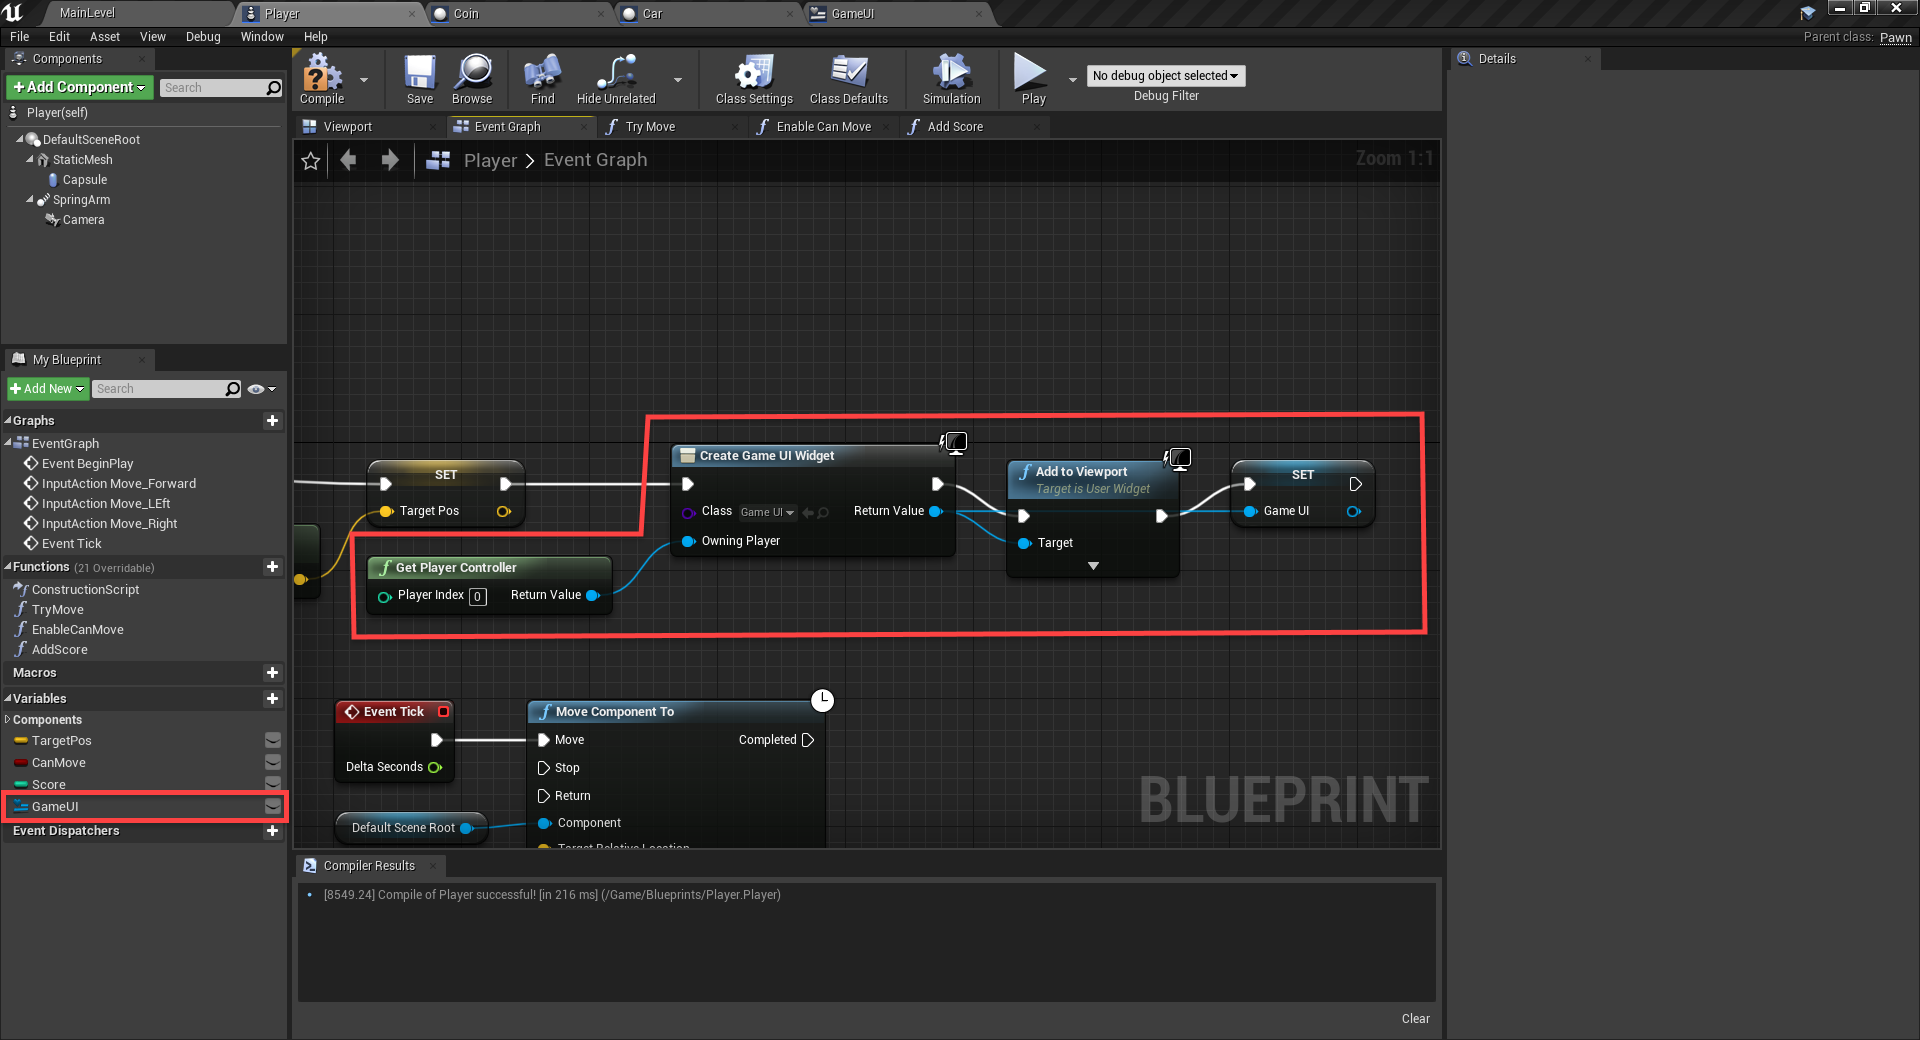
Back in the Player blueprint, we can initialize the UI. First, create a new variable of type GameUI called GameUI.

Then continuing on the EventBeginPlay flow, create and initialize the UI widget.

Unreal Engine Event Graph with event to initialize the UI

So inside of the AddScore function, we can update the UI.

AddScore logic with UI logic added

If you press play, you’ll see it in action!

End Goal

To finish the project off, we’re going to create a flag at the end of the level that the player needs to reach. This will enable the win screen, prompting them to restart the game. So in the Blueprints folder, create a new blueprint of type Actor called EndFlag.

All we’re going to do component wise is add in a static mesh.

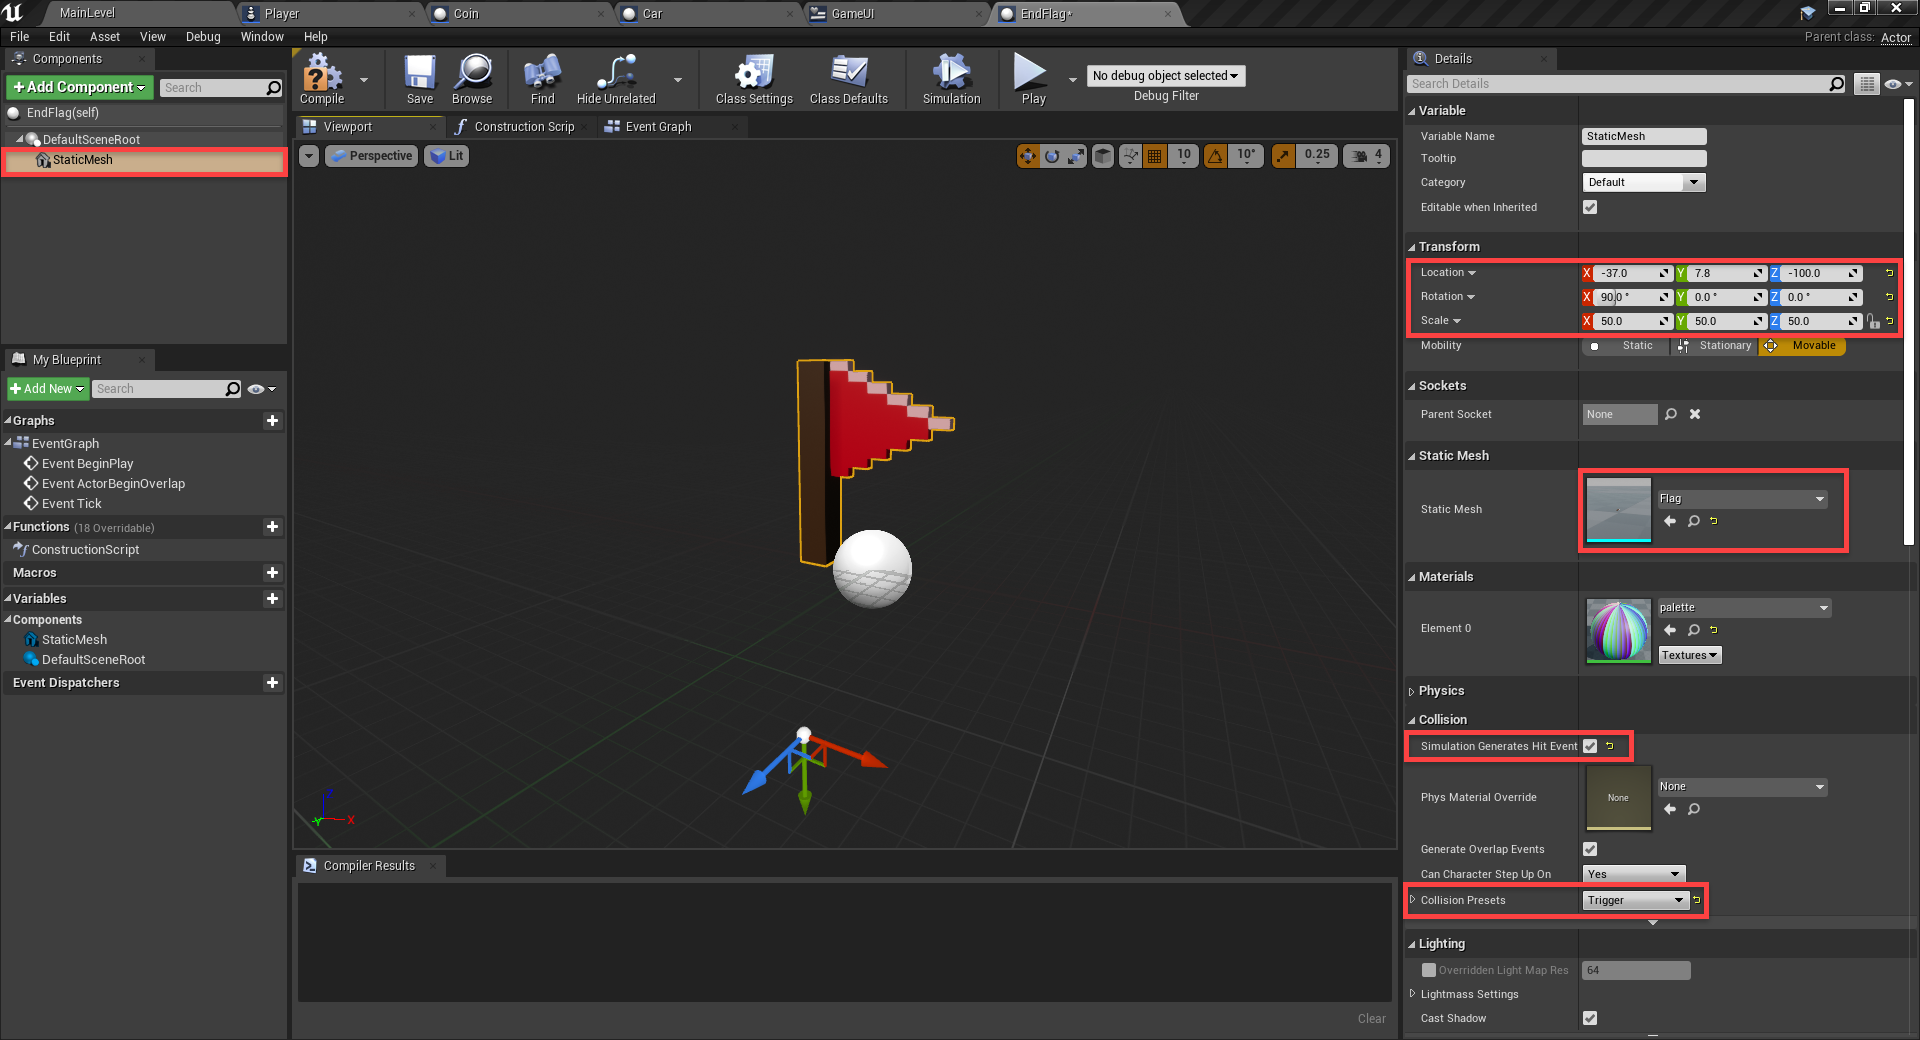
  • Set the Static Mesh to Flag
  • Set the Location to -37.0, 7.8, -100.0
  • Set the Rotation to 90, 0, 0
  • Set the Scale to 50, 50, 50
  • Enable Simulation Generates Hit Events
  • Set the Collision Presets to Trigger

EndGoal blueprint created with flag model

Over in the Event Graph, we just want to check when the flag has collided with something. If it’s the player, enable the win screen. Also enable the cursor.

Logic to trigger game win pop up in Unreal Engine project

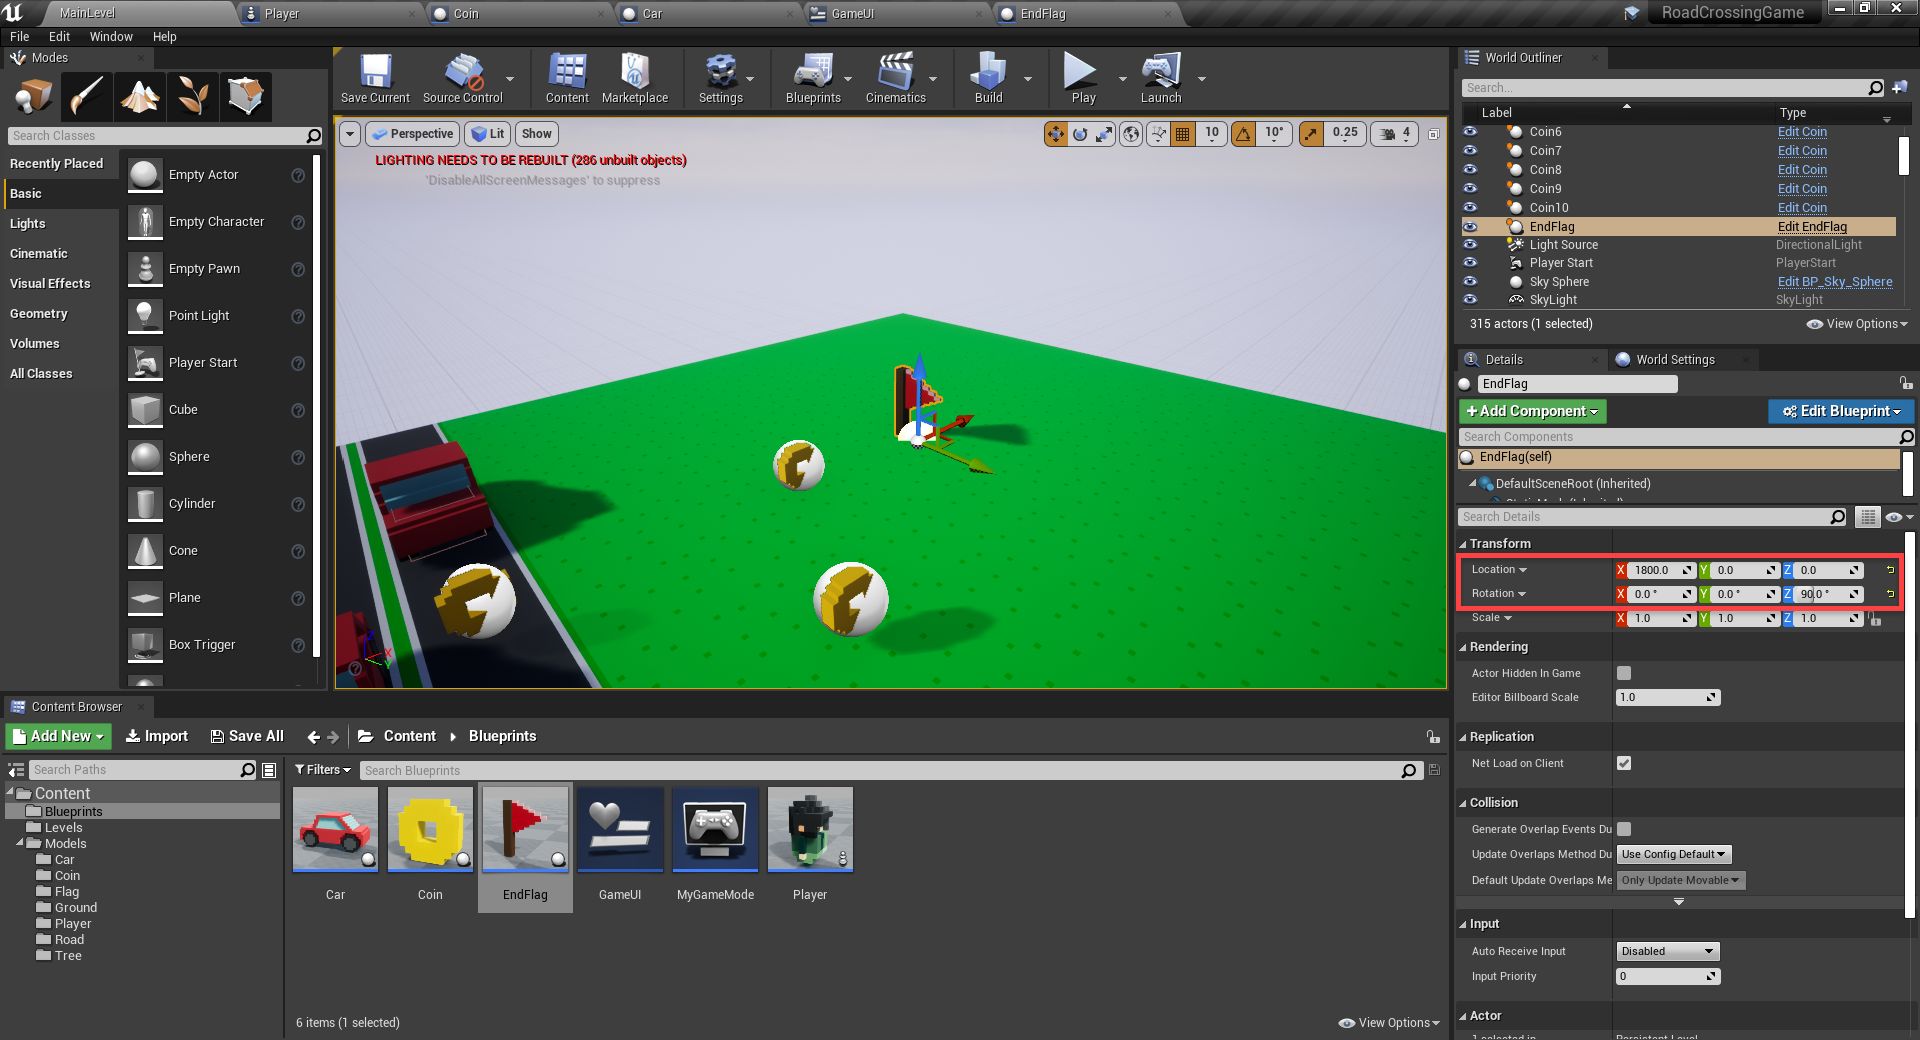
Back in the level editor, let’s drag in the flag and position it at the end of the level.

  • Set the Location to 1800, 0, 0
  • Set the Rotation to 0, 0, 90

EndGoal blueprint added to Unreal Engine level

Conclusion

There you have it!  You now have a complete road-crossing, arcade game made with Unreal Engine!  Over the course of this tutorial, we’ve learned to set up everything from coin collection to the constant flow of forward-moving cars to create obstacles for the player.  All of this was accomplished with Unreal Engine’s Blueprinting system, which handles all our game logic – including win conditions!

From here, you could expand the game by adding in more obstacles, collectibles, or even more unique levels.  You can also use these fundamentals to create an entirely new game with your new-found knowledge. Whatever you decide, good luck, and we hope you’ve learned a lot about building games with Unreal Engine!

Unreal Engine road-crossing arcade game

How to Create an Action RPG in the Unreal Engine

$
0
0

Introduction

Welcome everyone!  No matter how many years pass, RPGs remain a popular genre.  Many developers dream of making their own, whether to experiment with never-before-seen mechanics or a simple desire to tell a deep and interactive story.  Given Unreal Engine’s amazing graphical capabilities, it is also a top engine choice for many pursuing this in order to capture the unique aesthetic style they’re after.

In this tutorial, we’ll be taking the first steps on this path and show you how to create an action RPG with Unreal Engine. It will feature a third-person player controller, who can move, jump, attack and block, along with an enemy who will chase after the player and attack them. This tutorial will also cover the basics of setting animation transitions for that as well.  The project shown here can be a great basis for a much larger game, or just a good way to learn many of the systems in the Unreal Engine.  Regardless, if you’re ready to start making your own RPGs, let’s dive in.

If this is your first time using the engine, though, then we recommend you view our Unreal Engine Beginner’s tutorial first.

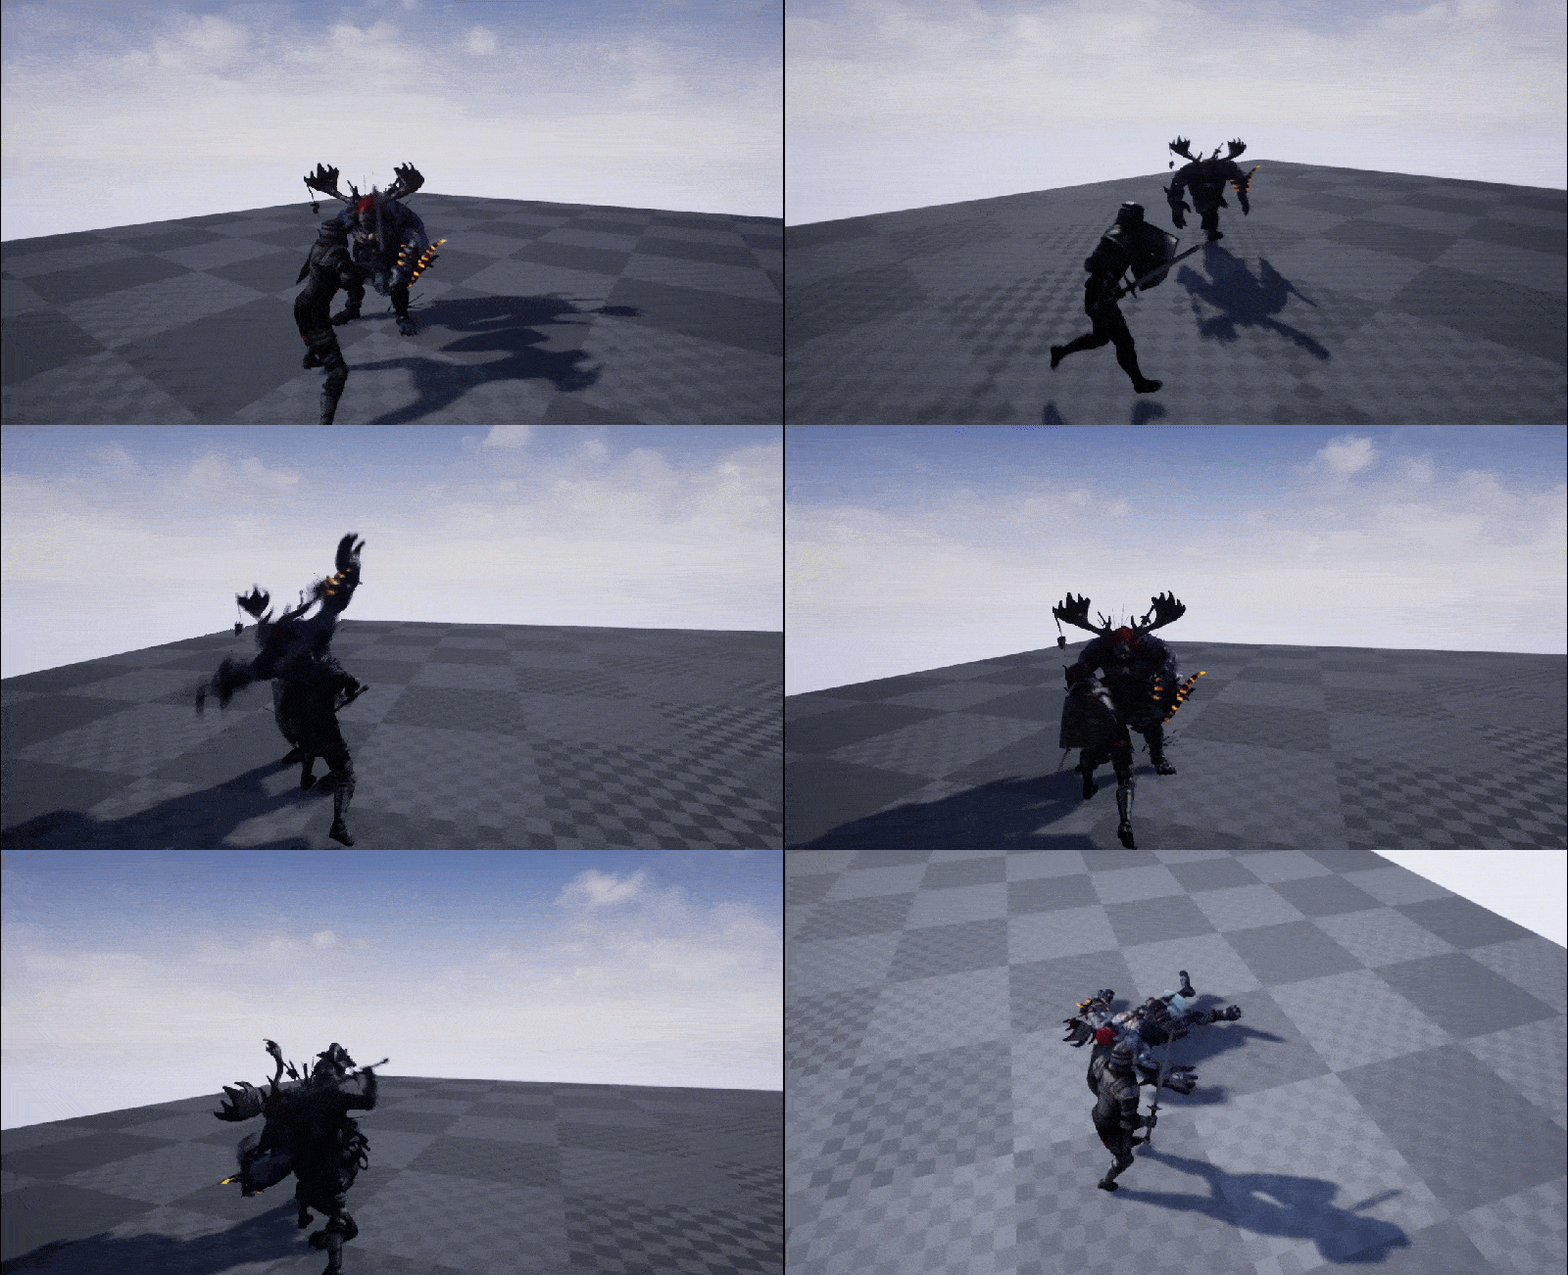
GIF of Unreal Engine action RPG

Don't miss out! Offer ends in
  • Access all 400+ courses
  • New courses added monthly
  • Cancel anytime
  • Certificates of completion

Project Files

This tutorial will be using a few models and animations from Mixamo. You can choose to get your own, or download the ones we’ll be using for the project.

Also, you can download the complete project to see how all the levels, models and blueprints interact.

Creating the Project

To begin, let’s create a new project (you don’t need to include the starter content). When the editor opens up, let’s create four new folders.

  • Animations
  • Blueprints
  • Levels
  • Models

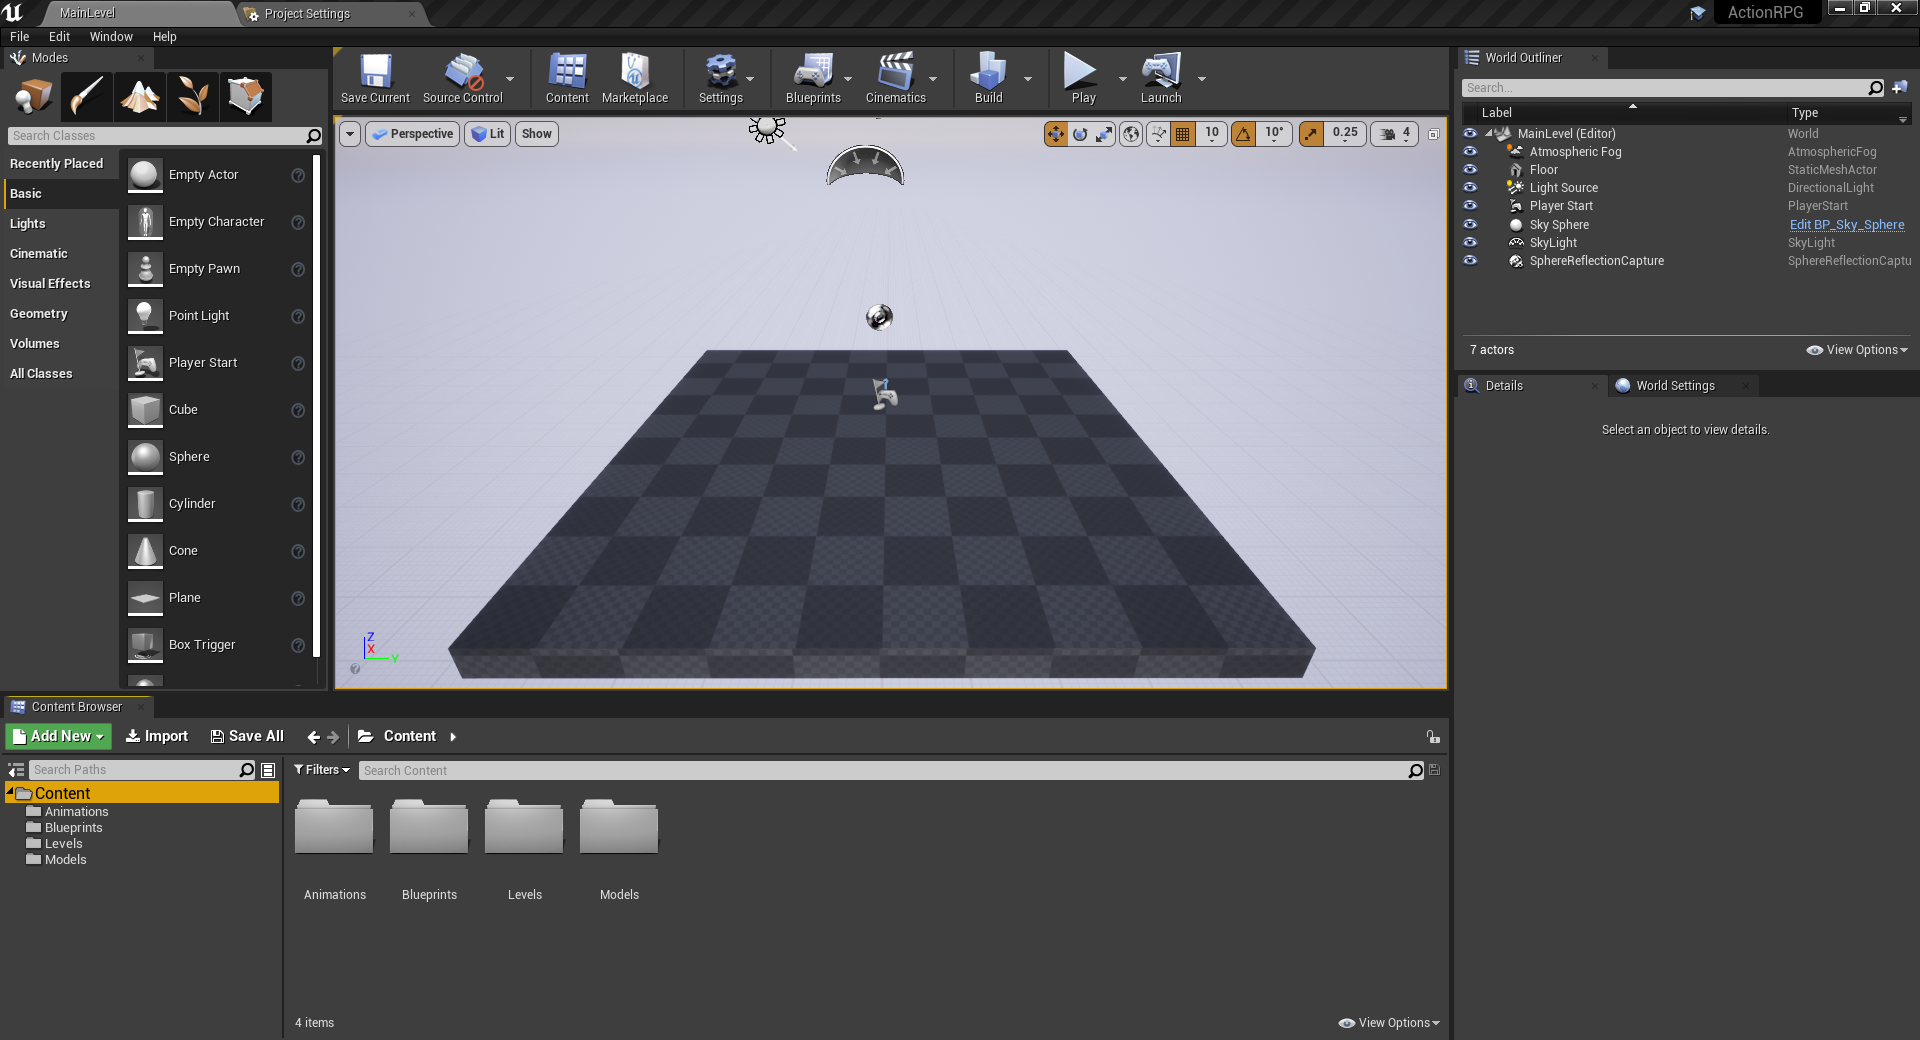
Save the current level to the Levels folder as MainLevel.

New project in Unreal Engine

Next, download the assets from the beginning of the tutorial and extract them anywhere on your computer.

  1. First, open the Models Contents Folder folder and drag the contents into our project’s Models folder.
    1. Import all those assets when promoted to.
  2. Then do the same for the Animations Contents Folder.
    1. When asked to select a skeleton for the animation, choose either the player of enemy one depending on the animation.

You should now have both models and all the enemy and player animations needed for the tutorial.

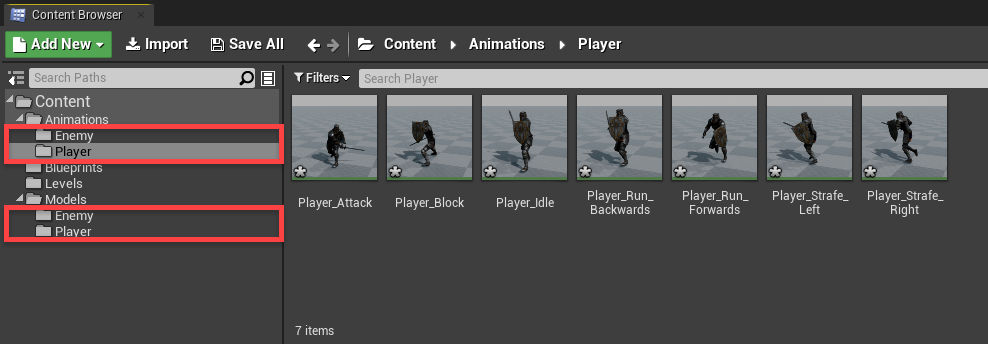
Animations and Models added for enemy and player in Unreal Engine project

Before we start creating the player, we’ll need to setup the control inputs. In the Project Settings window (Edit > Project Settings…) go to the Input screen.

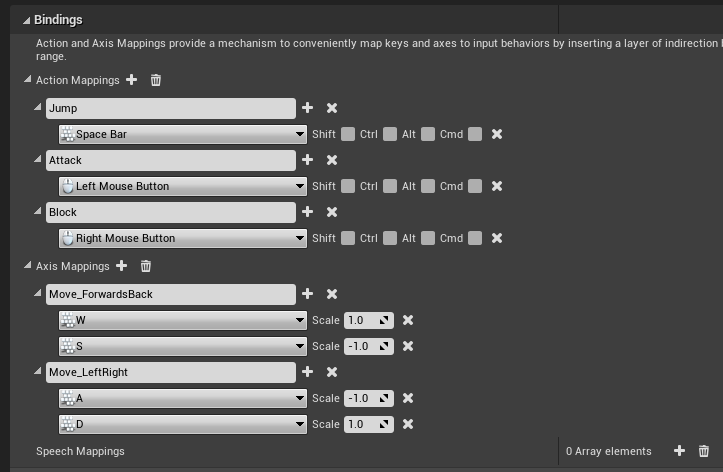
Here, you want to create three new Action Mappings and two new Axis Mappings. Fill them in as seen in the image below:

Unreal Engine project bindings for movement

Creating the Player

Time to create our player. In the Blueprints folder, create a new blueprint (parent class of Character) called Player. Double-click it to open the blueprint editor.

We have a few components already created for us.

  • CapsuleComponent (collider)
    • ArrowComponent (defines the forward direction)
    • Mesh (our player’s skeletal mesh)
  • CharacterMovement (movement, jumping, etc)

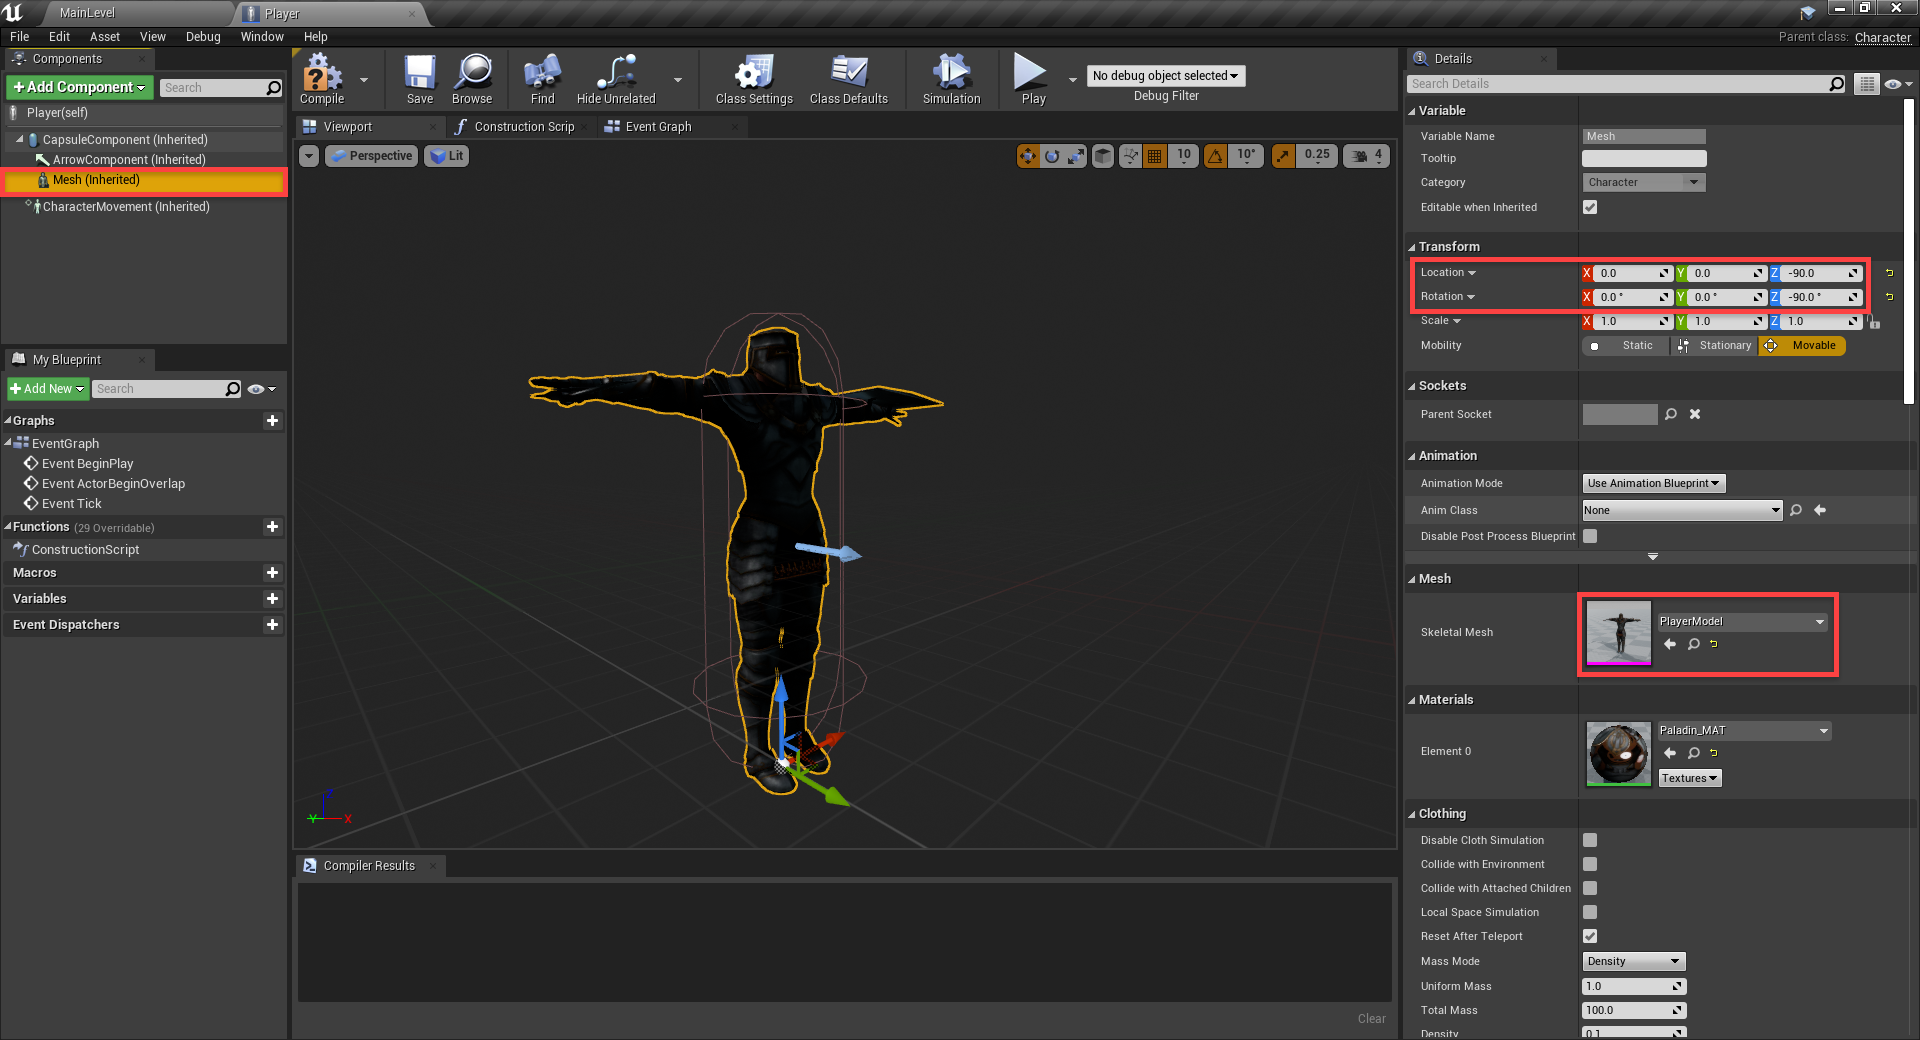
First, select the Mesh.

  • Set the Skeletal Mesh to PlayerModel
  • Set the Location to 0, 0, -90
  • Set the Rotation to 0, 0, -90

Unreal Engine Player Blueprint setup

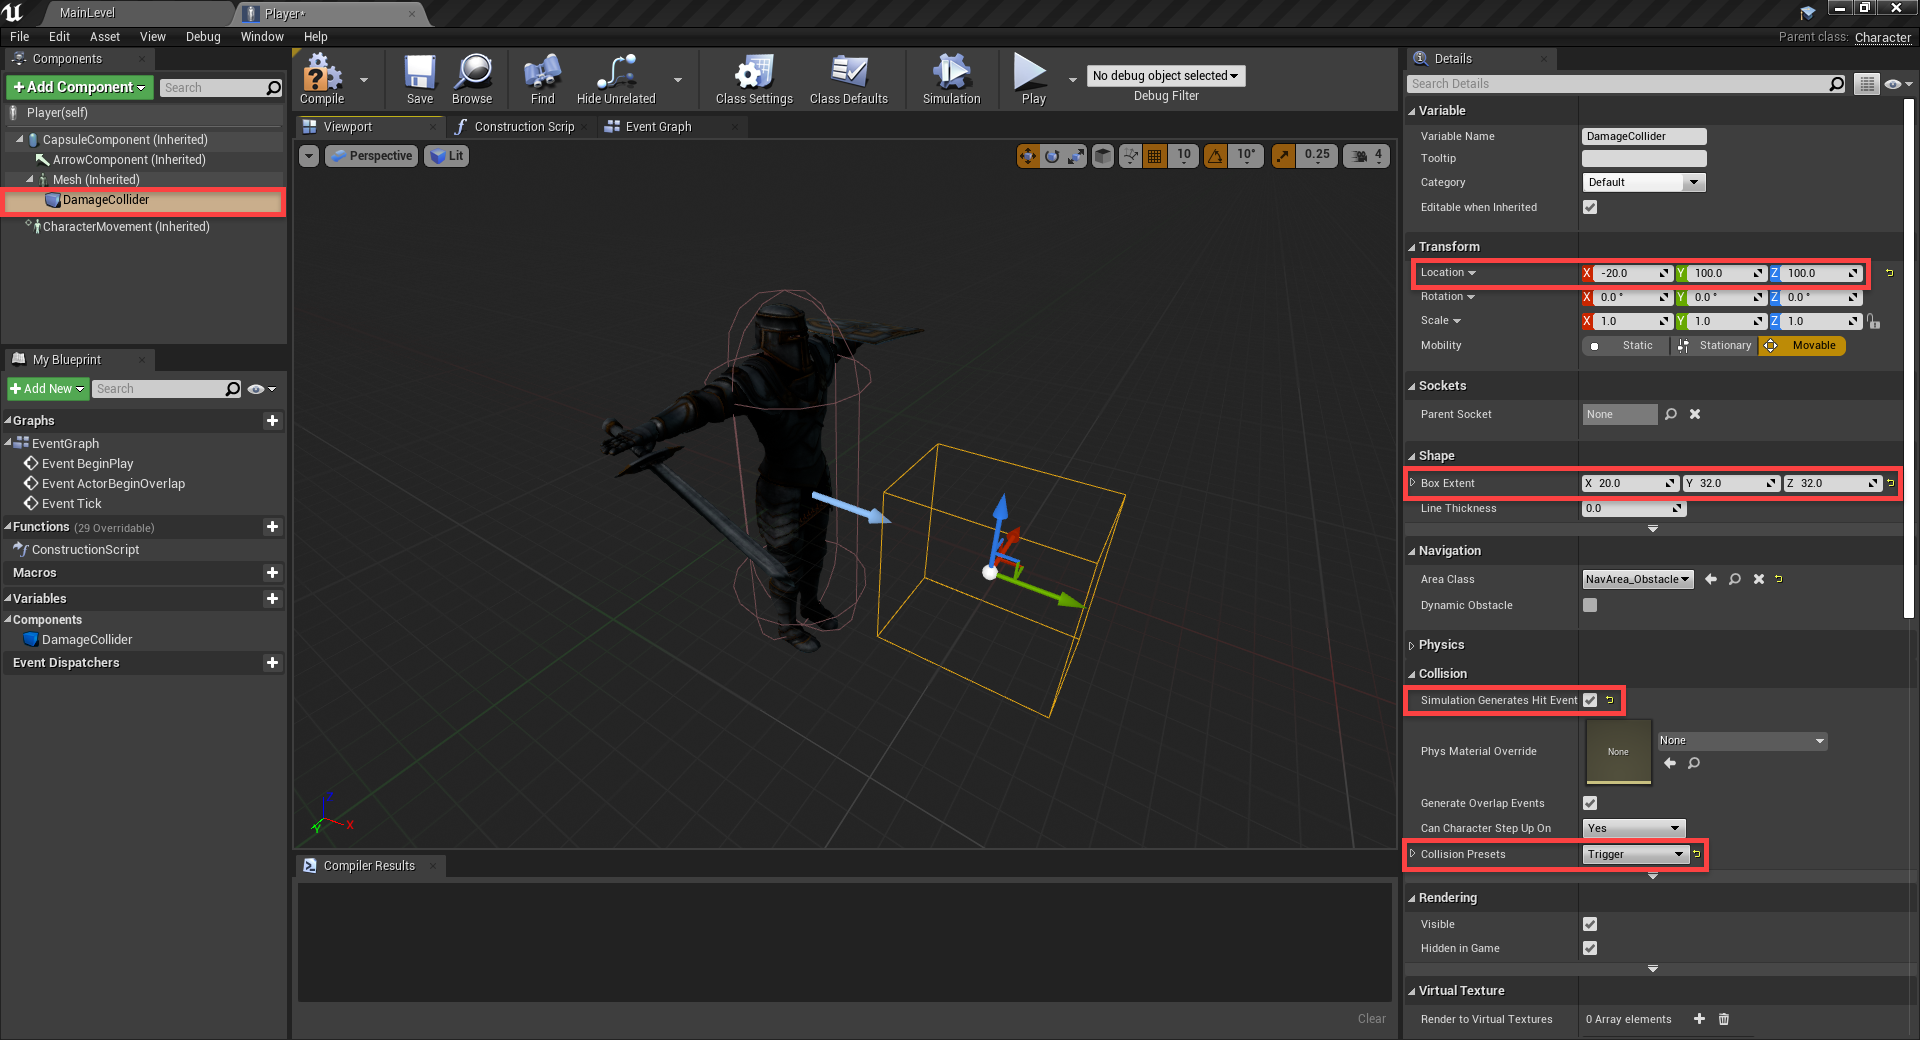
When attacking, we’ll need to check if we’re actually hitting anything. This will be done with a damage collider. Create a new Box Collision component and make it a child of the mesh.

  • Set the Location to -20, 100, 100
  • Set the Box Extents to 20, 32, 32
  • Enable Simulation Generates Hit Events
  • Set the Collision Presets to Trigger

Damage collider added to Player Blueprint in Unreal Engine

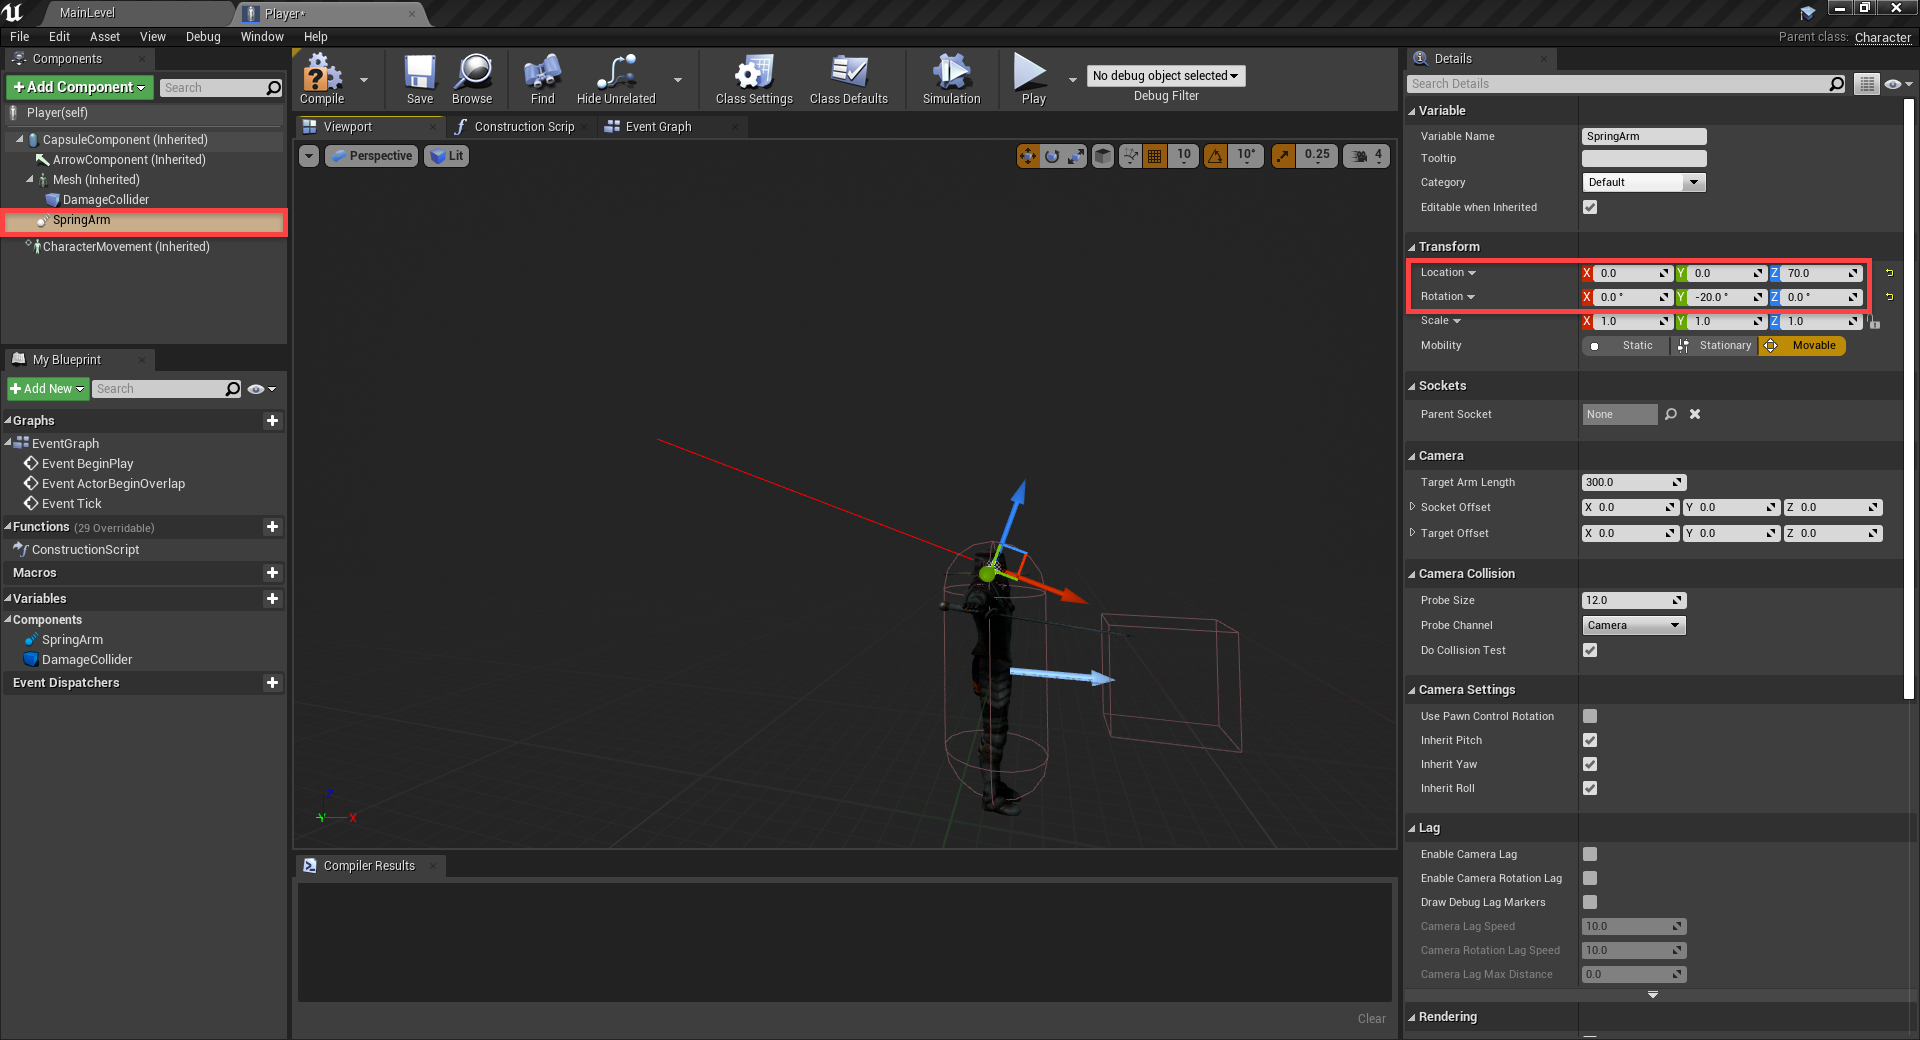
Next, we need to setup the camera. In order to have it orbit around our player, we’ll first create a Spring Arm component. This holds its children at a distance.

  • Set the Location to 0, 0, 70
  • Set the Rotation to 0, -20, 0

Spring Arm Component added to Unreal Engine project

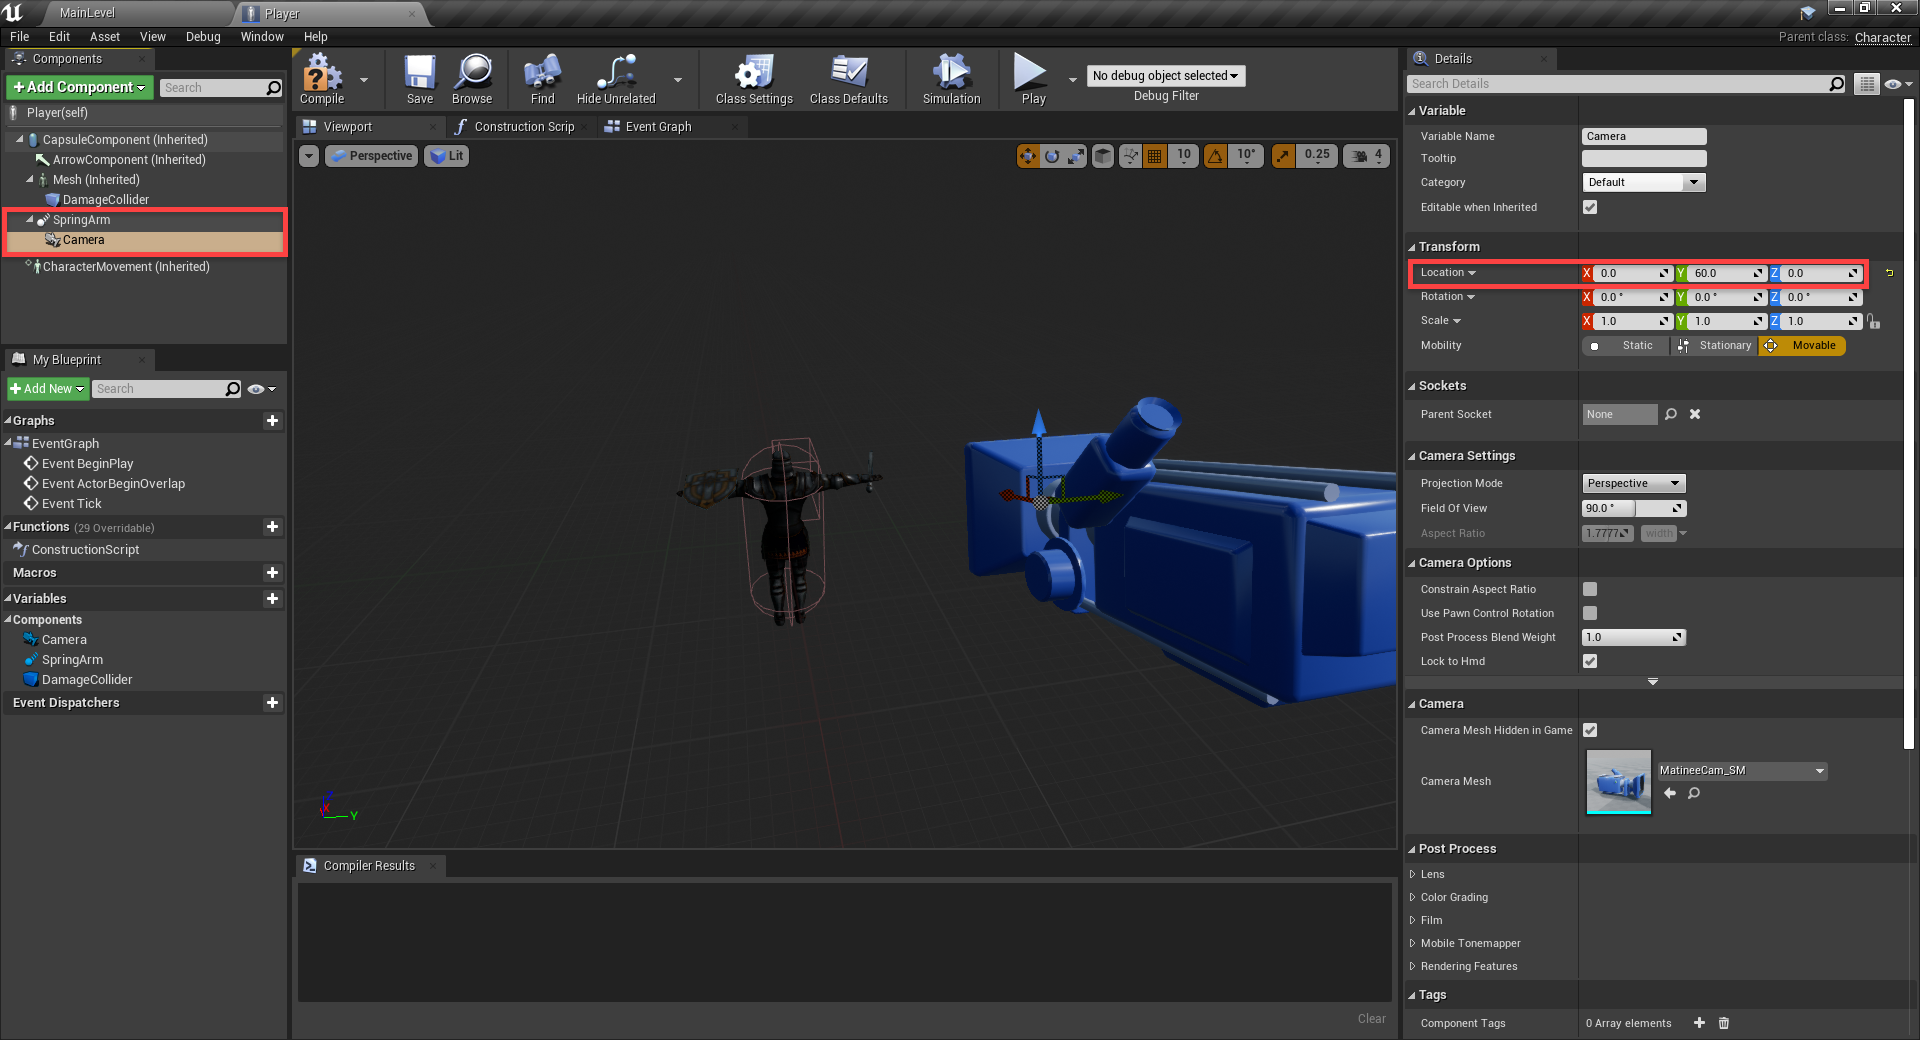
As a child of the spring arm, create a Camera component.

  • Set the Location to 0, 60, 0

Camera added to Unreal Engine project

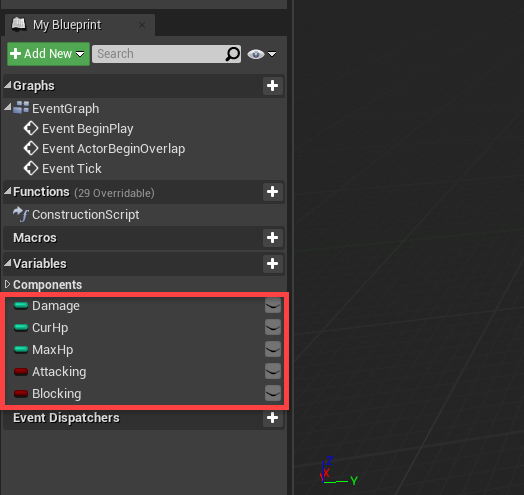
Now that we’ve got all of our components setup, we can begin with our variables.

  • Damage (Integer)
  • CurHp (Integer)
  • MaxHp (Integer)
  • Attacking (Boolean)
  • Blocking (Boolean)

You can then click the Compile button and fill in some default values.

  • Damage = 1
  • CurHp = 5
  • MaxHp = 5

Various Components added to Unreal Engine blueprint

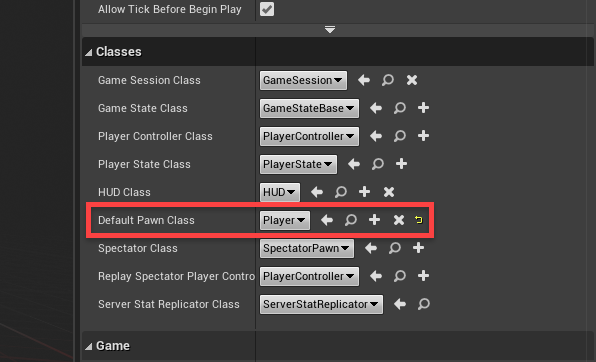
Next, let’s go back to the level editor and create a new blueprint. This is going to be of parent class GameModeBase and it’s going to be called MyGameMode. Open it up, and all we’re going to do here is set the Default Pawn Class to Player.

Default Pawn Class set to Player in Unreal Engine

Back in the level editor, let’s go to the World Settings panel and set the GameMode Override to our MyGameMode. Now when we press play, the player should spawn.

MyGameMode blueprint added to Unreal Engine project

Camera Orbit Logic

Let’s go to our player’s event graph and begin by implementing the camera orbit functionality. This will allow us to move the mouse around, causing the camera to move around the player like in a third-person game.

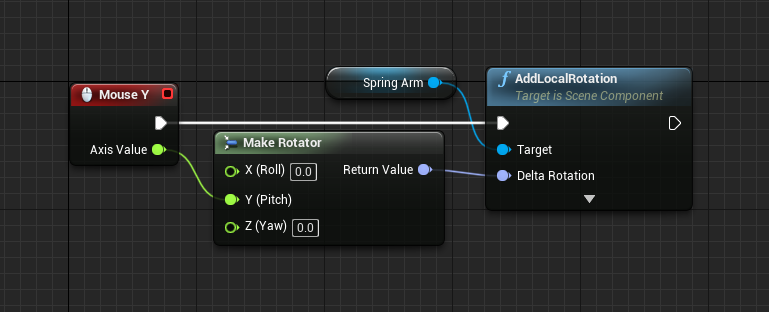
The Event Mouse Y node gets triggered when we move the mouse up and down. We’re creating a rotation along the Y axis and adding that to the spring arm. If you press play, you should see it in work.

Blueprint logic to rotate camera in Unreal Engine

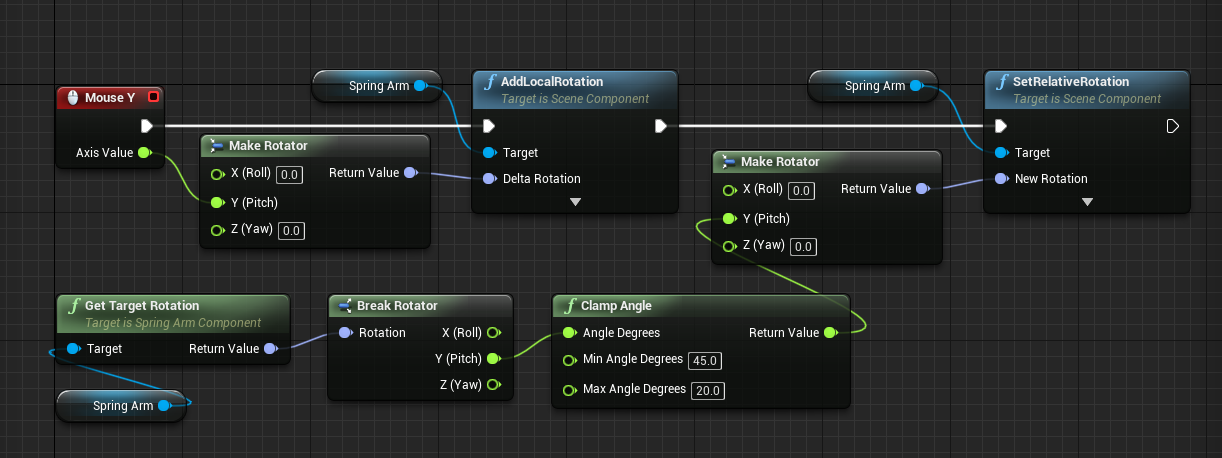
One problem though, is that we can rotate all the way around. What we need to do, is clamp the rotation. Prevent it from moving too far up and too far down. We’ll be using the Clamp Angle node to clamp the Y rotation axis. Now if you press play, you’ll see that there’s a limit to where you can rotate the camera vertically.

Event Graph logic to clamp camera rotation in Unreal Engine

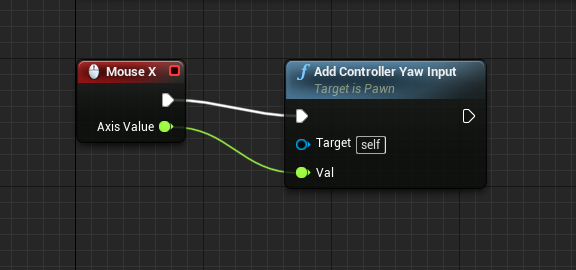
For the horizontal rotation, we can just use the Event Mouse X node and plug that into the Add Controller Yaw Input node. This will automatically rotate the player vertically.

Logic for horizontal camera rotation in Unreal Engine

We now have a fully working camera orbit.

Moving the Player Around

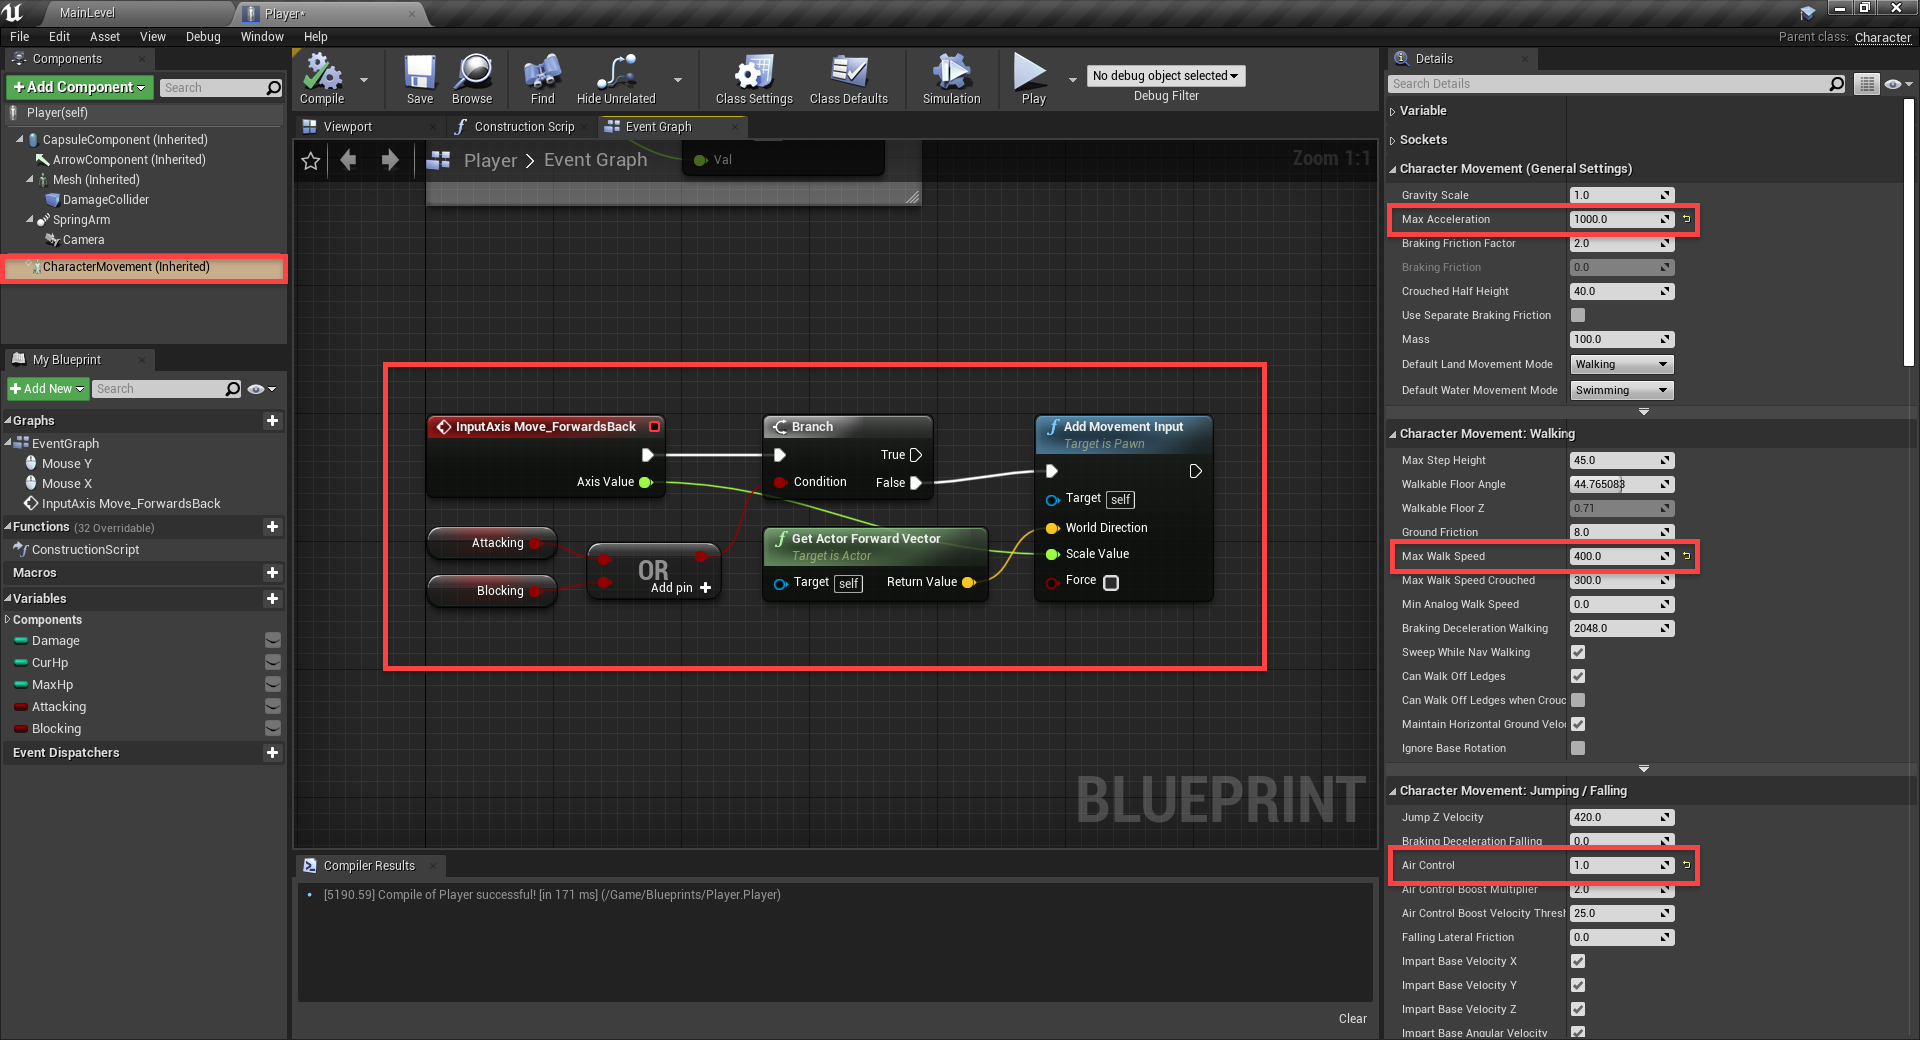
For the player movement, we’re first going to be checking for when the player is using the Move_ForwardsBack input axis. We’ll then check if they’re currently attacking or blocking. If not, then we’ll move them in the respective direction.

We can also select the CharacterMovement component to change some of the movement properties.

  • Set the Max Acceleration to 1000
  • Set the Max Walk Speed to 400
  • Set the Air Control to 1.0

Now if you press play, you should be able to move forwards and back relative to where you’re facing.

Event Graph logic for player movement

Horizontal movement is basically the same, but we’re checking for the Move_LeftRight input and setting the world direction to the player’s right vector.

Event logic for horizontal player movement in Unreal Engine

If you press play, you should see that we can now fully move around. Since we’re using the character parent class, it comes with a bunch of pre-made things such as jumping. To implement jumping, we just need to check if we’re on the ground, then trigger the jump node.

Event Graph logic to allow player to jump

Attacking and Blocking

The player can attack and block incoming attacks. First, for attacking we’ll check for the appropriate input and make sure we’re not already attacking or blocking. Then we’ll set the attacking variable to true, wait 1.5 seconds (duration of the attack animation) and set it back to false.

Event Graph logic for player attacking in action RPG

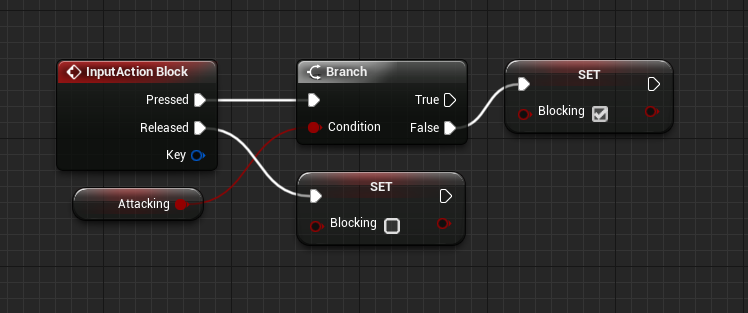
It’s similar for blocking. We’ll check for the input, make sure we’re not attacking then set the blocking variable to true. When we let go of the button, we’ll set it to false.

Blocking Event Graph logic for action RPG character

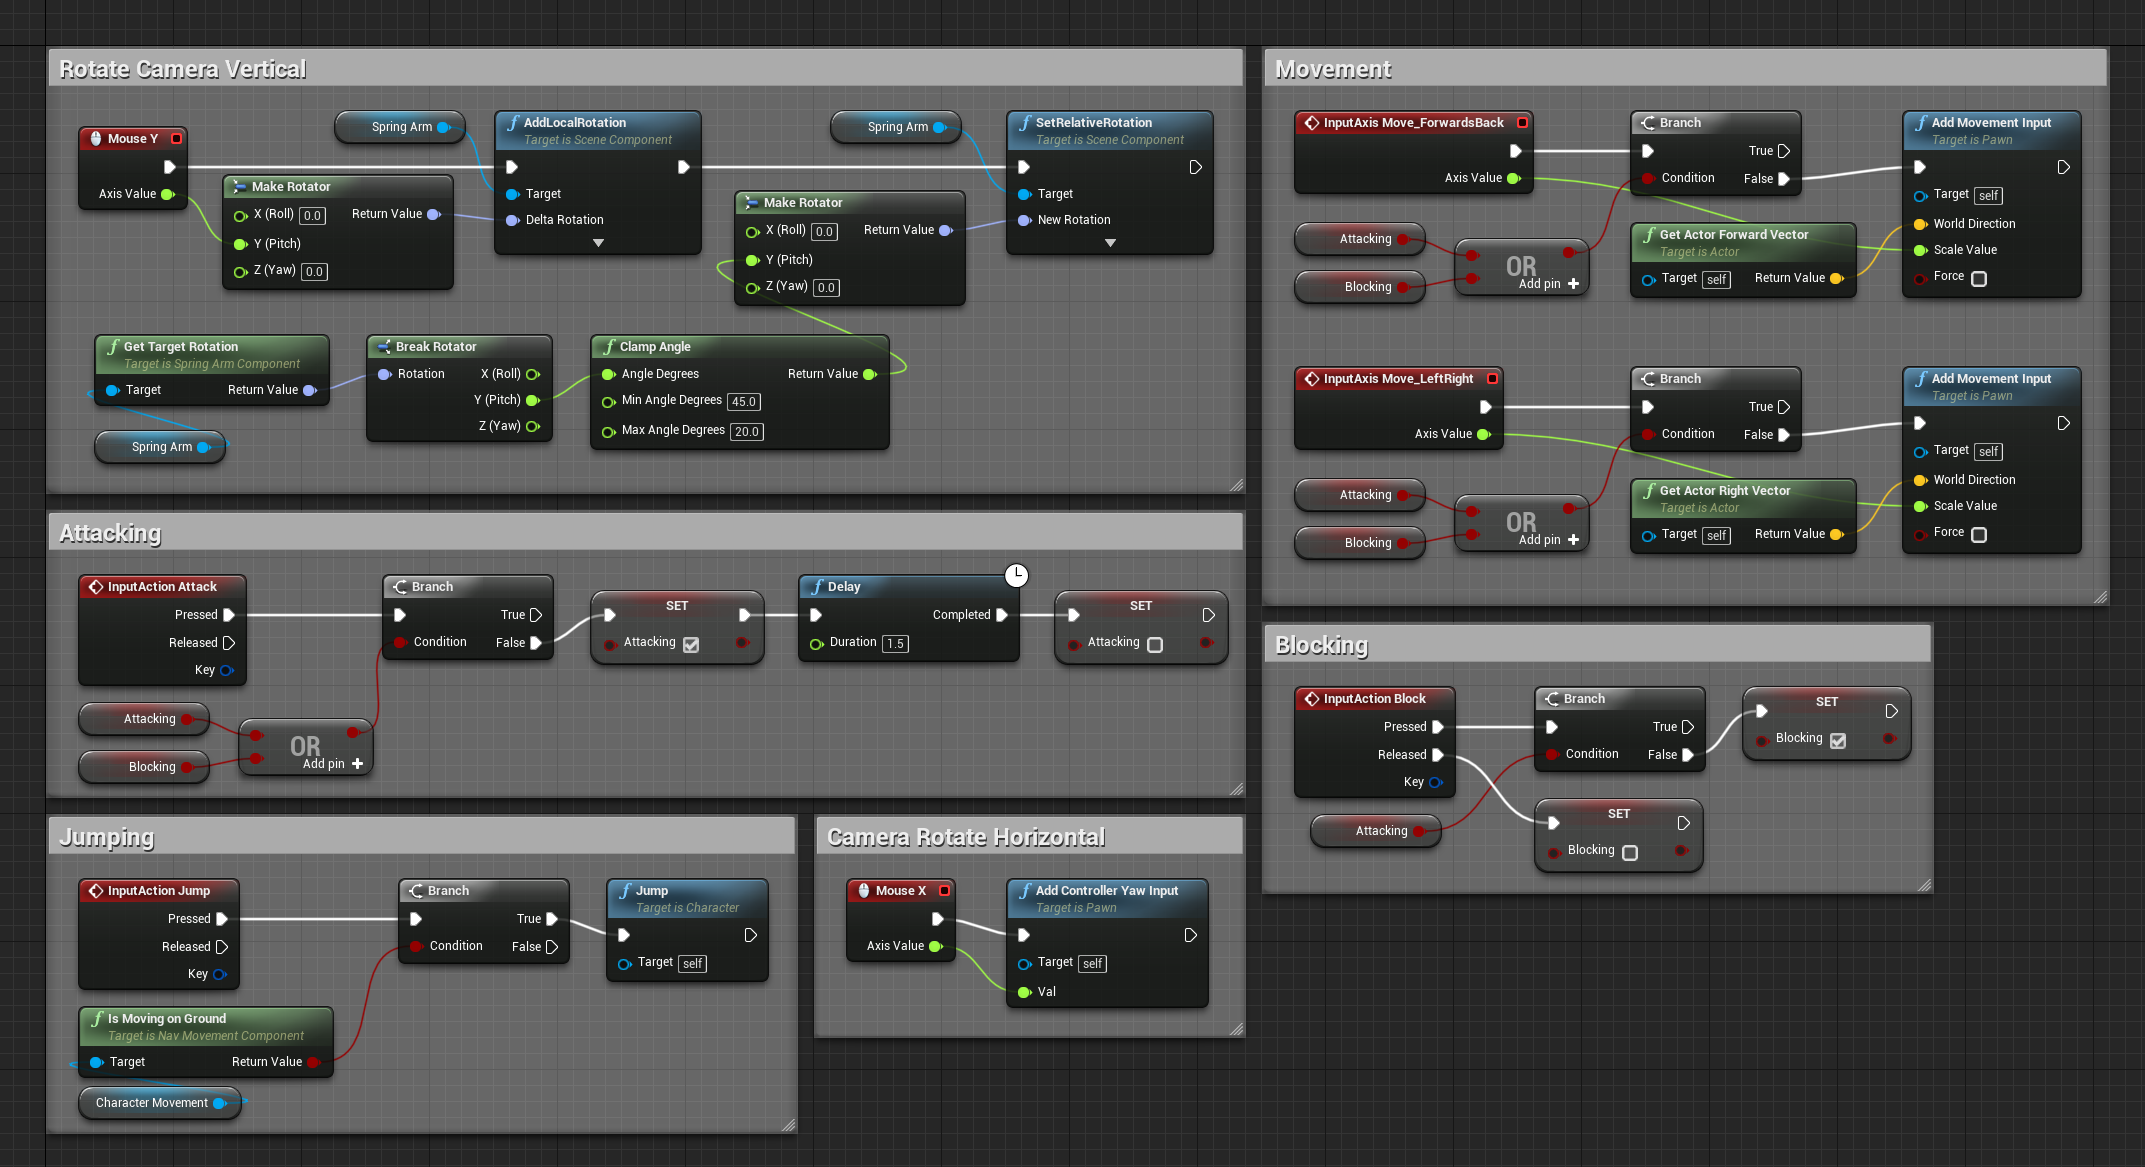
Here’s an overview of everything you should have in the graph so far. I’ve commented the different sections to make it easier to read. You can do this by selecting a group of node, then right clicking them and clicking Create Comment From Selection.

Event Graph overview for camera movement, player movement, and player combat

Player Animations

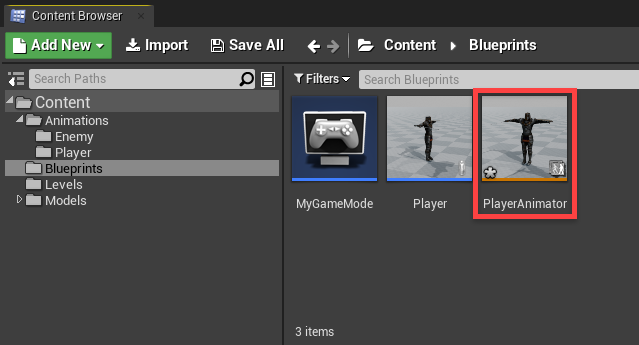
We’ve got our player setup but the model is static. To fix this, let’s go to the Blueprints folder and create a new Animation > Animation Blueprint. When it asks for a skeleton, choose the player model. Call the blueprint PlayerAnimator.

PlayerAnimator blueprint added to Unreal Engine Content Browser

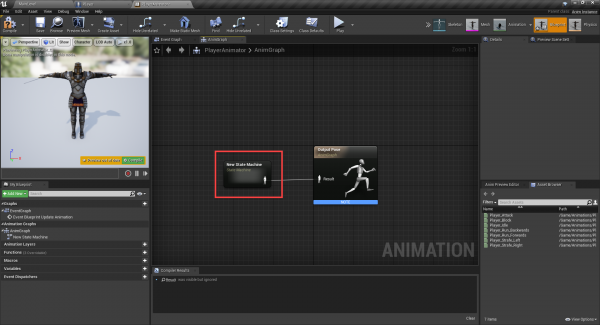
Double-click to open it up. First, we’re going to create a new state machine (right click and create state machine node). Plug this into the Output Pose. A state machine basically determines what animation to play based on given inputs (are we moving? attacking? blocking?).

Output Pose added to Player state machine

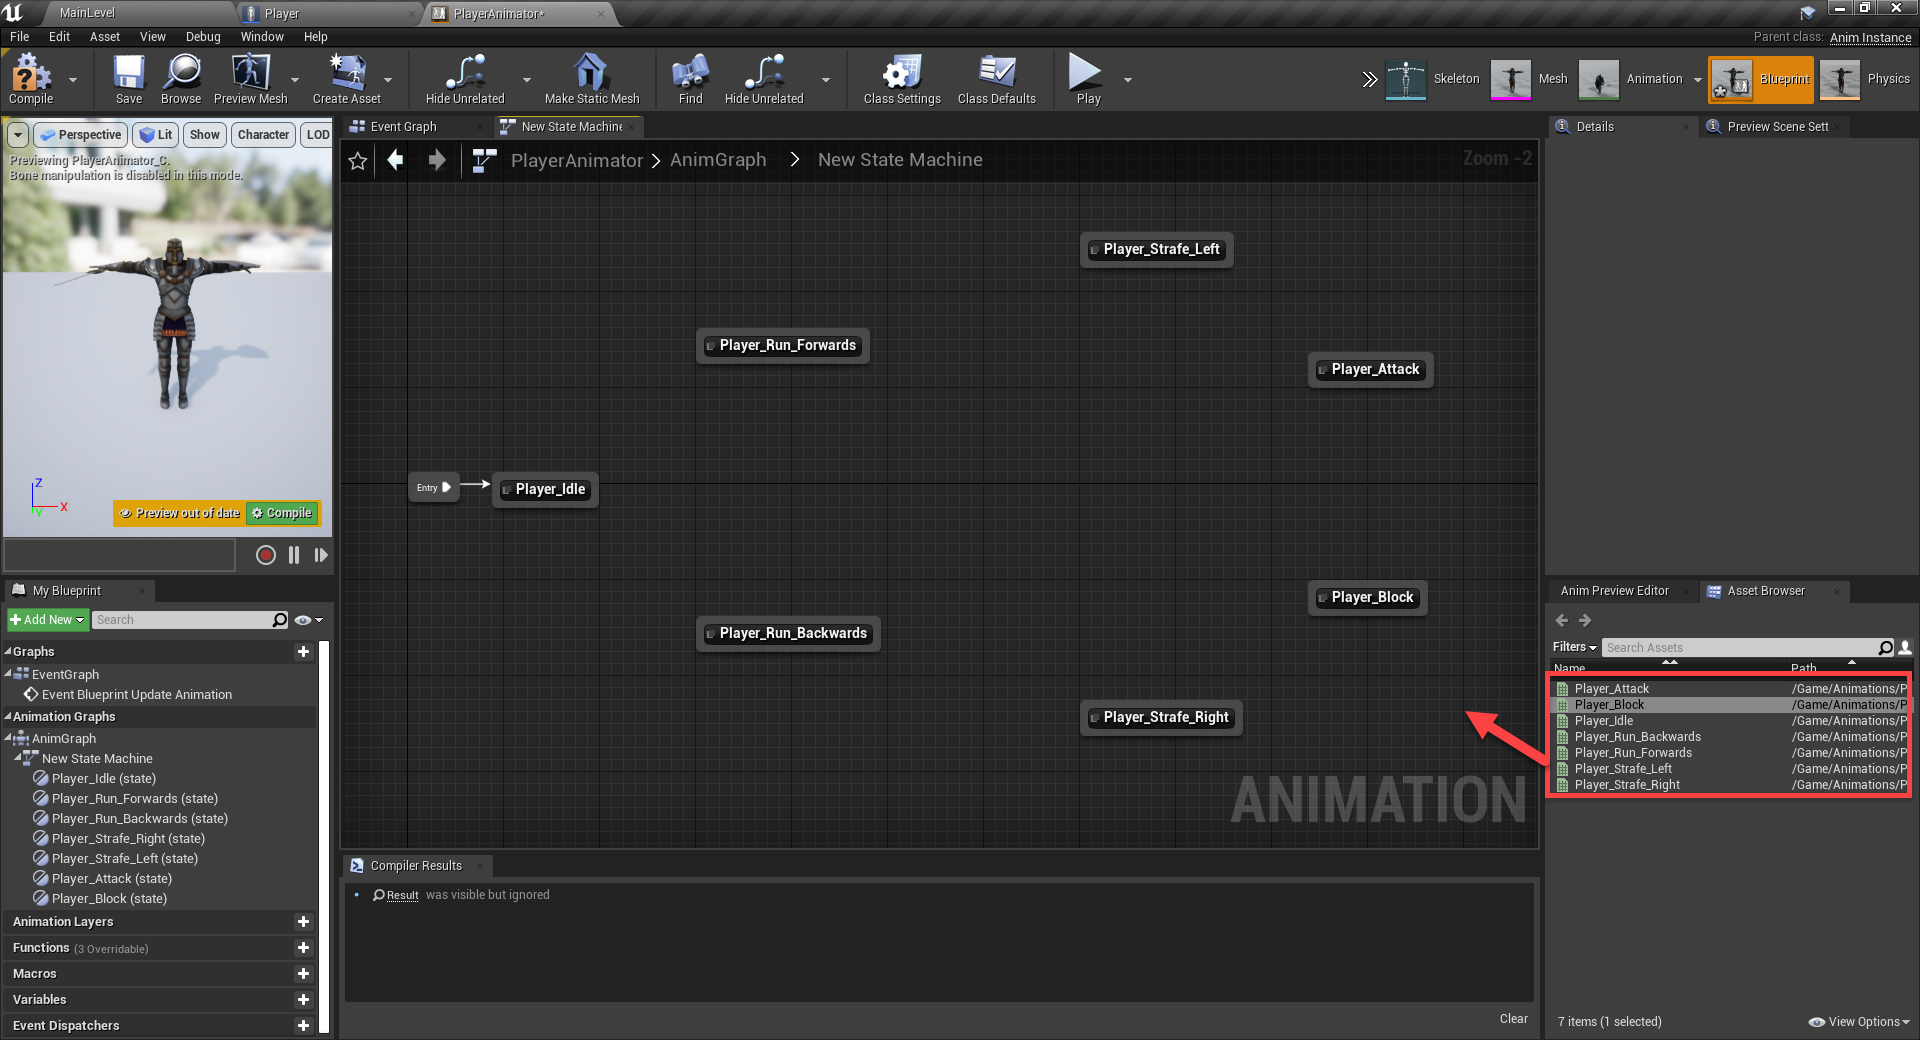
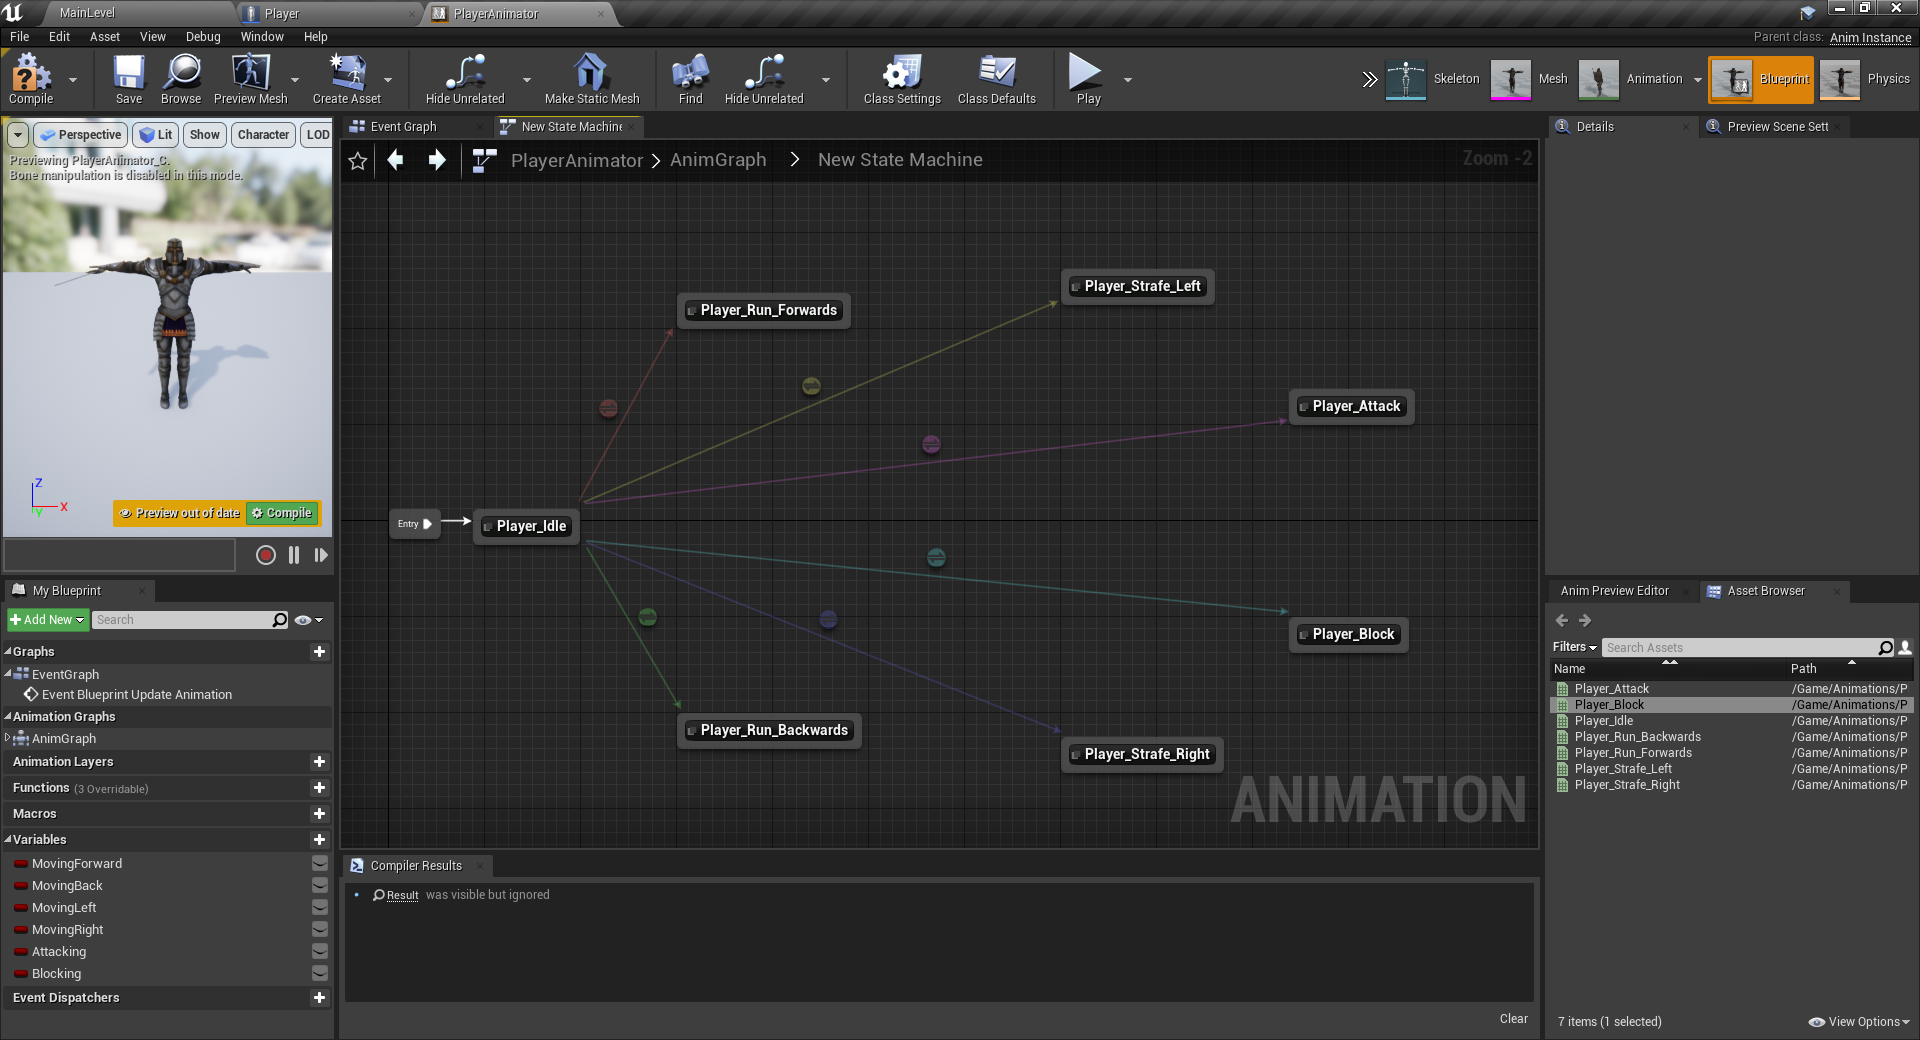
Double-click on the state machine to open it up. This is where we’re going to connect the 7 animations we have. Drag them in like so, and connect the entry node to the idle animation.

New state machine created for Player animations

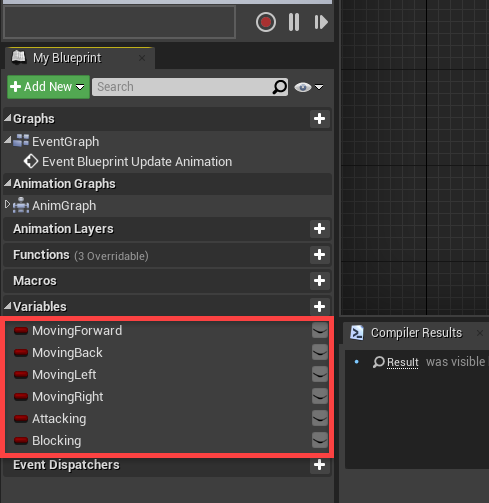
At the bottom left we can create the variables we’ll be using. All these are booleans.

Variables to track player actions for state machine

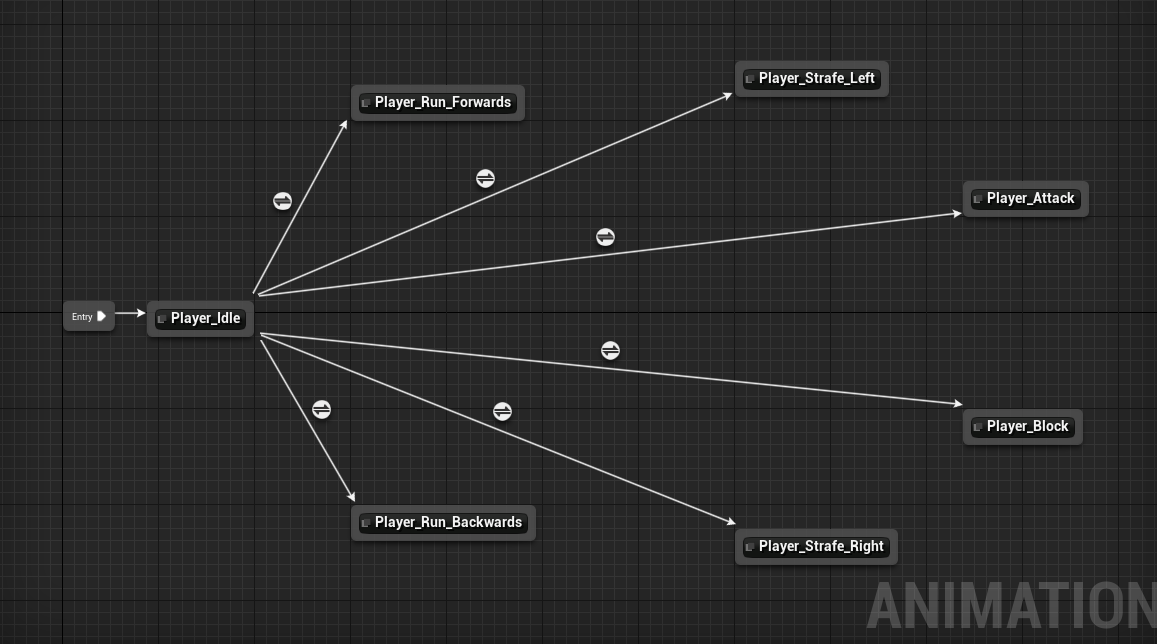
Let’s start with the idle animation. Connect that to all other animations which we can transition to.

Player idle animation connected to other movement and combat states

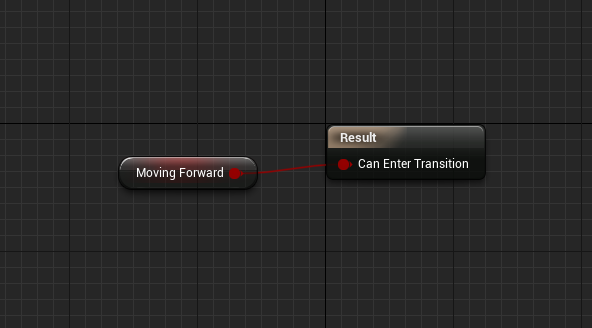
You’ll see that each connection has a white circle button. Double-click on the run forwards transition, it will take us to a graph where we can setup a condition. This is going to return true or false for whether or not we can enter the transition.

Logic to control transitions when moving forward

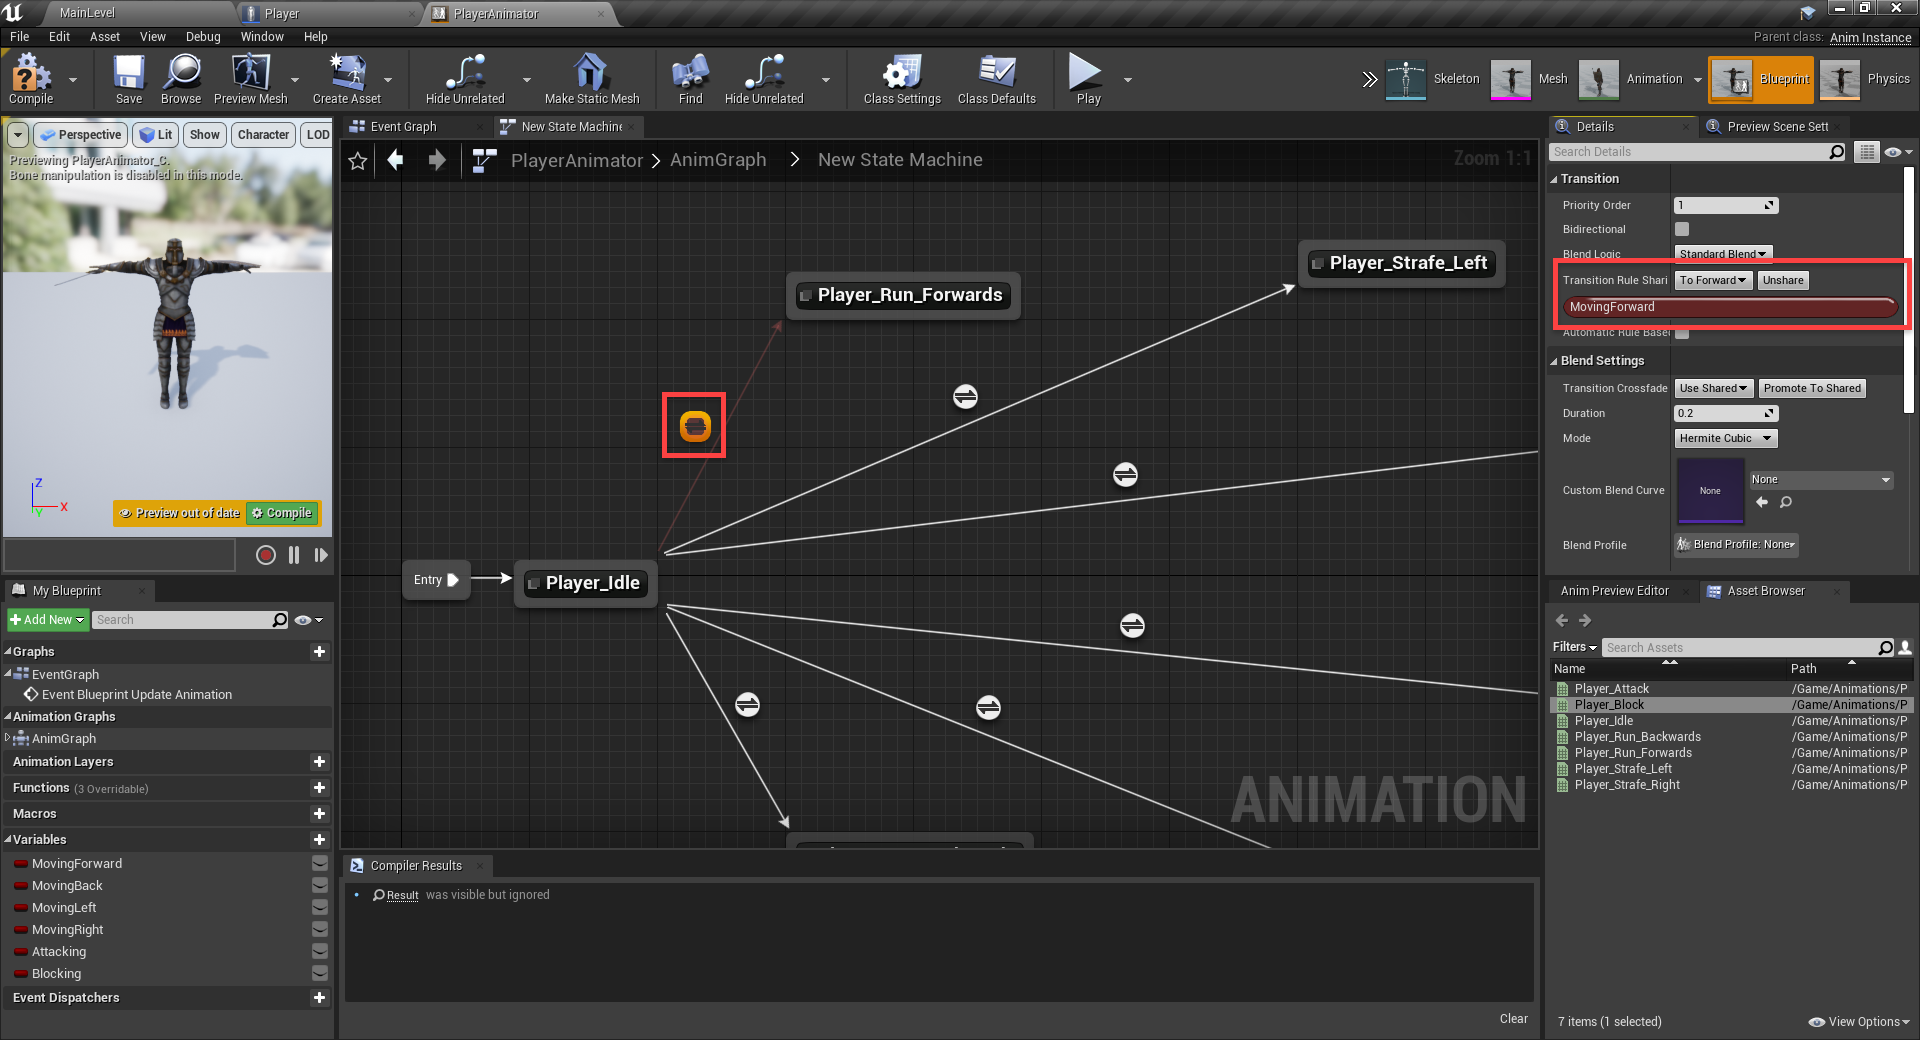
We can then go back to the state machine. Select the transition we just made and click Promote to Shared. Call it To Forward. This is basically a saved transition rule we can use again without needing to go back into the same graph.

Unreal Engine with saved transition logic saved for more use

Let’s go ahead and fill in the rest for the appropriate transitions.

Transitions added to Player animation state machine

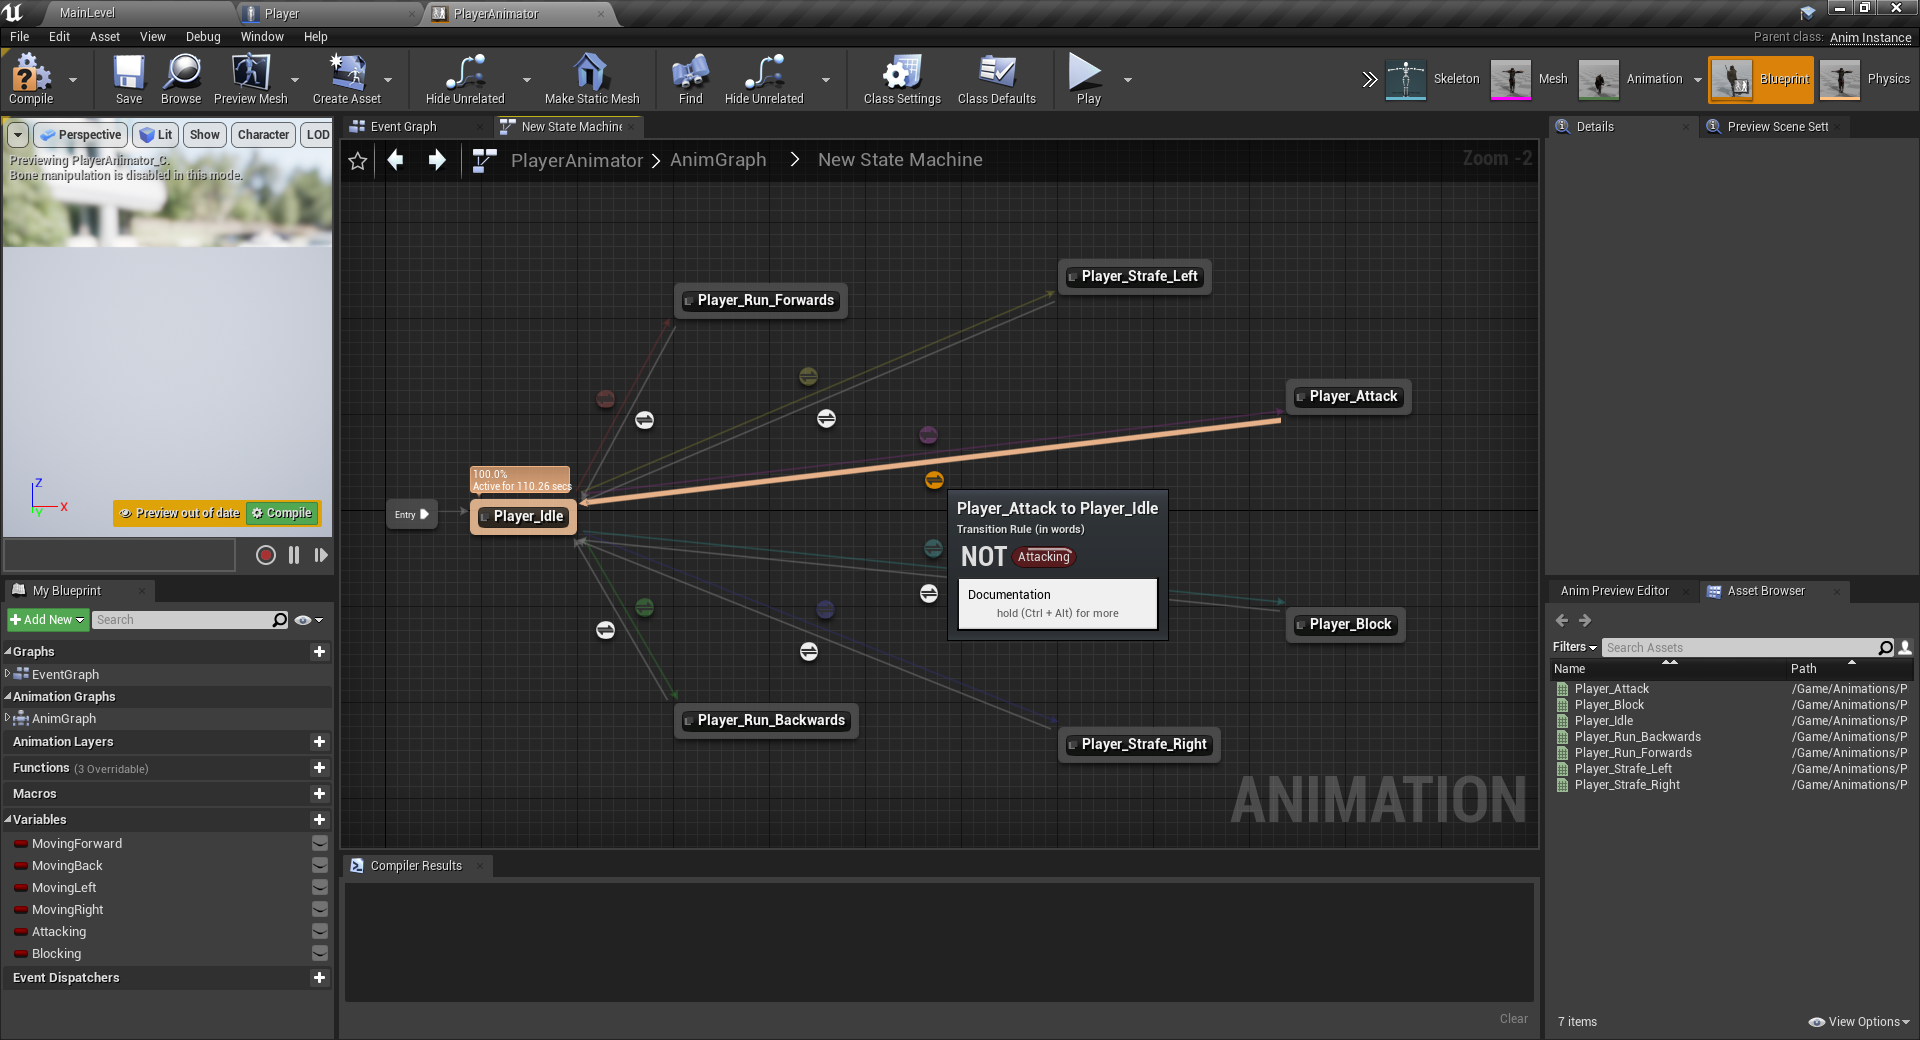
We’ve got transitions from the idle animation, but what about back to it? Create a transition from each animation, back to idle. The condition is going to be the same as the one going to it, but with a not node in-between. Basically the opposite.

Player state machine showing condition for transition

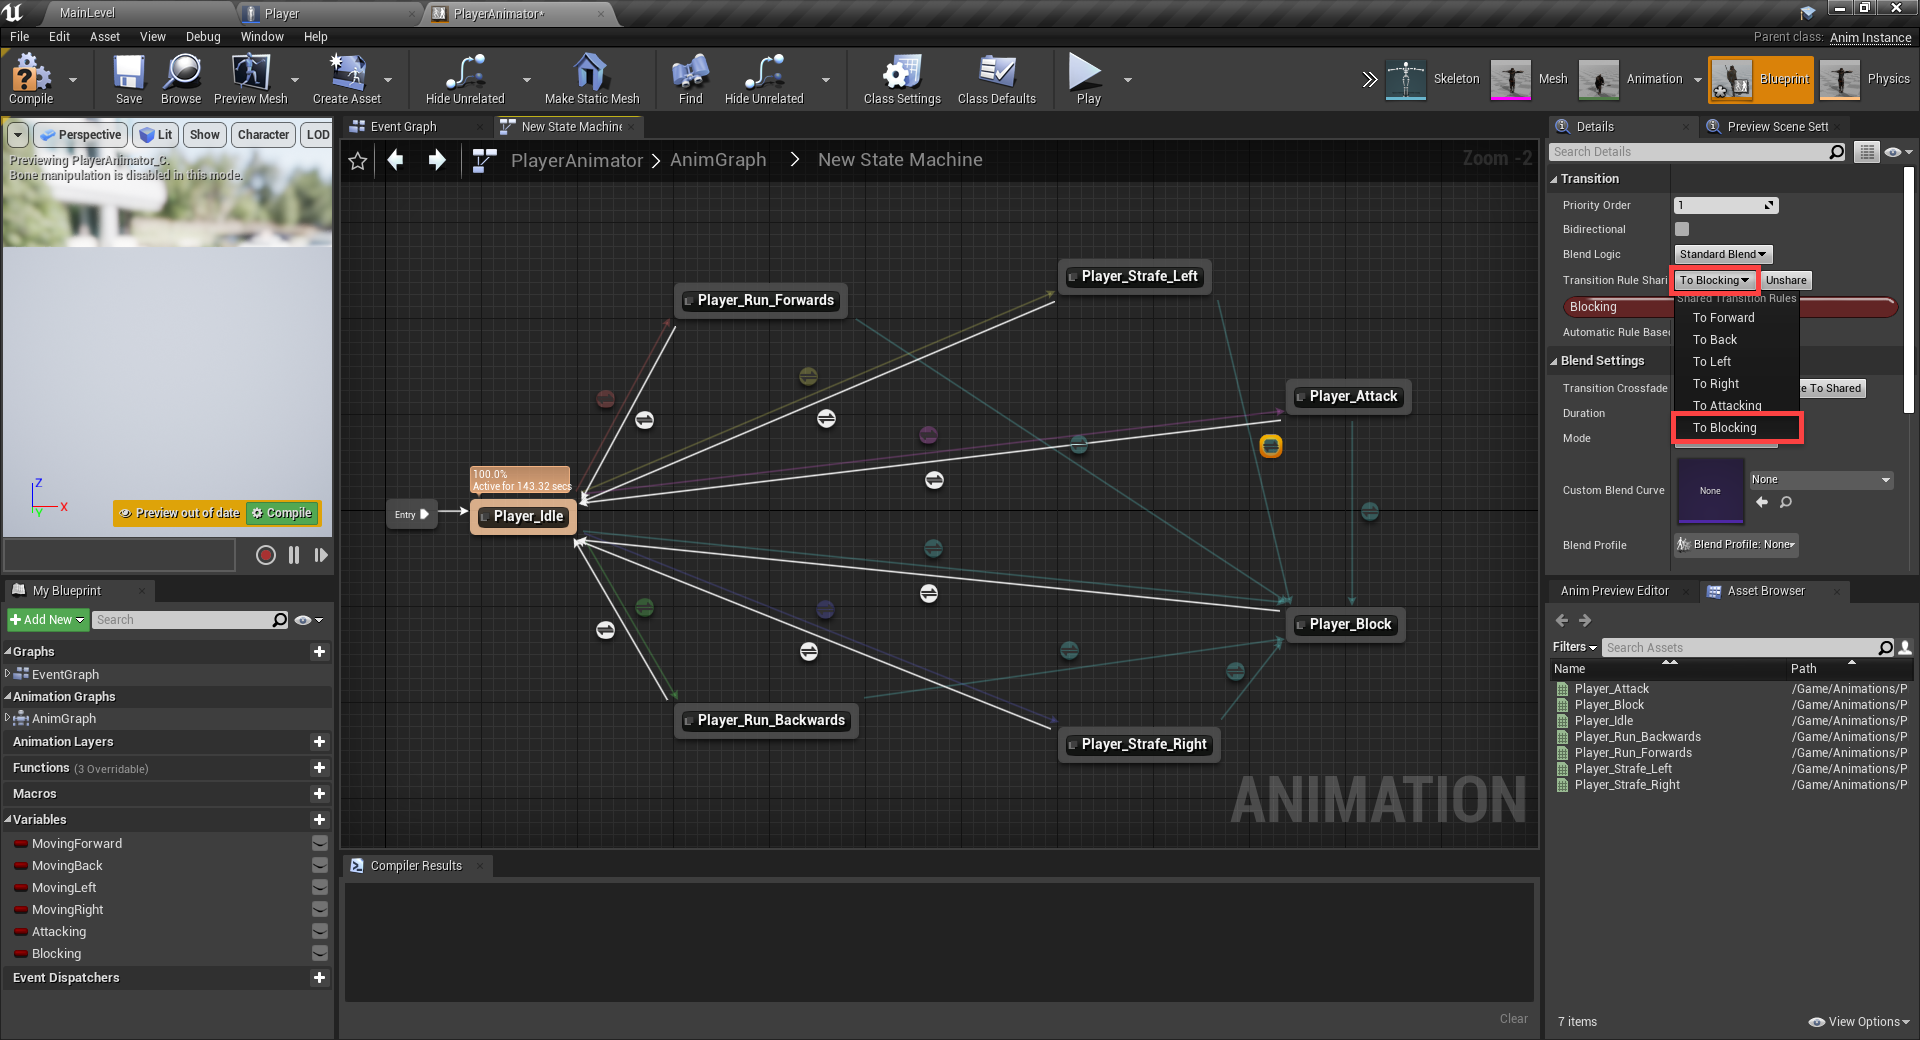
From here, all the animations are pretty much the same in the way they’re connected, except for the Player_Block one. For that, we can only transition back to idle. So create a transition from all the other animations, using the To Blocking transition rule.

Blocking player state connected to all other animations in Player State Machine

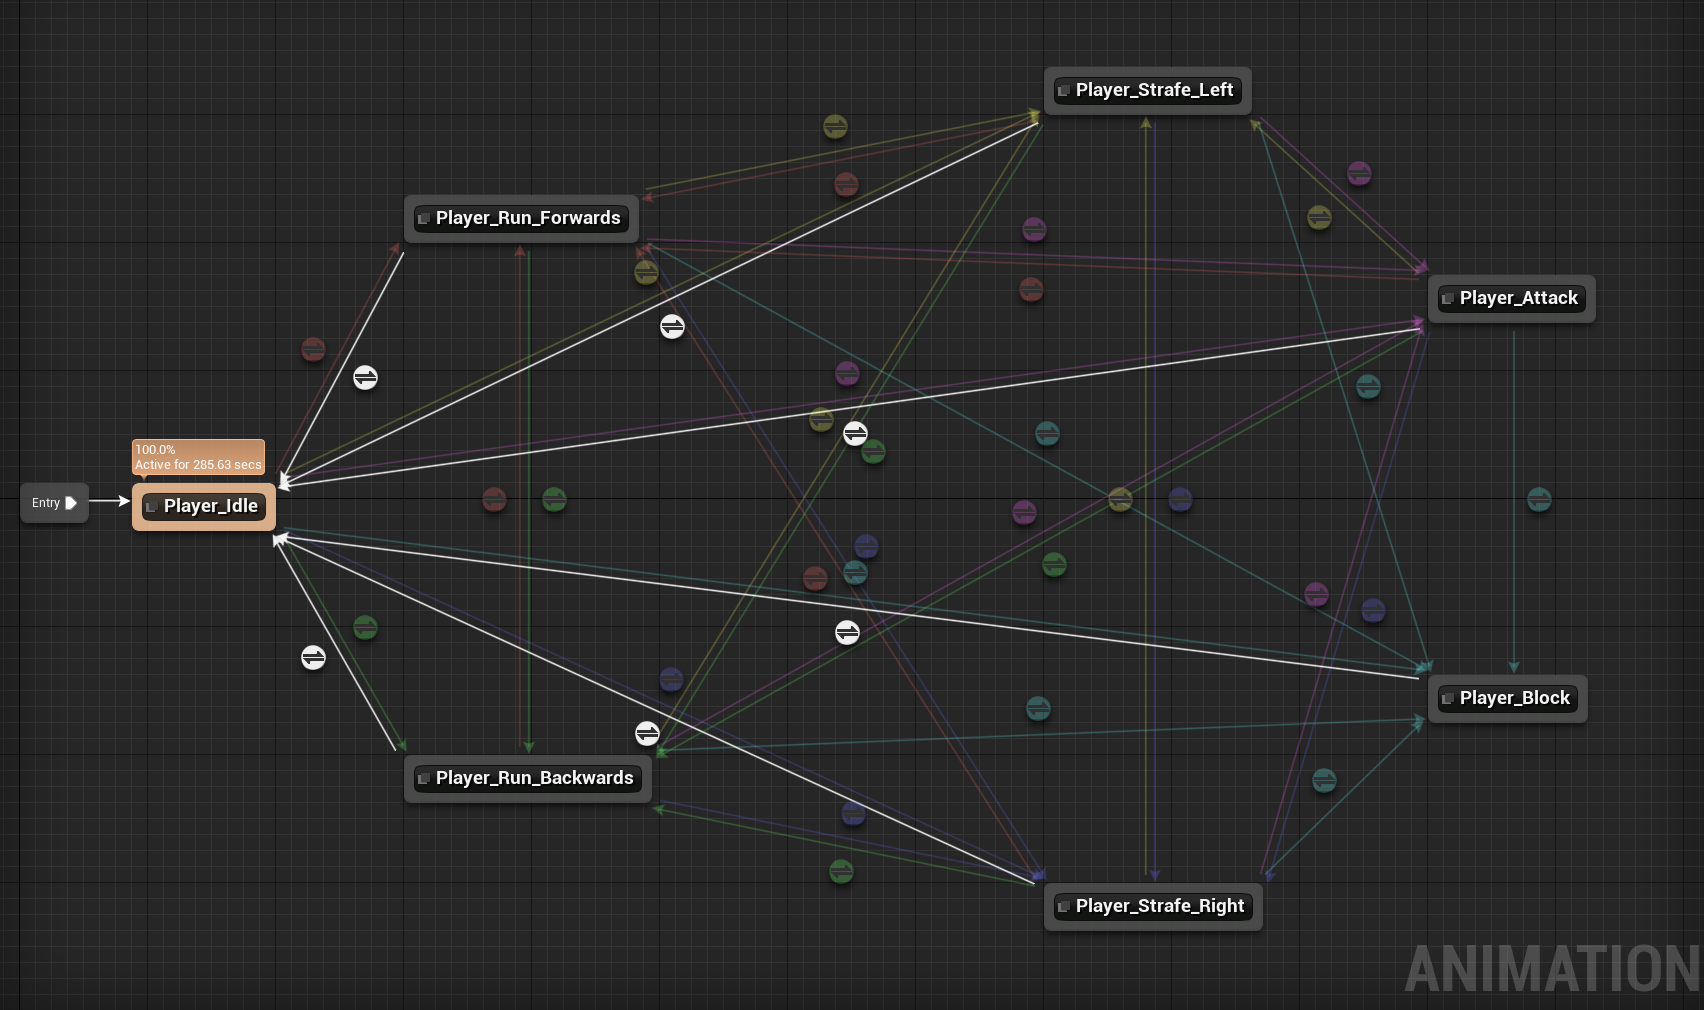
For the rest of the animations, we want to create a transition to and from every other animation like we already have with the idle animation. Just make sure that there’s no return transition from the block animation.

Here’s what the final state machine should look like. Basically for each animation – think what animations can it transition to.

Event Graph overview of player state machine for animations

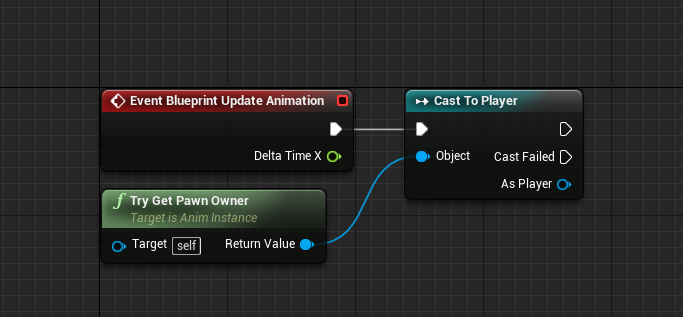
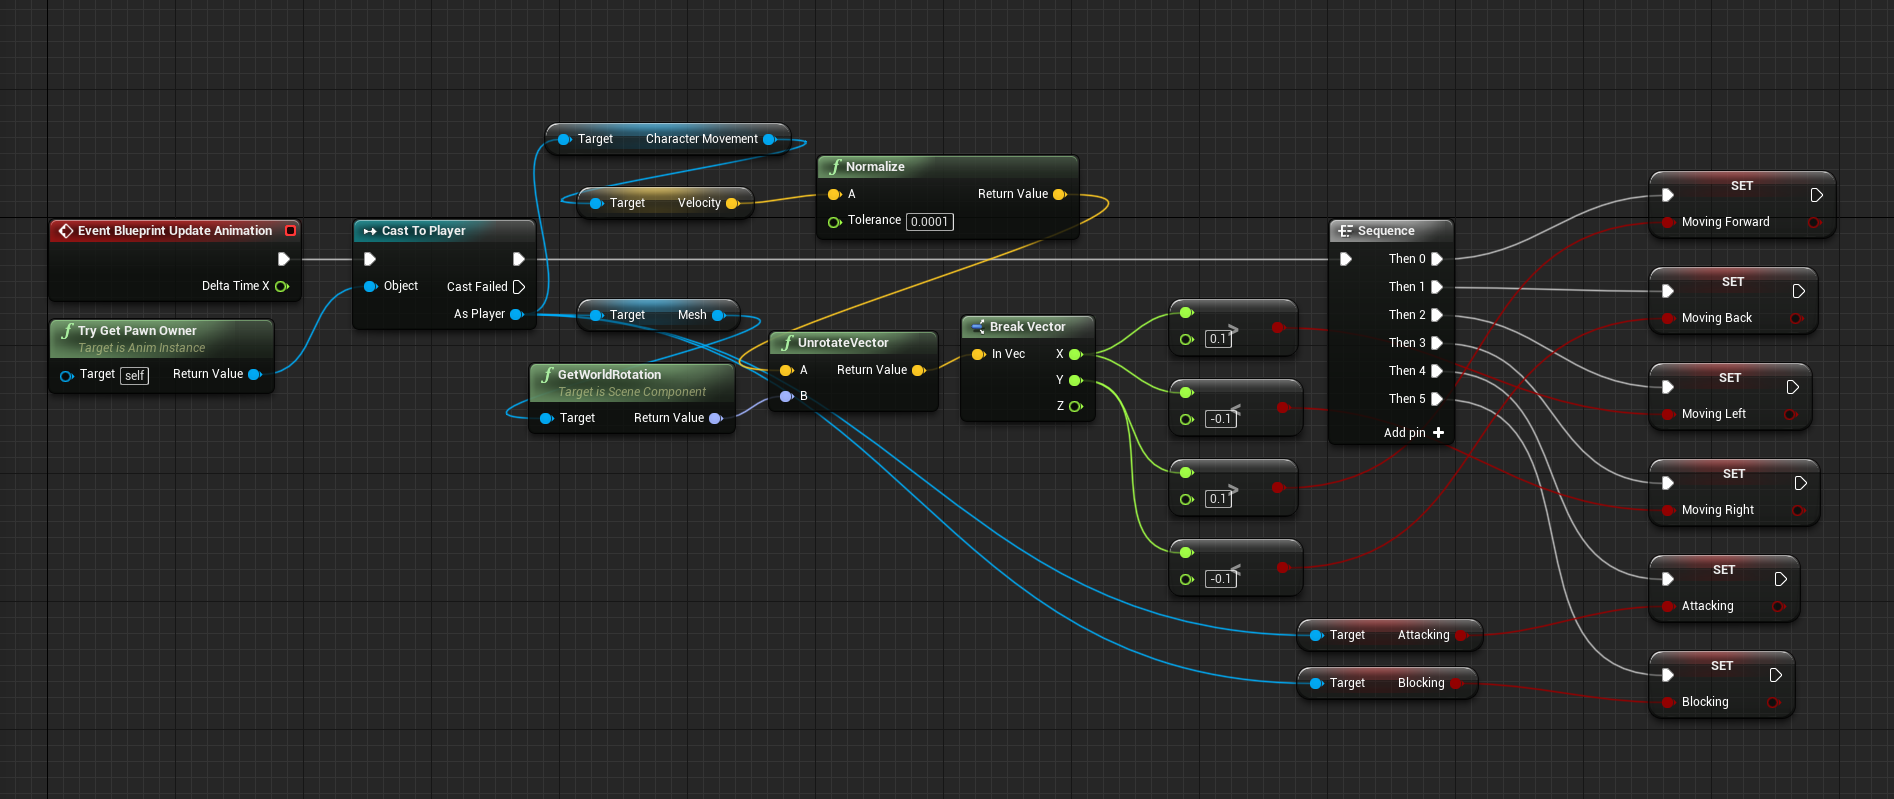
We’ve got the animations setup, but there’s no logic behind setting the variables yet. Go to the Event Graph tab, and there are two nodes by default. Each frame, we want to cast the pawn owner to a player class so we can access its properties.

Player cast logic in Event Graph to access properties

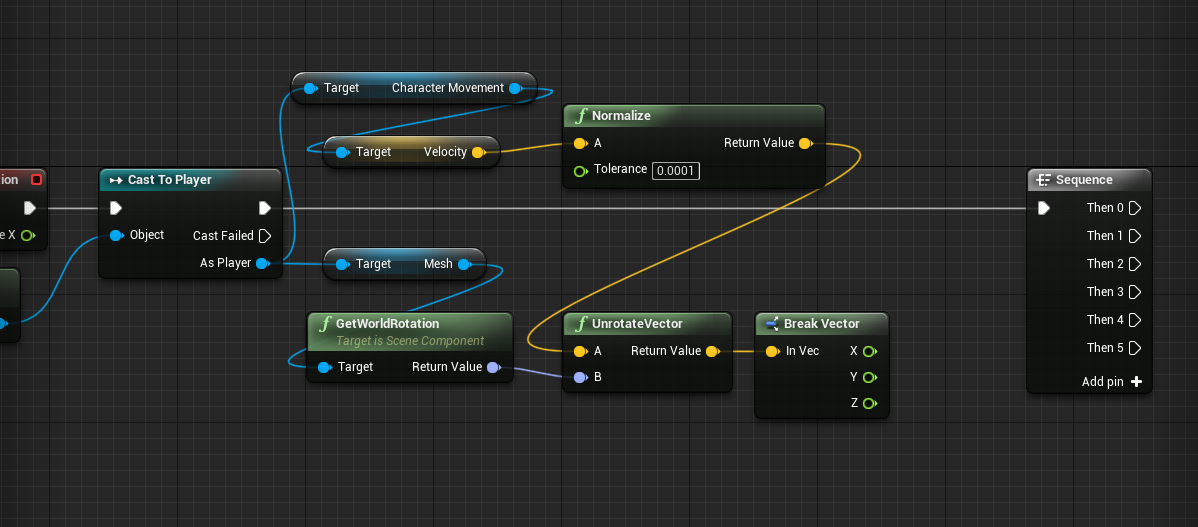
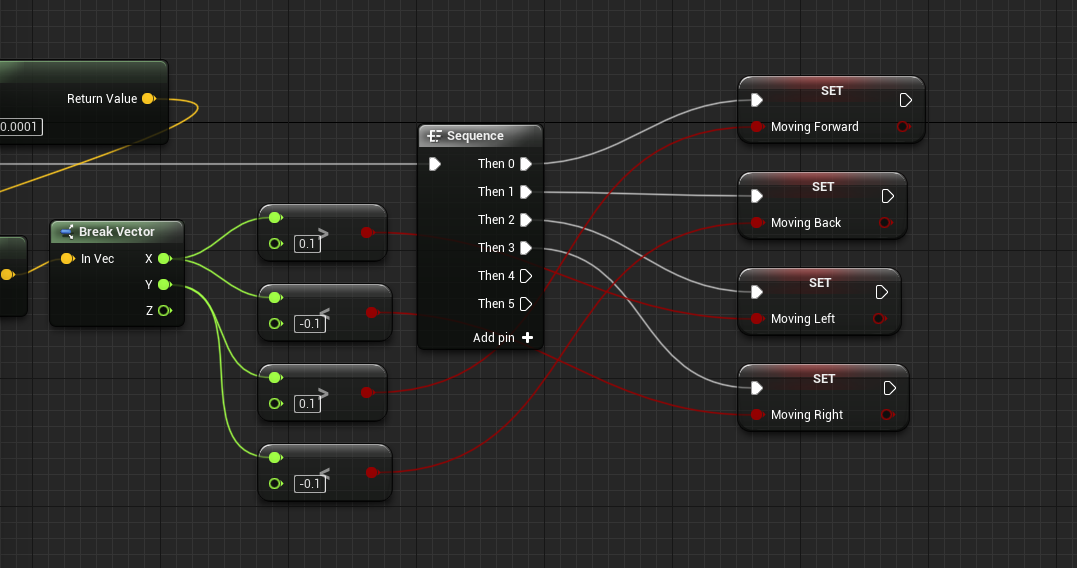
What we want to do is get the player’s velocity. We’ll use this to determine which direction we’re moving in, so we can decide which animation to play. The sequence node can trigger a number of different nodes sequentially. Click Add pin so we have 5 outputs.

Sequence node added to grab player properties in Unreal Engine

Here’s how we want to set the moving booleans.

Moving booleans set within Unreal Engine event graph for player

The attacking and blocking booleans will just be based on our player’s respective variables.

Attack and Blocking nodes set up with Player Event Graph

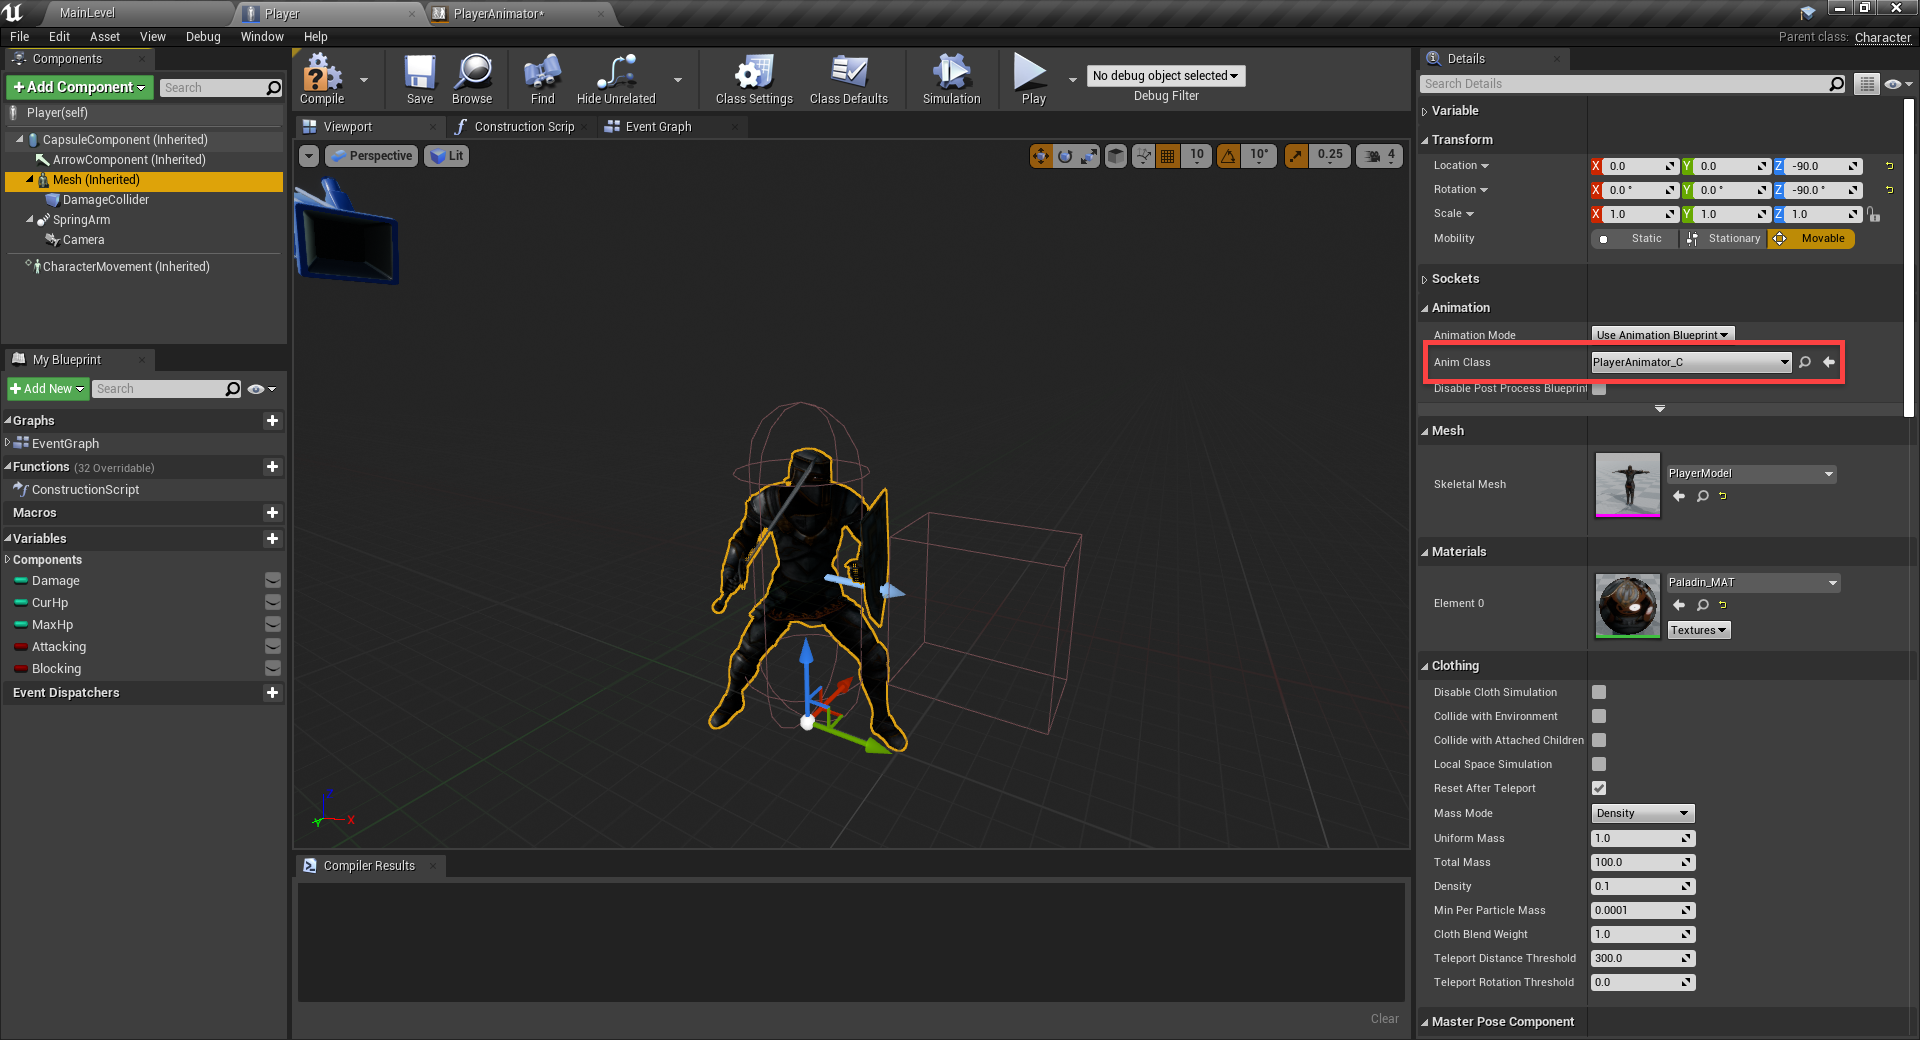
Finally, back in the Player blueprint select the Mesh component and set the Anim Class to PlayerAnimator.

Player Anim class circled and set up

You should now be able to see the animations playing in-game!

Navigation Volume

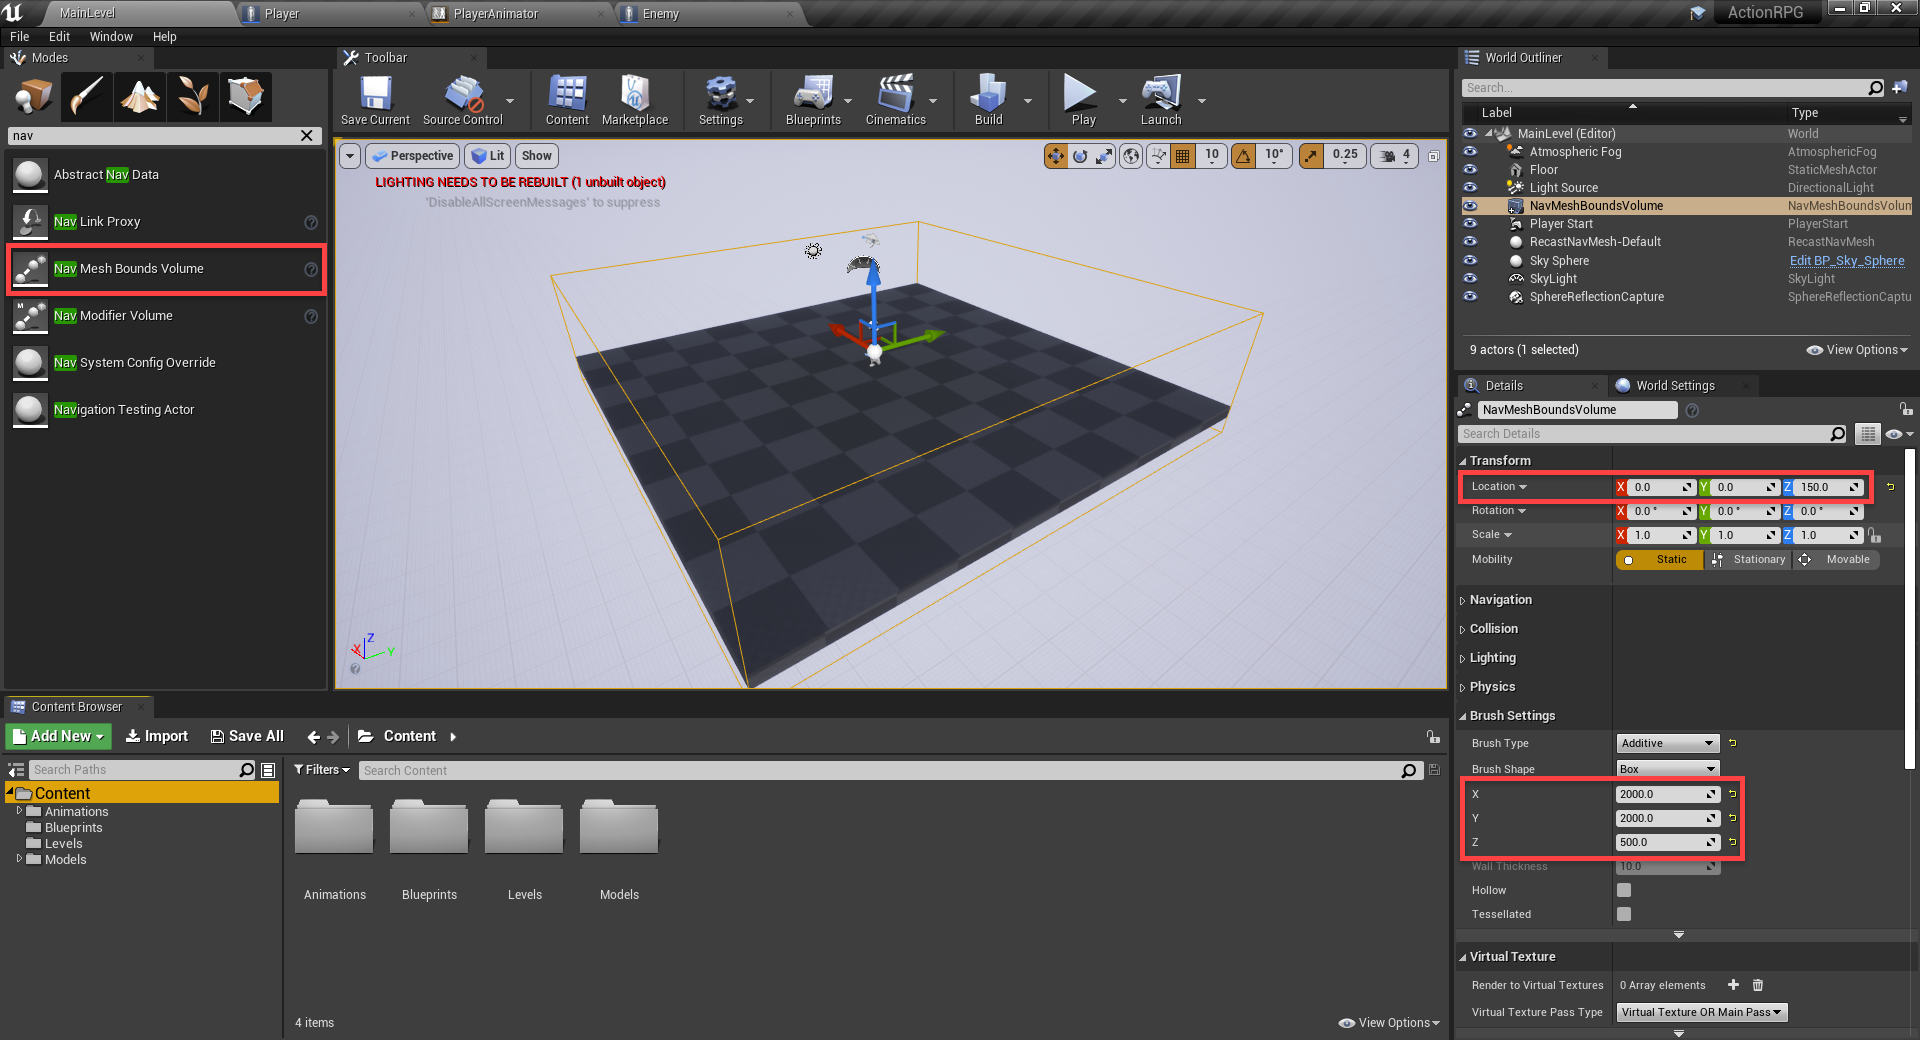
Before we create the enemy, we’ll need to setup the nav mesh. This allows an AI to move freely through an environment, navigate around and over obstacles. In the Modes panel, search for the Nav Mesh Bounds Volume object and drag that in.

  • Set the Location to 0, 0, 150
  • Set the X and Y to 2000
  • Set the Z to 500

I also increased the size of the ground. You can press P to toggle the nav mesh visibility.

Mesh bounds showing in Unreal Engine

Creating the Enemy

In the Blueprints folder, create a new blueprint of type Character. Call it Enemy. In the blueprint, we’re just going to modify the mesh component.

  • Set the Static Mesh to EnemyModel
  • Set the Location to 0, 0, -90
  • Set the Rotation to 0, 0, -90

Enemy Blueprint created in Unreal Engine Action RPG

Now for the variables.

  • Health (Integer)
    • Default value = 5
  • Damage (Integer)
    • Default value = 1
  • Attacking (Boolean)
  • Dead (Boolean)
  • Target (Player)

Variables set up for enemy in Unreal Engine Action RPG

In the Event Graph, we’re first going to get the player.

Event Graph with player character obtained in Blueprinting logic

Then every frame we’ll use the AI Move To node. This will use the nav mesh to move the enemy towards the player. Make sure to set the Acceptance Radius to 150 so the enemy won’t go inside the player.

AI Move To node added to Action RPG enemy

The On Success output gets triggered once the enemy reaches the player. When this happens we’re going to enable the attacking variable if we can, wait 2.667 seconds (attack animation duration), then re-enable the attacking variable.

Logic for once the enemy reaches the player in action rpg

Select the CharacterMovement component.

  • Set the Max Acceleration to 300
  • Set the Max Walk Speed to 250

Unreal Engine Details window with speed settings applied

Back in the level editor, we can drag in an enemy, press play and test it out!

Enemy Animations

Like with the player, create a new animation blueprint called EnemyAnimator. Make sure you’re also linking the enemy skeleton.

EnemyAnimator Blueprint created in Unreal Engine

Inside the enemy animator, create a new state machine, then double-click it to enter.

Output Pose node added for Enemy

Start with the variables.

  • Moving (Boolean)
  • Attacking (Boolean)
  • Dead (Boolean)

Then we can drag in the 4 animations. Connect the entry to the idle animation.

Enemy State machine for animations

Hook the transitions up like below. Make sure that the dying animation has no exit transitions.

Enemy state machine with various transitions added in Unreal Engine

To prevent the dying animation from looping – double click it, select it and disable Loop Animation.

Enemy Dying node added in Unreal Engine

In the Event Graph, we’ll want to hook it up like this.

Event Graph set up to prevent dying animation loop

Finally, back in the Enemy blueprint, select the mesh and set the Anim Class to EnemyAnimator.

Enemy Anim Class set with animator in Unreal Engine

Damaging the Enemy

Let’s now implement the ability for the player to damage the enemy. In the Enemy blueprint, let’s create a new function called TakeDamage. Create an input of type integer called DamageToTake.

Event Graph logic for enemy to take damage from player

This will be called over in the Player blueprint. In there, create a new function called TryDealDamage. This will get an array of enemies overlapping the damage collider. We’re just going to call their take damage function.

Event Graph logic for player to try and deal damage

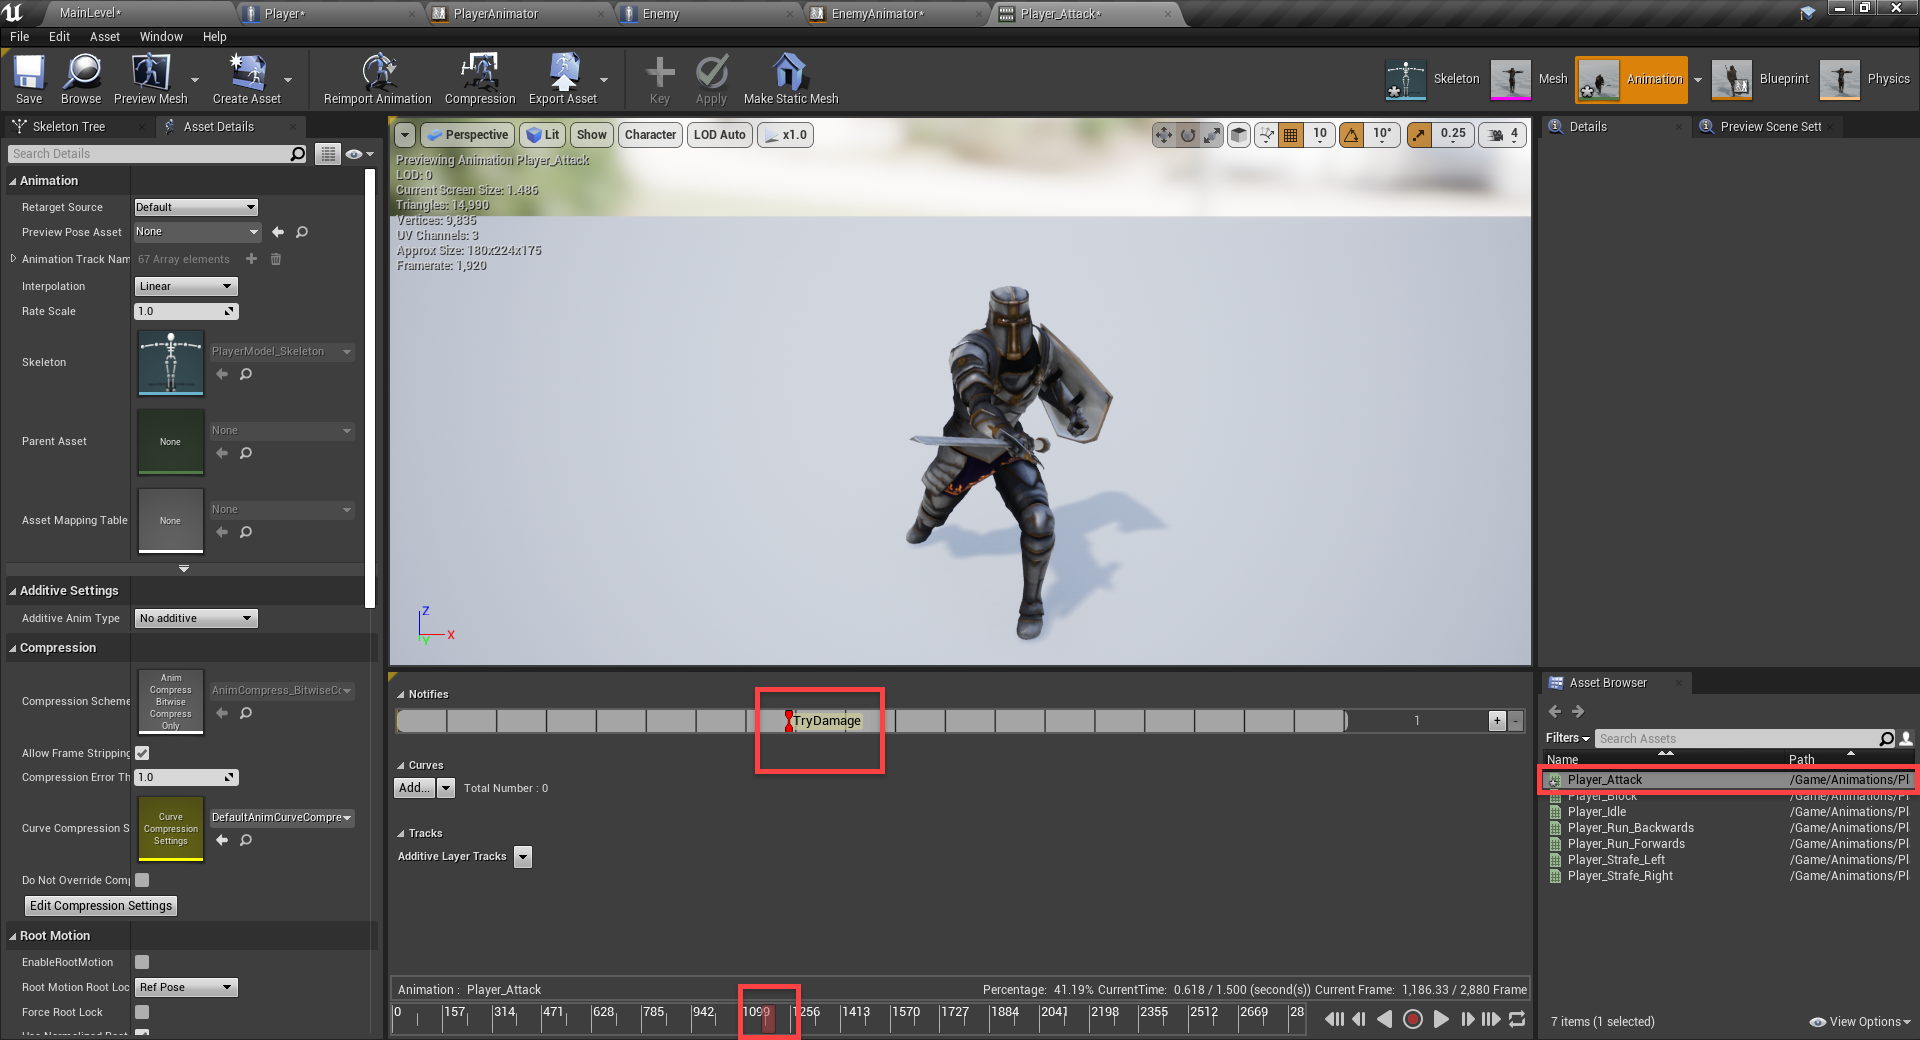
The TryDealDamage function will be called when our animation “hits” the target. So let’s go to our PlayerAnimator and double click on the Player_Attack animation to open it up. Move the play head to where we want to attack. Right click the notfies timeline and select Add Notify > New Notify. Call this TryDamage. A notify is basically a custom event which triggers at a certain point in the animation.

Unreal Engine animation with Try Damage function trigger added

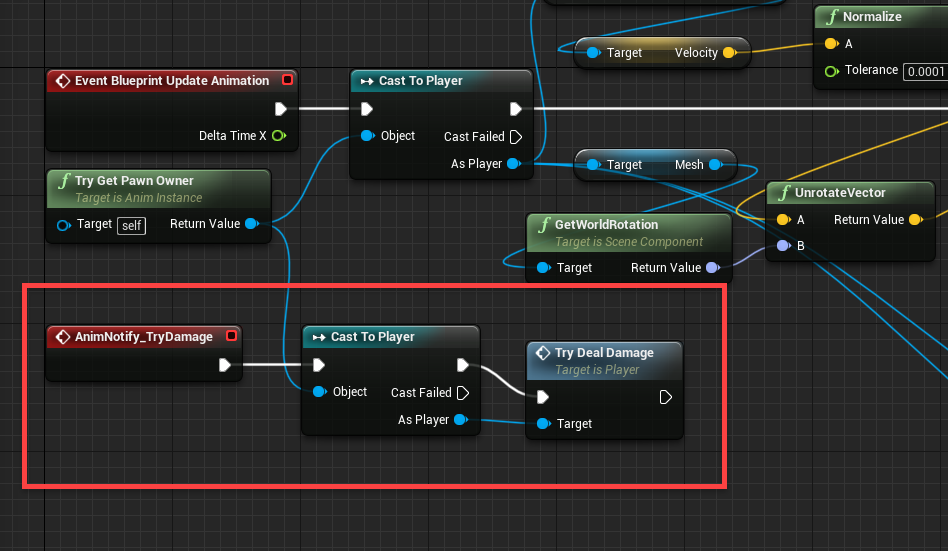
Over in the PlayerAnimator event graph, we can create the AnimNotify_TryDamage node. We just want to cast the player again and call the TryDealDamage function.

AnimNotify node added for player to try damage function

We should now be able to press play and defeat the enemy.

Attacking the Player

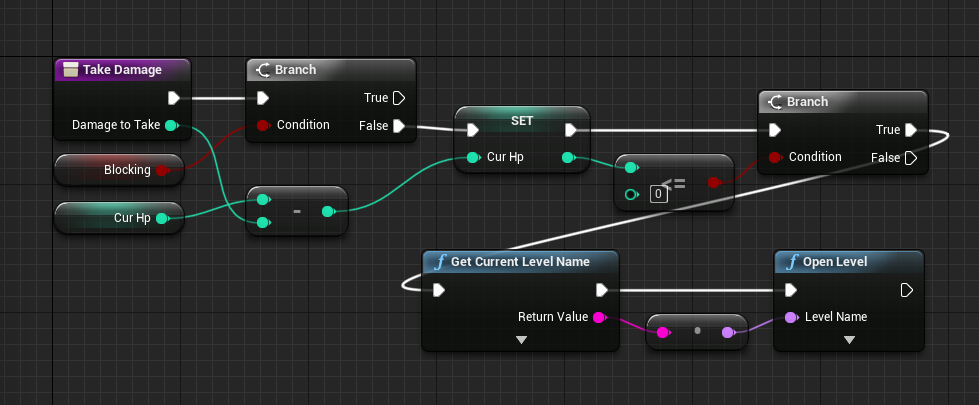
Now we need to implement the ability for the enemy to attack too. In the Player blueprint, let’s begin by creating the TakeDamage function. This will have an input of type integer called DamageToTake. When the player’s health reaches 0, the level will restart.

Take Damage logic for Player in action RPG

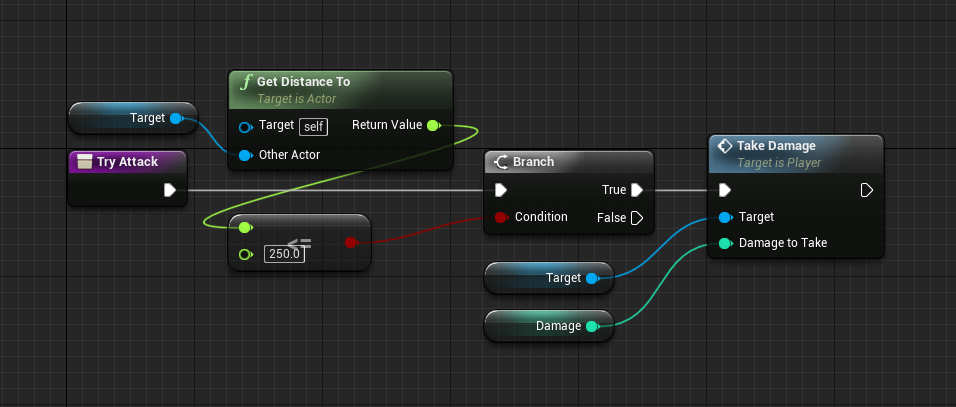
In the Enemy blueprint, create a new function called TryAttack. Here, we’re just checking our distance from the player and if it’s within a range, we’ll deal damage.

Enemy blueprint logic with new try attack logic

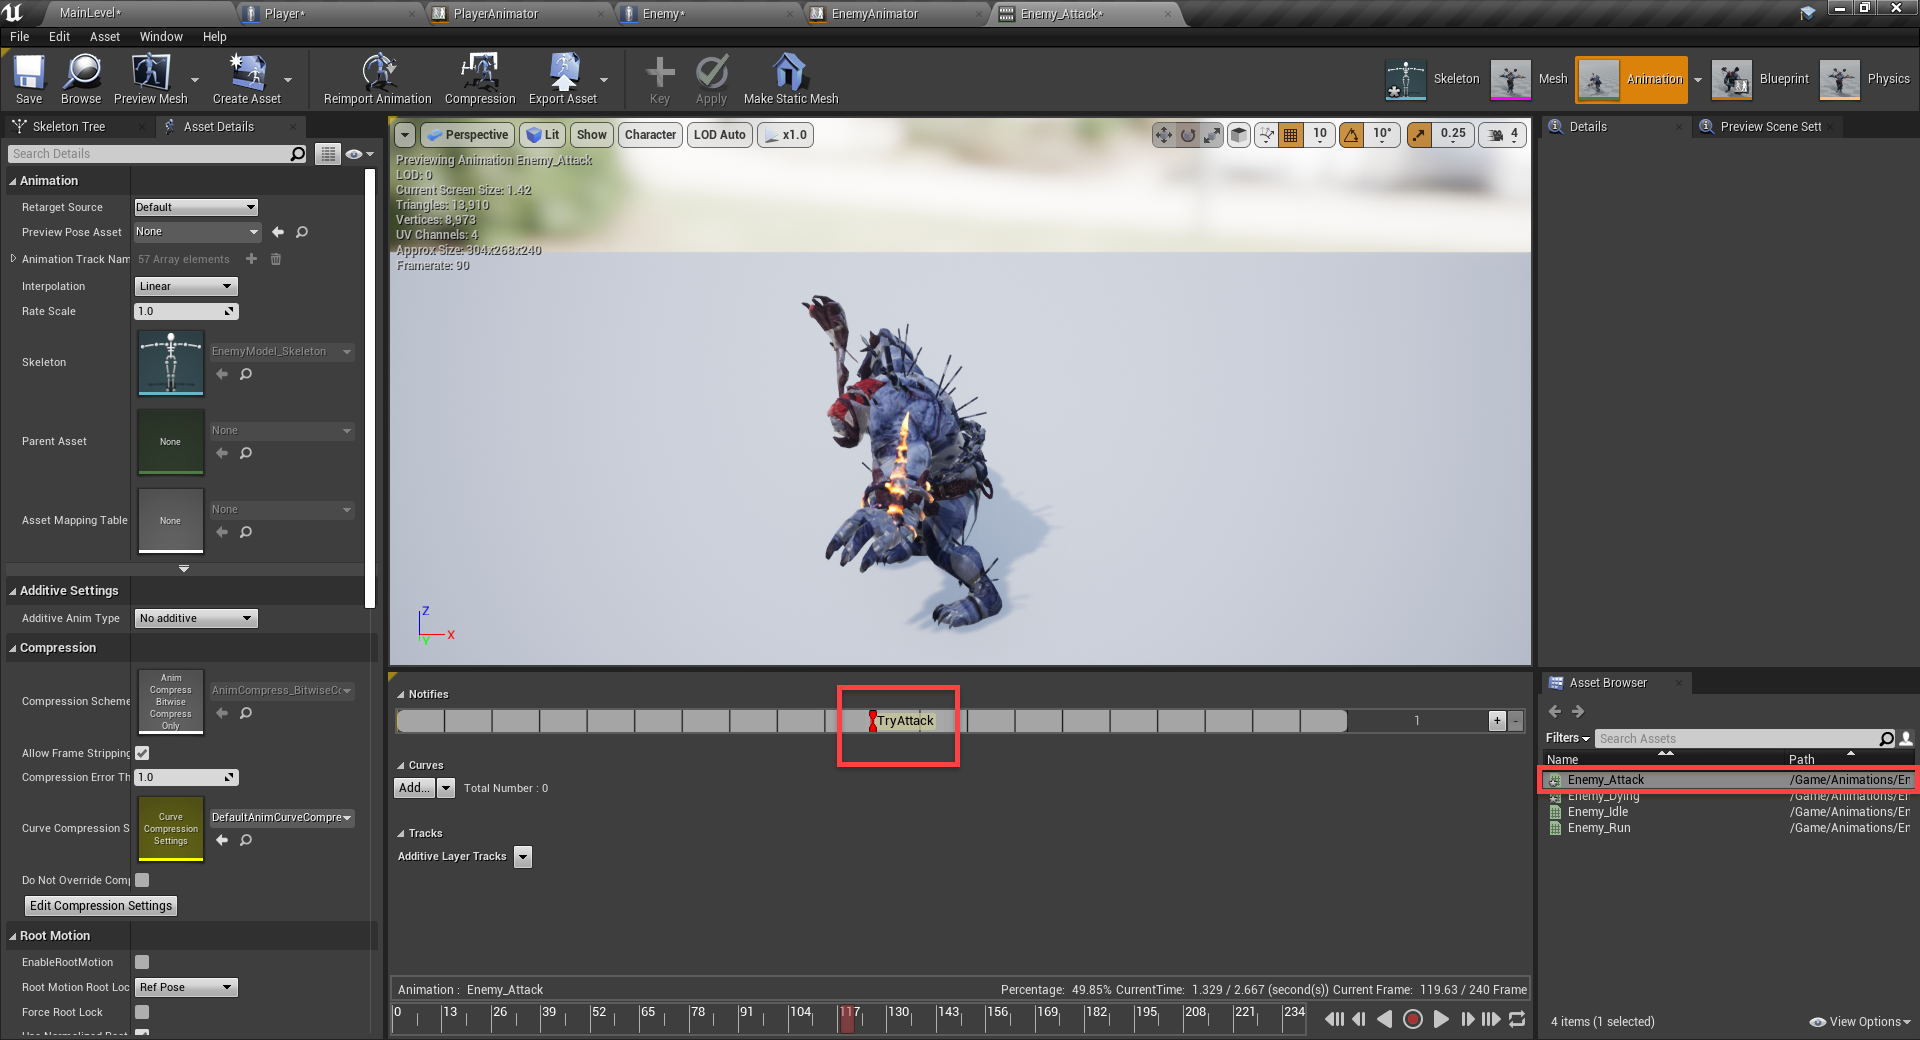
Finally, we need to go to the EnemyAnimator blueprint, double-click on the Enemy_Attack animation and create a notify at the point of damage.

Enemy Animation with Try Attack trigger added

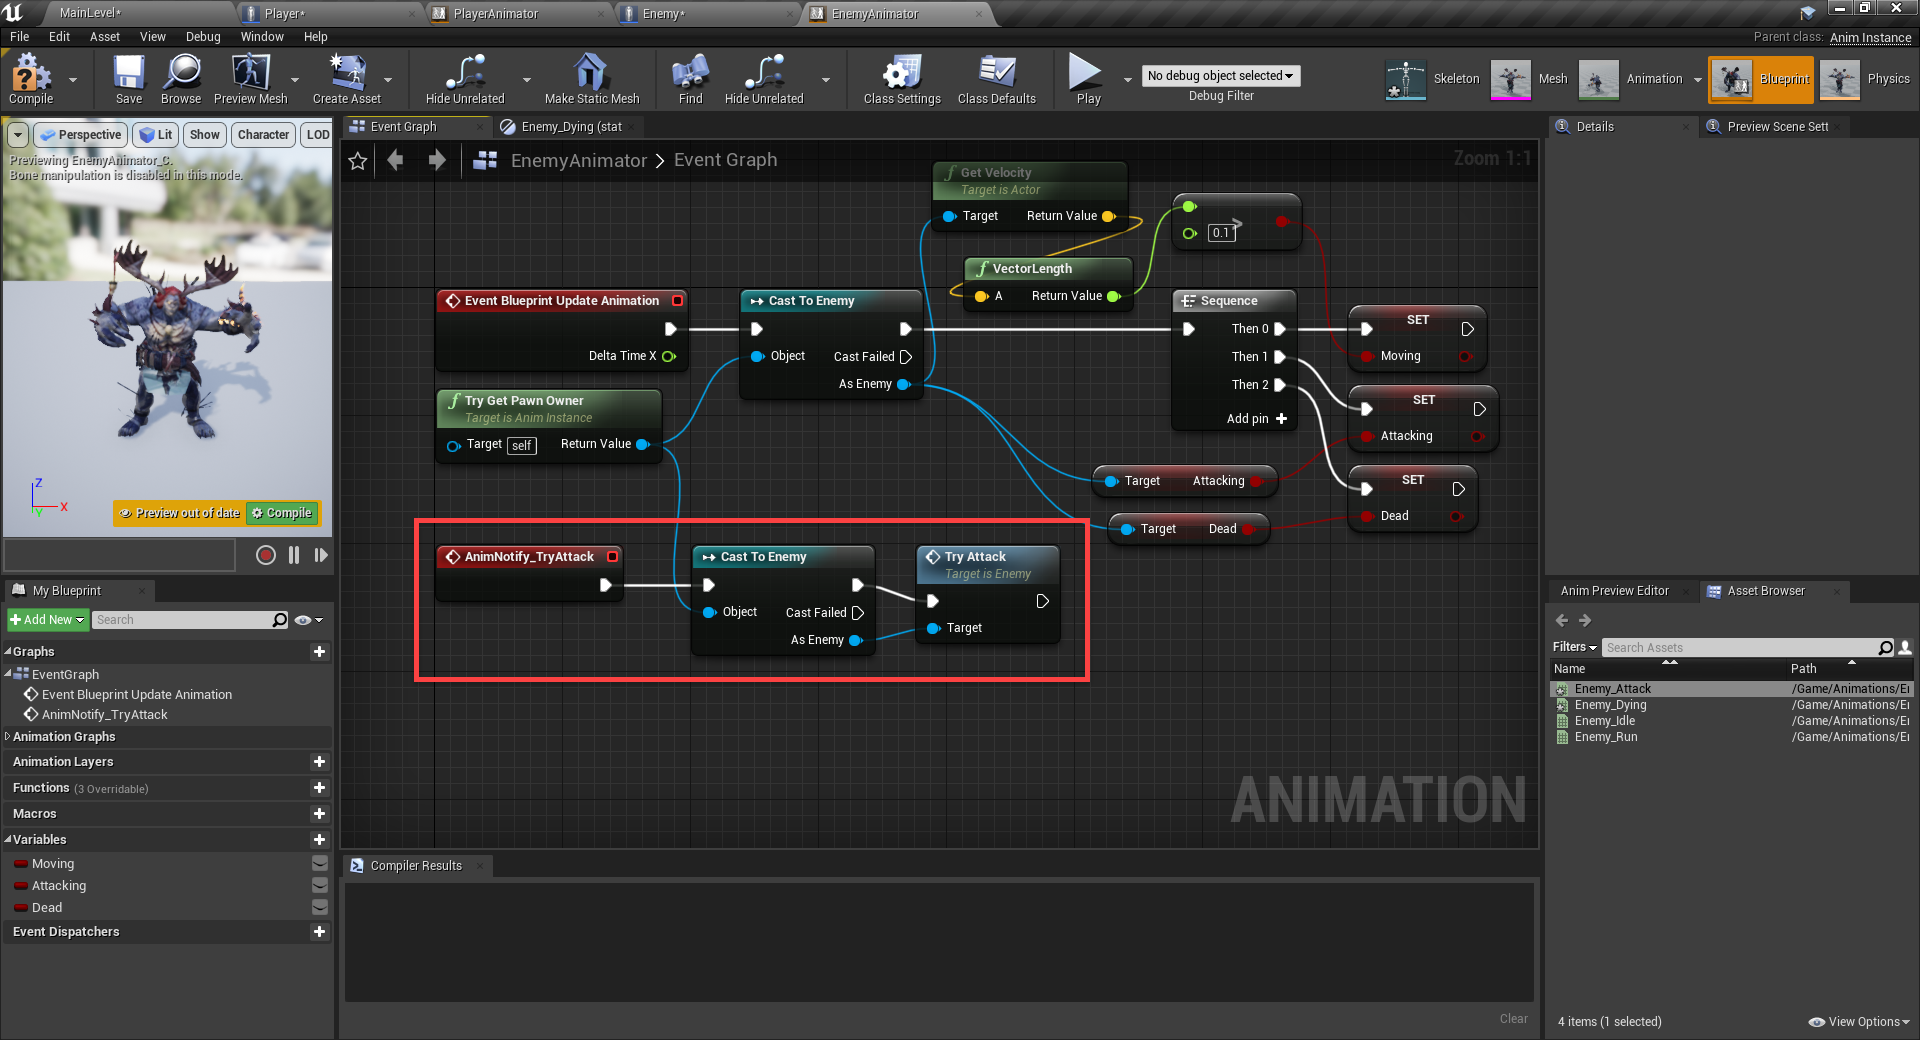
In the enemy animator event graph, we can create the notify event node and try attack like so.

AnimNotify added to enemy Event Graph

Now you can press play and test it out!

Fixing a Few Things

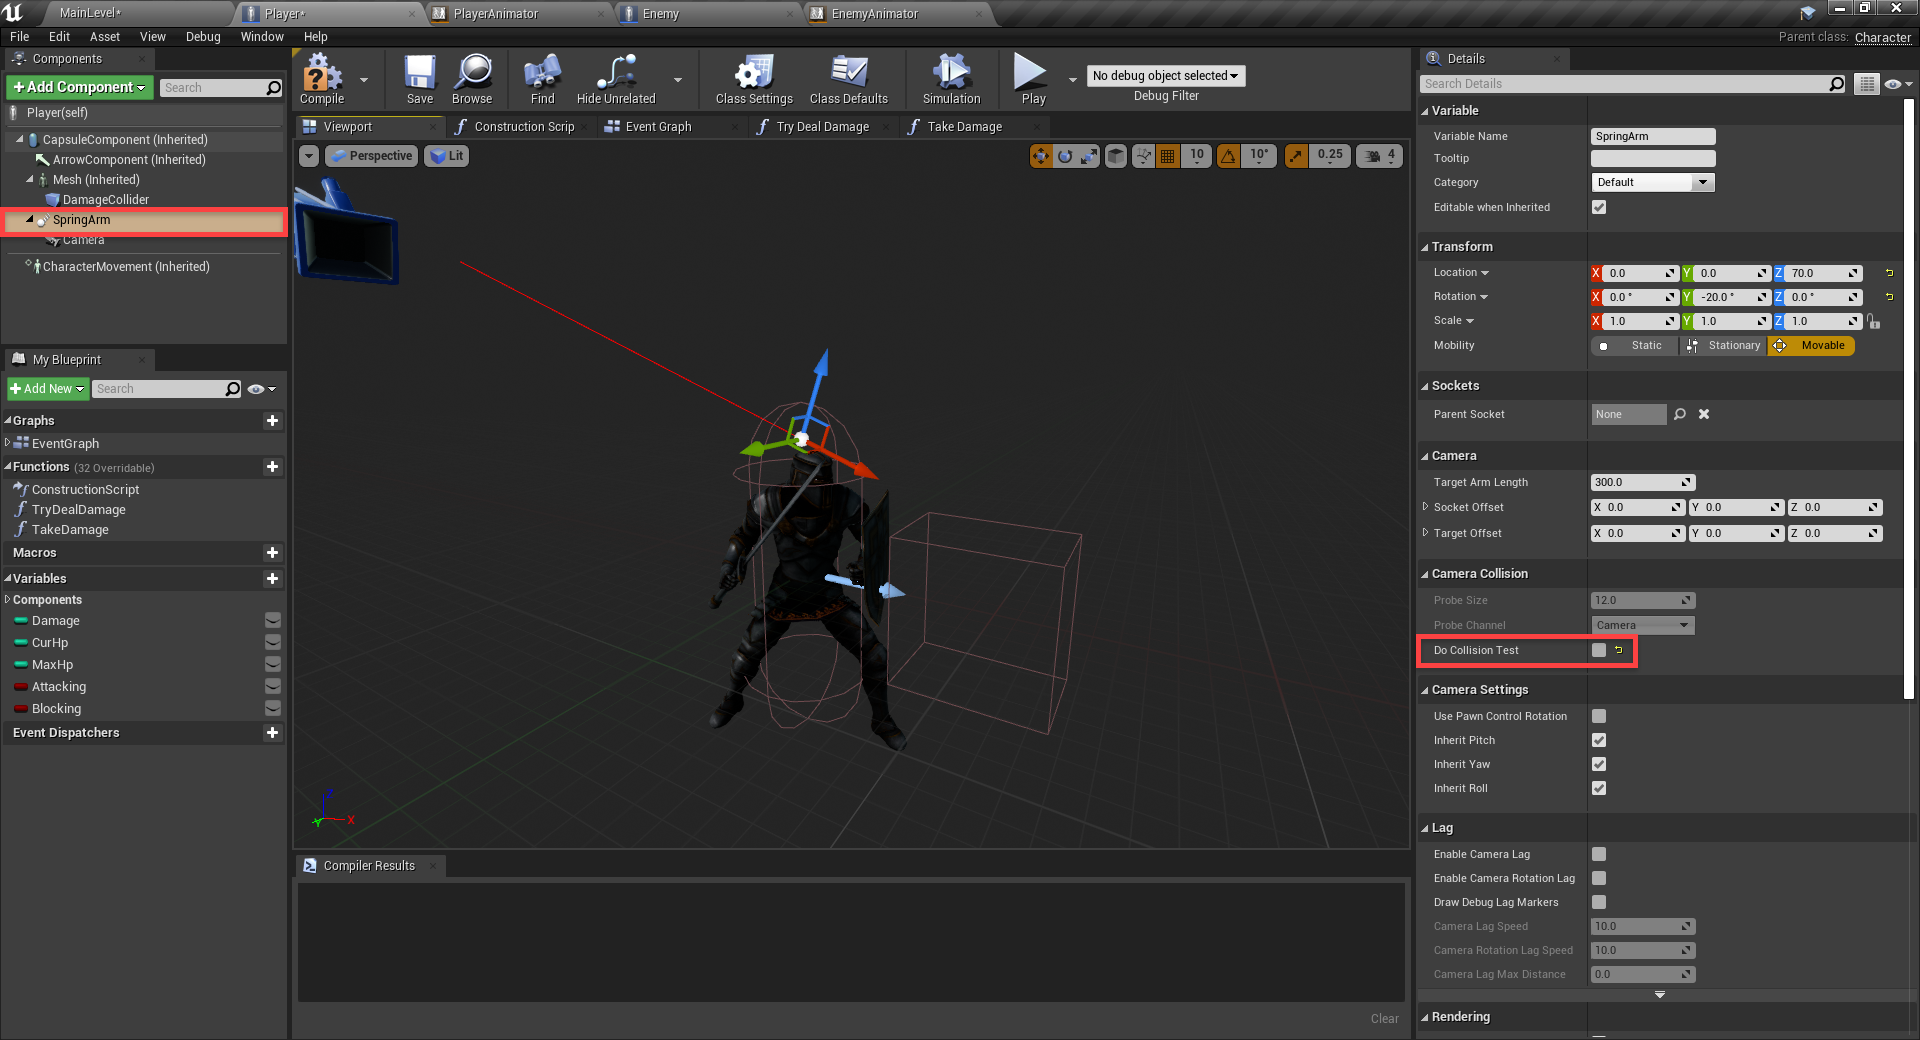
You may notice that when the enemy attacks, your camera glitches out a bit. This is because the camera automatically moves depending on if there’s anything between it and the player. Go to the Player blueprint, select the spring arm and disable Do Collision Test.

Do Collision Test option highlighted in Unreal Engine

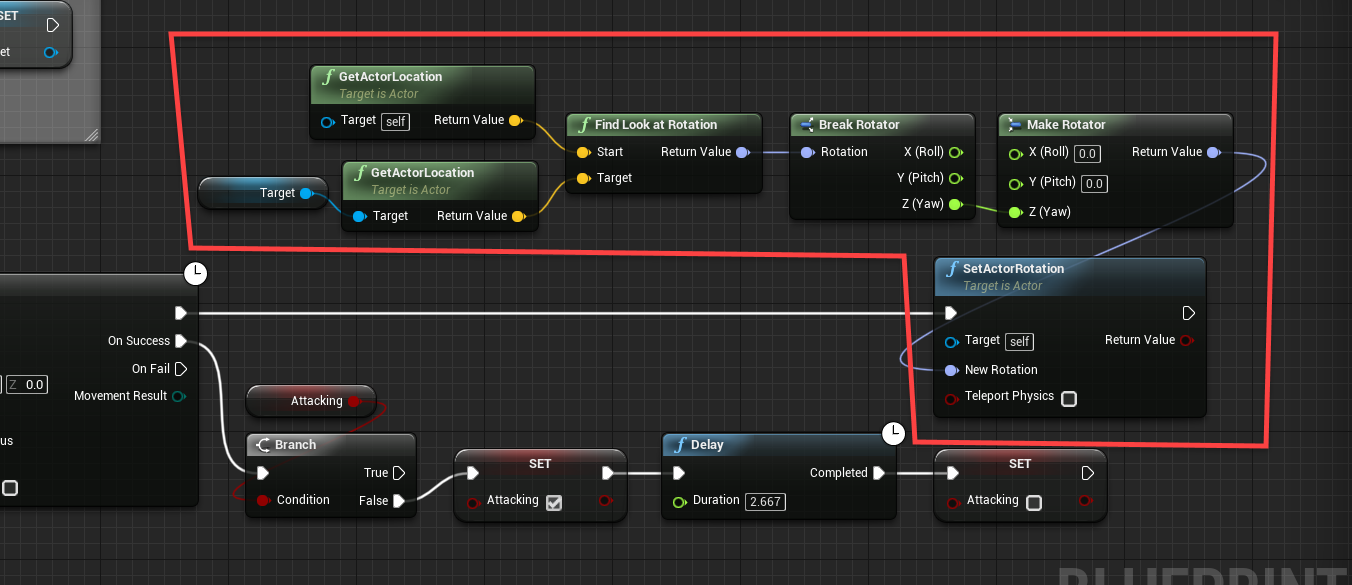
You may also want the enemy to always be facing the player. To fix this, we can go to the Enemy blueprint and add these nodes to the event tick path.

Edited logic for Camera rotation in Unreal Engine Event Graph

Conclusion

And there you go! We now have a working action RPG!

Through this tutorial, we set up a third-person player controller, a rotatable camera, enemy AI, animation state machines, and more – all using Unreal Engine and blueprints.  With these foundations in place, the project can easily be expanded should you want to add more levels, enemies, or a variety of other features.  You can, of course, use the fundamentals covered here to create other various types of games.

Either way, we hope you enjoyed the tutorial, and good luck with your game projects!

Action RPG made with Unreal Engine

Create a Puzzle Game in the Unreal Engine

$
0
0

Introduction

Ready to challenge your players to unique, brain-busting puzzles?

Puzzle games are a fairly unique genre in game development, requiring even more work than many other genres in its level design phase.  However, they can also be a rewarding experience in terms of development, as they offer unique challenges and systems that can be used across many different game projects.

In this tutorial, we’re going to be creating a puzzle game inside of Unreal Engine. This game will feature a player who can move around on a grid and whose goal is to collect a number of followers, evade traps, and reach the end goal.  Over the course of this tutorial, not only will you learn to use blueprints in Unreal for this purpose, but also gain a fundamental understanding of how to design puzzles and challenges for your games.

Before we continue, do know that this is not an introductory tutorial. If this is your first time using Unreal Engine, then we recommend you check out our Intro to Unreal Engine course here.

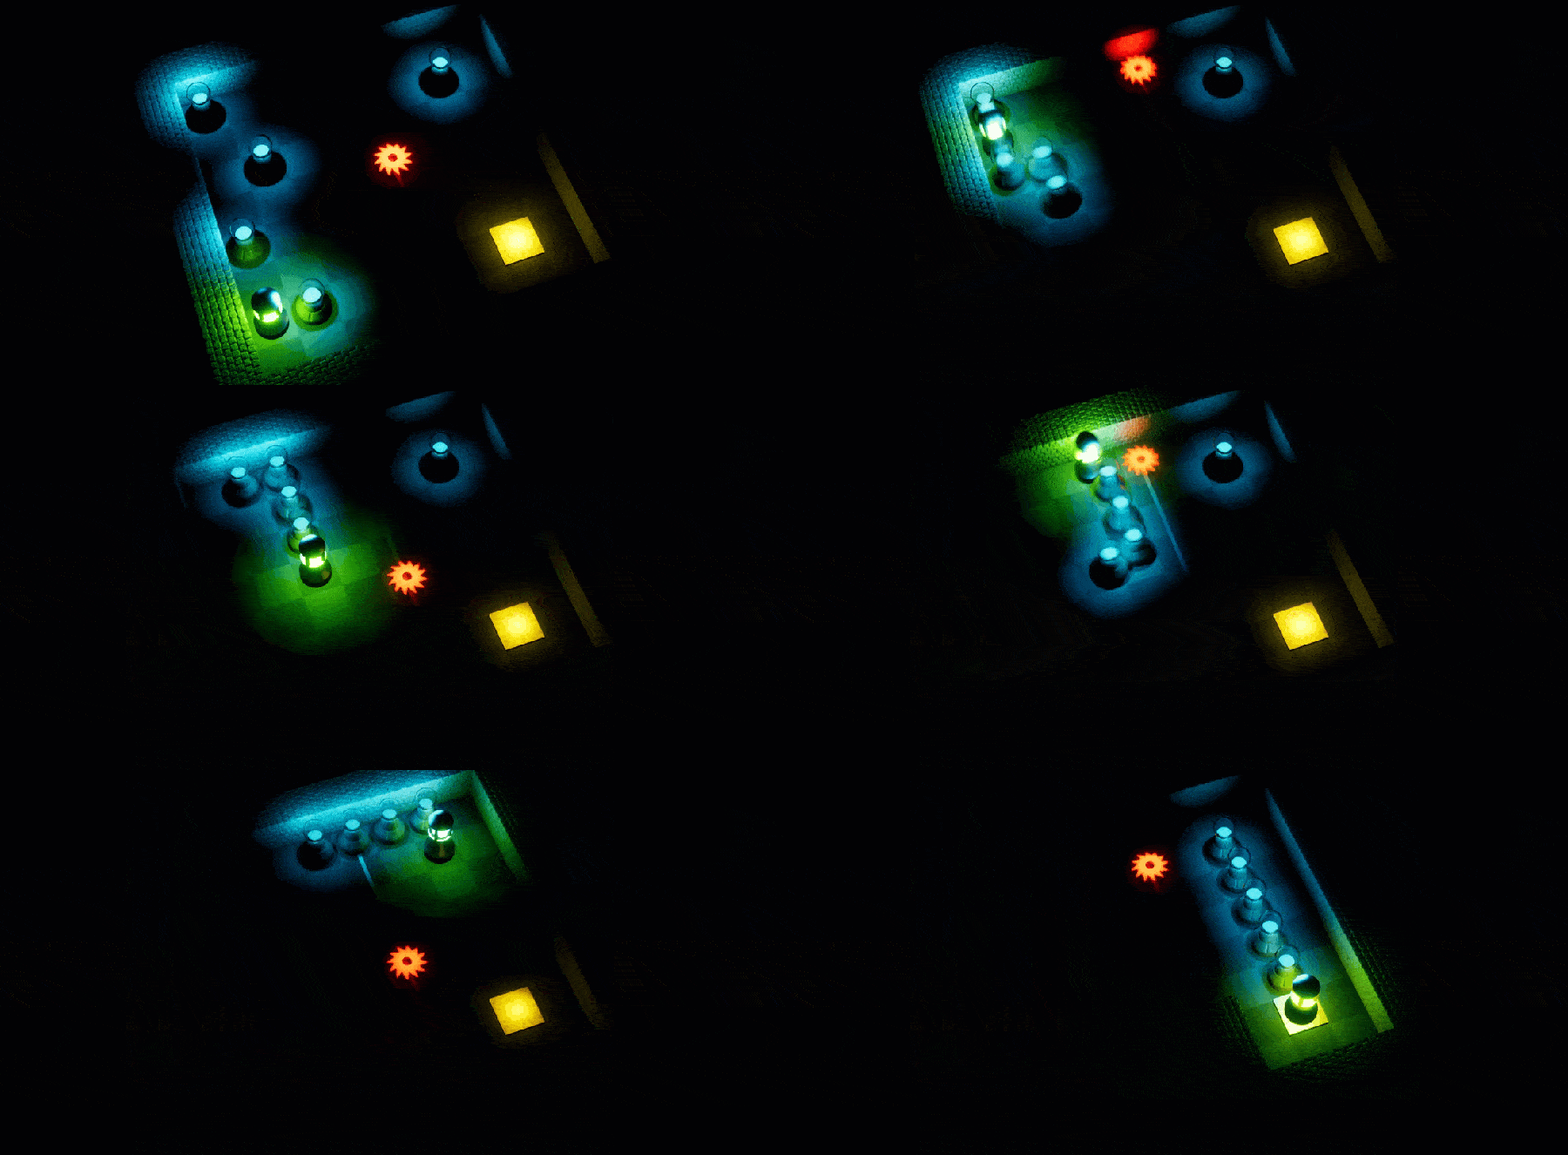
gif of the puzzle game

Don't miss out! Offer ends in
  • Access all 400+ courses
  • New courses added monthly
  • Cancel anytime
  • Certificates of completion

Project Files

For this project, there are a few 3D models we’ll be needing. You can use your own, although the tutorial will be made using these. The complete project can also be downloaded.

Creating the Project

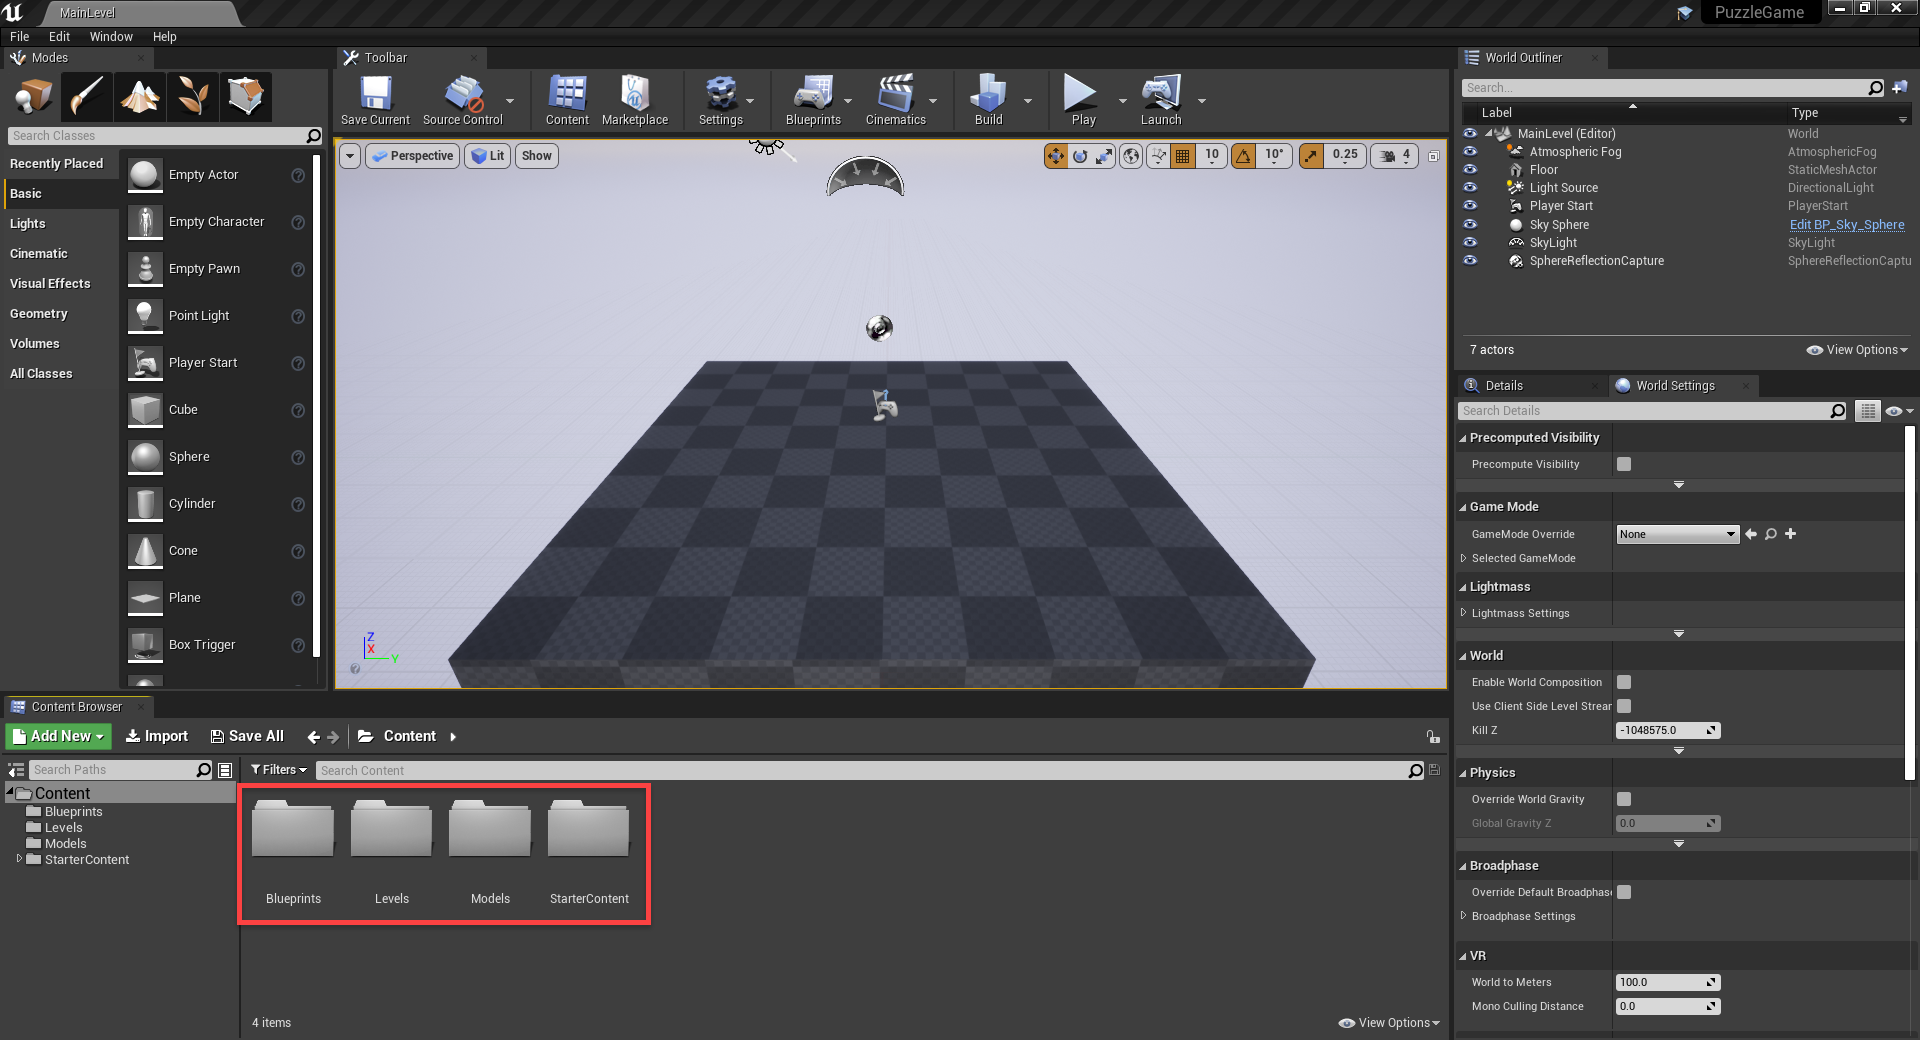
To begin, let’s create a new Unreal Engine project. When creating the project, make sure to include the starter content as we’ll be using a few of the materials. To begin, let’s create three new folders.

  • Blueprints
  • Levels
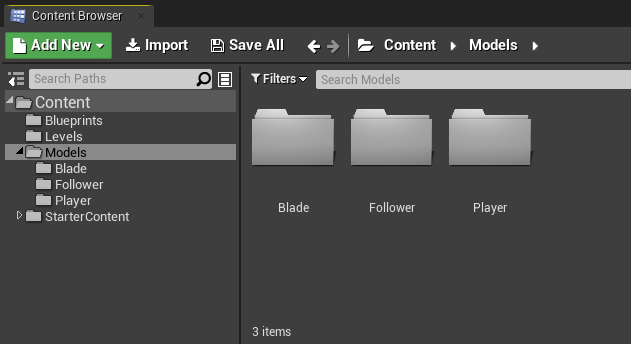
  • Models

Then, create a new level and save it to the Levels folder as MainLevel.

unreal engine editor

Let’s then download the required assets (linked at the top of the tutorial). There is a folder called Models Folder Content. Inside of that, drag the contents into our Content Browser‘s Models folder.

importing models

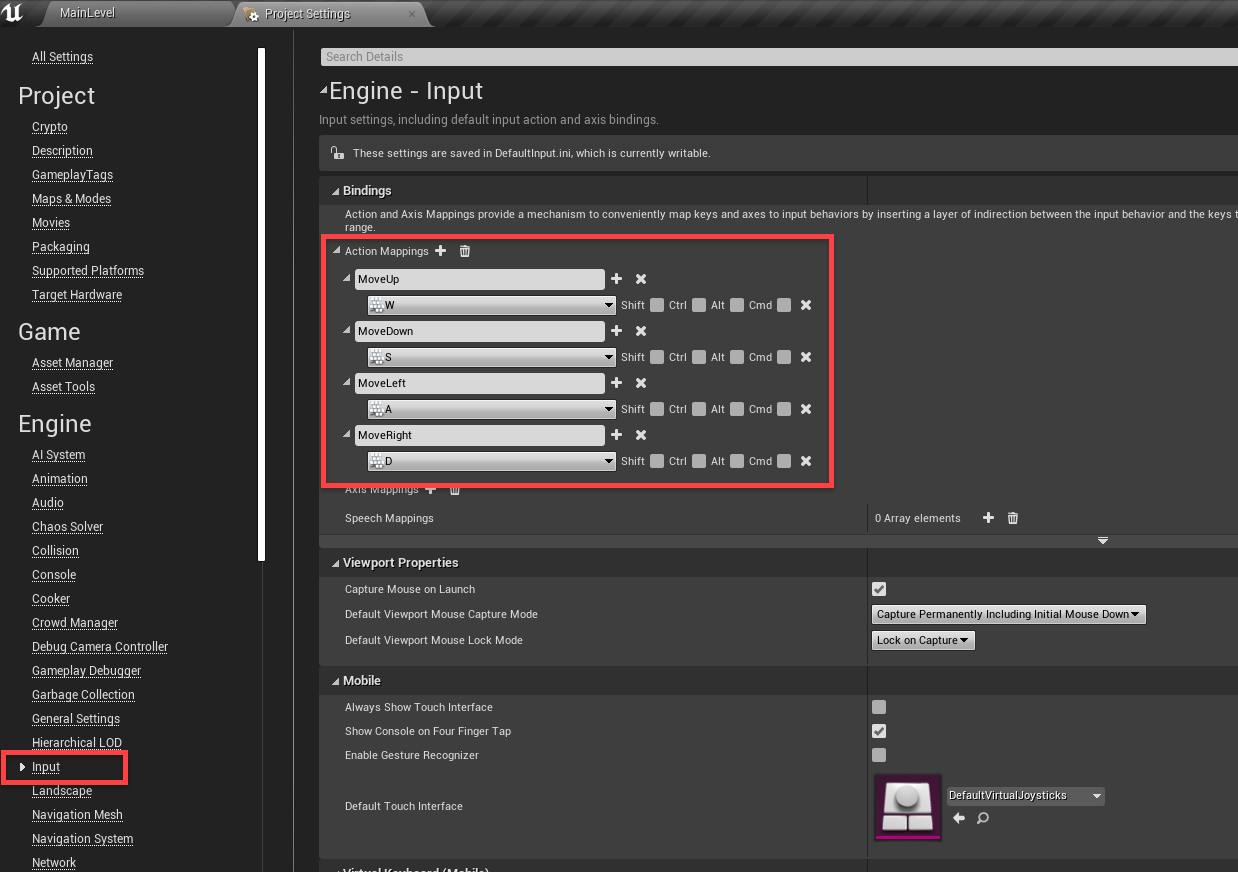
Next, let’s setup some key bindings. We need to know which buttons we’re going to use for player movement. Open the Project Settings window (Edit > Project Settings…). Click on the Input tab and create 4 new action mappings.

  • MoveUp = W
  • MoveDown = S
  • MoveLeft = A
  • MoveRight = D

setting up player controls

Creating the Player

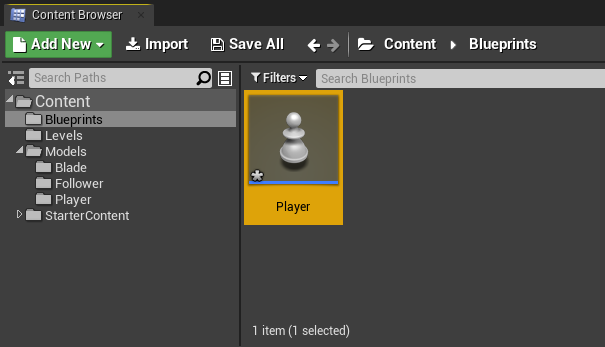
Now that we’ve got our controls sorted out, let’s create the player. In the Blueprints folder, create a new blueprint with a parent class of Pawn. Call it Player.

creating the player blueprint

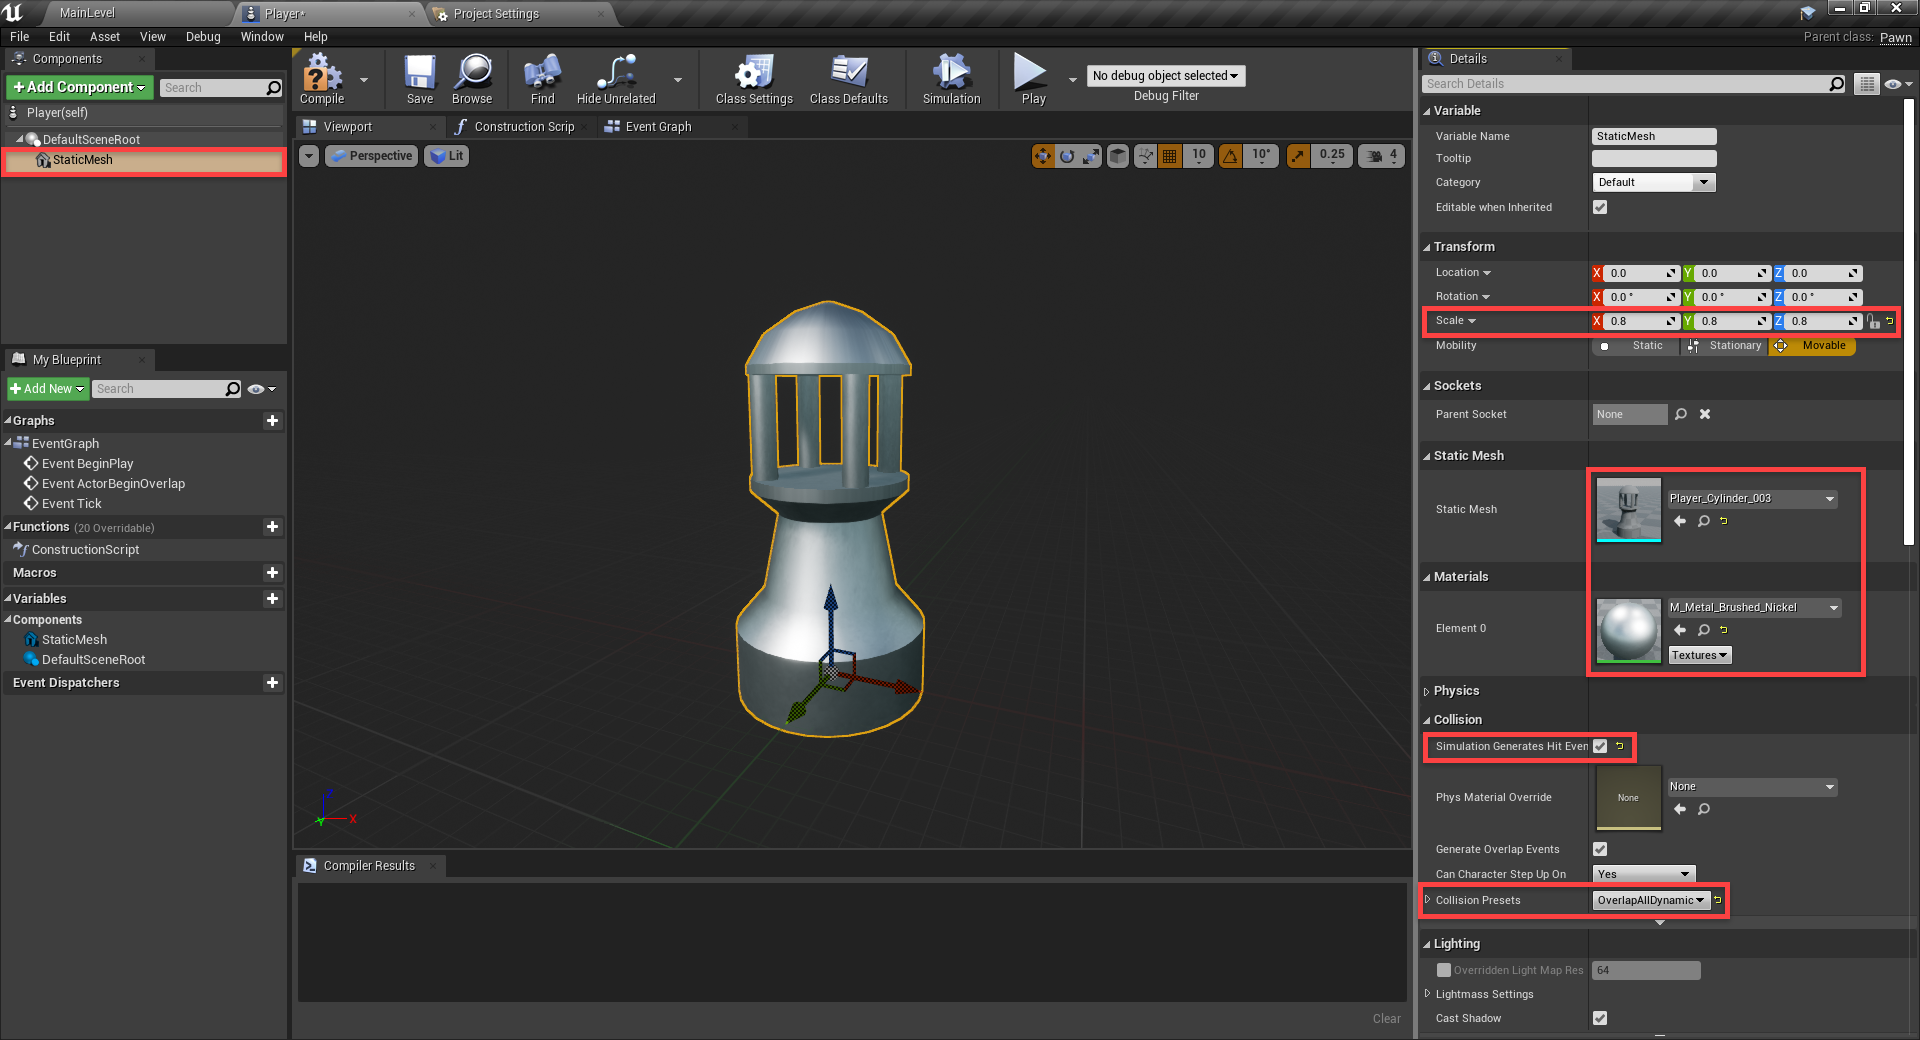
Open it up and we can begin to create the player. First, create a static mesh component.

  • Set the Static Mesh to Player_Cylinder_003
  • Set the Material to M_Metal_Brushed_Nickel
  • Set the Scale to 0.8, 0.8, 0.8
  • Enable Simulation Generates Hit Events
  • Set the Collision Presets to OverlapAllDynamic

creating the player model

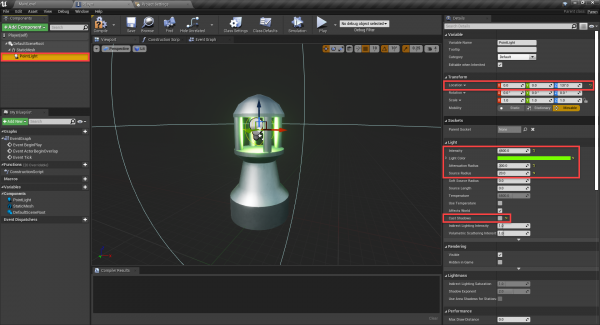
Then as a child of the static mesh, create a Point Light component.

  • Set the Location to 0, 0, 137
  • Set the Intensity to 4500
  • Set the Light Color to Green
  • Set the Attenuation Radius to 300
  • Set the Source Radius to 20
  • Disable Cast Shadows

adding a light to the player

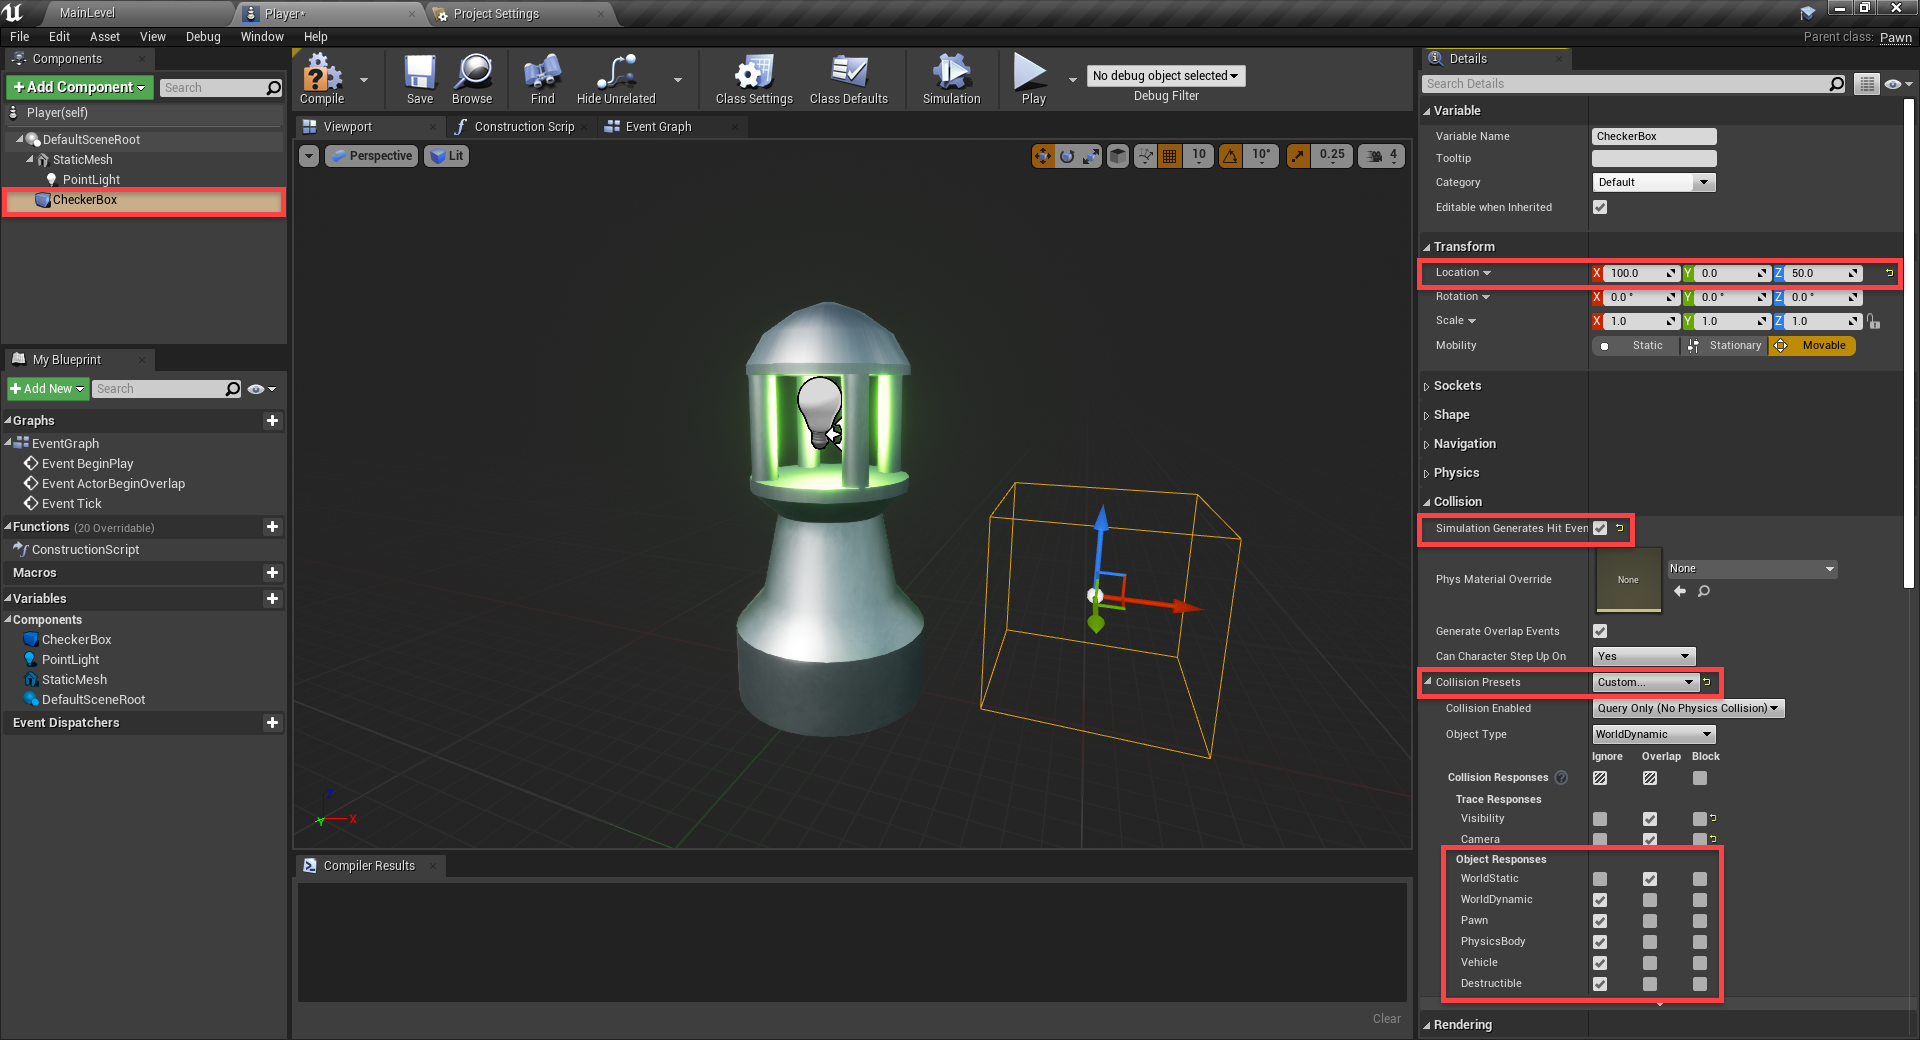
The final component will be a Box Collision, and this is used to know if we’re going to run into a wall.

  • Set the Location to 100, 0, 50
  • Enable Simulation Generates Hit Events
  • Set the Collision Presets to Custom…

Custom collision presets means that we can choose what we want to detect with this collider. Since we’re looking for walls, they fall under WorldStatic. So under Object Responses, set everything to Ignore except WorldStatic.

overlapping wall detection collider

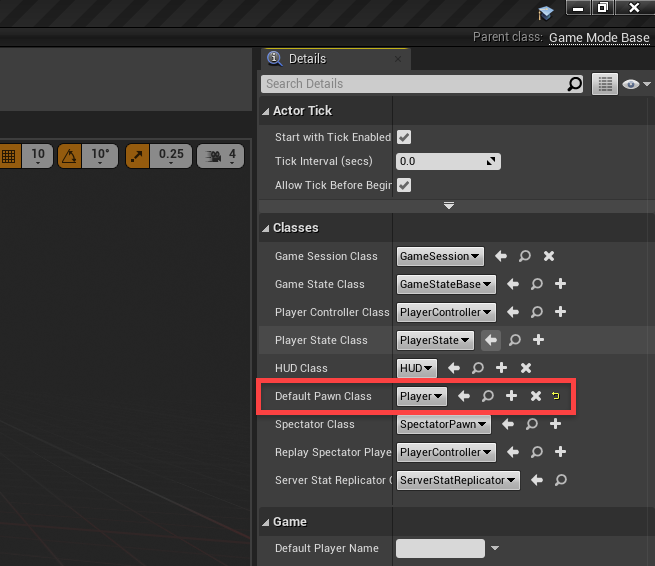
Now that we’ve got our player setup component-wise, let’s place them into the level. Back in the level editor, create a new blueprint of type GameMode Base and call it MyGameMode. Open it up and all we want to do here is set the Default Pawn Class to our Player.

game mode blueprint

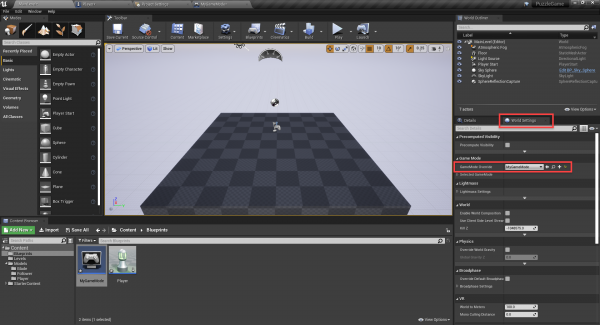
Save, compile then go back to the level editor. In the World Settings panel, set the GameMode Override to MyGameMode. Now when we press play, our player should spawn.

Unreal Engine World Settings window

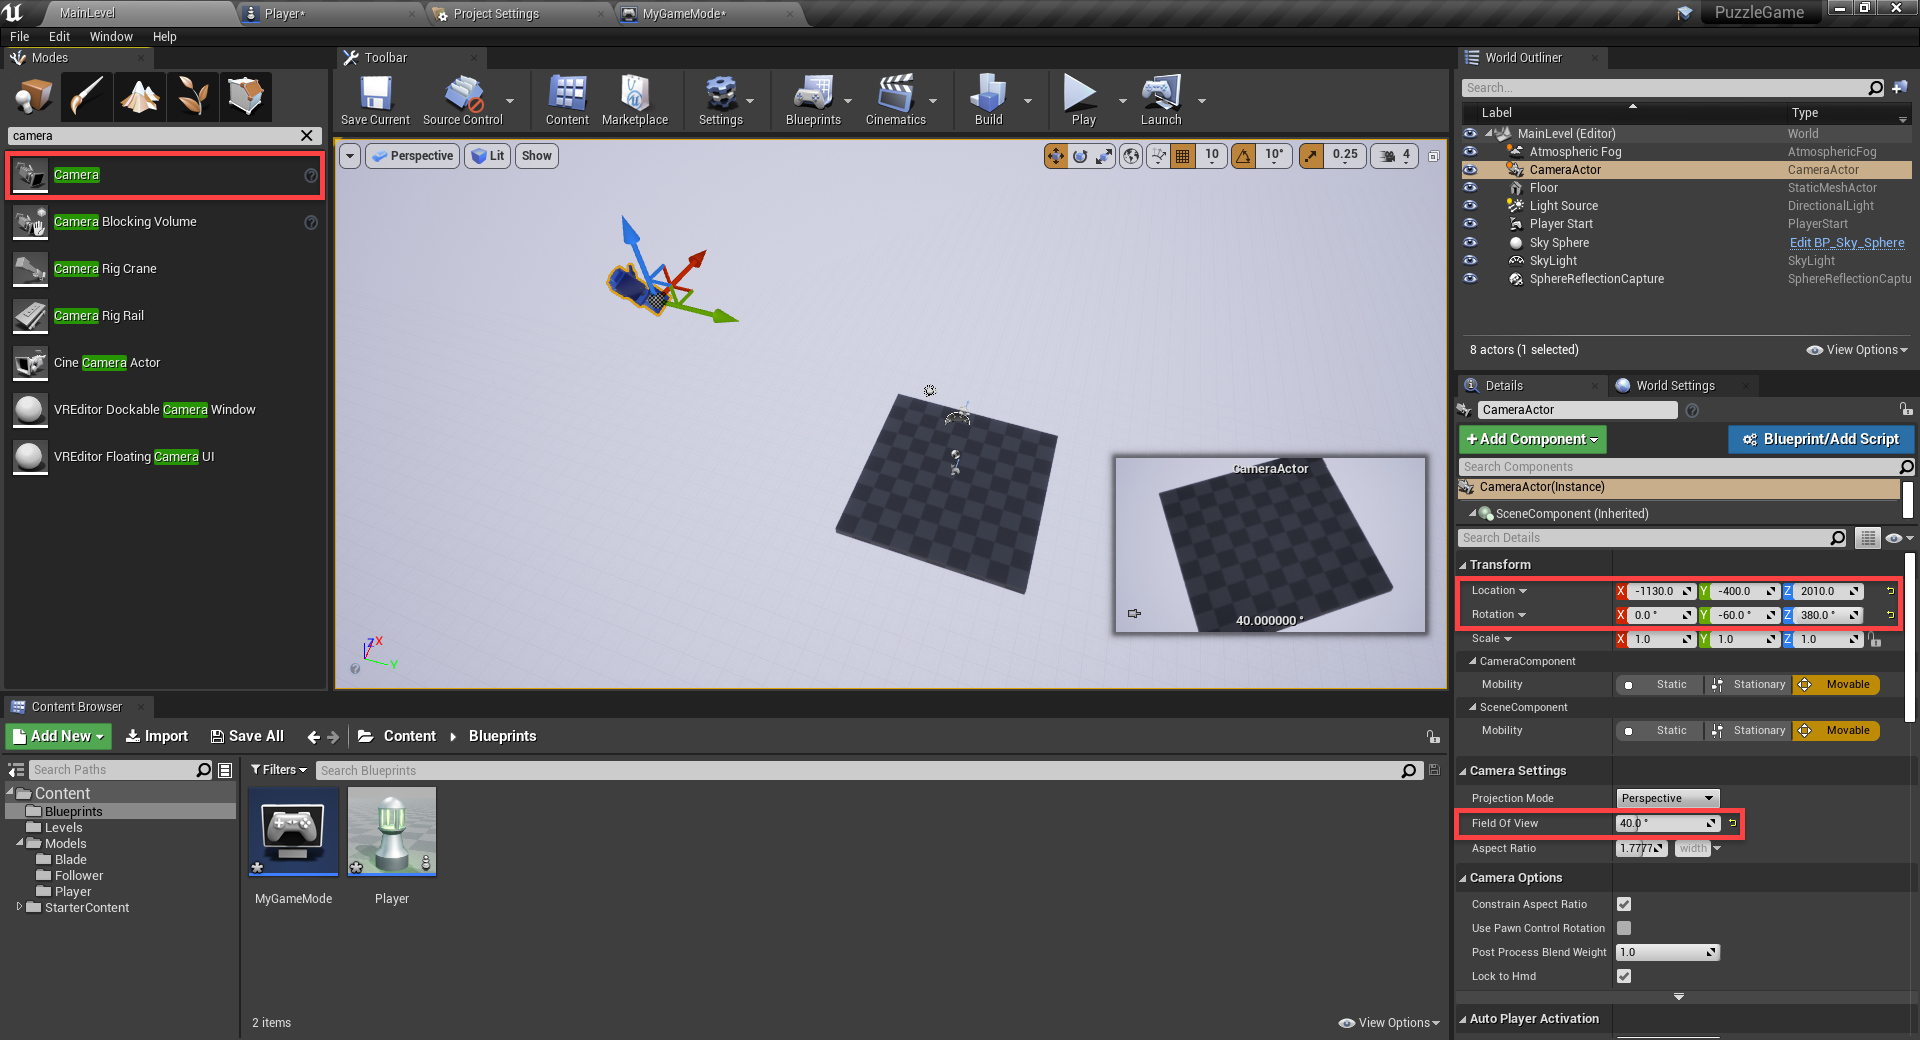
The default camera position is pretty bad, so let’s search for Camera in the Modes panel and drag that in.

  • Set the Location to -1130, -400, 210
  • Set the Rotation to 0, -60,  380
  • Set the Field of View to 40

creating the camera

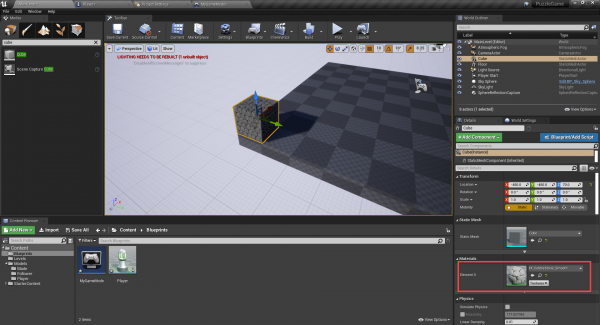
Now let’s setup the level bounds. Create a new cube and position it to the corner of the platform.

  • Set the Material to M_CobbleStone_Smooth

creating a cube

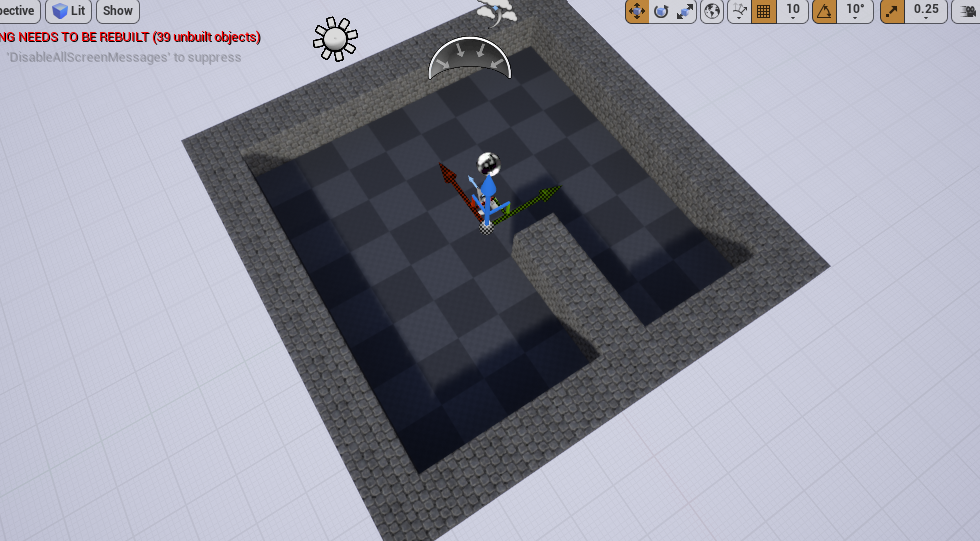
Copy and past that cube so we have something that looks like this. Also, select all the walls and in the details panel, enable Simulation Generates Hit Events and Generate Overlap Events.

level layout

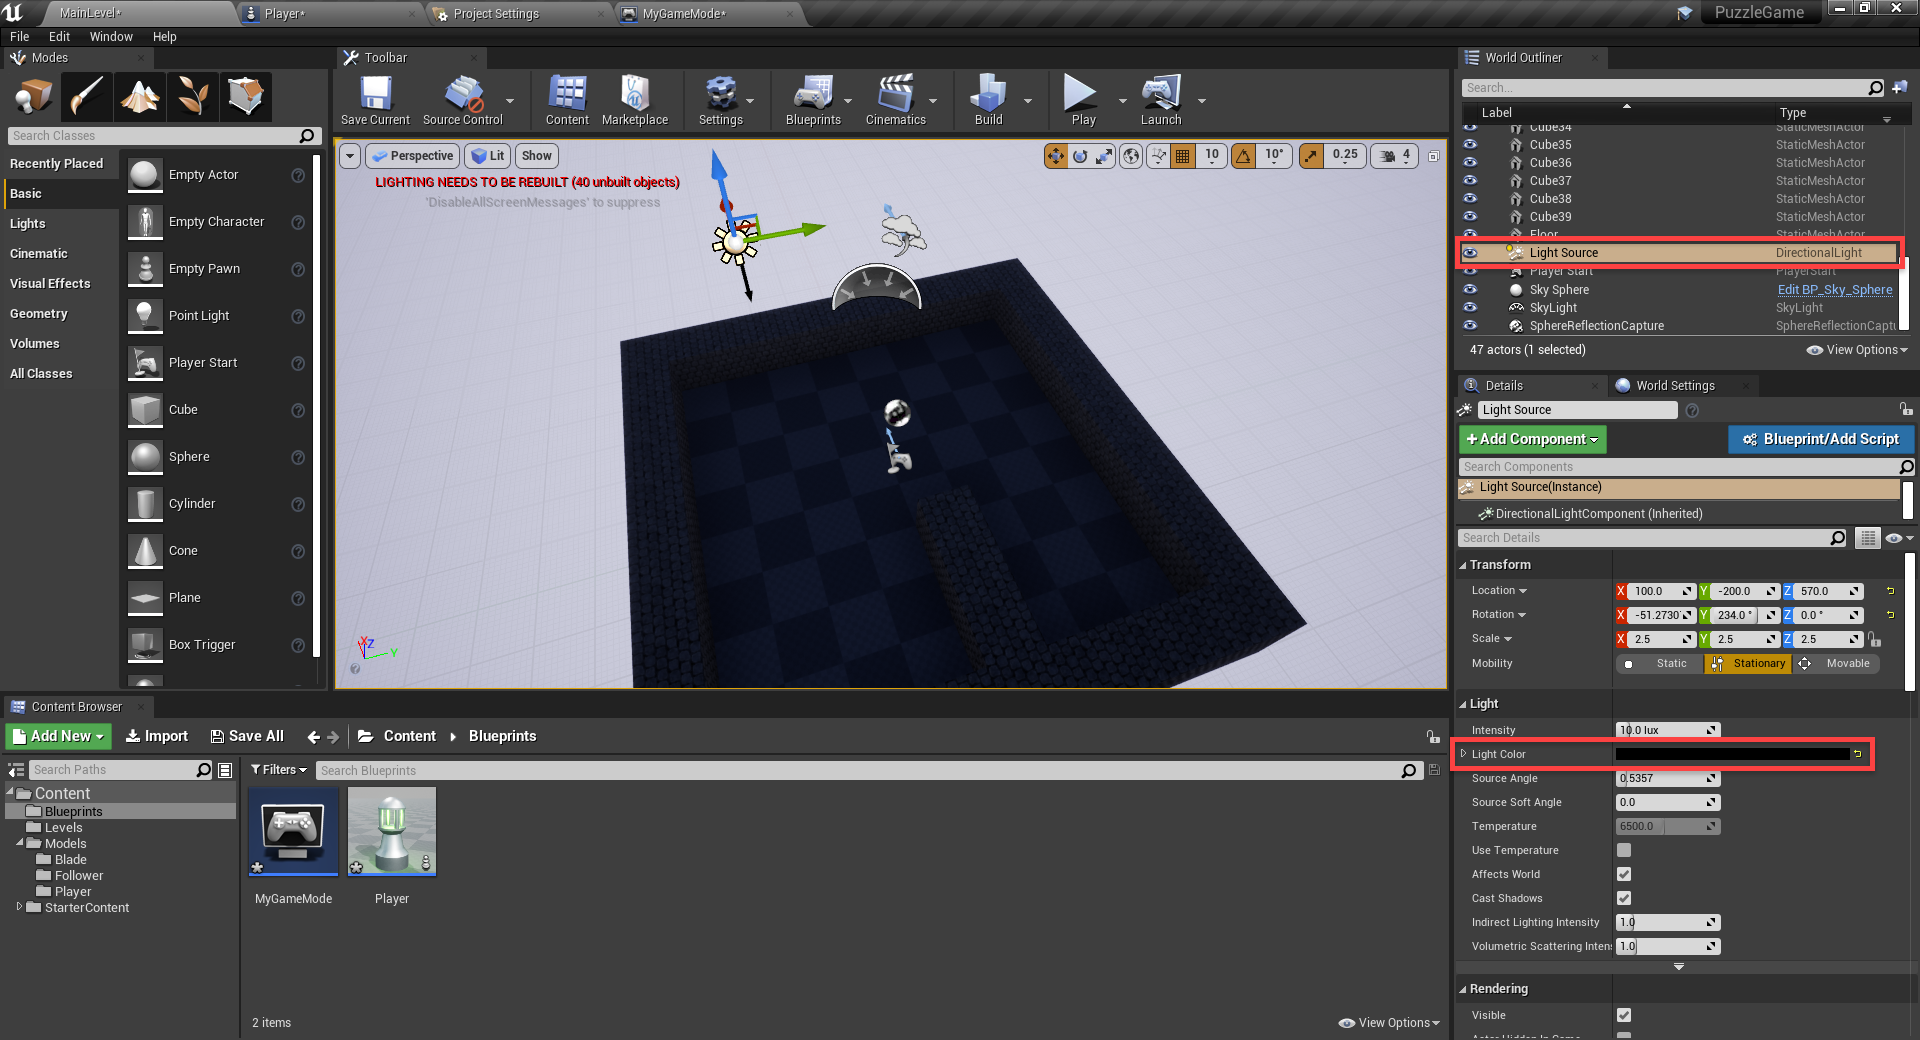
Since this puzzle game is in the dark with lights, let’s select the Light Source and set the Light Color to Black.

changing the light color

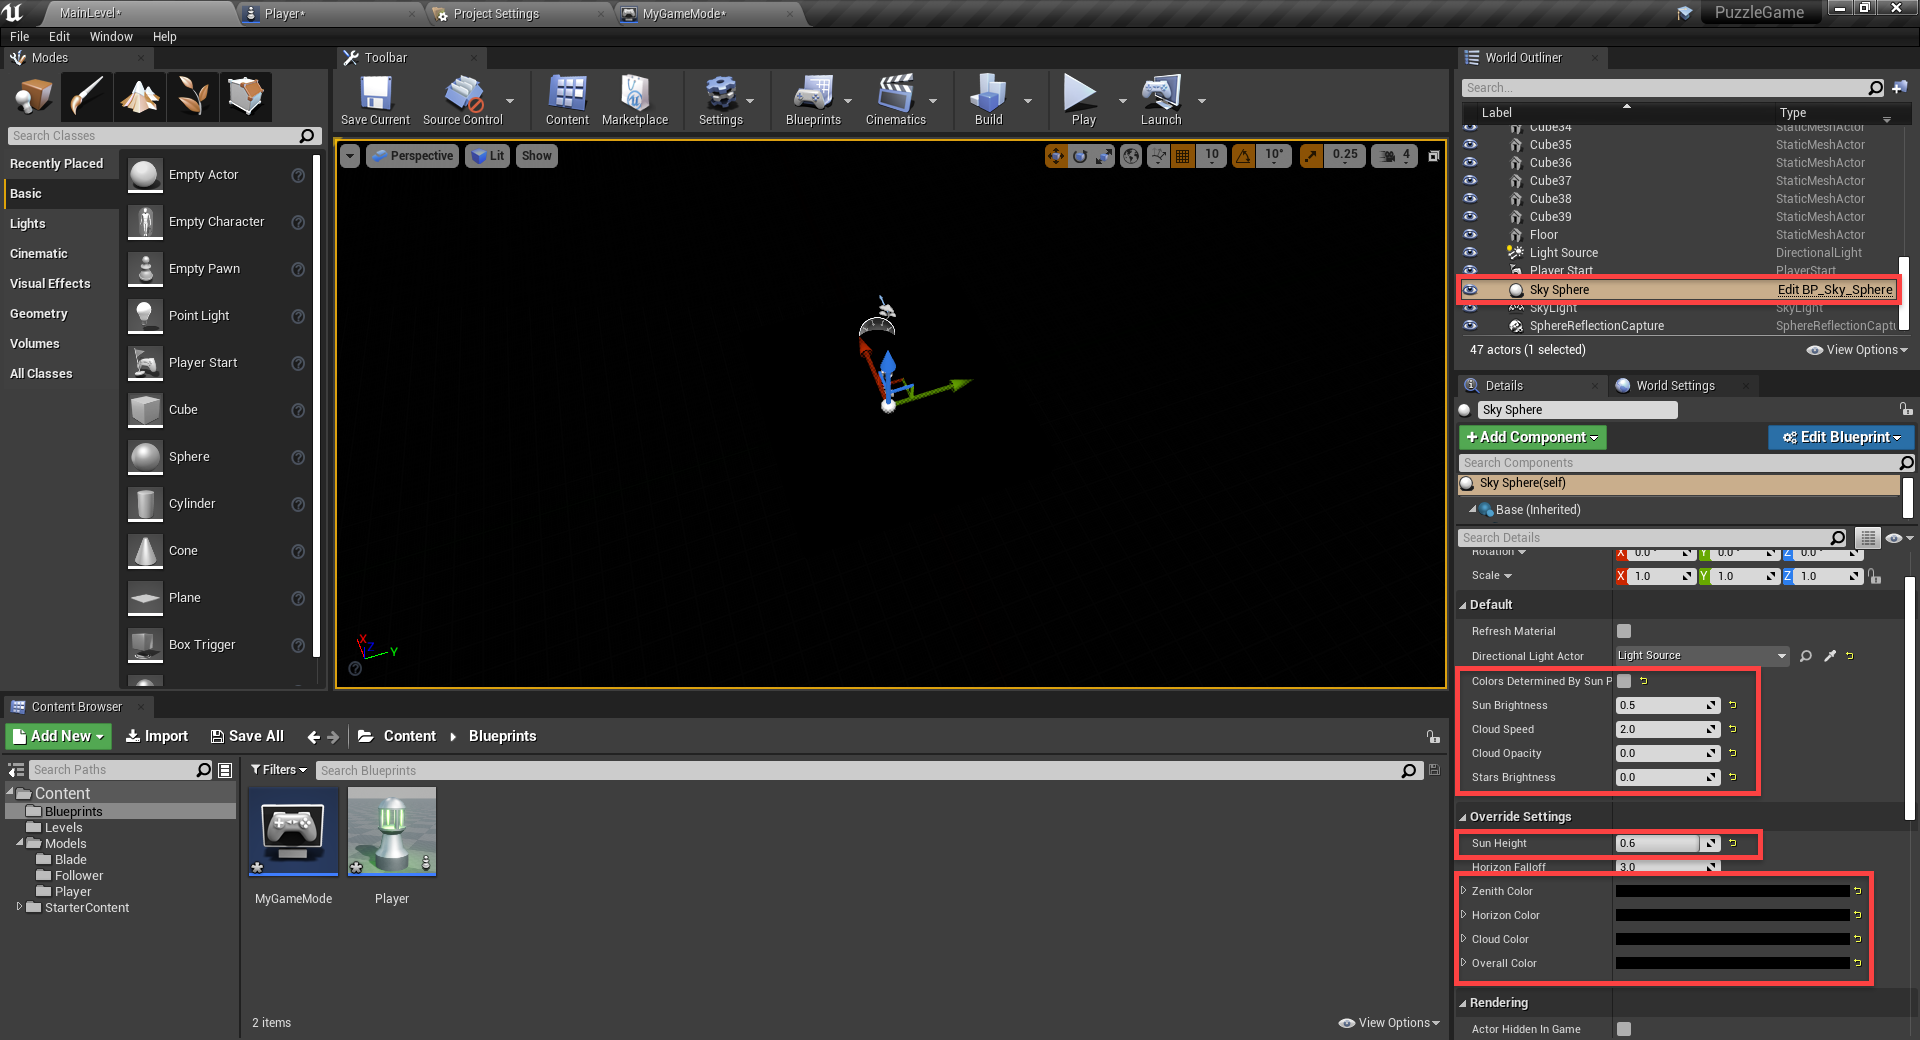
To make the sky night, we can select the Sky Sphere.

  • Disable Colors Determined by Sun Position
  • Set the Sun Brightness to 0.5
  • Set the Cloud Opacity and Stars Brightness to 0
  • Set the 4 colors to Black

After this, we need to click on the down arrow next to the Build button (in the toolbar) and select Build Lighting Only.

setting the sky color

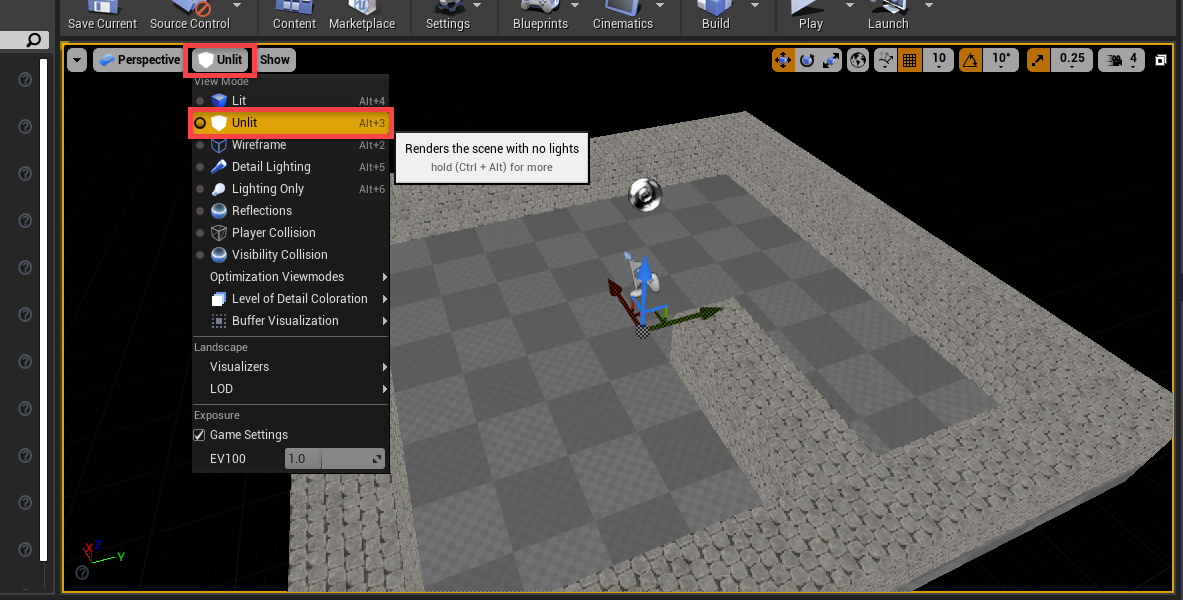
It’s pretty dark, so a way we can see is by disabling the lighting when working on the level. In the viewport, click on Lit and select Unlit.

changing the scene view

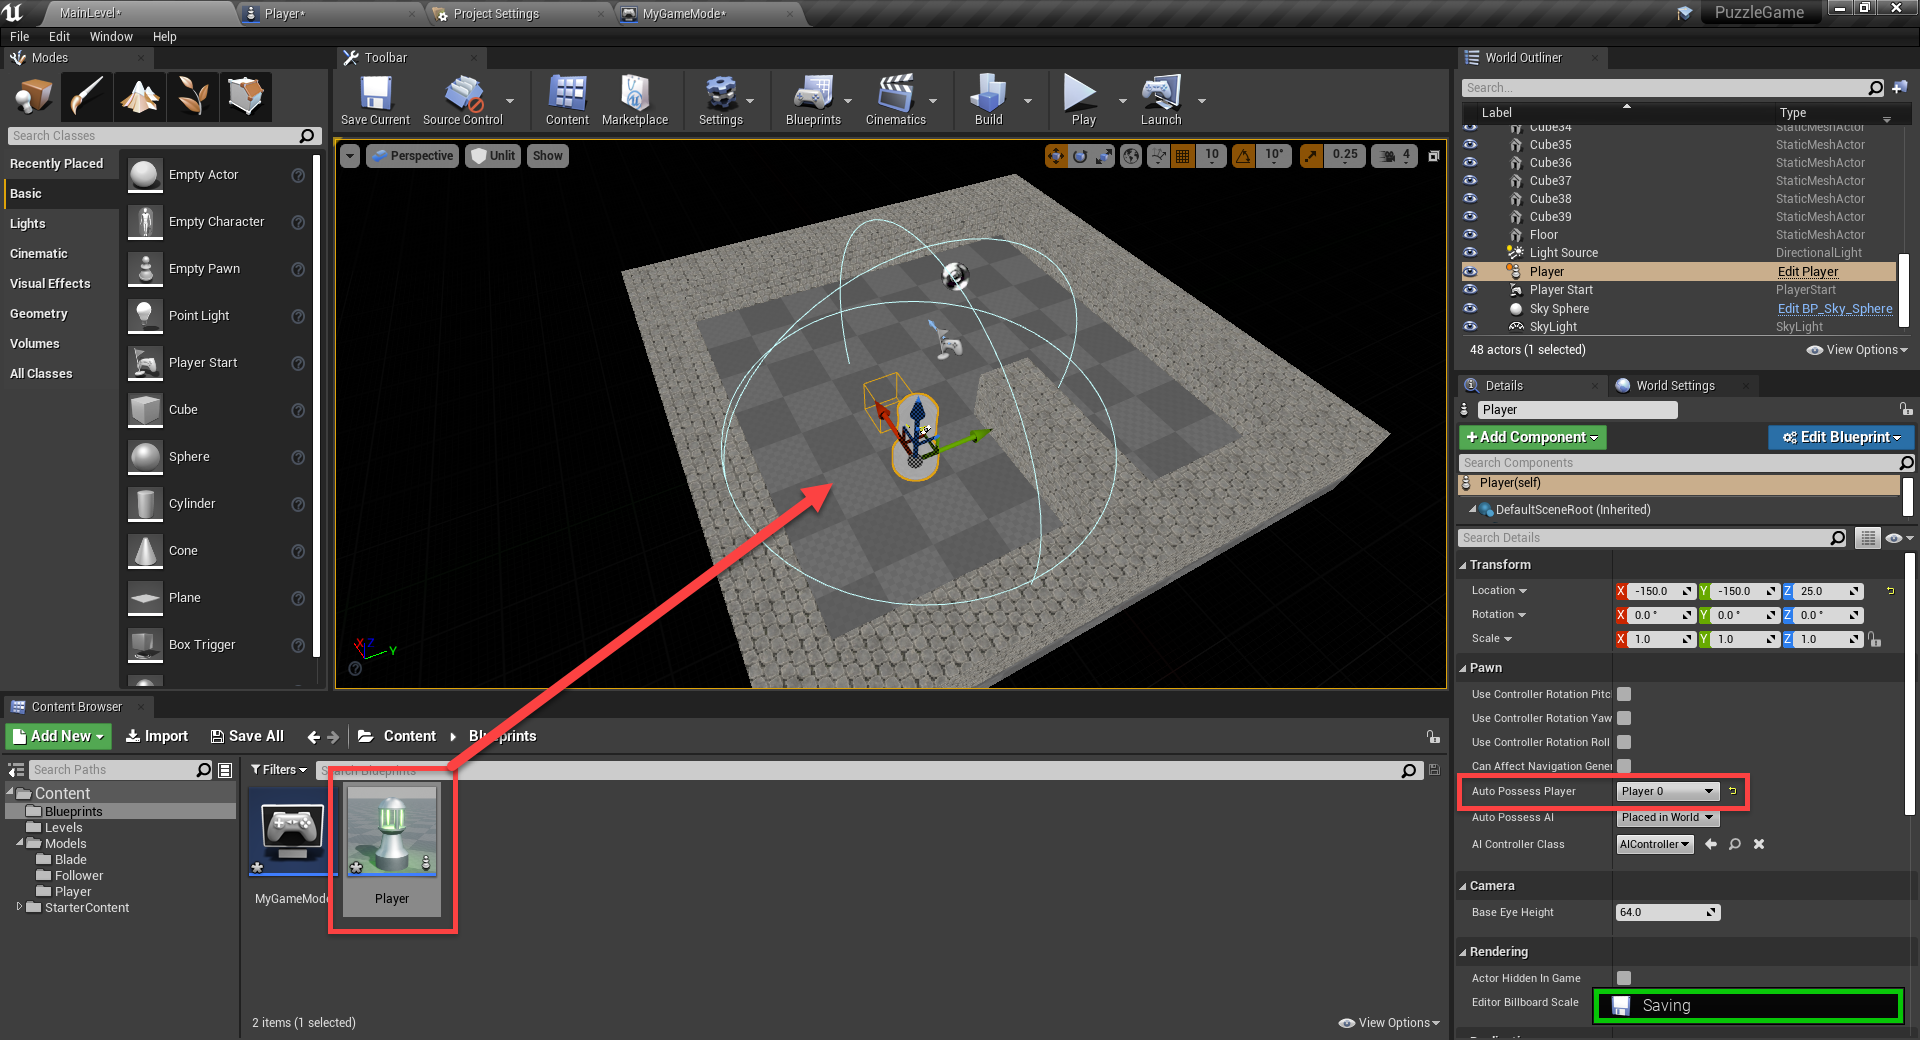
Drag in the Player blueprint. Set the Auto Possess Player to Player 0 so when we press play, we have control of the player.

adding the player

Moving the Player

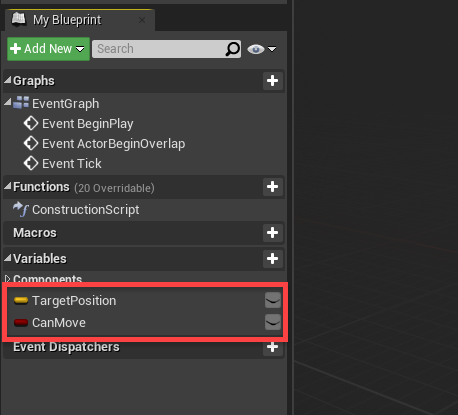
We’ll begin by adding in the ability for the player to move. First, we’ll create the variables.

  • TargetPositon (Vector)
  • CanMove (Boolean)

Compile, then set the CanMove default value to true.

player variables

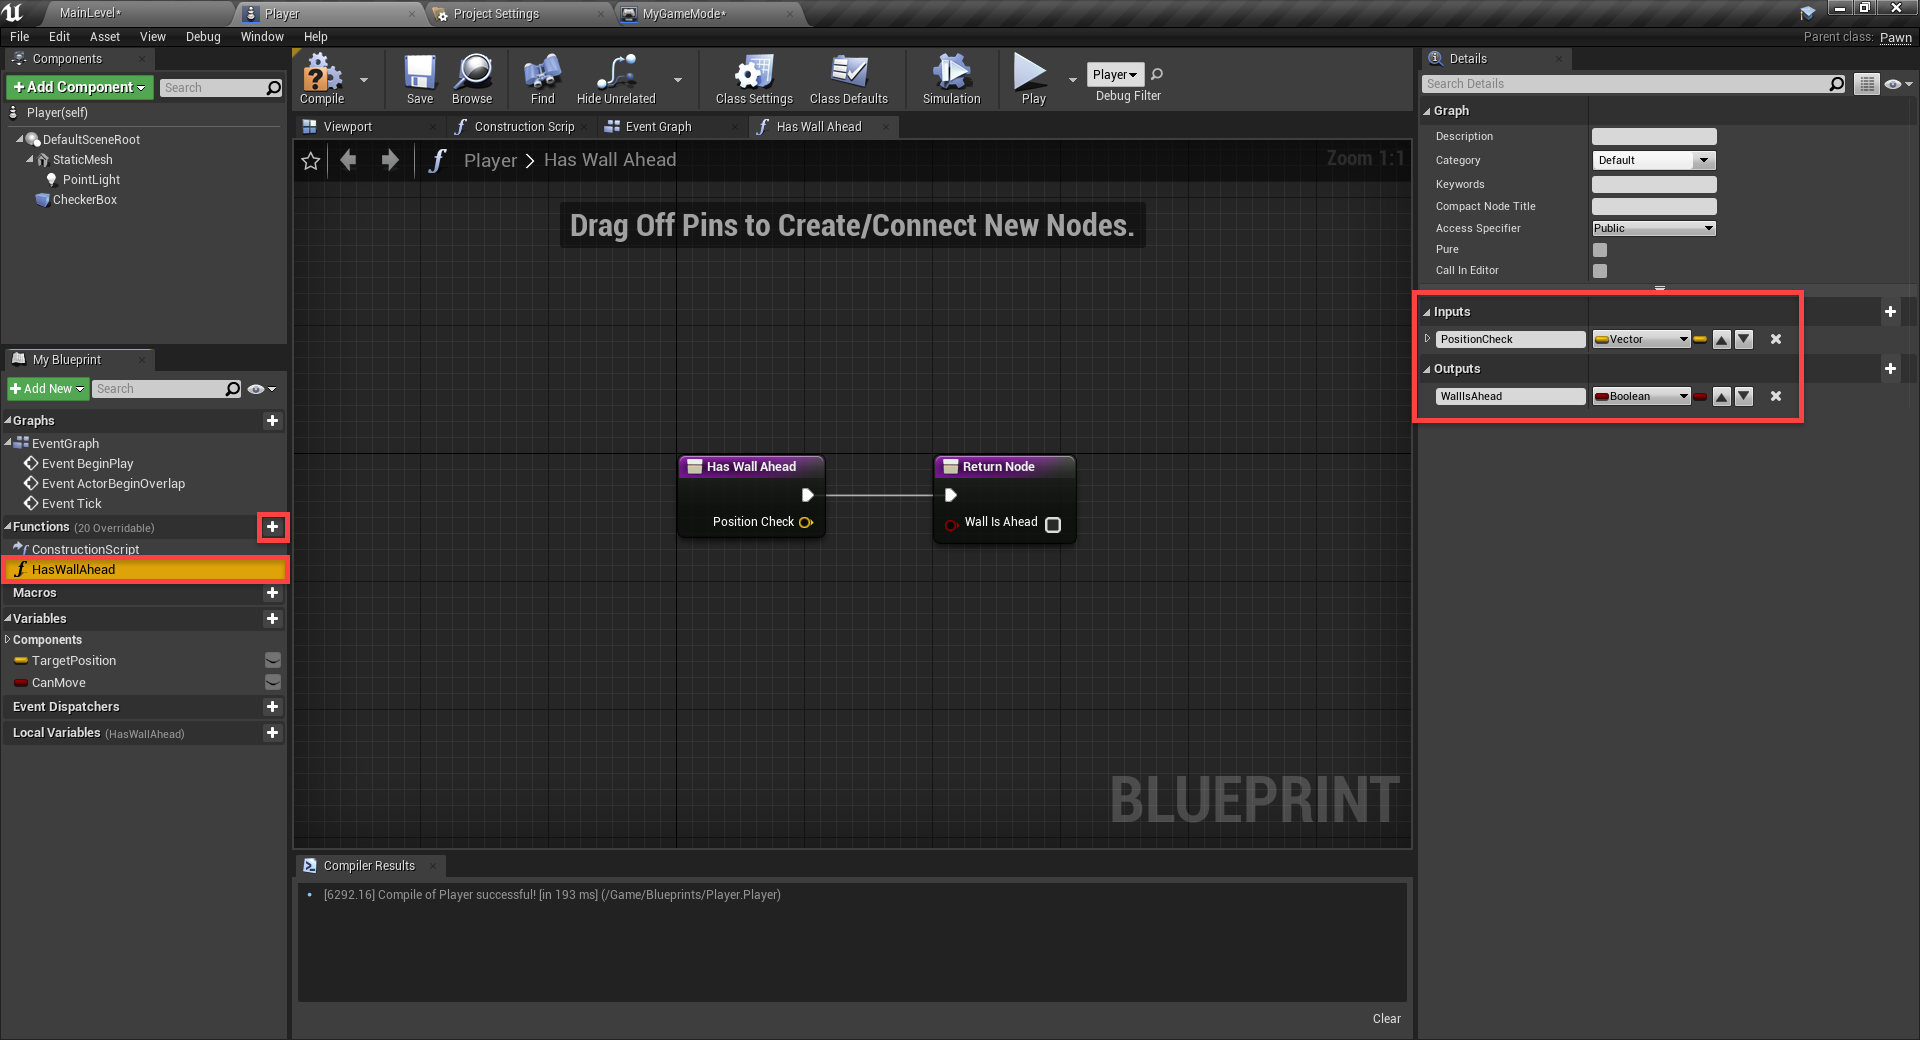
Whenever we want to move the player, we need to see if we’re going to move into a wall. If we are, then don’t move. This will be calculated in a new function called HasWallAhead.

  • Create a vector input called PositionCheck
  • Create a boolean output called CanMoveAhead (different from image)

creating a new function

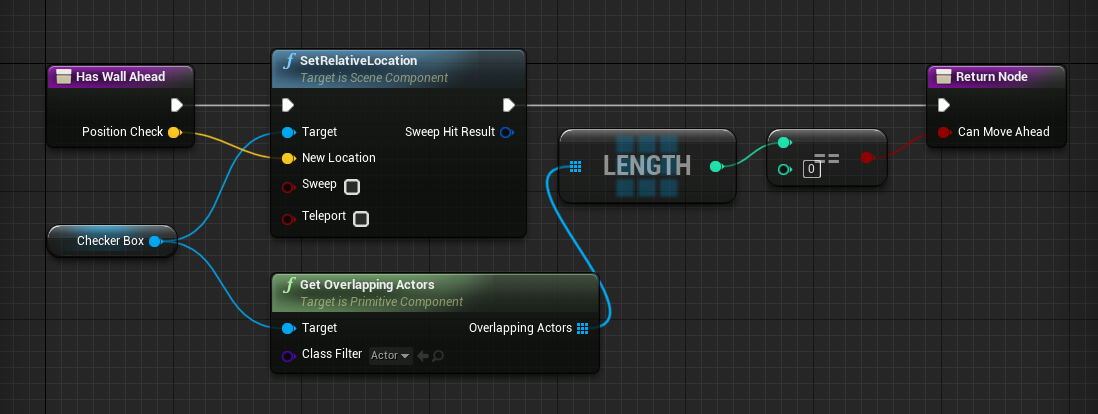
This function will change the position of the checker box, then see if it’s colliding with anything, outputting whether or not we can move ahead.

creating the function

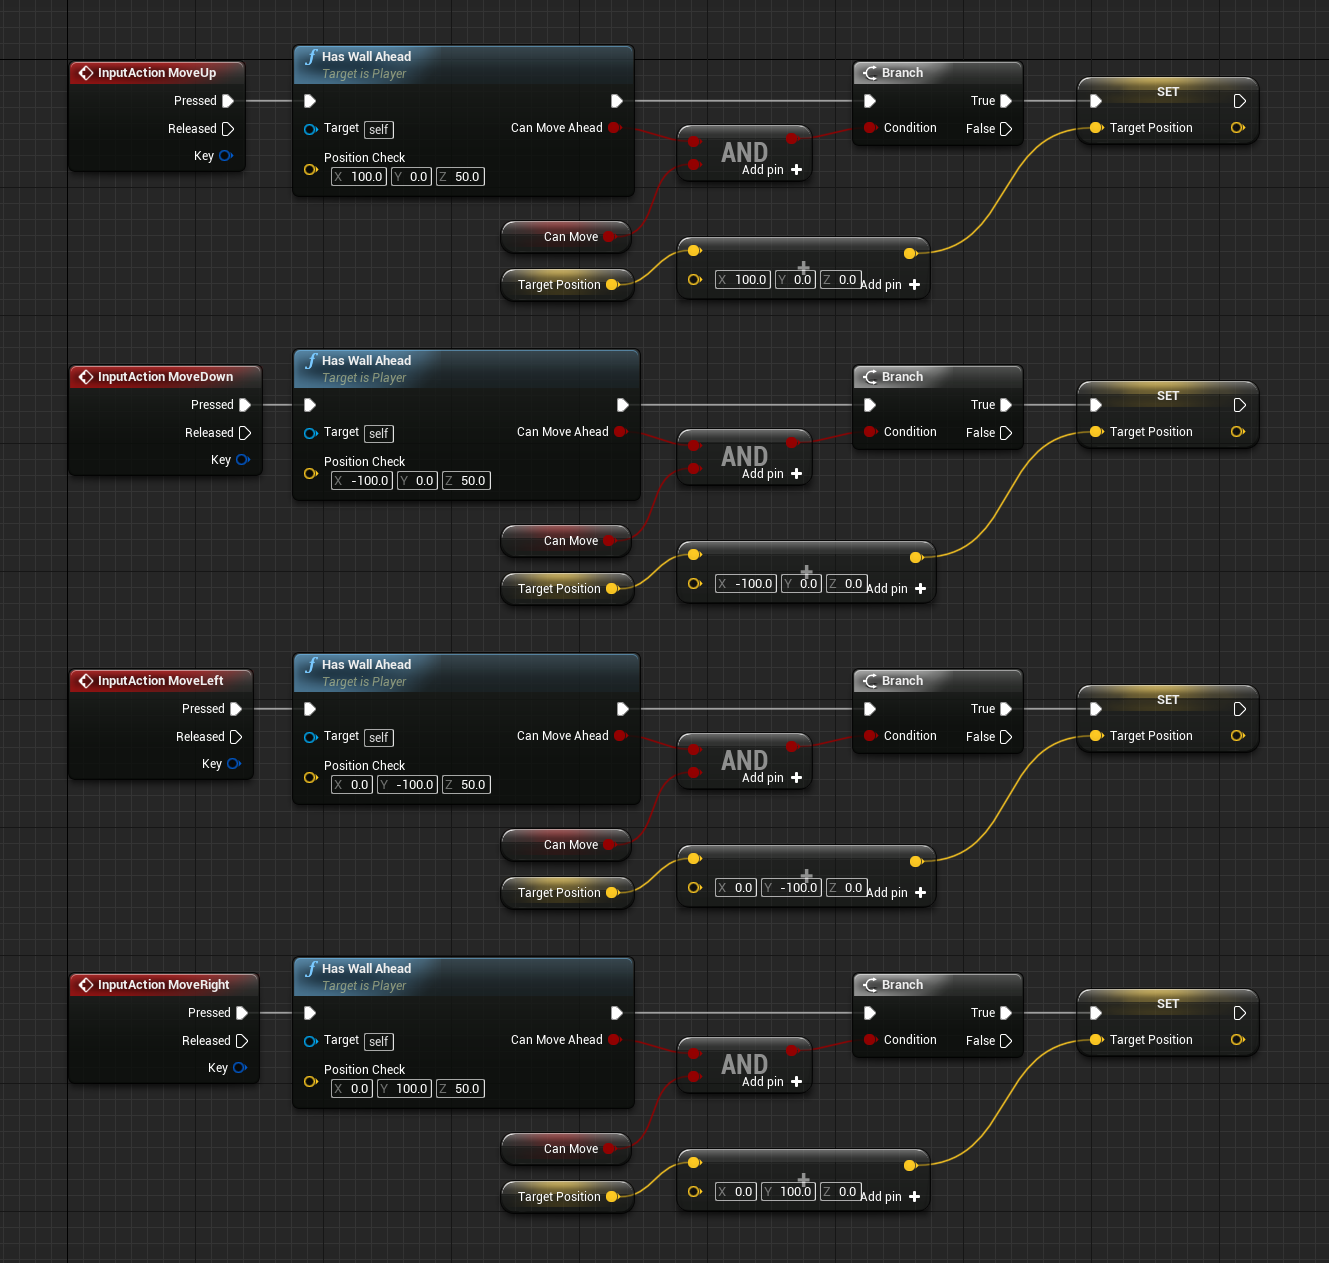
Back in the main Event Graph, we can begin to setup the movement inputs. Here’s how the movement will work:

  1. Detect movement key input (WASD)
  2. Check if we can move to that location
  3. Set the target position to that new position
  4. Overtime move towards the target position

player movement input

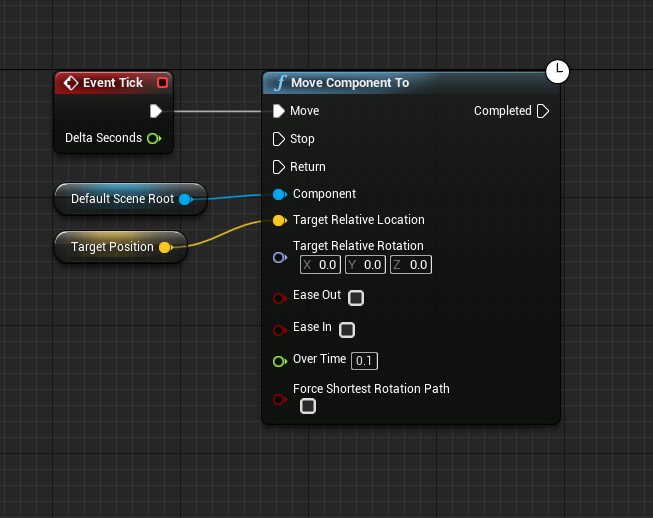
Using the tick node, we can move towards the target position every frame by plugging that into a Move Component To node.

moving component to

If you press play, you’ll be able to move forward with the W key. Now let’s go ahead and setup the other three movement inputs.

4 different movement inputs

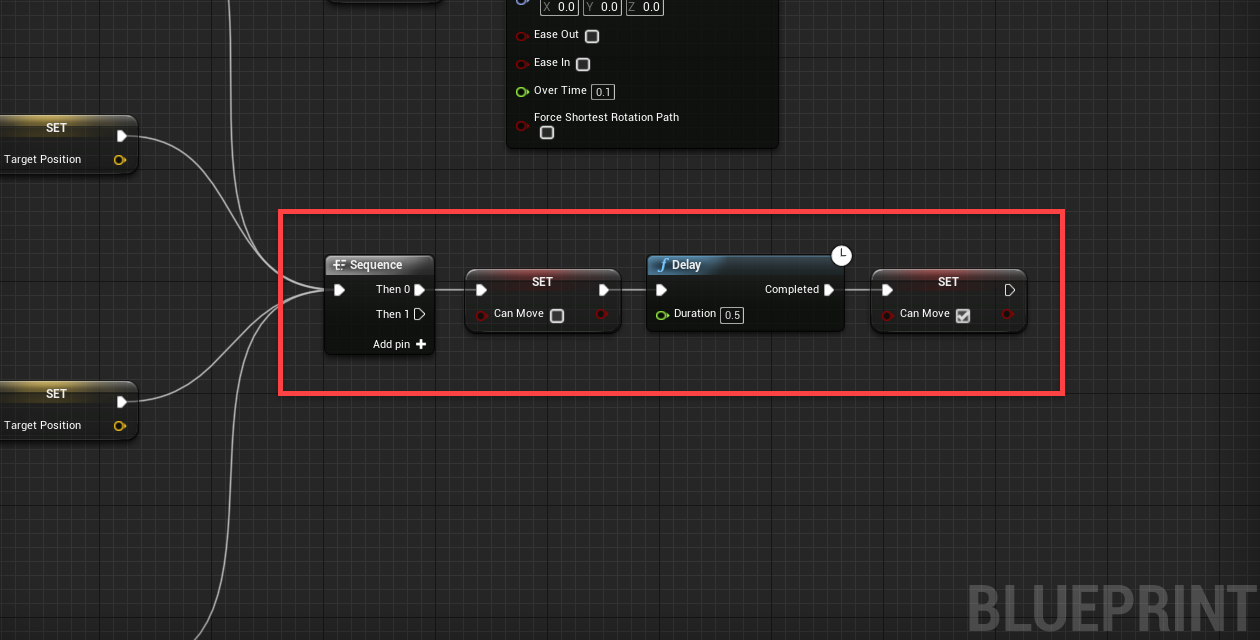
You may notice that we can move again even though we’re not at the target position yet. To fix this, create a Sequence node (we’ll be adding more to this is the future). Have the input connect to each of the set target position node outputs. What we want to do here is disable can move, wait half a second, then re-enable can move.

sequence disable can move

Creating the Progressor

This is going to be a game where everything moves only when the player moves. The followers, obstacles, etc. So to make it a nice system, we’ll create a base blueprint which all others will inherit from.

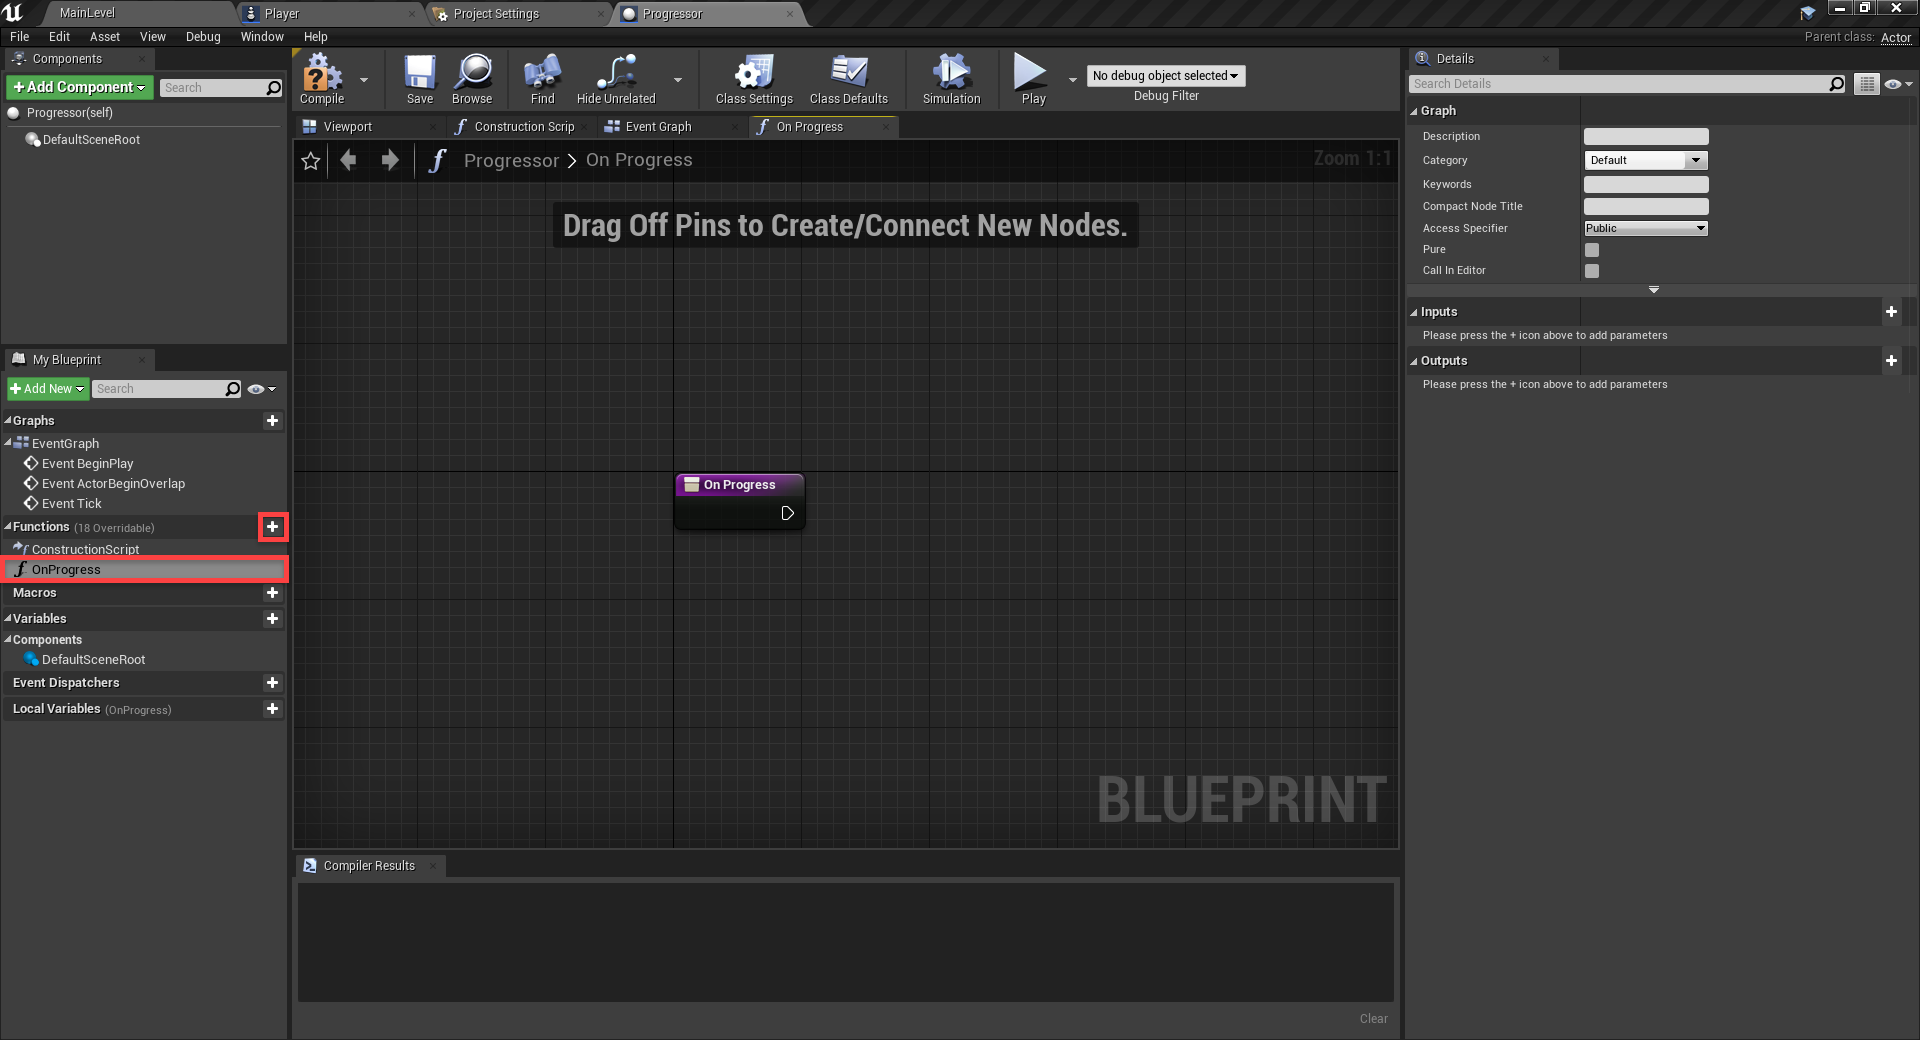
In the Blueprints folder, create a new blueprint of type Actor called Progressor. The only thing we want to do inside of this blueprint, is create a new function called OnProgress.

progressor event

Now that we have the base of all progressors (followers, blades, etc), we can call the OnProgress function when the player moves.

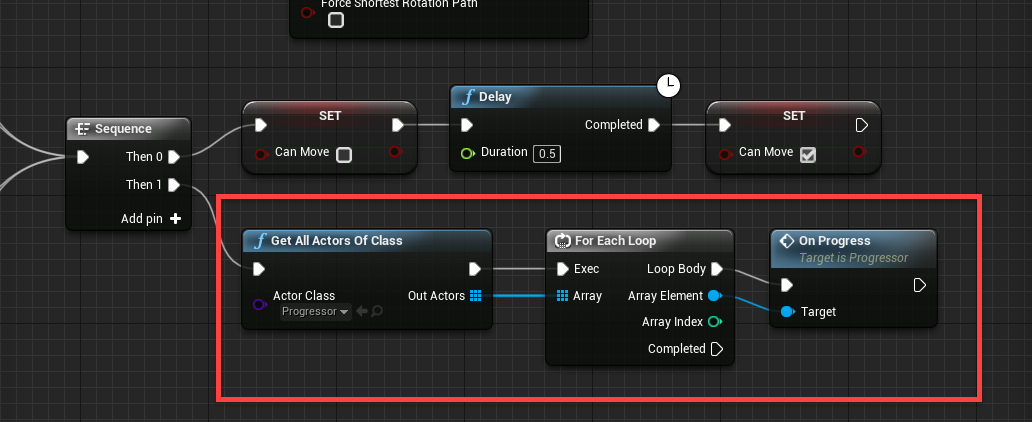
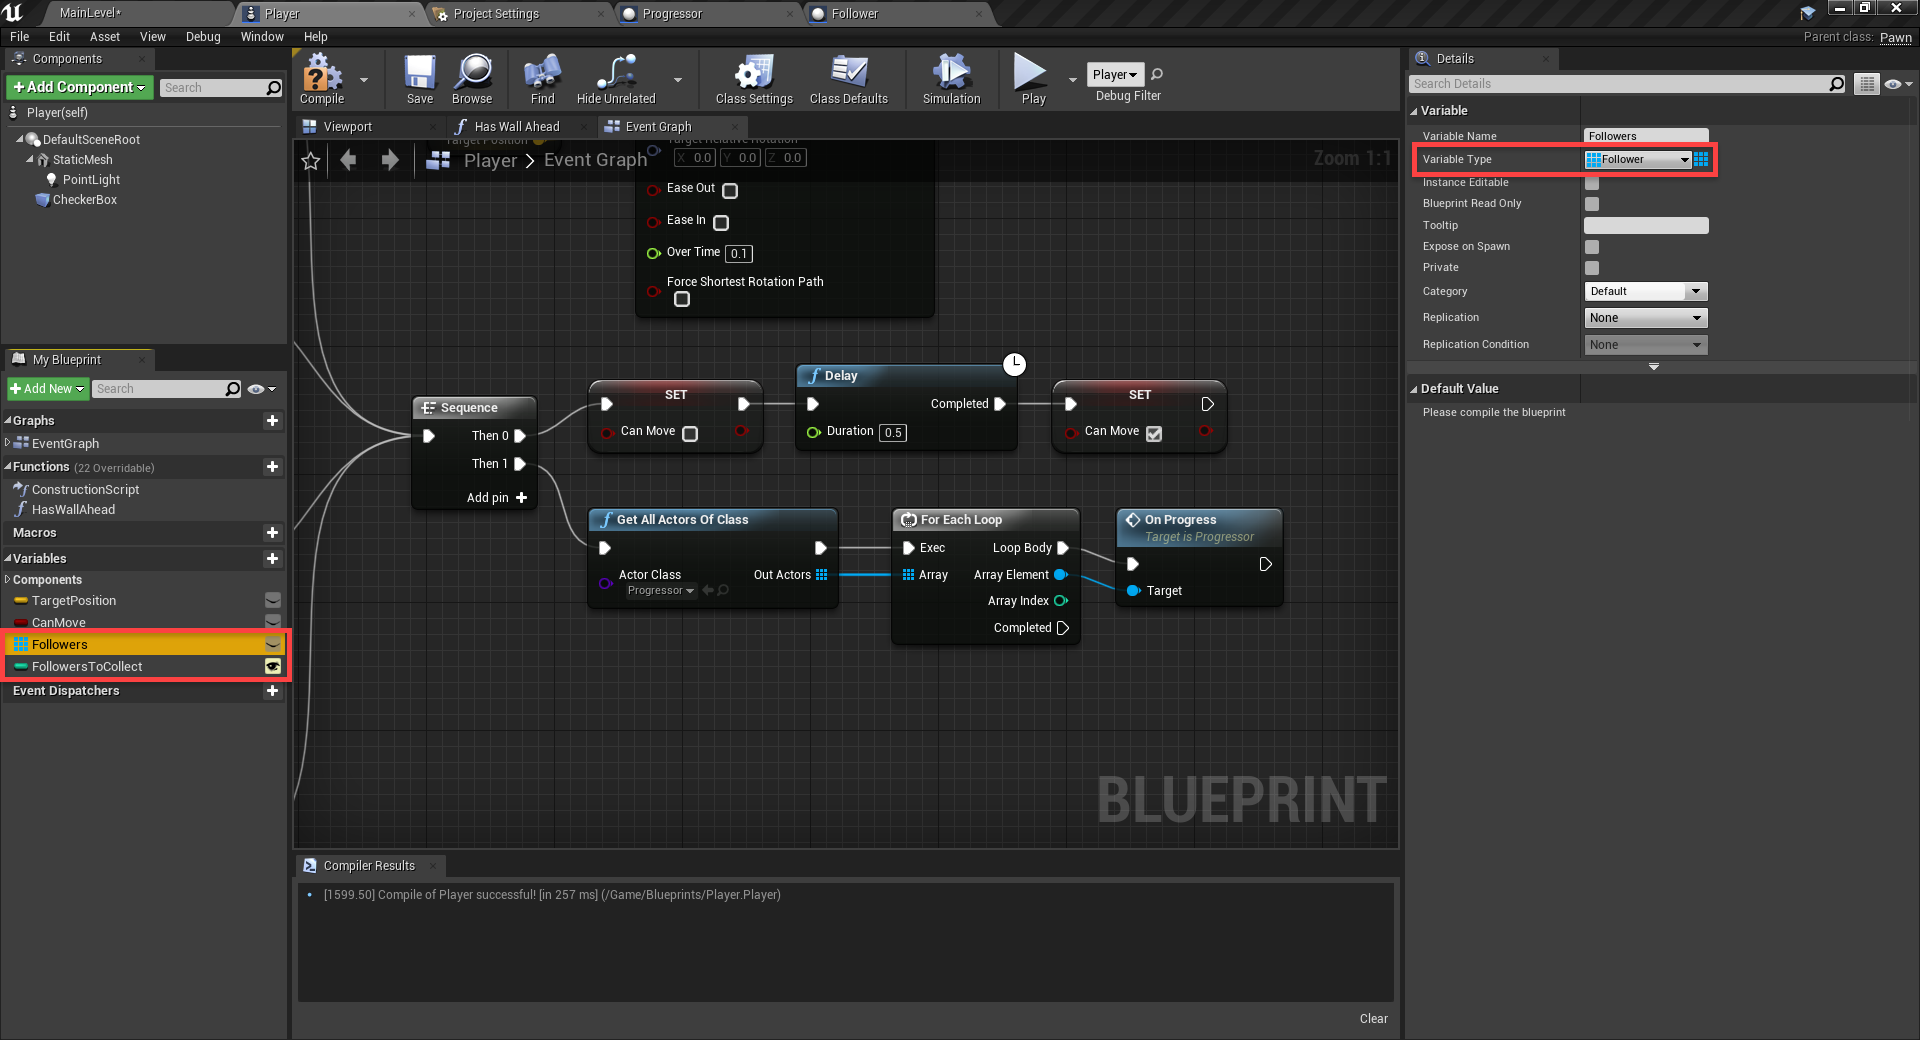
In the Player blueprint, create the GetAllActorsOfClass node and connect that to the sequence node.

  • Set the Actor Class to Progressor
  • Connect that to a for each loop
    • This will loop through every progressor in the level
  • We then want to call each progressor’s OnProgress function

calling the on progress function

Creating the Followers

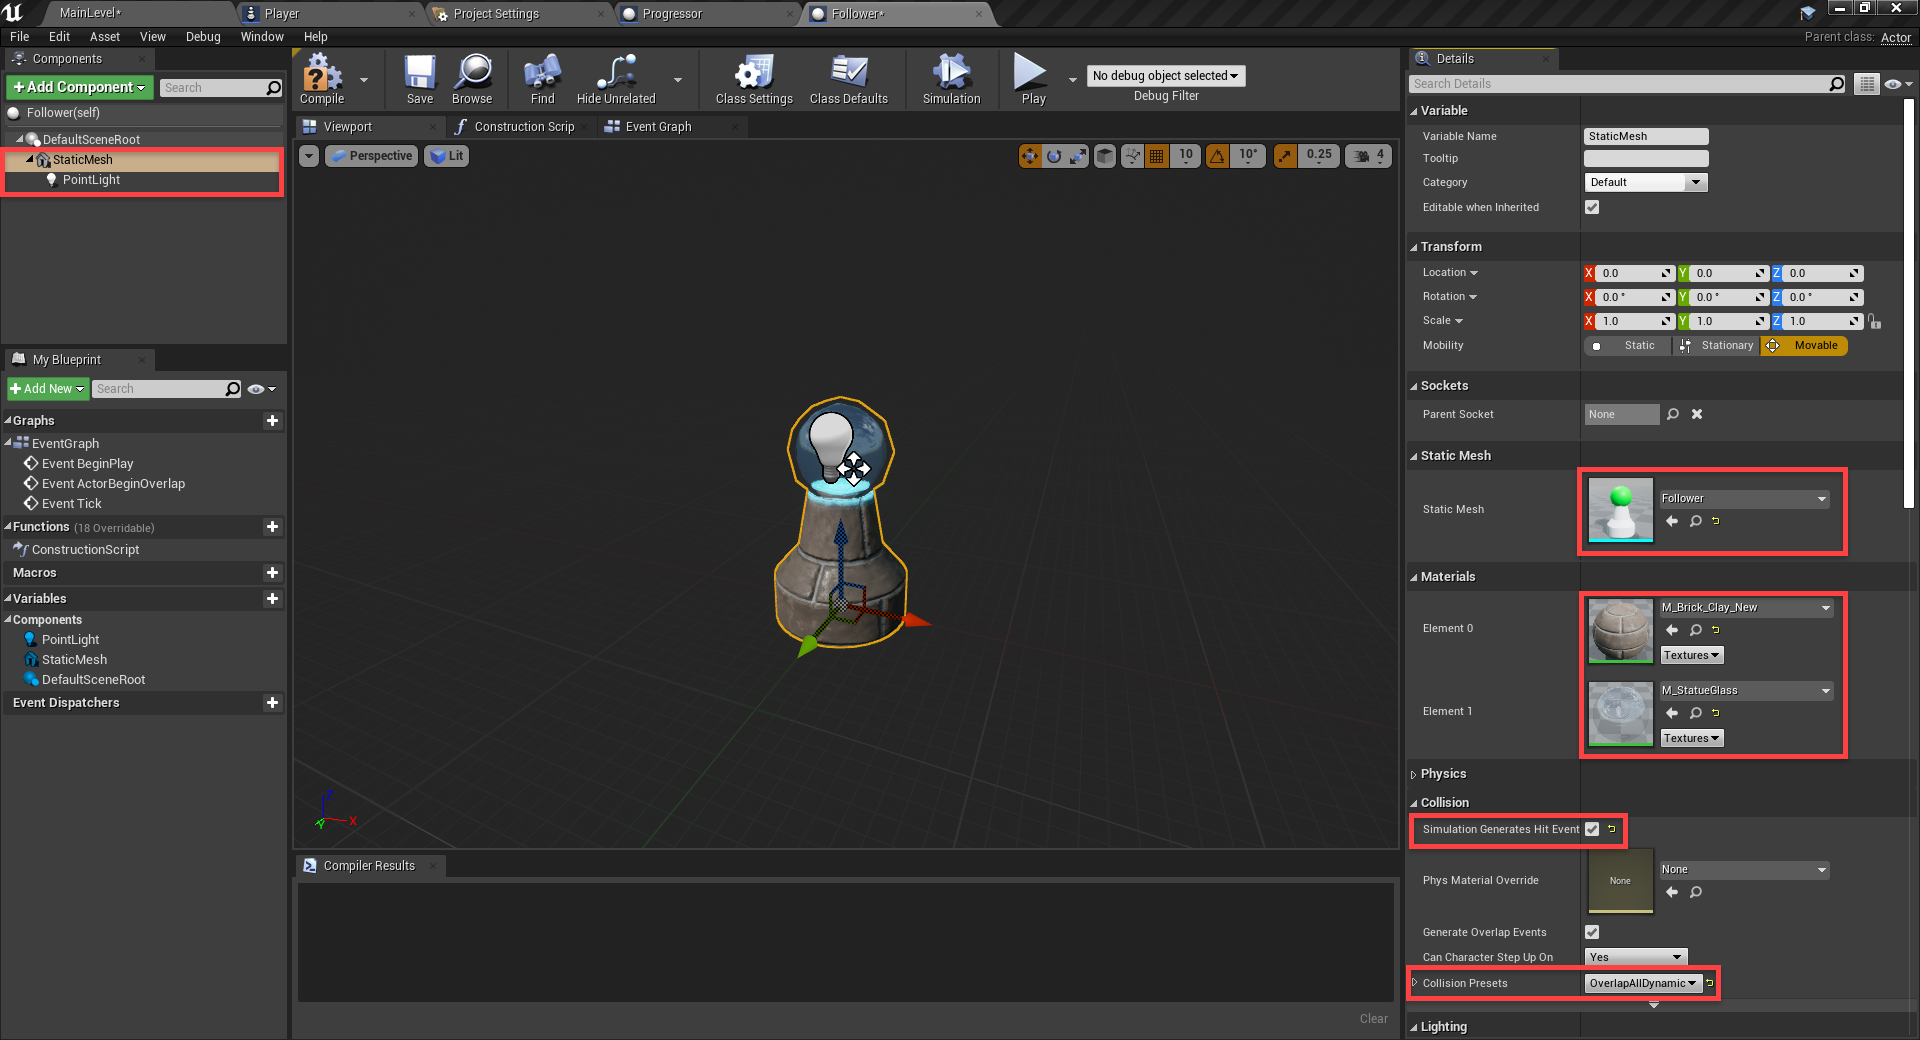
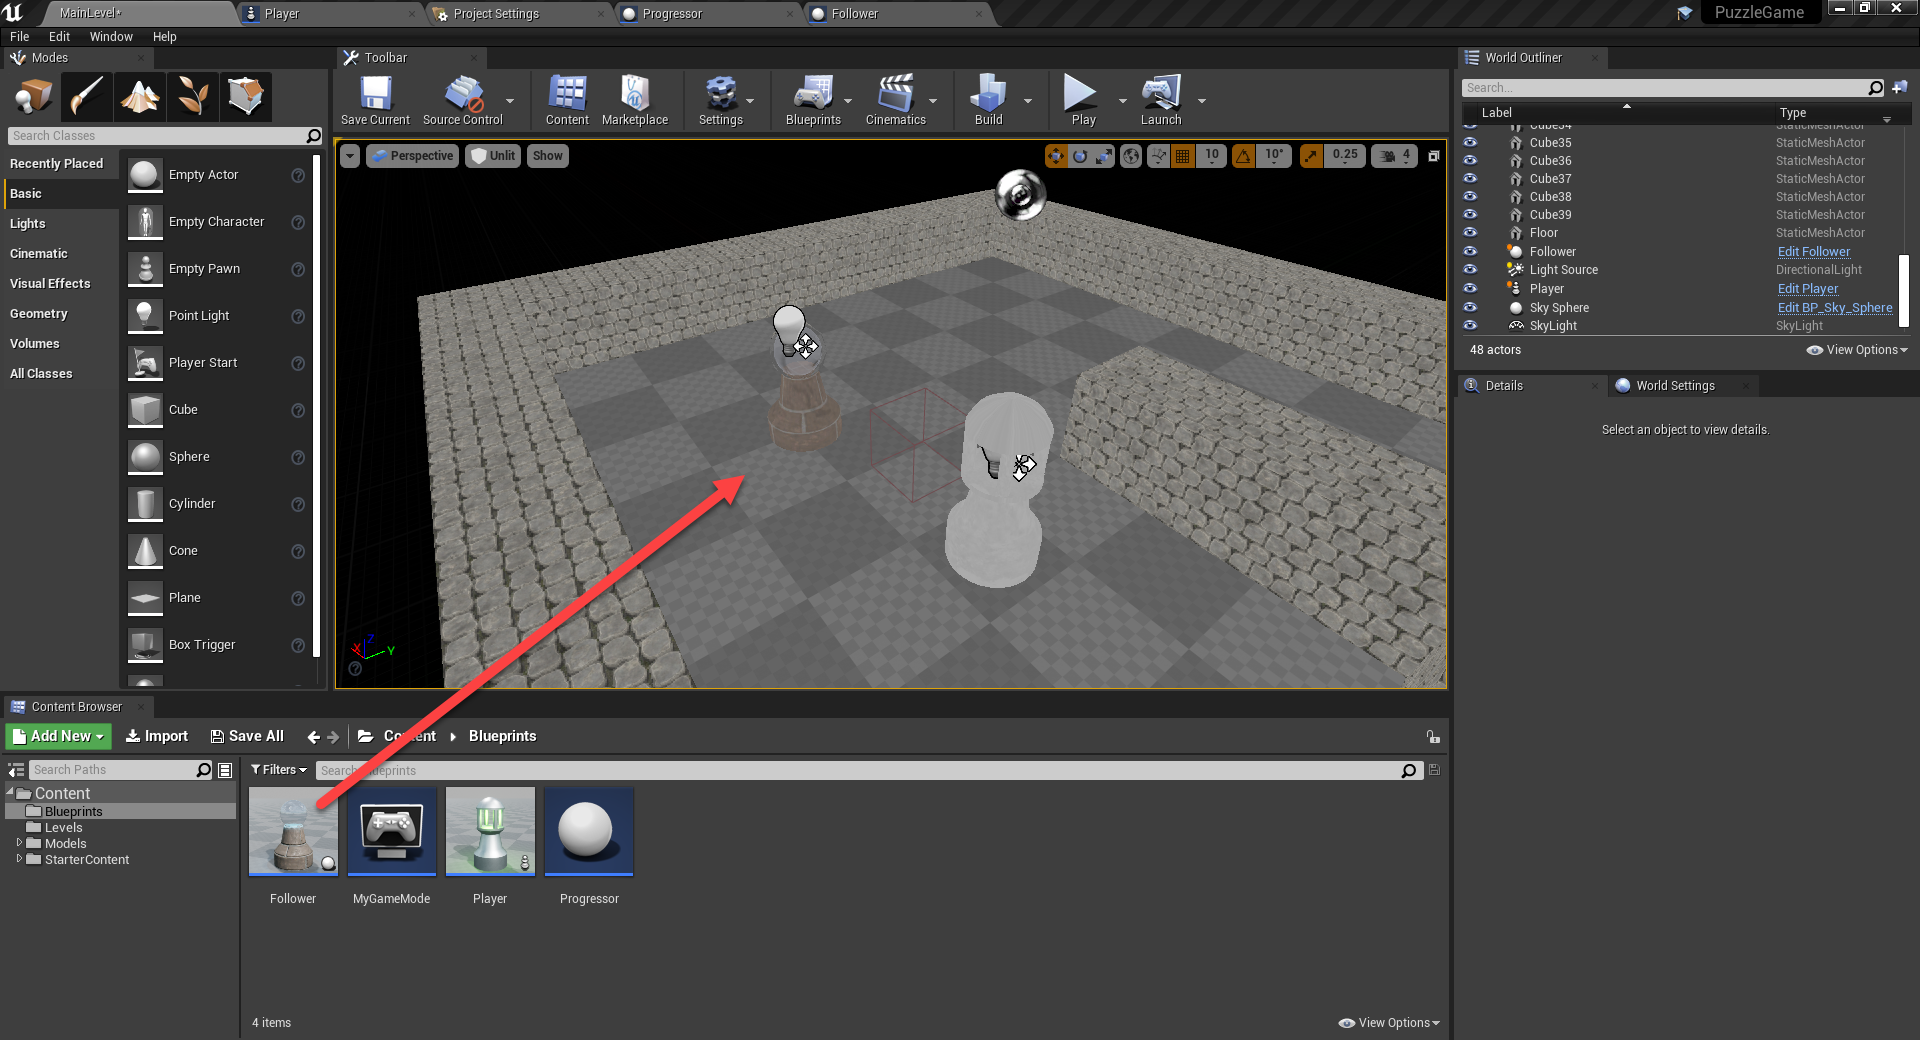
Now that we’ve got the progressor system in place, let’s create our follower blueprint. This is going to be what the player can collect and then have follow them. Create a new blueprint with the parent class of Progressor. Call it Follower.

  • Create a static mesh component
    • Set the Static Mesh to Follower
    • Set the Materials to M_Brick_Clay_New and M_StatueGlass
    • Enable Simulation Generates Hit Events
    • Set the Collision Presets to OverlapAllDynamic
  • Create a point light with blue light

follower blueprint

We then want to create three variables.

  • CanMove (Boolean)
  • TargetPosition (Vector)
  • Target (Actor)

follower variables

In the event graph, we first want to set the initial target position when the game starts.

set target position

Using the Event Tick node, we want to make the follower move towards the target position every frame (only if they can move though).

move towards the target position

When the player moves, we’re calling all progressor’s OnProgress function. Well in the follower, we can detect when that’s being called and do something. Create the Event OnProgress node. We then need to get that parent event call, so right click on the red node and select Add call to parent function.

detecting parent function call

Finally for the follower, we need to create the SetTarget function. This will be called when the player collects them, allowing them to follow. Make sure to add an actor input for the target to be set to.

set target function

In the Player blueprint, we can setup the ability to collect these followers. First, we need some variables.

  • Create a variable of type Follower called Followers
    • We want this to be an array, so in the Details panel, click on the icon left of the variable type and choose Array
  • Create a variable of type Integer called FollowersToCollect
    • Set this to Instance Editable

follower variables

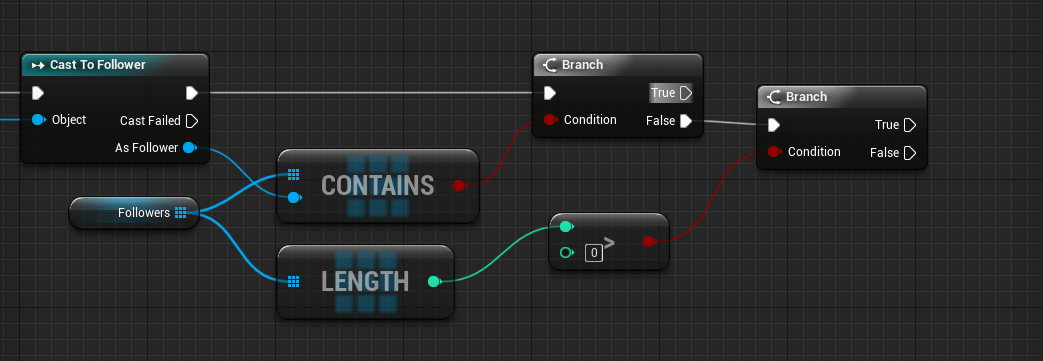
Let’s begin by creating an Event ActorBeginOverlap node to detect when we’ve overlapped an object. Then we can cast that to a follower.

follower cast

We then need to check if we’ve already collected the follower. If not, then we need to check if this is the first follower we’re collecting.

follower conditions

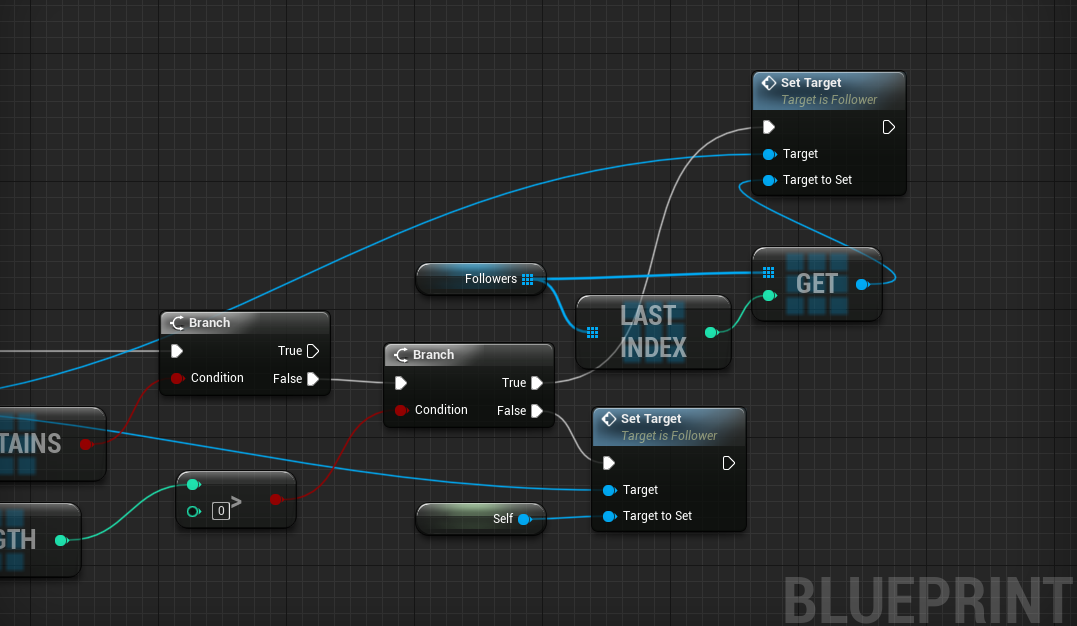
If this is the first follower, then set its target to us. Otherwise, set its target to the last follower in the line.

setting the follower's target

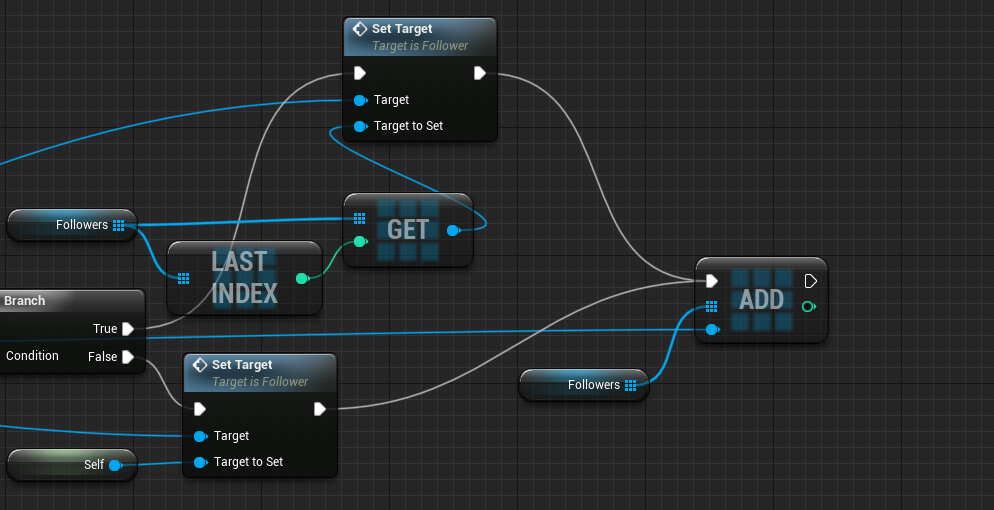
Finally, we want to add the follower, to the followers array.

adding it to the array

Back in the level editor, drag in a follower and press play!

adding the follower to the level

You can now also add in multiple followers and begin a chain!

Creating the Blade

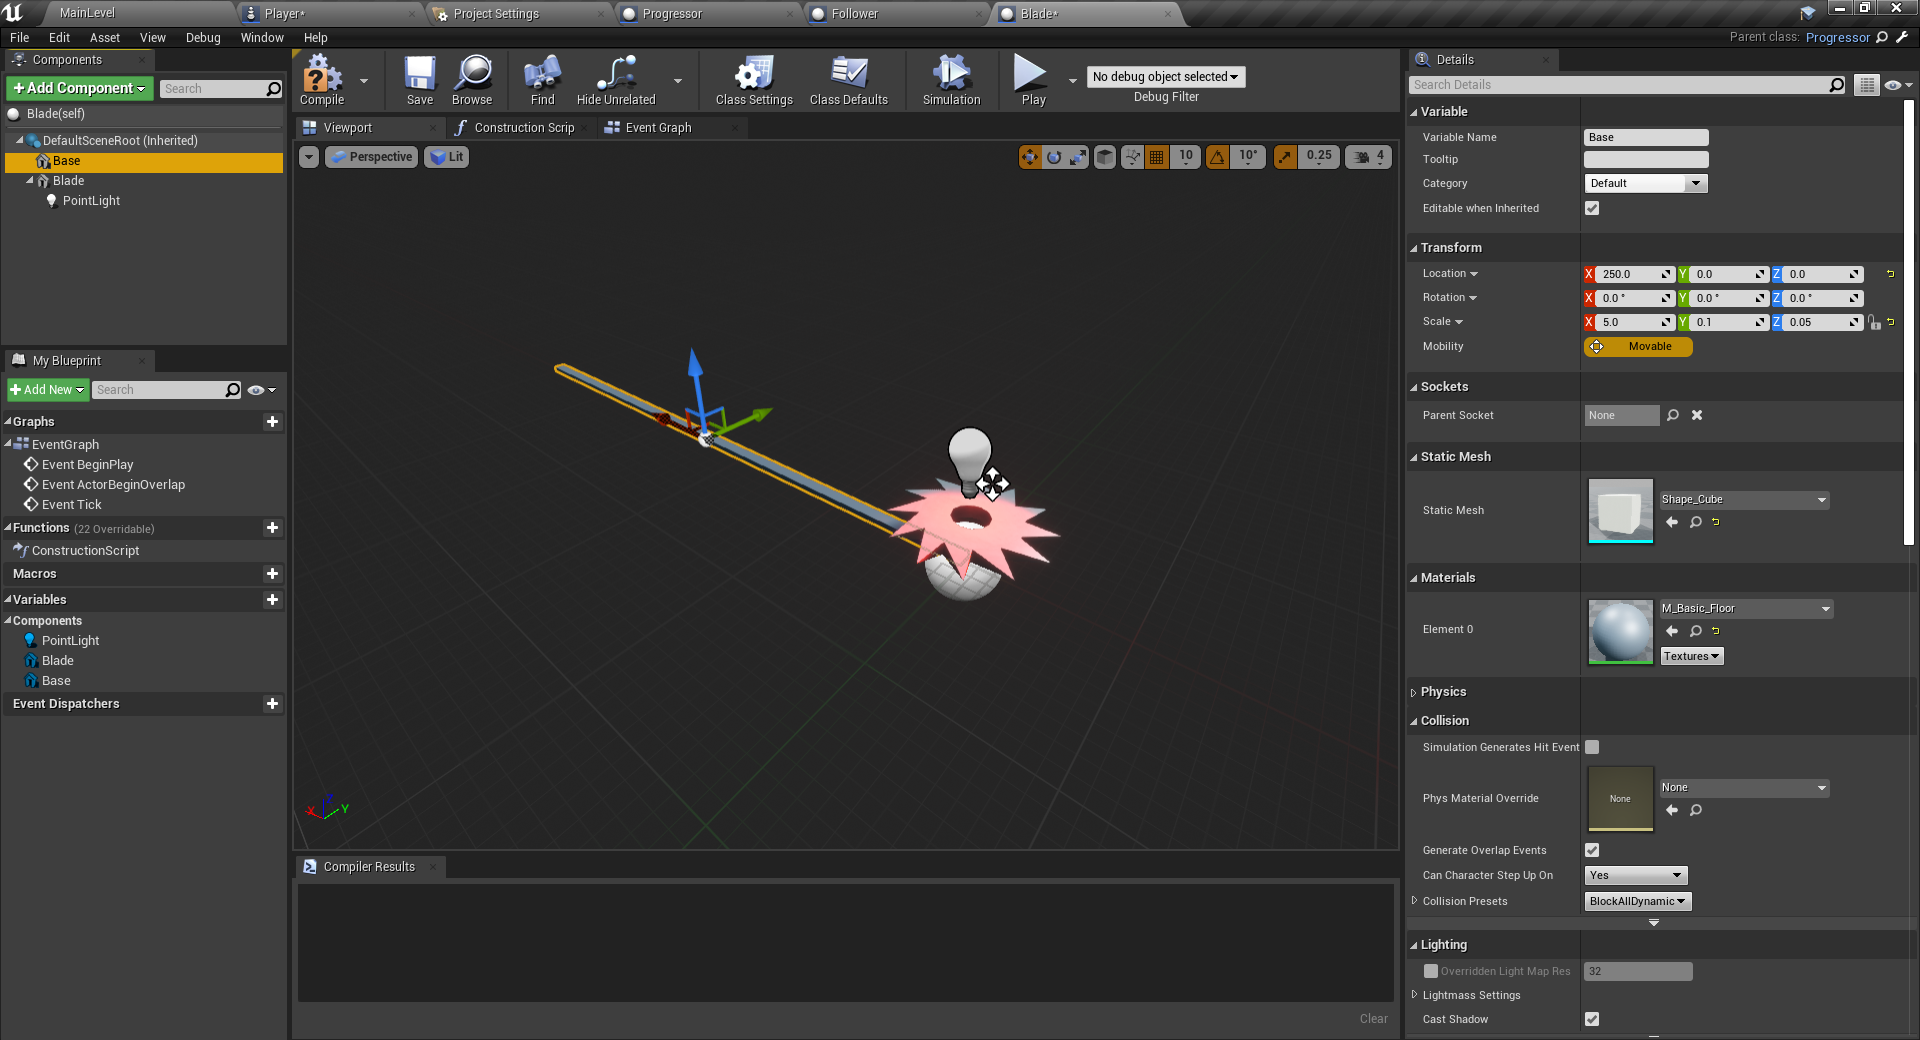
As an obstacle, we can create a blade which will reset the player if they touch it. Create a new blueprint with the parent class of Progressor. Call it Blade.

  • Create a static mesh component called Base
    • Set the Location to 250, 0, 0
    • Set the Scale to 5.0, 0.1, 0.05
    • Set the mesh to Cube
  • Create a static mesh component called Blade
    • Set the mesh to Blade
  • As a child of the blade, create a point light component

blade components

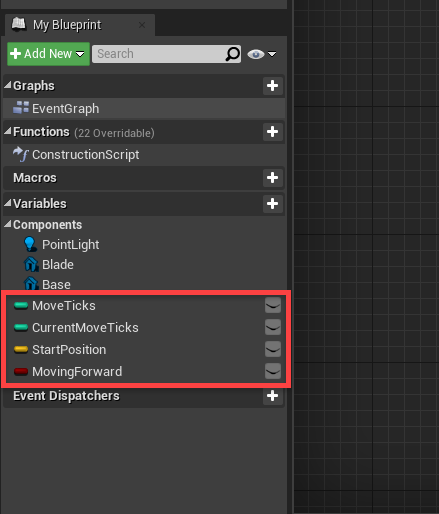
In the event graph, let’s start with some variables.

  • MoveTicks (Integer)
  • CurrentMoveTicks (Integer)
  • StartPosition (Vector)
  • MovingForward (Boolean)

Compile, and set the MoveTicks default value to 5.

blade variables

First, we’ll have to set the start position.

setting the start position

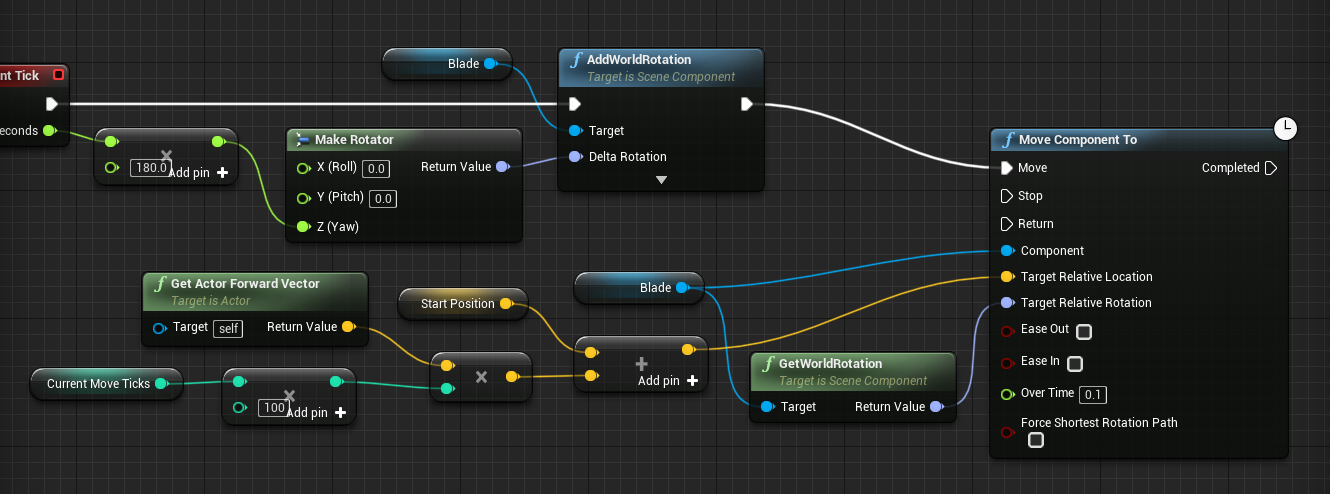
Overtime we want the blade to rotate.

rotate over time

Continuing from that node, we’ll make it so the blade moves based on the current move ticks variable.

moving the blade

The next set of nodes will increase or decrease the current move ticks whenever the On Progress event is triggered. This will make the blade move back and forth.

moving the blade each on progress

Coming from the second sequence execution output, let’s check if the blade has collided with anything. If so, restart the level.

check blade collisions

Now we should be able to play the game and reset the scene when colliding with the blade.

End Goal

Finally, we have the end goal. This will take us to other levels.

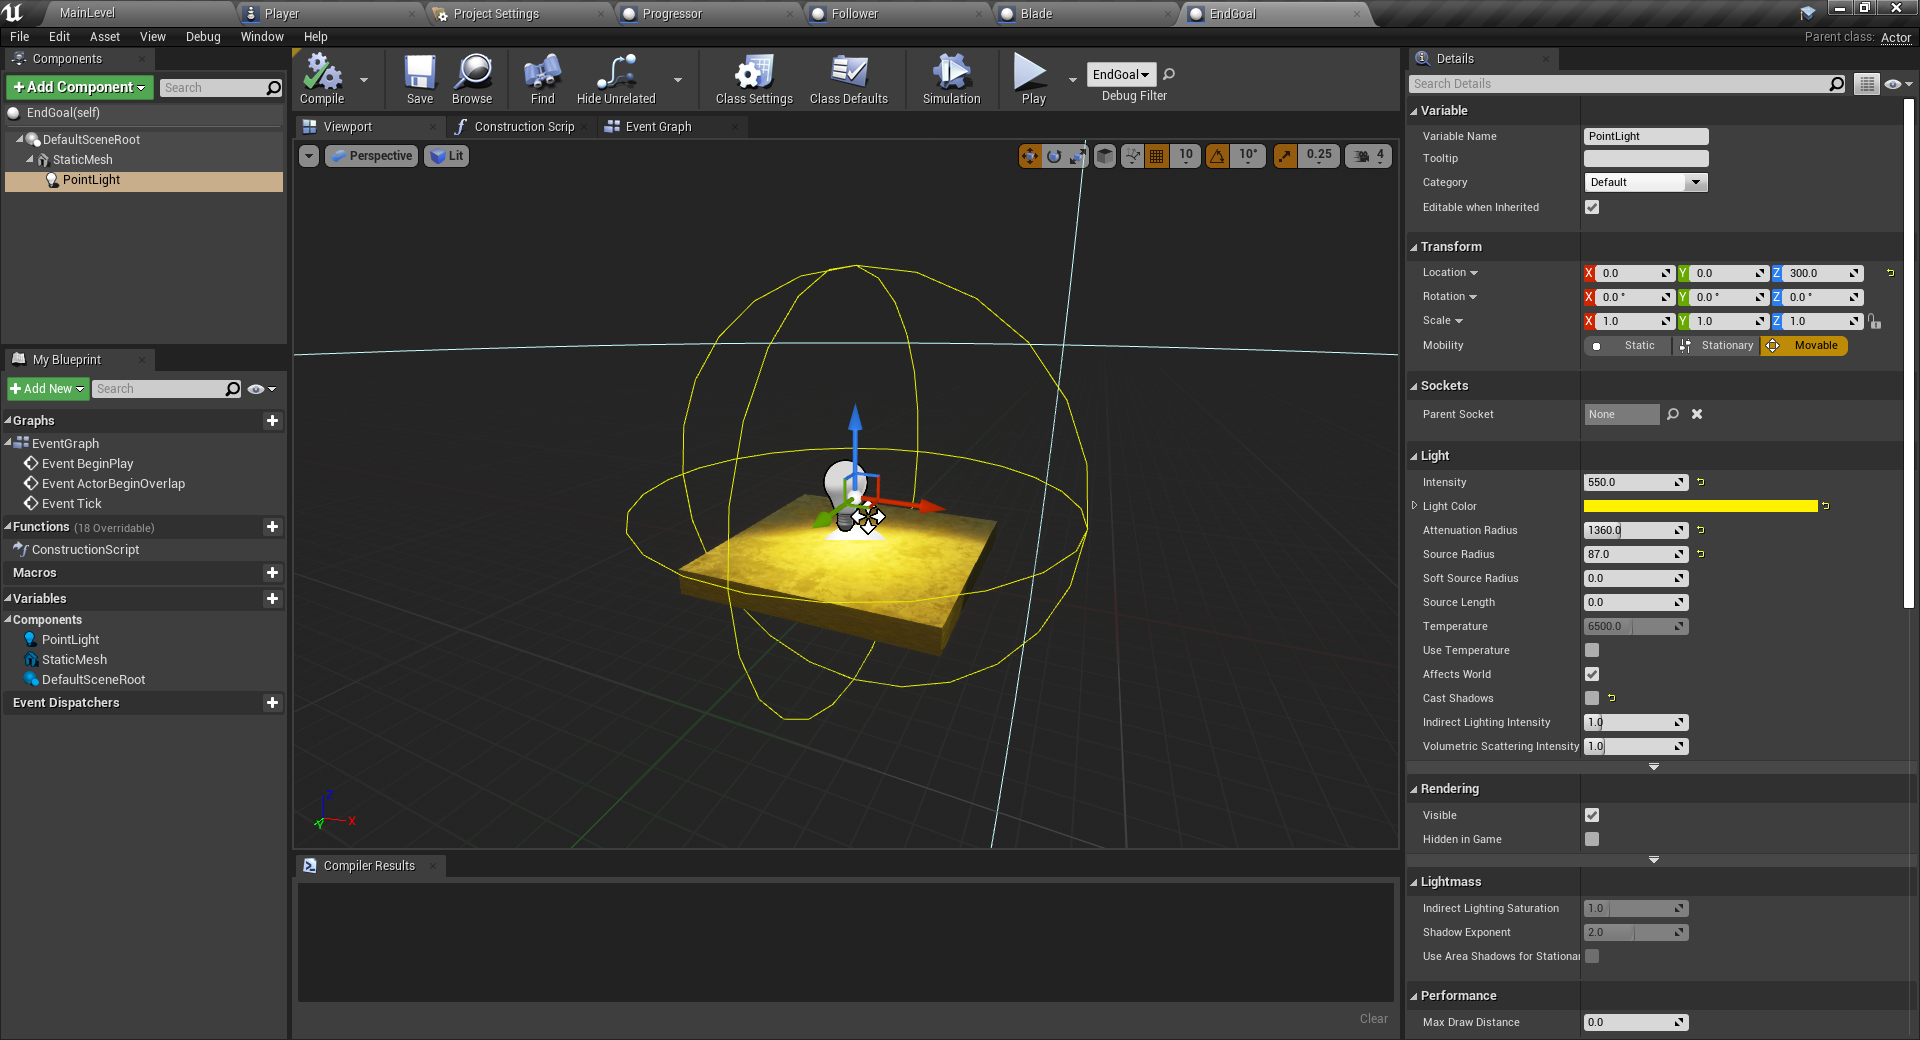
Create a new blueprint of type Actor called EndGoal. Create a cube static mesh with a light like so:

end goal blueprint

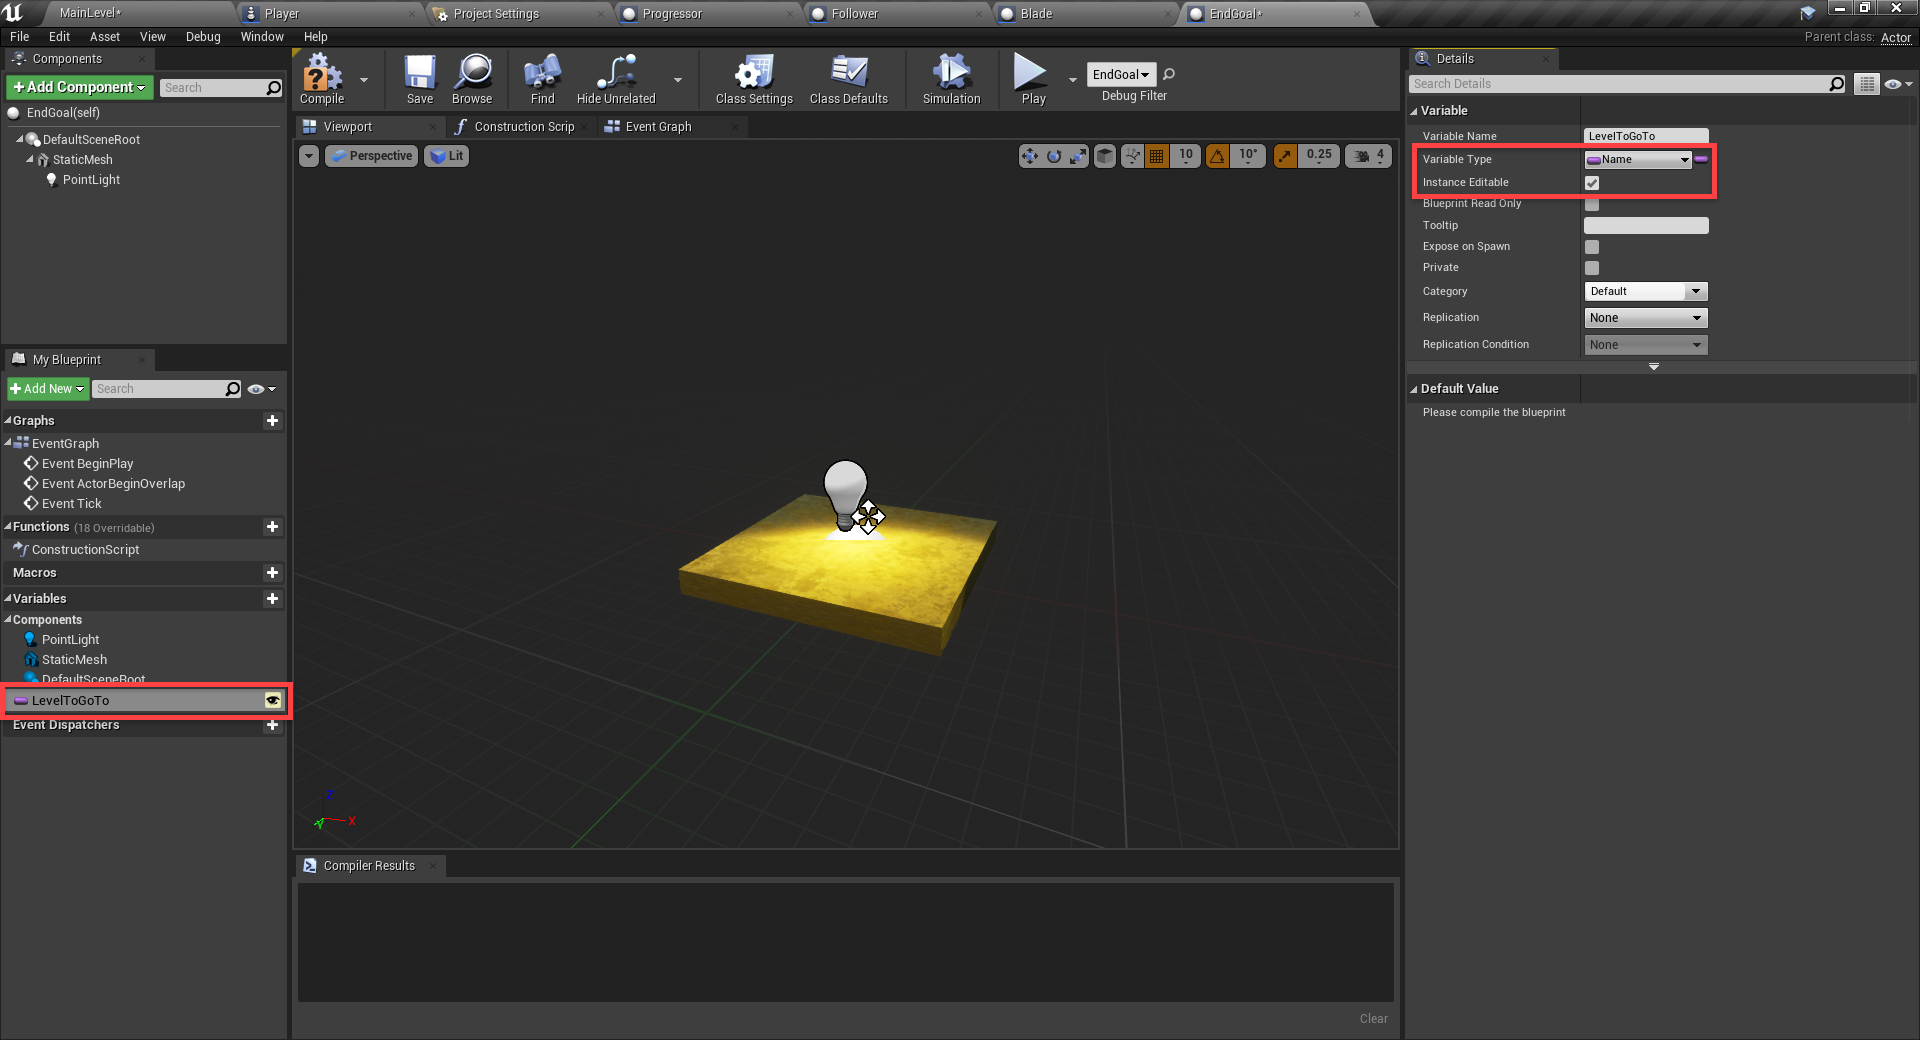
Then, create a new variable called LevelToGoTo. Make it of type Name and enable Instance Editable.

end goal variable

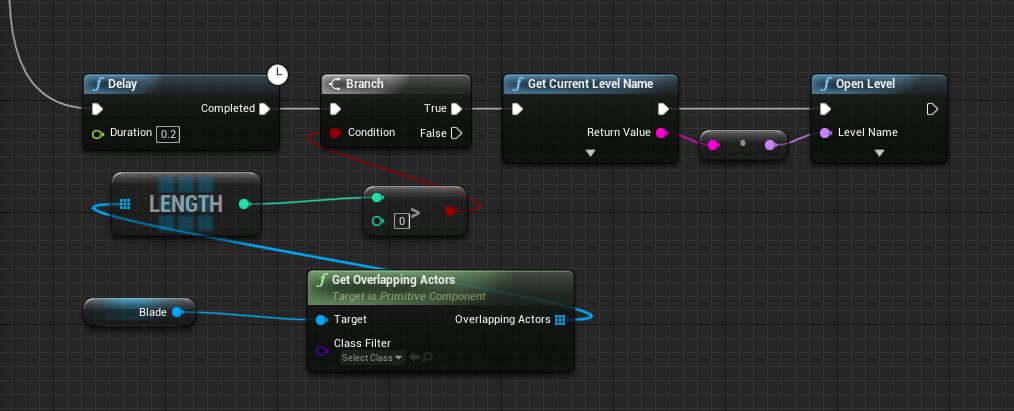
All we’re going to do here, is check for collisions. If it’s the player, we’ll check to see if they have all the followers in the level and if so, open the next requested level.

end goal blueprint graph

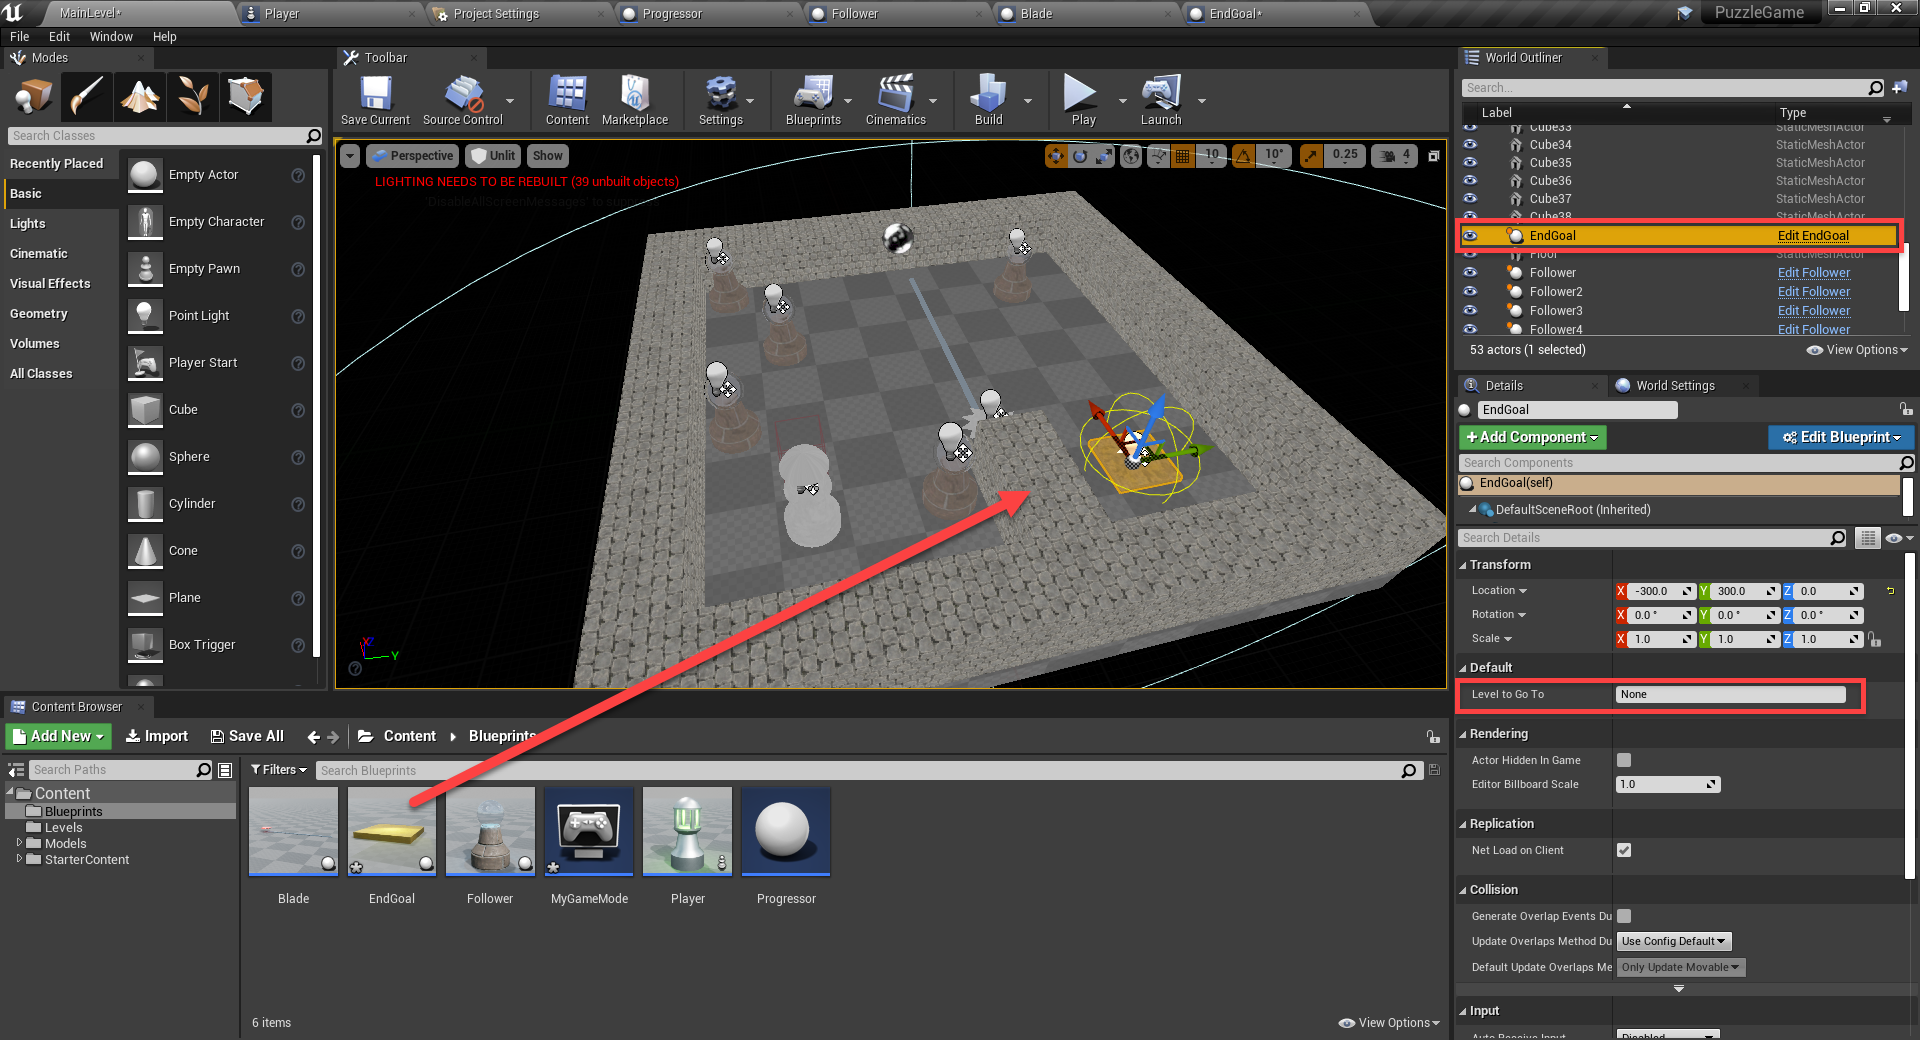
Back in the level editor, place down the end goal and if you have a level to go to, enter the name in the detail panel.

adding the end goal to the level

Conclusion

Congratulations on completing the tutorial!

You now have the basis for a semi-turn based puzzle game.  As stated at the beginning, our game features a player who needs to collect a number of followers.  Once collected, the player needs to reach the end goal – all while avoiding a blade haunting their every step.  Our game features all of this and more, most of which we accomplished with Unreal Engine’s built-in features and blueprinting system.

From here, you can expand upon the game, adding in more levels, mechanics, etc. Or you could create an entirely new project with your newfound knowledge.

Whatever you decide, good luck with your future games and we hope you enjoyed developing a puzzle game with Unreal Engine!

Unreal Puzzle game in action

A Guide to C++ Vectors

$
0
0

You can access the full course here: C++ Foundations

Vectors

Arrays aren’t great when we need a list of data that will change in size, i.e. we will add elements to it or remove elements from it. For that, we can use a vector. It is a more functional version of an array that still stores data in a list-like format but can grow or shrink. We have to first import the vector library by adding this line of code at the top:

#include <vector>

Then we can replace our roster with this:

std::vector<std::string> roster;

Not how we don’t initialize it with items initially and we set the type of values in the vector to string in the <>. We can add them with the .push_back() function like this:

roster.push_back(“Nimish”);
roster.push_back(“Sally”);
roster.push_back(“Laura”);

We can insert a value by specifying the index and the new value using the insert() function like this:

roster.insert(roster.begin() + 1, “Mike”);

This weirdly enough, needs an indexing type variable rather than just a regular int index so note the roster.begin() (start index) + 1 to insert it after the first element. We can remove an element from the back by using the pop() function like this:

roster.pop_back();

There are other functions to explore so check them out! You can access them by typing

roster.

And then a list of possible functions should pop up.


Transcript

What’s up guys? Welcome to our tutorial on vectors. Here we’ll take a look at a collection type that is similar to an array but a little bit more powerful. So we are going to first learn how to create vectors, then how to add elements to vectors, how to remove elements from vectors. Let’s head to the code and get started.

So let’s begin with talking about what vectors are. Well vectors really are just more powerful versions of arrays. So these are arrays that are mutable, meaning we can add elements to them and remove elements from them, but they also have a host of other functions that allow us to either manipulate them in some way or to retrieve properties of them. So really where we have static data that we know isn’t going to change very much, that’s probably where we should use an array. As soon as we know that data is going to change, it’s going to grow or shrink in size, then we probably need to turn to something like a vector.

Alright to gain access to the vector we actually have to add another include statement. So we need to include the vector library like so. Now these are part of the standard library so we’re going to need to do a standard vector like so, and then in the angular brackets beside it, we put the type of variable that we want to store in here. So let’s do basically the same thing as before with the roster, might as well keep the same examples. So we’ll do standard string here. It’s going to be a vector of strings. And then we just need to give this a name so in this case maybe roster or something.

Now we’re not going to set this up by providing initial values or anything. What we’ll do instead is create it and then we’ll just push items onto it. So when we push something onto a vector it just sticks it right onto the end. So in this case we’ll do roster and we’ll call the push back function, and then we just need to parse in an appropriate value. So in this case I’ll just maybe do my own name first. Okay and then maybe we’ll add a couple more people So let’s do Sally, and we’ll do Laura or something. Okay, just some people that we might want to add to our roster. So now it’s three members long, it starts off with my name and then the next and then the next.

Okay, so each one you add just goes to the back of the stack. Similarly we can remove elements from a vector by doing the roster in this case, or the vector name dot pop back. So the pop back function is just going to remove the last element in a vector. We can keep doing this until we have popped all the elements or until we get to the one we want.

Alternatively if I want to insert an item at a specific index, lets say I want to put someone right after myself but before Sally, what they can do is they can do roster dot insert. And with the insert function this takes first the position then the value. Now annoyingly enough I actually can’t just do the position of one, what I would have to do is something like roster dot begin plus one. And then my value, lets do Mike or something. Okay, so this is now going to insert the value of Mike in between me and Sally because it gets the beginning, or zero, plus one which would be this index and it just inserts it right here, so basically pushes this back and puts that new value Mike right there.

Now these are just a few of the many possible operations we could perform on vectors. You can open them up, see a complete list by doing the name dot and now you can see that there are a lot of different functions that we can call on these vectors. So feel free to check some of them out, otherwise we covered the basic operations of add remove and insert. Definitely give it a bit more of a play around. When we come back we will be talking about if statements and that will be our first introduction into conditional logic in our code. So stay tuned for that, thanks for watching, see you guys in the next one.


Interested in continuing? Check out the full C++ Foundations course, which is part of our One-Hour Coder Academy.

An Introduction to Unity’s ML-Agents

$
0
0

 Introduction

Okay. So you’re a budding computer science enthusiast and you’re trying to make an AI that will take over the world. You do your research and find out about this thing called “machine learning.” You’ve seen several impressive demonstrations of machine learning technology so you decide that this is the tool you’re looking for. You do more research into how to create a machine learning agent which inevitably leads you here.

Well, my friend, you have come to the right place. Unfortunately, the AI you’re going to be building in this tutorial is a far cry from the “earth dominating” AI you have in mind.  However, the knowledge found here will help you build interesting games and apps.

Through the instructions below, we’re going to be making a much more tame AI that will learn to balance a virtual rigid body. We’re going to be using Unity’s ML-Agents platform to configure and train our neural network (i.e. the algorithms or “brain” of our system). We’re going to go through how to install ML-Agents to work with the Unity Editor – and even how we can save the generated neural network to our project.

So while it isn’t anything close to enslaving mankind, if you’re ready to discover machine learning’s role in game and app development, sit back, and get ready learn how to use ML-Agents.

Don't miss out! Offer ends in
  • Access all 400+ courses
  • New courses added monthly
  • Cancel anytime
  • Certificates of completion

What is ML-Agents?

Unity ML-Agents is a machine learning framework integrated into the Unity editor that uses Python and TensorFlow (an open-source mathematics library). It is capable of Supervised learning, Unsupervised learning, and Reinforcement learning. Reinforcement learning is what we most think of when it comes to machine learning. An agent is trained to generate a policy (basically a set of instructions) by taking in observations and performing actions. This policy designed to maximize the number of rewards that performing the actions yields.

ML-Agents has five main components, four of which we are going to be using. They are the Training Environment, the Python Low-Level API, the External Communicator, the Python trainer, and the Gym Wrapper (we aren’t going to be using this much). The Training Environment is the scene we set up in the Unity Editor. This is where the agents observe and perform actions. The Python Low-Level API is an external tool that manipulates the machine learning “brain” during training. The External Communicator communicates with the Python Low-Level API and the Learning Environment. The Python Trainer lives in the Python Low-Level API and runs all the algorithms involved in training. The Gym Wrapper is a component tailored for machine learning researchers so we won’t be using that in this project.

Because this is a tutorial about how Unity’s machine learning package, this is not a tutorial about machine learning in general. For that, check out the Machine Learning Mini-degree on Zenva Academy. I highly recommend you learn about how machine learning actually works (assuming you don’t already). It’s a very fascinating and quickly evolving field of computer science.

Project Files and installation

The completed project for this tutorial can be downloaded here: Source Code.

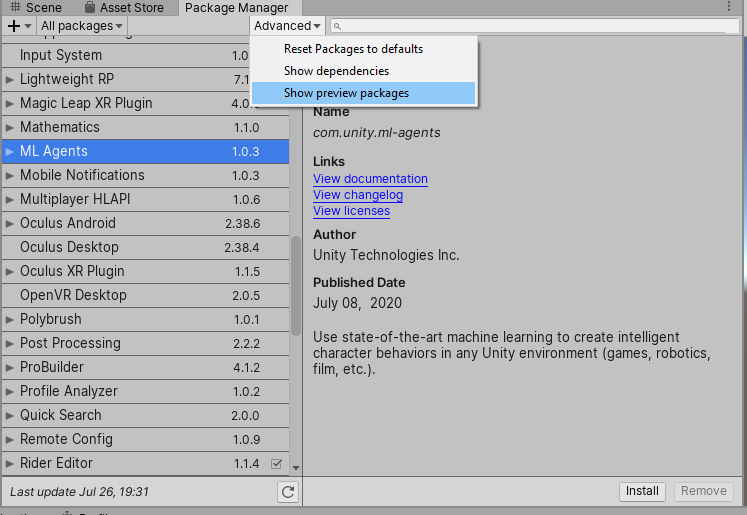
This project is based on an example provided by Unity. If you would like to check out this example or some other cool demos, Unity Technologies has put together a Github with all the projects (ML Agents GitHub). Unity ML-Agents can be imported from the package manager. Go to Window -> Package Manager and make sure you’re viewing all the packages. Download and import ML-Agents.

Opening the package manager

Package manager importing ml agents

Next, you’re going to want to install Python 3.6 or later. Go to https://www.python.org/downloads/ and download the 64-bit package for your operating system. It must be 64-bit or you will be unable to install ML-Agents. Once Python is installed, open a command-line window and run this command:

pip3 install mlagents

This will install Tensorflow and all the other components that go into ML-Agents.

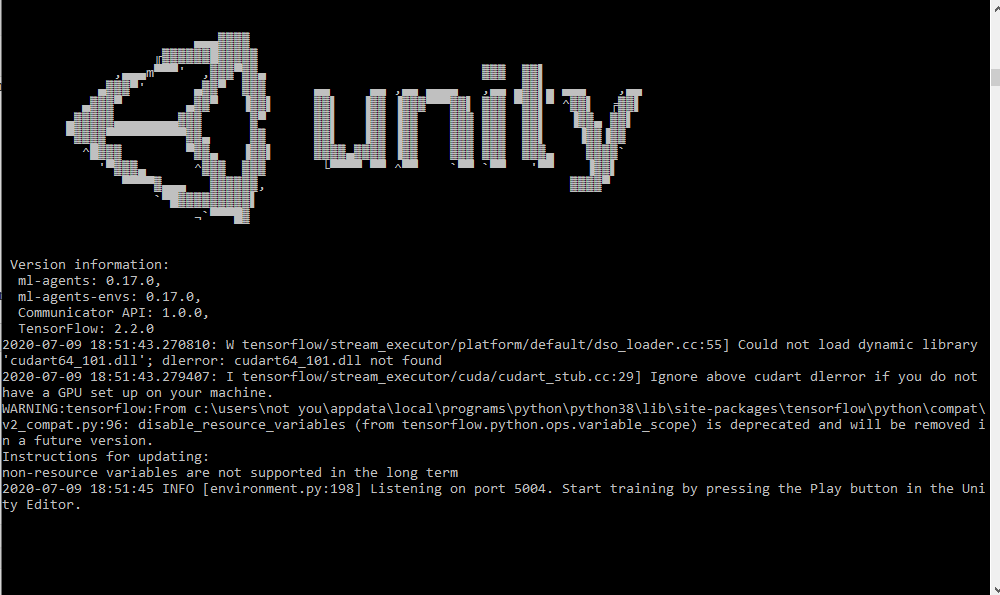
This is not the only time we will be using the command line window. Go ahead and keep it open as we work through our project.

Project Overview

Observations

When approaching any machine learning project, it’s a good idea to have some sort of allocation plan for rewards and observations. What sort of observations is the agent going to take in? What sort of rewards are we going to give it for performing certain actions? Now, for a machine learning project you’re making from scratch, often your original allocation plan will need to be tweaked. Fortunately, you’re following along with a tutorial so I’ve already found the correct plan for taking observations and setting rewards. First off, the “agent” in our project is whatever is attempting to balance the ball (this could be a plane or a cube). There are three key observations this agent needs. The first is the velocity of the ball it is trying to balance. The second is the rotation of the ball in the X and Z axes (we don’t need the Y-axis). Lastly, it needs the position of the ball.

Graphic explaining the observations (velocity, position, and rotation)

The cool thing about this project is we can train the neural network to use either a plane or a cube. I’m going to be using a cube throughout this project but feel free to do some experimentation.

Rewards

In terms of rewards, there are two main ways we are going to be manipulating them. The first and most obvious is when the agent drops the sphere. We will give it a reward of -1. However, when the agent continues to keep up the sphere, we’ll give it a very small reward each calculation (a value of about 0.01). This way, the agent will be rewarded for how long it keeps the ball up and punished if the ball falls. The idea of training the neural network, then, is to teach it to get the maximum number of rewards.

Setting up the Environment and the Agent

Setting up the actual elements in the scene is pretty simple. We need a cube and a sphere both scaled to a reasonable size.

Scale of the cube in Untiy

scale of the ball in Unity

We don’t need to worry about exact sizes since the neural network will train to regardless. Assign a Rigidbody to the Sphere.

Create an empty game object called “AgentContainer” and place the sphere and the cube as child objects.

Agent container with cube and sphere

The reason we do this will become clear when we start scripting the agent.

Speaking of which, let’s assign all the necessary components to our agent. Create a folder called “Scripts” and create a new C# script called “BalllBalanceAgent.”

The new Scripts folder in Unity

The new c# BallBalanceAgent script

Assign this to our Cube Agent and then open it up in a text editor.

Attaching the script to the agent object

The very first thing we must do to this script is to make sure it is using “UnityEngine.MLAgents” and “UnityEngine.MLAgents.Sensors.”

using UnityEngine;
using Unity.MLAgents;
using Unity.MLAgents.Sensors;

public class BallBalanceAgent : MonoBehaviour
{
    // Start is called before the first frame update
    void Start()
    {
        
    }

    // Update is called once per frame
    void Update()
    {
        
    }
}

Next, we can delete it inheriting from MonoBehaviour and make it inherit from “Agent.”

using UnityEngine;
using Unity.MLAgents;
using Unity.MLAgents.Sensors;

public class BallBalanceAgent : Agent
{
    // Start is called before the first frame update
    void Start()
    {

    }

    // Update is called once per frame
    void Update()
    {

    }
}

This is super important and is at the heart of scripting ML-Agents. If you have a look at your agent in the Unity Editor, you’ll see that the “BallBalanceAgent” has been given a “MaxStep” slider. Essentially, this is how long an agent episode will last. An “episode” is a period of time where the agent can gain rewards and perform actions. For example, if the ball falls off the cube, we would want everything to reset so the agent can try again. Giving it an integer value will tell the agent how long to “do stuff” in the scene until everything resets and the agent tries again. A value of zero means an infinite number of steps which means an infinite amount of time. We’re going to be starting and ending the episode manually so we need this set to zero.

While we’re in the Unity Editor, there’s a couple of other components this agent needs. The first is a “Decision Requester.”

Decision requester component in Unity ML Agents

A Decision Requester does what its name implies, it requests a decision to be made based on the observations taken in. The “Decision Period” determines how many Academy steps must take place before a decision is requested. But what is an “Academy step” and what even is the “Academy?” We’ll look at each of these in more detail but for now, the Academy is basically a global singleton “brain” that runs basically everything in ML-Agents. An Academy step is basically a period of time that the Academy uses during training. The current value of 5 should be plenty for our project.

The next component our Agent needs is a “Behaviour Parameters” script.

Behaviour parameters component in Unity ML Agents

This dictates how many observations we’re taking in and what sort of form the actions outputted will take. We’re going to be messing with this more as we start scripting our agent. So go back to your BallBalanceAgent script and delete the Start and Update methods to get ready to script this thing.

using UnityEngine;
using Unity.MLAgents;
using Unity.MLAgents.Sensors;

public class BallBalanceAgent : Agent
{
    
}

Scripting the Agent

Overview and setup

The Agent abstract contains five definitions of methods we are going to override. They are “Initialize”, “CollectObservations,” “OnActionReceived,” “Heuristic,” and “OnEpisodeBegin.”

using UnityEngine;
using Unity.MLAgents;
using Unity.MLAgents.Sensors;

public class BallBalanceAgent : Agent
{
    public override void Initialize()
    {
        base.Initialize();
    }

    public override void CollectObservations(VectorSensor sensor)
    {
        base.CollectObservations(sensor);
    }

    public override void OnActionReceived(float[] vectorAction)
    {
        base.OnActionReceived(vectorAction);
    }

    public override void Heuristic(float[] actionsOut)
    {
        base.Heuristic(actionsOut);
    }

    public override void OnEpisodeBegin()
    {
        base.OnEpisodeBegin();
    }
}

“Initialize” functions similar to the “Start” method except this is called a little bit earlier than “Start.” “CollectObservations” is where we send observations to the Academy and “OnActionReceived” is where we get an action from the academy. “OnEpisodeBegin” is called whenever a new episode starts (as its name implies). This leaves “Heuristic” as the only method without an explanation. To understand what “Heuristic” is, go back to the Unity Editor and have a look at the Behavior Parameters on the Agent.

Different modes on the Behavior Parameter component in Unity ML Agents

As you can see, “Behaviour Type” has three options, “Heuristic Only”, “default”, and “Inference Only.” When set to Default, if a neural network has been generated, the agent will run “Inference Only” as it uses the neural network to make decisions. When no neural network is provided, it will use “Heuristic Only.” The Heuristic method can be thought of as the traditional approach to AI where a programmer inputs every possible command directly onto the object. When set to “Heuristic Only,” the agent will run whatever is in the Heuristic method. Go ahead and put these few lines of code in the Heuristic method:

public override void Heuristic(float[] actionsOut)
    {
        actionsOut[0] = -Input.GetAxis("Horizontal");
        actionsOut[1] = Input.GetAxis("Vertical");
    }

Let’s jump back into the BallBalanceAgent script and set up the variables we’re going to need to use. We’re going to need access to both the position and the velocity of the ball. Create two variables, one of them public the other private. One of them of type Gameobject and one of type Rigidbody.

using UnityEngine;
using Unity.MLAgents;
using Unity.MLAgents.Sensors;

public class BallBalanceAgent : Agent
{
    public GameObject ball;
    Rigidbody ballRigidbody;

    public override void Initialize()
    {
        base.Initialize();
    }

    public override void CollectObservations(VectorSensor sensor)
    {
        base.CollectObservations(sensor);
    }

    public override void OnActionReceived(float[] vectorAction)
    {
        base.OnActionReceived(vectorAction);
    }

    public override void Heuristic(float[] actionsOut)
    {
        base.Heuristic(actionsOut);
    }

    public override void OnEpisodeBegin()
    {
        base.OnEpisodeBegin();
    }
}

Next, we’re going to need access to a data set on the Academy called “EnvironmentParameters.” We’ll use these to set and get the default size of the ball.

using UnityEngine;
using Unity.MLAgents;
using Unity.MLAgents.Sensors;

public class BallBalanceAgent : Agent
{
    public GameObject ball;
    Rigidbody ballRigidbody;
    EnvironmentParameters defaultParameters;

The “ball” variable will be assigned in the inspector but we still need to assign “ballRigidbody” and “defaultParameters.” We do this in the “Initialize” method like this:

using UnityEngine;
using Unity.MLAgents;
using Unity.MLAgents.Sensors;

public class BallBalanceAgent : Agent
{
    public GameObject ball;
    Rigidbody ballRigidbody;
    EnvironmentParameters defaultParameters;

    public override void Initialize()
    {
        ballRigidbody = ball.GetComponent<Rigidbody>();
        defaultParameters = Academy.Instance.EnvironmentParameters;
    }

Now, we’ve set up the variables we’re going to need, let’s start taking in observations and setting actions.

Taking Observations and Setting Actions

We already know what observations the agent needs so all we need is the syntax. In the “CollectObservations” method, type the following:

public override void CollectObservations(VectorSensor sensor)
    {
        sensor.AddObservation(ballRigidbody.velocity);
    }

What we have done is told the Academy to observe the values in this vector3. We’re going to keep seeing all these things the Academy does. Here, the Academy is collecting essentially three floats and sending them off to Python and Tensorflow. Just for information sake, there are several other ways to take in observations that do not use this method. This method is known as “Arbitrary Vector Observation.” It should also be noted that a “vector” in machine learning contexts means just floats stacked together. It’s a bit different than the conventional Unity understanding of vectors.

But this is not all the observations we need to make. We also need to add the position of the ball and the rotation of the cube agent.

public override void CollectObservations(VectorSensor sensor)
    {
        sensor.AddObservation(ballRigidbody.velocity);
        sensor.AddObservation(ball.transform.position);
        sensor.AddObservation(transform.rotation.z);
        sensor.AddObservation(transform.rotation.x);
    }

Now hit save and jump over to the Behaviour Parameter component and have a look at the “Vector Observation” and “Space Size.”

Observation size on the Behavior Parameter component Unity ML Agents

We need to make sure the observation space size matches our code. What it is essentially asking for is how many float inputs is the agent taking in? If add up all the vectors in the CollectObservations method, we see that we’re observing eight float values (2 Vector3s and 2 rotation values). Set the space size to 8.

Correct observation size Unity ML Agents

The “StackedVectors” slider allows you to set how many vectors must be observed before it is sent to the Academy. For our project, this shouldn’t be more than 1.

Now we’ve got to configure what we’re going to do with whatever the neural network spits out. First off, we need to determine if we should have a “continuous” or “discrete” action space. A continuous action space spits out a value ranging from -1 to 1. A discrete action space spits out an integer value. For our project, it’s pretty obvious what we need. Set the “Space Type” in the Behaviour Parameter component to “continuous.”

Action space size in Unity ML Agents

Next, we need to determine how many actions we should demand from the neural network. In our case, we want the neural network to control the X and Z rotation of our agent. So set the  “Space Size” to 2.

Correct number of actions in ML Agents

Now we can jump back into the BallBalanceAgent script and work on the agent actions. There are a couple of different approaches to this project. The way we’re going to approach it is to set the rotation of the agent equal to a special variable. This variable doubles whatever action is received from the neural network. But we’re only going to set the rotation of the agent if the agent isn’t rotated too far. This makes sure we don’t get any weird flipping. As I mentioned earlier, if you’re working on this project from scratch, this approach is probably not what you’re going to chose right off the bat Fortunately, you’re working through a tutorial that “knows all the answers” so to speak.

In the “OnActionsRecieved” method, write the following lines of code:

public override void OnActionReceived(float[] vectorAction)
    {
        var zangle = 2f * Mathf.Clamp(vectorAction[0], -1f, 1f);
        var xangle = 2f * Mathf.Clamp(vectorAction[1], -1f, 1f);

        if ((gameObject.transform.rotation.z < 0.25f && zangle > 0f) ||
            (gameObject.transform.rotation.z > -0.25f && zangle < 0f))
        {
            gameObject.transform.Rotate(new Vector3(0, 0, 1), zangle);
        }

        if ((gameObject.transform.rotation.x < 0.25f && xangle > 0f) ||
            (gameObject.transform.rotation.x > -0.25f && xangle < 0f))
        {
            gameObject.transform.Rotate(new Vector3(1, 0, 0), xangle);
        }
    }

As you can see, we’re only telling it to rotate if it hasn’t rotated more than 25 degrees in either direction on either axis.

Setting Rewards and Resetting Agents

Now we need to assign rewards to the agent. According to our plan, we were going to give the agent a small reward for keeping the ball up. We were also going to give it a -1 reward if the ball falls off. We also need to end the episode and restart if the ball falls off. Let’s start with the latter. Create a new method called “ResetScene” and put the following code in it:

void ResetScene()
    {
        ballRigidbody.mass = defaultParameters.GetWithDefault("mass", 1.0f);
        var scale = defaultParameters.GetWithDefault("scale", 1.0f);
        ball.transform.localScale = new Vector3(scale, scale, scale);
    }

This sets the mass and scale of the ball to its default size. Notice, it’s getting the value from the Academy’s environment parameters.

Next, we need to do a bit more resetting in the “OnEpisodeBegin” method. We need to reset the position and velocity of the ball, the rotation of the agent, and why not randomize it each episode?

public override void OnEpisodeBegin()
    {
        gameObject.transform.rotation = new Quaternion(0f, 0f, 0f, 0f);
        gameObject.transform.Rotate(new Vector3(1, 0, 0), Random.Range(-10f, 10f));
        gameObject.transform.Rotate(new Vector3(0, 0, 1), Random.Range(-10f, 10f));
        ballRigidbody.velocity = new Vector3(0f, 0f, 0f);
        ball.transform.position = new Vector3(Random.Range(-1.5f, 1.5f), 4f, Random.Range(-1.5f, 1.5f))
            + gameObject.transform.position;
        ResetScene();
    }

    void ResetScene()
    {
        ballRigidbody.mass = defaultParameters.GetWithDefault("mass", 1.0f);
        var scale = defaultParameters.GetWithDefault("scale", 0.5f);
        ball.transform.localScale = new Vector3(scale, scale, scale);
    }

Just as a double reset, let’s call “ResetScene” in the Initialize function:

public override void Initialize()
    {
        ballRigidbody = ball.GetComponent<Rigidbody>();
        defaultParameters = Academy.Instance.EnvironmentParameters;
        ResetScene();
    }

Now, we can assign rewards. We do this exclusively in the “OnActionRecieved” method. We can check if the ball has fallen off the agent by simply subtracting the transforms. If the ball is on, we give it a small reward each frame, if it is off, we subtract an entire point.

public override void OnActionReceived(float[] vectorAction)
    {
        var zangle = 2f * Mathf.Clamp(vectorAction[0], -1f, 1f);
        var xangle = 2f * Mathf.Clamp(vectorAction[1], -1f, 1f);

        if ((gameObject.transform.rotation.z < 0.25f && zangle > 0f) ||
            (gameObject.transform.rotation.z > -0.25f && zangle < 0f))
        {
            gameObject.transform.Rotate(new Vector3(0, 0, 1), zangle);
        }

        if ((gameObject.transform.rotation.x < 0.25f && xangle > 0f) ||
            (gameObject.transform.rotation.x > -0.25f && xangle < 0f))
        {
            gameObject.transform.Rotate(new Vector3(1, 0, 0), xangle);
        }
        if ((ball.transform.position.y - gameObject.transform.position.y) < -2f ||
            Mathf.Abs(ball.transform.position.x - gameObject.transform.position.x) > 3f ||
            Mathf.Abs(ball.transform.position.z - gameObject.transform.position.z) > 3f)
        {
            SetReward(-1f);
            EndEpisode();
        }
        else
        {
            SetReward(0.1f);
        }
    }

And we’re done scripting the agent! Now, we can save it, assign the ball object, and begin training.

Assigning the ball object to the agent in Unity ML Agents

Training the Agent

To make training go faster, duplicate it a couple of times.

Duplicated agents for training in ML Agents

Multiple agents can train in parallel which drastically decreases training time. Now, open up a command line and run this command

mlagents-learn --run-id=BallBalancingAI

When you see this in the command line:

Command Line with ML Agents compiled correctly

You can simply hit play and let the agents train:

A gif of the agents trainging

Saving the Neural Network

It’s a good sign when the rewards cross 4000.

Command line view of ML Agents rewards

Now, it’s just a matter of saving the neural network to your Unity Project. It is located in whatever directory your command line was pointed, in a folder called “results.” For me, this was located in C:\Users\MyUserName\results. They’ll be a folder named with the ID we assigned (“BallBalancingAI”) and inside will be the neural network called “My Behaviour.”

The folder that contains the neural network ML Agents

[all my previous attempts are visible lol]

Drag that network into your project files and assign it to your agents (deleting all but one and assigning would be much easier).

Importing the Neural Network into Unity

Assigning the neural network to the agent

Now hit play and watch your agent balance the ball!

A gif of the agent balancing the ball

And just like that, you’ve made an AI using machine learning!

Conclusion

Though not ready for world domination, we have achieved what we set out to do: create an AI with the help of Unity’s ML-Agents.

With our simple ball balancing project, we hope you realize how much potential machine learning has. It can help us immensely in making AI in a more intuitive way – especially compared to hand-coding each behavior. It can be (as we’re sure you’ve seen from this tutorial), a bit involved, but it allows for much more diversity when it comes to artificial intelligence.

While we’ve just scratched the surface here, the skills provided can be expanded in numerous ways. So go forth, experiment with your own projects, and test the full limits of ML-Agents. Ultimately, this is simply a tool we hope you use to…

Keep making great games!
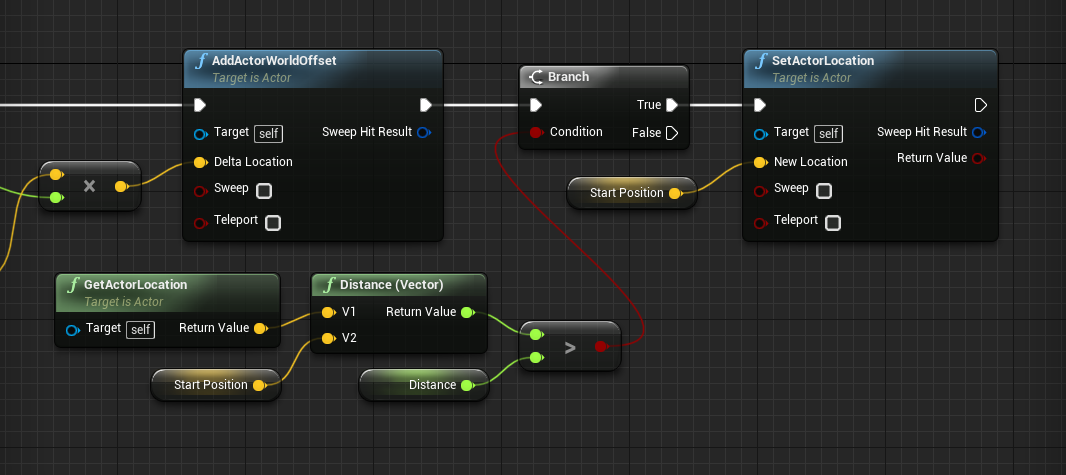
Learn to use Loops in C++

$
0
0

You can access the full course here: C++ Foundations

While Loops

Now that we can perform tests and execute code once, the next step is to be able to perform tests and execute code multiple times as long as some condition continues to be true. For this, we use loops. Loops provide a way to execute code multiple times without having to type the same code again and again.

The simplest form is the while loop and it acts very much like an if statement run multiple times. It performs a test and executes code if the test returns true but instead of executing the code once, it continuously executes the code until the test eventually returns false. This can be dangerous because if the test never returns false, the loop will run infinitely and the program will crash so we need to make sure that we build the loop in such a way that it will eventually exit.

Games at their heart, often contain a big game loop that continuously performs checks, handles player interaction, renders graphics, etc. as long as the game is still running and breaks when the user does something to end the game. We can build a very very simplified version of this by moving a player as long as they are not quite at the end position and then exiting the loop when they are. We first need current and end position variables:

int pos = 0;
int endPos = 5;

Then we need a way to check if we are at the endPos and if not, move our player forwards. An if statement will only do it once so we need a loop which loops like this:

while (pos < end_pos) {
  pos += 1;
  std::cout << pos << “\n”;
}

The difference is that the while loop loops to the top and executes the test and code continuously until eventually, in our case, the pos >= endPos. In this case, it will run 5 times. We know that this will eventually stop because our pos < endPos at the start and we’re increasing it by 1 each time.

For Loops

The next type of loop is the for loop. This acts similar to a while loop but it runs a set number of times. We build right into the loop when to start and when to stop so we know how many times it will run. This makes it great for pairing with collection types as we can just set the start point to be the beginning of the collection and the end point to be the end and visit each element in the collection. We can set up a for loop like this:

for(int i = 0; i < endPoint; i += 1) {

}

Not all for-loops have to be set up with these exact numbers; we can change the start value of i, the end condition, or the step value ( += 1 ). This one just starts with a value of 0, increases i by 1 each time, and runs until i < endPoint returns false. For example, if we wanted to print out every member in an array, we could do something like this:

int intArray[] = {5, 4, 3, 2, 1};
For (int i = 0; i < 5; i += 1) {
  std::cout << intArray[i] << “\n”;
}

This uses i as an indexing variable with the initial value run to be 0 and the final value run to be 2 and uses that to visit each element of the array. i starts at 0, then 1, then 2, then we exit the loop when i = 3. We don’t have to use i; sometimes we just want to perform a task a set number of times and that’s where for loops excel. Go ahead and run the loop within the main function to print out each element.

The final thing about loops is that every for loop can be turned into a while loop but not every while loop can be turned into a for loop because sometimes we don’t know how many times a while loop will run but we always know how many times a for loop will run.


Transcript

While Loops

Hello guys welcome to our tutorial on While Loops. Here we’re going to first introduce the concept of loops, and then we’ll explore the first and simplest kind. So we’re going to start by covering what are While Loops, then we’ll just write and run a very simple example. So let’s head to the code and begin.

Right, so before we write any actual code let’s talk about what While Loops are, and what they bring to the table. Well, a loop in code is just a way to execute the same statement or set of statements multiple times by racing it just once, putting it within a loop and running the loop. Okay, so this is hugely beneficial for us because we don’t want to have to rewrite the same code over and over again, if it’s doing exactly the same thing. It’s much easier to write it once, run it many times, than to write it many times and then run it once.

Okay, so a while Loop is the simplest form of it. And it actually acts very very similar to an IF statement. It will execute some code if some test returns True. The difference is that it will continue to execute the code, as long as that case is True. So if the case never returns False, then it will always execute the code over and over again infinitely until the program crashes. So that’s bad. But if we design our While Loops carefully, we can prevent this issue and control exactly how many times we want it to run.

Now what we can do is we can simulate a very very basic kind of platform runner. Typically the way these games work, is there’s an endpoint your current position, and then you have to get to the endpoint, by jumping over obstacles, defeating enemies et cetera, and the game is over or at least the level is over as soon as you reach the endpoint. So to simulate that, we might use a While Loop. We could have an Integer that represents a current position or just Pos for short. Maybe we start at zero, have an Integer that represents the end position, maybe we’ll just set this equal to five. Okay?

And what we’re trying to do is basically keep moving forwards until we reach the end. So we might use a While Loop for this will basically say something like, as long as our position is less than our end position, we’ll continuously execute some code and quit missing one of those. Okay? So in this case we might want to increase our position by one. So we’ll do in Pos plus equals one, and then maybe we want to print out our current position. So we can do Standard C out our Pos and we’ll do a new line as well. Okay, so we’ll do that and then just the new line character.

Okay, so let’s go ahead and run this. How many times do you think this will run? It should run five times. Okay? The reason it runs five times is because our end position is five. We start at zero. When we get to the first iteration, we perform the check, zero is less than five. So we execute the code, just increase it’s position by one, prints out and then loops back up to the top. We perform the test again. Yep, one is still less than five So we execute the code.

Now two still less than five. So we execute the code on and on, until eventually position is equal to five. We go back up to the top, we perform this test and it returns False. Because five is no longer less than five, at which point we exit out of the loop. So we skip over this code and that’s it. Okay,then we could execute any code down here okay, so that’s your basic While Loop.

Again there is the issue that if you don’t design this carefully, you can end up having it run forever. So you always want to make sure there is a way to exit out of your While Loops, or that eventually they will end okay? Otherwise that’s pretty much of it for the basic While Loop. Again really just think of it as an IF statement that continuously runs rather than just runs once. In the next section, we gonna be covering the For Loop So definitely play around with While Loops a bit.

Make sure you’re super comfortable with them. And we’ll learn about the next loop type in the next section. Okay? so stay tuned for that Thanks for watching and see you guys there.

For Loops

Hello, everyone. Welcome to our tutorial on For Loops. This is the next type of loop, the for loop, it’s a bit more restrictive, but that also makes it potentially easier to use than the while loop. So we’re going to start by covering what are for loops, then write and run for loops, and of course compare and contrast them to while loops. Let’s enter the code and get started.

Okay, so previously, we talked about while loops, hopefully you’re comfortable with those, because a for loop is actually gonna run fairly similarly to this. Again, it’s just another mechanism by which we can execute the same code multiple times. The difference here is that for loops are always going to run a set number of times. We choose exactly how many times we want the loop to run by; specifying a start point and end point and then some sort of a step or an iterator variable, okay? So we need these three items when designing a for loop. That makes it a bit more tedious to set up but ensures that it will run a set number of times.

So it looks a bit like this. We have for, we have the start condition, the end condition, and then the step variable. Okay, so to set up a basic loop, let’s say that runs five times, what we would do is we would create an int i equals zero, so we’re starting with i equal to zero, we’re ending when i is no longer less than five, and we’re increasing i by one each time, okay?

So this is a very basic for loop that will run five times, okay? Again, because we’re starting at zero, we’re executing the code and then we increase i by one at the end, we go back up to the top, i is equal to one now. We check to see if we’re at the end condition, if not, we execute the code, increase it by one, and so on and so forth until eventually i is no longer less than five.

Now, this makes it very good to pair with arrays because we can use i as the indexing variable within an array and then we can just set it to run for as many elements are in an array. So let’s actually demonstrate that.

We’ll just have maybe an array of integers, maybe we’ll just do the numbers five, four, three, two, one, so nothing terribly exciting. We’re just going to create an array of ints, maybe just be like intArray. Okay, and we’re just gonna set this equal to five, four, three, two and one. Okay, so really, again, nothing terribly exciting. What we’ll be doing is printing these guys out. So we’ll just do a standard cout and we’re just going to do the intArray at the index of i and then of course, a new line character.

Okay, so essentially, with each loop iteration, we’re guessing the intArray value at the index of i, so it starts at zero, then one then two then three then four and then exits. So it will start at five then four, three, two, one, and then will exit, okay? So if we save this and we run it, then we’ll basically be printing out the numbers five, four, three, two and one. And there we go, okay?

So we can use i as the indexing variable, although we don’t have to, we can just set this loop to run five times, you don’t necessarily have to use i as an indexer. But that’s very often where you’ll be using for loops, okay?

So to compare and contrast them to while loops, essentially, we’ll use for loops where we know exactly how many times we want the loop to run. We use a while loop when we’re not 100% sure how many times it will run, such as with a game. With a game loop, the game could be over in a minute, it could be over in five hours, okay? So the loop needs to run continuously throughout that. When we’re iterating through in array, there’s a finite number of elements thus we know exactly how many times we’re going to be running the loop, and that’s why we’d use a for loop, okay?

So practice around with for loops. I know it looks a bit more complex, but really, it’s no different from a while loop. It’s just a bit more strict. Now the one restriction here is that every single while loop or every single for loop can become a while loop, but not every single while loop can become a for loop, okay? So try and think about that. When we come back, we’re gonna be talking about functions. So stay tuned for that, thanks for watching and see you guys in the next one.


Interested in continuing? Check out the full C++ Foundations course, which is part of our One-Hour Coder Academy.

How to Build Unreal Engine Games

$
0
0

You can access the full course here: Unreal Engine Game Development for Beginners

Building Unreal Engine Games

Building Our Game

Now that you’ve got your game, you’ll want to share it with people or post it online. Building a game basically means packaging it up in a format that doesn’t require the game engine to run.

Project Settings

First, we should go to the Project Settings window (Edit > Project Settings…) and click on the Description tab. Here, we can enter in a Project Displayed Title. This is the name of the game.

Unreal Engine Project settings window

Let’s then go to the Maps & Modes tab. Here, we want to tell the game what the starting level will be. Set the Game Default Map to MainLevel.

Unreal Engine Maps & Modes window

Back in the MainLevel, let’s go File > Package Project. Here, we can select our platform.

Unreal Engine File menu with Package Project selected

For me, i’m going to select Windows > Windows (64-bit).

Unreal Engine export options for Windows

A window will pop up and we can create a new folder to build our game to. Click Select Folder and the game will begin to build.

Windows file explorer with MyFirstGame Folder selected

When everything is done, you can open up the folder and view the game files. In order to open the game, we just need to double-click the StarterProject.exe executable. This will open up the game, allowing us to play.

File System set up for export Unreal Engine project

Transcript

So we’ve created our game, we’ve set up the lighting we’ve of set up the very some blueprints and everything. Now we want to build our game to an executable so that we can play it outside of the Editor and maybe even share it to other people, put it online, really whatever you want to do with it, okay?

So, first of all, what we need to do is actually change a few settings because right now, it’s all on the default stuff, which might not be what you want. So what we’re gonna do is we’re gonna go to edit, project settings. Now, filling in this information isn’t necessary, although if you are thinking of publishing a full game, then you might want to go through and fill some of this in. All we really want to look at here is the Project Displayed Title. And this here is just going to be what is gonna be the name of the game pretty much.

So for this, I am just going to call this game here, Starter Game. You can, of course, call us whatever you want., I’m just going to call it Starter Game there. And then down here in the settings, there are some other options that you can change.

Now, along with this, we also need to go to the Maps and Modes up here in the top left. Maps and Modes basically mean which game mode are we gonna set as a default and which map do we want, or which level do we actually want to start as the default when we open up the game? So with Default GameMode here, we don’t necessarily have to change this since we are manually overriding that for each level but if you do, you can come here and select the MyGameMode for this and this will apply to every level in the game that hasn’t been specified. So again, this isn’t necessary but we could do it this way.

Then down here, we have the Default Maps. The Editor Startup Map is the level that appears when we open up the Editor for the first time. Right now that’s on Minimal_Default, which is one of the levels that actually come with the Static content. So if you want, we can change that to our MainLevel. And Game Default Map is a level that opens up when we launch the game. Now we don’t want Minimal_Default openning up since that’s not really a game level and that’s not really the level that we’re working on.

So let’s change this to our MainLevel as well. So when we open up the game, when we double click on the executable, it is going to appear with our MainLevel, okay? Apart from that, that is really all we need to change or to keep an eye on.

Back in our MainLevel here, what we can do now is go to file and we want to click on Package Project. And this here is gonna build our project, put into a package and allow us to basically have as an executable on our computer. So you can see that there are a number of different options that we can choose. We can choose Android, HoloLens, iOS, Linux, Lumin, tvOS and Windows.

Now I’m running this on a Windows device, so I’m gonna a choose Windows. But if you are looking to build on another device, especially one of the mobile devices, you will need to look up some important things because there are a few things that do need to be changed when you are building for a mobile platform. But I’m building for Windows, so I’m gonna select Windows, choose a 32 bit or 64 bit, depending on your system. I’m gonna choose 64 bit here.

And it is now going to ask us to choose a folder to put the game in. So I’m gonna navigate to my desktop here and on my desktop, I’m gonna create a brand new folder here. And this folder here is just gonna be called MyFirstGame, there we go. Create that folder, select it and then we can hit the Select Folder button down here. And that is all we need to do. It’s very quick, it may take time depending on how large the game is but, of course, if you are creating a very large game then it can take quite some time.

So, you probably don’t want to do this all the time, you probably only want to do this whenever there is a release for your game or there is something you have to test on different computers. Otherwise, I recommend just playing the game inside of the Editor since it is pretty much almost instant, and there we go. The game has now finished building.

So what we can do now is go to our desktop here. I’m gonna go to my desktop and we should see that there is the, MyFirstGame folder. Inside of that we have a WindowsNoEditor folder, and inside of that is where we have our game files. So, pretty much to start the game you’ll see that there is a StartaProject application right here in EXE, we can just double click on that and it will open up. And here we go, we have our game just as it was inside of the Editor. We can move around with the WASD keys, the printing still appears at the top left.

If you do want to you can take that away inside of the blueprints. The Gates work as well, the Physics work, everything works as it should and as it was designed for inside of the engine. So there we go, we’ve got a game built. To exit out, we actually haven’t implemented that yet so we’ll probably just have to go Alt + F4 on that, like so.

Now in order to actually send this up to people, normally you probably aren’t able to necessarily just send off a folder, you actually have to bundle that. And on Windows, what we can do and on other operating systems is we can put it inside of a zip folder. And a zip folder basically just compresses it so we can upload to the internet even this way we can even upload “itch.io” and many other websites as well.

So, back on my desktop, I’ve got the MyFirstGame folder right here, I’m gonna right click on it and I’m gonna go to the Send to, and I’m gonna go compressed zip folder here. Select that it’s going to compress this into a zip right now. It may take some time again, depending on the size of your game and there we go. We have a zip file right here with our game in it. And as you can see, game is actually quite large, it’s around 400 megabytes in size.

And the reason why is because when we created our project, we imported the Static content. And the Static content is quite a large file size, I believe it’s around, I’d say around half a gigabyte in size. So if you are creating a game and you have the Static content, make sure that before you are released your game that you delete those files delete all the assets that you don’t necessarily need as they can quite clog up your game as they have done here. But just like before we’ve got an executable here we can then upload this to the internet and share it with people.

So there we go ,thanks for watching.

Interested in continuing? Check out the full Unreal Engine Game Development for Beginners course, which is part of our Unreal Game Development Mini-Degree.


Drawing Sprites with SFML & C++

$
0
0

You can access the full course here: Discover SFML for C++ Game Development

Drawing Sprites

We’ve seen how to draw a basic shape but realistically, most of our games will use more than shapes. We will want to place graphics, icons, and other images into our games and we do so via Sprites. Setting up a Sprite is generally done in two steps with SFML: first, we load in a texture, then we create a sprite and pass in the texture. Once we have the sprite set up, we can set attributes such as the size and position and then display it by drawing it into the window during the run loop.

In our project, we should create a folder called assets that contains any assets needed in our game. We only have 4 so there’s no need to further divide the assets folder. Copy the “enemy.png” and “background.png” images, the “damage.ogg” audio file, and the “Arial.ttf” font files from your provided files and paste them into the assets folder. We will only work with the Enemy.png image for now. To create a texture, we first create a texture variable and then call the loadFromFile() function, passing in the path to the file as a string. It returns true if successful and false otherwise so we should perform a boolean test to see if the load was successful. In our main function, write this code after the code to create the window and before the run loop:

sf::Texture texture;
if (!texture.loadFromFile("assets/enemy.png")) {
  std::cout << "Could not load enemy texture" << std::endl;
  return 0;
}

This will create a variable of type sf::Texture and load the image into it. If the load fails, we print an error message and return. Sometimes, the load for an asset fails for some unknown reason so we should handle any errors properly. You will need to #include <iostream> at the top of main.cpp as well. Once we have the texture, we can create a sprite object called enemySprite and pass in the texture like this:

sf::Sprite enemySprite;
enemySprite.setTexture(texture);

The sprite will only be as big as the image provided and will default to be at position (0,0) or in the upper left corner. We can change the position like this:

enemySprite.setPosition(sf::Vector2f(100,100));

Which brings the sprite 100 pixels out from the left and 100 pixels out from the right and increase the size of the sprite by scaling it like this:

enemySprite.scale(sf::Vector2f(1,1.5));

This will scale the width of the sprite by 1 (no change) and scale the height to 1.5x its original height. Notice how both functions take an sf::Vector2f as inputs and each needs an x and y value. In order to draw the sprite, we change the draw code to this:

window.clear();
window.draw(enemySprite);
window.display();

We always have to clear the window before drawing anything and display the window after we draw to it.

Transcript

What’s up everyone? Welcome to our tutorial on Drawing Sprites. Here we’ll get a quick intro into what sprites are from a game context and how to create and use them in SFML.

So this is actually a two step process, the first thing we need to do is create a texture object. Once we have that we can create a sprite from it and then we can set the position and the scale. So let’s head to the code and get started. Alright, so just a quick heads up again, I took all the code from the previous section, not that we really did very much and put it in old code and I’ll continue to do this with each new section.

Alright, so what is a sprite from a game context? Well essentially, a sprite is gonna be an object in the game that has an image associated with it. So this is really the main difference between let’s say shapes and sprites in games is that a sprite has an image and a shape just has well a shape. It just has its boundaries, it has some sort of code to dictate what shape those boundaries will take on, be of circles, square, rectangle, etc.

So in our case, the background of our game and the enemy itself, those are both going to be sprites, we’re not really gonna be working with shapes very much. So like I said this is a two step process. The first thing we need to do is load in a texture and a texture needs an image to load. So that’s why I had you load in your assets folder. So your project should look like this, sfml project, you have your codes, and then you have your assets folder with the items in it. We’ll use the ttf as a font later on. Same with the damage.ogg, that’s for sound. For now we’ll at least want the enemy.png because that’s what we’re gonna be working with here. Okay, so as long as we have it in our project assets /enemy.png, then we can load it in like this.

Okay, first thing that we’ll need to do is create a texture itself so we’ll do sf, Texture, texture. Okay, now a texture just like the Render Window is part of the SFML Graphics library. Anytime you need a new module, you’ll need to load it in here. Okay, so we have a texture object, we actually don’t need to call a constructor, set it equal to a texture or anything like that. Once we create the object, we have access to it immediately and we need to call the load from file function, like this texture.load From file, oops! Not load from stream we want load from file.

Okay, and then we’re going to pass in the path to the file. So in this case this is gonna be “assets/ “enemy “.png”. Now this is actually gonna return true or false based on the success or failure. So we’re gonna say something like if text actually, we’ll say if not texture.load from file, then maybe we’ll just print out some message and return. So let’s just close that off and this should actually be in here.

Okay, so in this case, what we can do is something like Standard c out, I actually don’t think we have the iOS stream library so I’m just gonna include that now. Include your stream. Okay, good stuff. Okay, so now what we’ll do is c out something like “Could not load, “enemy texture”. Okay, and then we’re just going to end it.

All right and because we really want the game to only run if the texture is loaded, we’re actually gonna return false. Cool, so as long as this is the case oh actually you know what? This is returning will turn zero. Okay, so as long as the texture is loaded, so as long as this doesn’t return zero, then we have a texture rather an image loaded into this texture, and now we can use it with a Sprite. So to do that, we’ll do basically the same process as with the texture, we need to create the sprite object first, Sprite and we’ll call this like enemySprites or something.

Okay, and then we’re going to call upon the enemySprite . setTexture function and then we’re I’m just going to pass in the texture that we loaded. Okay, so this will associate a texture with a Sprite. So now the sprite is created It has a texture and we can draw it. We don’t know exactly what size or position well we do know what position it will be in which will be 00 by default which will be upper left corner and the size will be exactly the size of the image itself. We can modify that later on, and which we’ll do in just a minute here.

Okay, so just using the default values, if we want to draw this to the window, we simply call upon the window.draw and then pass in the Sprite. So in this case, enemySprite. Okay, cool. So we’ll get this Save, and let’s run the code, let’s see what happens. So clear it, let’s compile it, and then let’s run it and now you can see that we have this little sprite in our game.

Obviously there are some issues here it’s getting cut off so the screen is not big enough to begin with. Also, this is kind of in the top left corner, we might not want it there and might not be quite big enough. Okay, so this is all stuff that we can just maybe let’s do a 500 by 500 window. That way we have enough size to draw most of the things that we need. Then if we go to rerun it, we should probably see that’s not gonna take up the whole screen anymore. It’s just take up a part of it. So maybe we don’t want it in the top left. Maybe we want it kind of a bit centered.

So what we can do is maybe move it about 100 pixels to the right and 100 pixels down, might put it roughly in the center, okay. So what we can do is take this enemy sprite, enemySprite, okay and we can set the position of it. So, this is gonna take in an a Vector two f object like this SF Vector two f which will take in a vector two dimensional float, and this will need a width and a height or an X and Y value. So in this case, we’ll just do a 100 and 100. Okay, if we go to lets close this off, we go to rerun it.

Okay, so recompile it, again, every time you make a change, you have to recompile it, you can see that this has now moved, we can also change the height, let’s kind of make this guy a little bit taller, but we won’t necessarily change the width of it. So what we can do is lets close that up do the enemySprite . And we can scale it. Okay, weirdly enough, you can’t assign a specific width and height, you actually have to scale things.

Okay, so in this case, we’re going to again pass in a vector2f, capital V, Vector two f, okay and then we’re going to pass in the amount by which we want to scale the x and the amount by which we want to scale the y. So the x is going to remain exactly the same. So we’ll just do one, the y however, we want to change the height, maybe we’ll do like a 1.5 and see how that works out.

Okay, so we’ll go back to here. Well, I guess we don’t need to clear it. We’ll just kind of recompile and we’ll rerun it and now you can see that this guy is horribly stretched, but at least the scaling worked. Now there are plenty of other things that we can do with Sprites but this will be pretty much the extent of what we’re gonna do in this course with our Sprites.

One last thing to note before moving on to the next section is that the sprites bounding box is actually this whole rectangle. Weirdly enough, the bounding box doesn’t follow the image like this. This is gonna be the bounding box. So when when it comes to detecting mouse clicks on the sky, even if you click up here, it’s technically within the bounding box. So that’s going to register a click. Okay, we’ll get more into that a little bit later on. Just wanted to make you guys aware now. Okay, we’ll close this up.

Otherwise, that’s it. So in this section, we covered two things, loading in textures, and the second creating sprites and assessing their attributes. Definitely Feel free to play around with this. Maybe try to load in your background. See how well you can do with that. When you’re ready to move on, we’ll do pretty much the same thing but with text. So stay tuned for that. Thanks for watching and see you guys in the next one

Interested in continuing? Check out the full Discover SFML for C++ Game Development course, which is part of our C++ Programming Bundle.


How to Make AIs Target Objects with Unity ML Agents

$
0
0

Introduction

We often hear in the news about this thing called “machine learning” and how computers are “learning” to perform certain tasks. From the examples we see, it almost seems like magic when a computer creates perfect landscapes from thin air or makes a painting talk. But what is often overlooked, and what we want to cover in this tutorial, is that machine learning can be used in video game creation as well.

In other words, we can use machine learning to make better and more interesting video games by training our AIs to perform certain tasks automatically with machine learning algorithms.

This tutorial will show you how we can use Unity ML agents to make an AI target and find a game object. More specifically, we’ll be looking at how to customize the training process to create an AI with a very specific proficiency in this task. Through this, you will get to see just how much potential machine learning has when it comes to making AI for video games.

So, without further ado, let’s get started and learn how to code powerful AIs with the power of Unity and machine learning combined!

Don't miss out! Offer ends in
  • Access all 200+ courses
  • New courses added monthly
  • Cancel anytime
  • Certificates of completion

Project Overview and Source Code

This project is based on an example from the Unity ML-Agents demo package. You can download this package on GitHub (https://github.com/Unity-Technologies/ml-agents) or you can simply download this completed project by clicking here (Source Code). The basic description of our project is that we are going to have a cube bouncing around on a plane looking for the “target” cube.

pre visualization for ML Agents project

(pre-visualization)

This is a great project to customize the level of proficiency on an AI. Do we want this AI to be adequate, competent, or a complete beast at this objective? We’ll be determining this as we go through our project. Another important thing to note is that this tutorial isn’t intended to cover machine learning in general, nor is it meant to be an introduction to ML-Agents. For a deeper explanation of ML-Agents and what the components do, have a look at the other ML-Agents tutorial on the Game Dev Academy (https://gamedevacademy.org/unity-ml-agents-tutorial/) . With this overview, let’s start formulating a plan for rewarding the agent

Rewards and Penalties

Some obvious penalties we could give this agent are for falling off the plane or for going too far off the edge. What may not be as obvious is what other penalties we can give the agent. For example, we could penalize the agent if it takes too long to reach the target or if it uses too many jumps to get there. If you were to develop this project from scratch, you might start off with a totally different approach to assigning penalties. You might go through several different plans for assigning penalties before finding one that works. Fortunately, you’re following along with a tutorial that already knows what the best penalty and rewards plan are. Therefore, in terms of penalties, our agent will be given three. One for falling off the plane, one for taking too long to reach the target, and a smaller penalty for using an action. This will encourage the agent to search for the most efficient way to reach the target.

Now let’s talk about rewards. The most obvious reward the agent will get is when it reaches the target cube. And believe it or not, this is actually the only way we are going to be rewarding the agent. This stiff system of many penalties, fewer rewards will be what makes the agent good at this objective. Because getting rewards is so narrow, the agent will be forced to find the most efficient way to reach the target. It will also give it a chance to be an absolute beast at the objective. Just be prepared for some decently long training times.

Observations

What sorts of things does the agent need to know in order to make decisions? What we can do here is to let the agent skip a step and simply give it the position of the target. We could try and give the agent some sort of “seeing” mechanism where it searches around and finds the target that way, or we can simply give it the position at the start. This is the best way to do observations with a project that doesn’t need to get too terribly complicated. Even with this “short cut”, we’ll still find that it does take a decent amount of time to train.

So we’re going to give the agent the position of the target, what else does the agent need to know? Well, since it isn’t automatically added, we will give the agent its own position as an observation. This way, what will hopefully happen is that the neural network will recognize the connection between close proximity to the target position and high rewards. Observations for this project are fairly simple and straight forward.

Actions

So we’ve got our observations that we’re going to send off to the neural network and it’s going to evaluate the observations and send back some actions (a massive oversimplification of machine learning but it serves our purposes). What do we want the agent to do with those actions? Further, how many should we demand from the neural network? Again, if you were making this project from scratch, you might have to go through several iterations of a plan before coming to the right one. I’ve already got the plan that will work best with this project so let’s just start there. We need three float actions from the neural network. This will be for the x, y, and z rotation of our agent. If the agent is jumping around, it might be tempting to have the neural network control the strength of the jump as well. As a general rule, you want to have the neural network control as few things as possible especially things that involve physics interactions. Therefore, the best approach is to have the neural network control the rotation of the object while we use a fixed jump strength to bounce around.

Setting up the Project

Installing ML-Agents

Go to Window -> Package Manager and download the ML-Agents package.

Navigating to the package manager

Importing the ML Agents package

If you can’t see it, make sure you are viewing “preview packages.” Next, you’re going to need Python 3.6x 64-bit installed. Then you can run the following console command to install ML Agents

pip3 install mlagents

For more detail on installing ML-Agents, check out the introductory tutorial on the Game Dev Academy (https://gamedevacademy.org/unity-ml-agents-tutorial/).

Setting up the scene

Nothing is complicated about our scene. We need a plane and two cubes but these objects should be children of an empty game object called “Environment”. As a general rule, it’s best to have your agents be children of some other object. That way, it’s easier to duplicate the parent object and the neural network is dealing with the same general transform across all agents.

Parent Object of the Agent in Unity

Create a new folder called “Materials” and create some new materials to make everything easier to see.

A folder for our materials

Creating new materials and assigning them to the objects in the scene

Let’s do some re-naming. The non-colored cube will be the “Agent” and the green cube will be the “Target.”

Renaming the objects "Target" and "Agent"

The target will need a Rigidbody set to “Kinematic” and its collider will need to be “Trigger.”

Adding a rigidbody and a collider that is trigger to the target

Now the agent will need a Rigidbody as well but this one will not be Kinematic neither will the collider be “Trigger”.

The rigidbody component on the agent

While we’re here, let’s go ahead and give the agent and the target some scripts. Create a new “Scripts” folder and make two C# scripts called “BouncerAgent” and “BouncerTarget.”

New "Scripts" folder

Two new C# scripts

Assign these to their respective game objects.

The "BouncerTarget" script on the target

The "BouncerAgent" Script assigned to the agent

The Agent is going to need one more component. Click “Add Component” and find the “Behavior Parameters” script. Add this to the Agent.

Finding the "BehaviourParameters component

This will communicate with the Academy (the Academy is the component that sends observations to the neural network and gets back actions) during the training process to generate a neural policy. And with that, everything is now set up in the scene and we can begin scripting!

Scripting

The Agent Script

First things first, we must be inheriting from “Agent” instead of “Monobehavior” which requires we be using “Unity.MLAgents”.

using System.Collections;
using System.Collections.Generic;
using UnityEngine;
using Unity.MLAgents; //new line

public class BouncerAgent : Agent //new line
{
    // Start is called before the first frame update
    void Start()
    {
        
    }

    // Update is called once per frame
    void Update()
    {
        
    }
}

Next, let’s go ahead and add in the five methods contained in the Agent abstract. They are “Initialize”, “CollectObservations,” “OnActionReceived,” “Heuristic,” and “OnEpisodeBegin.” Implementing “CollectObservations” requires that we are using “Unity.MLAgents.Sensors”.

using System.Collections;
using System.Collections.Generic;
using UnityEngine;
using Unity.MLAgents;
using Unity.MLAgents.Sensors; //new line

public class BouncerAgent : Agent
{
    public override void Initialize()
    {
        base.Initialize();
    }

    public override void CollectObservations(VectorSensor sensor)
    {
        base.CollectObservations(sensor);
    }

    public override void OnActionReceived(float[] vectorAction)
    {
        base.OnActionReceived(vectorAction);
    }

    public override void Heuristic(float[] actionsOut)
    {
        base.Heuristic(actionsOut);
    }

    public override void OnEpisodeBegin()
    {
        base.OnEpisodeBegin();
    }
}

There now, to complete the skeleton of our script, add in the “Update” and “Fixedupdate” methods.

using System.Collections;
using System.Collections.Generic;
using UnityEngine;
using Unity.MLAgents;
using Unity.MLAgents.Sensors;

public class BouncerAgent : Agent
{

    public override void Initialize()
    {
        base.Initialize();
    }

    public override void CollectObservations(VectorSensor sensor)
    {
        base.CollectObservations(sensor);
    }

    public override void OnActionReceived(float[] vectorAction)
    {
        base.OnActionReceived(vectorAction);
    }

    public override void Heuristic(float[] actionsOut)
    {
        base.Heuristic(actionsOut);
    }

    private void FixedUpdate()
    {
        //new method
    }

    private void Update()
    {
        //new method
    }

    public override void OnEpisodeBegin()
    {
        base.OnEpisodeBegin();
    }
}

So now that we’ve got the majority of the methods we’re going to be using, let’s add in some variables. What sorts of variables do we need? We obviously need the position of the target and we’re going to need the position of the player. But let’s think for a minute, if we’re trying to have this agent bounce around to reach the target in the quickest way possible, we not only need variables for jumping (such as the rigid body of the player and the jump strength), but we also need a way to keep track of how many times the agent has jumped. These are the variables we’re going to be needing:

using System.Collections;
using System.Collections.Generic;
using UnityEngine;
using Unity.MLAgents;
using Unity.MLAgents.Sensors;

public class BouncerAgent : Agent
{
    public GameObject target;
    public GameObject agentObject;
    public float strength = 350f;

    Rigidbody agentRigidbody;
    Vector3 orientation;
    float jumpCoolDown;
    int totalJumps = 20;
    int jumpsLeft = 20;

    EnvironmentParameters defaultParams;

We’ve got the position of the target and the agent. These we will assign in the inspector along with the strength of the jump. The agent rigid body we will assign using a GetComponent and the “orientation” vector is what we will use to rotate the agent. “jumpCoolDown” is so the agent doesn’t keep jumping like crazy. “totalJumps” and “jumpsLeft” are to keep track of how many times the agent has jumped. What we can do is if “jumpsLeft” is equal to 0, we can end the episode and assign a punishment. And finally, the “EnvironmentParameters” just allows us to reset everything to its default value when an episode ends.

Now that we’ve got all the variables we need, we can start filling in all those methods we created. The obvious place to start is the Initialize method. Here, we can assign the rigidbody variable, zero out the orientation vector, and assign the “defaultParameters.”

public override void Initialize()
    {
        agentRigidbody = gameObject.GetComponent<Rigidbody>();
        orientation = Vector3.zero;
        defaultParams = Academy.Instance.EnvironmentParameters;
    }

This is just so that everything starts with a fresh slate. Moving on, we need to populate the “CollectObservations” method. This is super simple since the only observations we’re taking in are the position of the agent and the target.

public override void CollectObservations(VectorSensor sensor)
    {
        sensor.AddObservation(target.transform.position);
        sensor.AddObservation(agentObject.transform.position);
    }

Super simple and straight forward. Note that we are taking in a total of 6 floats here since each position vector has 3 floats.

Now we need to specify what the agent is going to do when we get back some actions from the Academy. The code for this method (and, in a sense, for this entire script) may not seem very intuitive. That’s simply because, as I mentioned before, this method of scripting is the result of a lot of trial and error and so it can naturally seem different than how you’d probably approach this. Given this unintuitive nature, here’s the code that goes into “OnActionRecieved” and hopefully I can explain it all in a way that makes sense:

public override void OnActionReceived(float[] vectorAction)
    {
        for (var i = 0; i < vectorAction.Length; i++)
        {
            vectorAction[i] = Mathf.Clamp(vectorAction[i], -1f, 1f);
        }
        float x = vectorAction[0];
        float y = ScaleAction(vectorAction[1], 0, 1);
        float z = vectorAction[2];
        agentRigidbody.AddForce(new Vector3(x, y + 1, z) * strength);

        AddReward(-0.05f * (
            vectorAction[0] * vectorAction[0] +
            vectorAction[1] * vectorAction[1] +
            vectorAction[2] * vectorAction[2]) / 3f);

        orientation = new Vector3(x, y, z);
    }

First off, we need to clamp all the actions we get back so we don’t get any super strange values. Then, we assign those actions to some local variables. These variables are then going to determine the direction of the bounce and the orientation of the agent. Finally, we’re adding a small punishment (-0.05) whenever the agent uses up an action. It’s worth noting that “AddReward” is different in a big way from “SetReward.” By using “AddReward” we’re telling it to add (or subtract) a value from the total accumulated rewards. If we use “SetReward” that sets all accumulated rewards to whatever value you specify. They both sound similar but are very different when it comes to assigning rewards.

The “Heuristic” method is really simple as we just map the actions to the keystrokes.

public override void Heuristic(float[] actionsOut)
    {
        actionsOut[0] = Input.GetAxis("Horizontal");
        actionsOut[1] = Input.GetKey(KeyCode.Space) ? 1.0f : 0.0f;
        actionsOut[2] = Input.GetAxis("Vertical");
    }

Moving on, we need to populate “FixedUpdate.” This is where we’ll do a simple raycast that determines when the agent is touching the ground. We’ll use this to end episodes and keep track of how many jumps the agent has left. The completed method looks like this:

void FixedUpdate()
    {
        if (Physics.Raycast(transform.position, new Vector3(0f, -1f, 0f), 0.51f) && jumpCoolDown <= 0f)
        {

            //Forces a decision, zeros out velocity, and decrements 'jumpsLeft'

            RequestDecision();
            jumpsLeft -= 1;
            jumpCoolDown = 0.1f;
            agentRigidbody.velocity = default(Vector3);
        }

        jumpCoolDown -= Time.fixedDeltaTime;

        if (gameObject.transform.position.y < -1)
        {

            //When the agent falls off the plane

            AddReward(-1);
            EndEpisode();
            return;
        }

        if (gameObject.transform.localPosition.x < -17 || gameObject.transform.localPosition.x > 17
            || gameObject.transform.localPosition.z < -17 || gameObject.transform.localPosition.z > 17)
        {

            //When the agent goes beyond the plane

            AddReward(-1);
            EndEpisode();
            return;
        }
        if (jumpsLeft == 0)
        {
            EndEpisode();
        }
    }

Note that this is the only place where we actually end episodes. Also, note that the logic statement we used to determine if the agent had gone off the plane uses values (i.e 17 and -17) that we can get from the scene.

The position of the agent where it falls off

In the “Update” method, we just need to make sure the rotation of the agent matches the orientation vector. We can use “Vector3.Lerp” to rotate the agent.

private void Update()
    {
        if (orientation.magnitude > float.Epsilon)
        {
            agentObject.transform.rotation = Quaternion.Lerp(agentObject.transform.rotation,
                Quaternion.LookRotation(orientation),
                Time.deltaTime * 10f);
        }
    }

Notice that we do a check to make sure the magnitude is greater than a really small value. “float.Epsilon” is the smallest value a floating-point number can have. This is important because if we simply used zero, it would always be true.

We just have one more method to implement and that is the “OnEpisodeBegin” method. What do we want to do when an episode begins? The obvious choice would be to have the agent and the target respawn at a random point. We’re going to be revisiting this method once we’ve finished the “BouncerTarget” script. For now, this is what it should look like:

public override void OnEpisodeBegin()
    {
        gameObject.transform.localPosition = new Vector3(
            (1 - 2 * Random.value) * 5, 2, (1 - 2 * Random.value) * 5);
        agentRigidbody.velocity = Vector3.zero;
    }

And before we leave the “BouncerAgent” script, let’s add one more method that will be another level of resetting.

public void ResetParamters()
    {
        var targetScale = defaultParams.GetWithDefault("target_scale", 1.0f);
        target.transform.localScale = new Vector3(targetScale, targetScale, targetScale);
    }

And we can call this in the “OnEpisodeBegin” and “Initialize” methods.

using System.Collections;
using System.Collections.Generic;
using UnityEngine;
using Unity.MLAgents;
using Unity.MLAgents.Sensors;

public class BouncerAgent : Agent
{
    public GameObject target;
    public GameObject agentObject;
    public float strength = 350f;

    Rigidbody agentRigidbody;
    Vector3 orientation;
    float jumpCoolDown;
    int totalJumps = 20;
    int jumpsLeft = 20;

    EnvironmentParameters defaultParams;

    public override void Initialize()
    {
        agentRigidbody = gameObject.GetComponent<Rigidbody>();
        orientation = Vector3.zero;
        defaultParams = Academy.Instance.EnvironmentParameters;\

        ResetParamters(); //new line
    }

    public override void CollectObservations(VectorSensor sensor)
    {
        sensor.AddObservation(target.transform.position);
        sensor.AddObservation(agentObject.transform.position);
    }

    public override void OnActionReceived(float[] vectorAction)
    {
        for (var i = 0; i < vectorAction.Length; i++)
        {
            vectorAction[i] = Mathf.Clamp(vectorAction[i], -1f, 1f);
        }
        float x = vectorAction[0];
        float y = ScaleAction(vectorAction[1], 0, 1);
        float z = vectorAction[2];
        agentRigidbody.AddForce(new Vector3(x, y + 1, z) * strength);

        AddReward(-0.05f * (
            vectorAction[0] * vectorAction[0] +
            vectorAction[1] * vectorAction[1] +
            vectorAction[2] * vectorAction[2]) / 3f);

        orientation = new Vector3(x, y, z);
    }

    public override void Heuristic(float[] actionsOut)
    {
        actionsOut[0] = Input.GetAxis("Horizontal");
        actionsOut[1] = Input.GetKey(KeyCode.Space) ? 1.0f : 0.0f;
        actionsOut[2] = Input.GetAxis("Vertical");
    }

    void FixedUpdate()
    {
        if (Physics.Raycast(transform.position, new Vector3(0f, -1f, 0f), 0.51f) && jumpCoolDown <= 0f)
        {
            RequestDecision();
            jumpsLeft -= 1;
            jumpCoolDown = 0.1f;
            agentRigidbody.velocity = default(Vector3);
        }

        jumpCoolDown -= Time.fixedDeltaTime;

        if (gameObject.transform.position.y < -1)
        {
            AddReward(-1);
            EndEpisode();
            return;
        }

        if (gameObject.transform.localPosition.x < -17 || gameObject.transform.localPosition.x > 17
            || gameObject.transform.localPosition.z < -17 || gameObject.transform.localPosition.z > 17)
        { 
            AddReward(-1);
            EndEpisode();
            return;
        }
        if (jumpsLeft == 0)
        {
            EndEpisode();
        }
    }

    private void Update()
    {
        if (orientation.magnitude > float.Epsilon)
        {
            agentObject.transform.rotation = Quaternion.Lerp(agentObject.transform.rotation,
                Quaternion.LookRotation(orientation),
                Time.deltaTime * 10f);
        }
    }

    public override void OnEpisodeBegin()
    {
        gameObject.transform.localPosition = new Vector3(
            (1 - 2 * Random.value) * 5, 2, (1 - 2 * Random.value) * 5);
        agentRigidbody.velocity = Vector3.zero;

        ResetParamters(); //new line
    }

    public void ResetParamters()
    {
        var targetScale = defaultParams.GetWithDefault("target_scale", 1.0f);
        target.transform.localScale = new Vector3(targetScale, targetScale, targetScale);
    }
}

The Target Script

The target script isn’t nearly as involved as the agent script. We just need to check if the agent has collided with the target and respawn at a random position.

using UnityEngine;
using Unity.MLAgents;

public class BouncerTarget : MonoBehaviour
{
    void FixedUpdate()
    {
        gameObject.transform.Rotate(new Vector3(1, 0, 0), 0.5f);
    }

    void OnTriggerEnter(Collider collision)
    {
        var agent = collision.gameObject.GetComponent<Agent>();
        if (agent != null)
        {
            agent.AddReward(1f);
            Respawn();
        }
    }

    public void Respawn()
    {
        gameObject.transform.localPosition =
            new Vector3(
                (1 - 2 * Random.value) * 5f,
                2f + Random.value * 5f,
                (1 - 2 * Random.value) * 5f);
    }
}

Notice that we have a “Respawn” method. We can call this on the “OnEpisodeBegin” method back in the “BouncerAgent” script

public override void OnEpisodeBegin()
    {
        gameObject.transform.localPosition = new Vector3(
            (1 - 2 * Random.value) * 5, 2, (1 - 2 * Random.value) * 5);
        agentRigidbody.velocity = Vector3.zero;
        var environment = gameObject.transform.parent.gameObject;
        var targets =
            environment.GetComponentsInChildren<BouncerTarget>();
        foreach (var t in targets)
        {
            t.Respawn();
        }
        jumpsLeft = totalJumps;

        ResetParamters();
    }

It looks a little busy but all this is saying is to call the “Respawn” method whenever an episode begins on whatever targets are in the scene.

Training the AI

Now we need to set everything up in the inspector. The “BouncerAgent” needs itself and the target while the “Behaviour Paramters” component needs to have a observation space set to 6 and an action space set to “Continous” and 3. Also, go ahead give our behavior a unique name.

Configuring the Behaviour Paramters on the agent

Now, go ahead and duplicate the environment several times.

Duplicating the environment to begin training

Then open up a command line and run the following command:

mlagents-learn --run-id=AIBouncer

The agents will then start training. It may take a while so just make yourself a pot of coffee and sit tight.

a gif of the first training attempt

After a couple of hours, it should reach the maximum number of steps and the training will cease. However, if you notice they console log, you’ll see that the total number of rewards is a negative number.

Accumulated rewards during training

This is usually not a good sign. It means that even after all that time, the agent still wouldn’t behave properly. You can check this out by dragging in the neural network saved in “C:\Users\*your Username*\results\AIBouncer.”

Dragging the Neural Network into the project

The Neural Network running on the agent (first attempt)

So how do we fix this? Well, since we did see the rewards increasing over time, the best strategy is to increase the training time. We can do this by grabbing the config file we found in the results folder and modifying it a bit. Open it up in notepad and let’s have a look.

The Config File in Notepad

This config file is where all the training settings live. We can configure quite a lot and there’s too much here to cover just in this tutorial but the main thing we want to focus on is the “Max_Steps.”

The Default Max_Steps value on the config file

Right now, it’s set to 500,000 which, in this case, is much too little. The agent doesn’t accumulate enough rewards in that number of steps. So what should we set it too? This is where we can determine the level of proficiency this AI can have. If we set it to 4,000,000, the AI will train for much longer and become very proficient at the task. If we set it to a value a little bit lower, like 900,000, it will have a level of proficiency slightly better than you or I would. For safety sake, I decided to set mine to 4,000,000 and decided I would stop it if I felt it had trained enough.

The modified step value

Also, at the time of writing, there was a slight bug in version 1.0.3 of ML-Agents that requires you to delete this line

Deleting the line because of a bug

in order for the changes to be read. So delete that line and then save your config file. I chose to save it in my Documents folder as “bouncerAIconfig” since we’re going to be referencing it in our new training command. Make sure to include “.yaml” when you save the file. With our config file sufficiently modified, we can run a new command in the command line.

mlagents-learn Documents\bouncerAIconfig.yaml --run-id=AIBouncer --resume

Of course, you would put the path to your config file if you didn’t save it to your documents. Now, you should notice that ML-Agents recognized our changes to the config file and has resumed training!

Training attempt 2 recognizing the config file

This will take a bit longer so go ahead and make another pot of coffee.

A gif of the second training attempt

I let my agent train overnight and I think the results were worth it! Drag the neural network from the results folder and assign it to your agent.

Animated Gif of the finished Agent

Conclusion

With all our training done, we officially have our AI targetting objects – once again all thanks to Unity’s ML Agents!  So congratulations for following along and learning how to code an interesting AI for your game projects.

While we’ve chosen to demonstrate with simple primitives, the skills learned here can be applied to a number of different games projects.  Though we can’t say the coding principles will apply in all cases, we can say that through persistence and sticktoitiveness, you will be creating a number of different machine learning networks in no time to suit your own project.  What we hope we’ve taught you here, more than anything else, is how to modify the AI training process and how that in turn affects your ML agent.  Where you take these skills, though, is up to you!

We hope you’ve found this useful and relevant, and as always…

Keep making great games!

Best Coding Languages for Game Development

$
0
0

So, you’re ready to start creating your very own games.  However, there comes an important question to answer when you start: what programming language should you learn how to code?

While arguably most coding languages can be used to create games, including high-level languages like Python, some choices do have more benefits than others.  Additionally, choosing what programming language to learn how to code may ultimately lock you into certain engines or frameworks as well, which further affects the development process of your game.  To make a long story short, choosing the right language can be a stressful endeavor.

However, in this guide, we intend to cover some of the languages available to you to learn for game development and provide the necessary information that may help you decide.  If you’re ready to learn how to code and jumpstart your game development career or hobby, let’s dive into the best programming languages for games!
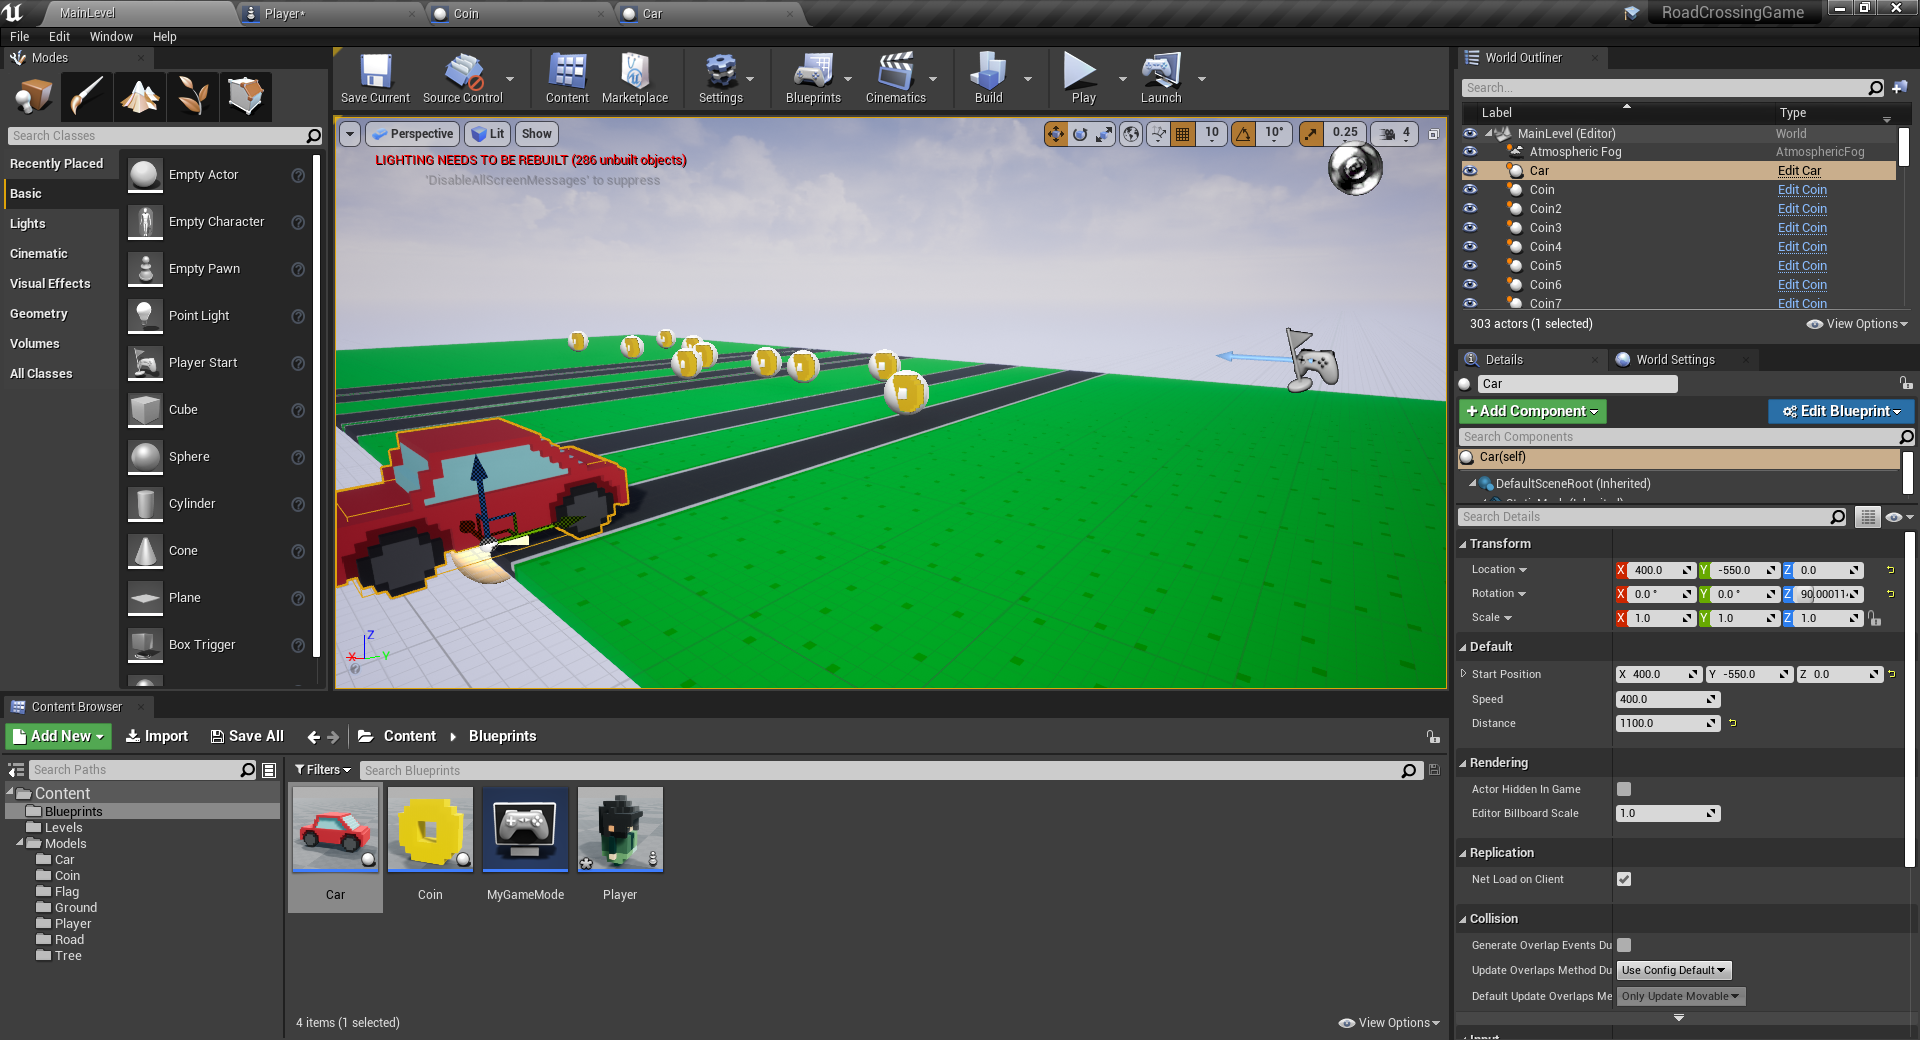
Two games on a sofa playing games

JavaScript

About

JavaScript is commonly known as one of the core pillars of web development.  It first appeared in 1995 and was designed to suit the new ECMAScript specifications that were attempting to standardize the web and web browsers.  While HTML informs web layouts and CSS informs web aesthetics, JavaScript is the true language that breathes life into websites, adding most amounts of interactivity you see on a day to day basis.

However, with the emergence of HTML5, JavaScript has also become the core pillar of HTML5 game development.  As it was originally designed with both object-oriented and event-driven systems for web user interaction, this made it the perfect choice to extend for games.  Additionally, with Flash now being obsolete, it also made way for these sorts of HTML5 games to rise up and become the mainstay of browser-based game development.

Babylon JS solar system scene

Pros

  • As HTML5 games are based on the web, JavaScript makes it easy to make browser-based games and mobile games.
  • Given JavaScript is a core part of the web, it’s easy to integrate such games with JavaScript-based frameworks and libraries, like Node.js and Express, for multiplayer game creation.
  • HTML5 games are generally the easiest to share since they can be hosted directly on a website for anyone to visit.
  • JavaScript is generally less resource-intensive for game development, meaning it’s great if you don’t have a powerful computer to develop games on.
  • Since JavaScript is an extremely stable language due to its need for the web, HTML5 games are easier to maintain and don’t require the same sort of updating games made with engines do.

Cons

  • Options for 3D graphics are limited to specific frameworks, generally forcing most people to rely on 2D graphics for their games.
  • It is rather high-level language, so it isn’t as efficient as other languages on this list in terms of how fast it performs tasks.
  • Due to not being as efficient, HTML5 games have more limits in terms of scope and size of the games you can make.
  • While JavaScript itself receives lots of support for web development, HTML5 game communities are a bit smaller compared to other languages and engines.

Turn-based RPG map screen made with Phaser

Relevant Engines & Frameworks

Games Made with JavaScript

Where to Learn JavaScript

C#

About

C# is a general-purpose language created in 2000 by Microsoft with the specific intent of working with their .NET framework.  Given the popularity of C++ and Java, it was designed to take the best of both languages and combine it into a new, easy-to-read, object-oriented language that had great cross-platform capabilities.  However, it also strove to keep businesses in mind so that it could be easily used for software development.

As for games, C# also found a home in the industry due to its relative efficiency and scalability.  In particular, it became the default language for the popular Unity engine, with all modern Unity libraries being built around the language.  Given Unity is used for a large percentage of the game industry, this has given it a tight hold in this regard.

City building game made with Unity and C#

Pros

  • Comparatively, C# is a very beginner-friendly language with fairly easy to read code.
  • Automatic memory management means you don’t have to do a deep dive into those aspects and can focus more on just developing your game.
  • As a language developed by Microsoft, it is a top choice for games on Windows PCs.  However, it is capable of working on most modern systems.
  • C# is a type-safe language, meaning your games will have more security and won’t exhibit tons of unexpected behaviors.
  • It is relatively efficient and scalable, meaning it’s well-suited to most types of game projects.

Cons

  • With some exceptions, outside of game engines, C# isn’t widely used for games.  Thus, an engine is almost required in this case for community support.
  • While more efficient than JavaScript, it isn’t as efficient as C++ or Java, meaning game performance can suffer if the game is sufficiently complex.
  • As the language was designed to work specifically with Microsoft’s .NET framework, it isn’t as flexible as other languages on the list.
  • In the business world, while in high-demand for general business applications, it isn’t as demanded for game developers as C++ is.

2D RPG made with Unity

Relevant Engines & Frameworks

Games Made with C#

Where to Learn C#

C++

About

The general-purpose C++ language was originally called “C with classes.”  It was created to take modern principles, like object-oriented programming, and combine it with the low-level features seen by the language of C.  In so doing, it would allow users to more easily create their programs with readability, while not losing advanced features such as memory management.

Given its general-purpose nature, C++ has, all around, become one of the most widely used languages, having applications for software and – as is the topic of this article – games.  In fact, many modern engines, such as Unreal Engine, are built on the language, so learning to code C++ is considered key by many professional developers.

Creating an Arcade-Style Game in the Unreal Engine

Pros

  • Being so close to C, C++ is amazingly efficient and is one of the fastest languages to choose if you have lots of complex tasks to run in your games.
  • C++ has perhaps the largest community and tutorial support given its universal usage almost everywhere.
  • Its ability to do things like memory management is very handy if you want tighter control on game performance.
  • It has a large amount of scalability and can be used for both small and large game projects.
  • It is platform-independent, meaning you can port projects around very easily regardless of OS.

Cons

  • While there are plenty of game engines to use, finding lighter-weight frameworks for C++ game development can be a challenge.  You also can’t easily develop games with JUST C++.
  • Of the languages on this list, C++ is probably the most difficult to learn and is the least beginner-friendly.
  • Though C++ gives you more control over memory management and the like, this comes at the cost of lacking automatic garbage collection – which means more work on the developer’s end.
  • As an older language, some modern features seen in other languages are not present or standardized with C++.
  • Since C++ allows developers to do more, this also allows less security – meaning you could get tons of unexpected behavior in your games without intention.

How to Create a First-Person Shooter in the Unreal Engine

Relevant Engines & Frameworks

Games Made with C++

Where to Learn C++

Java

About

Created in 1995, Java is an object-oriented language created for general-purpose use.  The design principle behind the language was to have it require as few dependencies as possible – especially compared to other languages at the time and even now.  In so doing, this meant that programs created with Java could easily run on different systems as they weren’t as dependent on the underlying computer architecture.

Given this cross-platform nature, Java is used fairly extensively for software development.  However, in the realm of games, it also finds a place.  Though not as extensively used as other languages on this list, quite a number of desktop games are still made with Java.  In addition, as the top choice language for Android devices, Java is used by a number of developers for mobile games and apps.

Pet database app made with Java

Pros

  • As Java is the foundation for Android devices, it is well-suited to making mobile games.
  • Despite its age, Java is capable of utilizing modern technologies like multi-threading for better game performance.
  • As long as the platform supports JVM, Java games can be run almost anywhere.  This includes systems like Linux.
  • It is well-suited to server development, so multiplayer games can be made fairly easily with Java without the need for extra libraries and so forth.

Cons

  • Even though successful games have been made with Java, it is not the standard choice for game development in the eyes of most developers.  Thus, community support for it in this field is limited.
  • Though it does have automatic memory management, it is known to have some latency issues for games because of that.
  • Few engines or libraries specific for game development exist for Java compared to other languages.
  • Most modern consoles do not support JVM, so despite its ability, Java games are often platform limited in this regard.

Color selection app made with Java

Relevant Engines & Frameworks

Games Made with Java

Where to Learn Java

Conclusion

Unidentified person playing a game

As we hoped to establish here, there is no wrong or right language to learn to code when it comes to games.  All of them have different features, different target platforms, and different sorts of developers who prefer them.  However, the collection here are, no doubt, some of the best programming languages you can opt to learn when it comes to game development.

Regardless of your choice, each is set to help you develop your game project.  So whether you pick C# so you can use Unity, want to dive into the challenge of developing with Java, or something else, learning to code is a profitable skill sure to help you in your long-time game hobby or career.

So get out there, learn to code, make games, and develop skills to last you a lifetime!

Don't miss out! Offer ends in
  • Access all 200+ courses
  • New courses added monthly
  • Cancel anytime
  • Certificates of completion

How to Handle User Interactions with SFML

$
0
0

You can access the full course here: Discover SFML for C++ Game Development

Handling User Interactions

There are many ways in which a user can interact with your program from pressing buttons, to opening and closing windows, and even simple events like moving a mouse. Each of these interactions triggers an event which we capture within the run loop and can either choose to handle or ignore. We could spend hours covering just events but we are only really interested in three for now: closing the window, clicking a mouse button, and pressing a keyboard key, specifically, the space bar.

To handle any event, we first need to create an sf::Event object and call the function window.pollEvent(). This gathers all of the events associated with a specific window (as you can have multiple windows open at once) and will continue to return true while there are events ongoing. For example, we are already handling the window close event with this code:

sf::Event event;
while (window.pollEvent(event)) {
  if (event.type == sf::Event::Closed) {
    window.close();
  }
}

This is only searching an event of type sf::Event::Closed, triggered when the user exits out of the current window. However, we also want to monitor mouse clicks and spacebar presses. Let’s start with mouse clicks. We can provide an else if case like this:

else if (event.type == sf::Event::MouseButtonPressed) {
  std::cout << "Mouse button pressed" << std::endl;
}

While this isn’t doing anything more than printing out “Mouse button pressed” whenever the user clicks the mouse somewhere in the window, we can see how easy it is to handle simple user events. To handle spacebar presses, we first need to detect for a KeyPressed event and then find out whether or not the key pressed was the spacebar like this:

else if (event.type == sf::Event::KeyPressed) {
  if (sf::Keyboard::isKeyPressed(sf::Keyboard::Space)) {
    std::cout << "Space bar pressed" << std::endl;
  }
}

The isKeyPressed() function will return true if the key we are looking for is the one that was pressed and false otherwise. If you try pressing anything other than the spacebar, nothing will happen but the spacebar will print the message “Space bar pressed”. We can put it all together like this;

sf::Event event;
while (window.pollEvent(event)) {
  if (event.type == sf::Event::Closed) {
    window.close();
  } else if (event.type == sf::Event::MouseButtonPressed) {
    std::cout << "Mouse button pressed" << std::endl;
  } else if (event.type == sf::Event::KeyPressed) {
    if (sf::Keyboard::isKeyPressed(sf::Keyboard::Space)) {
      std::cout << "Space bar pressed" << std::endl;
    }
  }
}

Note how all of this occurs within the run loop but before drawing anything. Typically, the first thing we do in a run loop is process and handle interactions as they may affect the state and thus the items that are drawn to the window.

Transcript

Hey everyone, welcome to a tutorial on handling user interactions. Here, we’re just going to explore a couple of the user interactions that we’ll be using in our game, how to detect them, and how to respond to them. So tasks are gonna be to first learn about how to monitor events, then we will respond to quit events, we’ve actually already took a quick look at that, then will respond to mouse clicks, and finally, to button presses. So let’s head to the code and get started.

All right, so like I said, we’ve actually already kind of covered one of the events and that is going to be the window.close. But we haven’t really covered events much in general. So we’re not gonna be creating anything outside of here for now. So in your while loop here, your main game loop, there will be a series of events that take place there could be multiple events happening at once.

For example, if the user is holding down a key and pressing their mouse, there could be lots of things happening okay? So what we do is that’s why we have a while loop because there could be multiple events, if we only do an if statement, that’s just gonna check one of them, which is not what we want. So by using the window.pollEvent, this is going to check to see if there are any events happening that are related to this particular window.

Technically, you can have multiple windows with SFML. Again, that’s a bit beyond the scope of this course. But for each new window, you want to pull events within that one.

Again, we just have the one window to work with. So that should be fine here. So you create an SF event object, and you pass it into the poll events that way we have access to it within the while loop. So here, we want to be checking to see what events are occurring, we only really need to check the ones that we’re interested in.

For example, if we’re just handling mouse clicks, we don’t need to do anything else. But at the very least, you should have this one that’s polling for the event closed, okay? Otherwise, you can run into issues with your game just continually running.

Okay, so events will have many possible types associated with it. In this case, this is the event.type SF event closed, and we’re just closing the window. Okay, we’ll also want to respond to mouse clicks. So when you click on the animate, we want to decrease some energy, and also will respond to key presses. So at the very end, when you want to restart the game, you press the space bar, and it will restart everything.

So let’s first work on the mouse clicks. What we’ll do is we’ll do an elifevent.type. I’ll actually you know what that should be an else if, and we need these. Okay, getting kind of confused with some Python code. Okay, so we’ll do this okay, and then we’ll say else if events.type is going to be equal to and here’s where we want to listen for a mouse button press. So we’ll pull the event SF event mouse button pressed.

Okay, we’re not gonna worry about the release or anything like that. We just want to check to see if the mouse button is pressed. Okay, so if the mouse button is pressed, we can pretty much do whatever we want. We’re not gonna check for collision detection or anything yet. We’ll cover that much later on in this course we will be covering it eventually though.

And for now what we can just do is print something else will stay Standard C out. We’ll say mouse button pressed, okay. And then we will do a new line, I guess. Okay, well, we can do we could actually just do the end L. So it should actually be standard endl okay.

So, if we’re checking to see if the mouse buttons pressed and we’re printing out, that’s good. We also you know, actually let’s go ahead and run this and demonstrate this. So we go to terminal clear will recompile it./main. Okay, you can see that I’m clicking on the screen, and we’re detecting the mouse button pressed is being printed out there every time.

Note how, if I’m clicking outside of the screen, nothing is registering. Now I’m kind of clicking all over the terminal right now. Nothing’s happening okay? That’s because we’re only detecting mouse clicks within this particular window. That is the desired behavior, at least for our game.

Okay, cool stuff, so we know how to detect mouse clicks. Again, we’ll get into the exact collision detection later to check to see if we’re clicking on an object, but we’ll also want to monitor keyboard presses. So we’ll do else if the event.type is gonna be equal to SF event key pressed.

Okay so we actually don’t launch immediately right into checking to see if the space bar key was pressed. What we should be checking see is if the events was a key press in general, okay, then we can go into that further and see if the key that was pressed was a space bar. And we may as well implement that logic here. We’re gonna need it later on anyway.

So we’ll say something like if SF keyboard is key pressed, and we’ll do SF, keyboard space. Okay, so just make sure that you can see the whole thing. So this might seem a little roundabout, we have to see if the keyboard is key pressed is called. And with this will take in a key to check to see if it’s pressed. Specifically, we’re just checking to see if the space bar is pressed. Okay, that key space equal to true, we’ll just print out something like space bar pressed. Space bar pressed, okay, and then we’ll end the line.

All right, so you can also check for other keys. For example, if you’re doing like a movement game where you press the arrow keys to move around, you’ll probably want to check for up arrow down, arrow left and right and so on and so forth. In case we’re only interested in if the space key is pressed, okay, so if this returns true, that means the space key is pressed, we can print out the statement.

Okay, so we’ll go again back to terminal. Let’s recompile, let’s rerun. Okay, and I’m pressing some other keys, nothing’s happening. Soon as I press space bar, then you can see that space bar is pressed. It’s also still detecting mouse clicks, and of course, it’s detecting close events as well.

All right, so that’s actually pretty much as complex as the user interaction handling is gonna go in our game. Like I said, you can make this really complex if you want, but we’re only really gonna be listening for these two commands, three if you include the window close. All right, so feel free to check out some of the other keys. See if you can implement like a little kind of movement thing if you want if you’re feeling adventurous. Otherwise, we’re gonna end the section here. When we come back, we’re going to be talking about how to monitor time is that’s going to be an important feature of our game. So stay tuned for that, thanks for watching. See you guys in the next one.

Interested in continuing? Check out the full Discover SFML for C++ Game Development course, which is part of our C++ Programming Bundle.

How to Playtest your Game – Game Design Tips

$
0
0

At some point during the game development and game design process, you’re going to be faced with a terrifying prospect: having to have another person experience the game that you’ve made. It’s never an easy thing to put yourself out there like that, but it’s an important step to take if you have plans to release the games you make to the wider public.

The first way someone will probably see your game, though, is as a playtest. Playtests are an essential component of the game dev process – from the smallest project to the largest.  They’re essential to all of game design, because every game developer or game development team needs to hear the perspective of people not involved with the actual development process. Not only does it help cut through biases that you may have about your work, but there are a lot of things an outsider can spot that you just can’t just given how long you’ve stared at the project.

Given the importance of this step, in this guide we will talk about how you got about playtesting your game. We’ll explore methods, tools, how to find playtesters, how to get the feedback you need, and how to use the feedback you get.

Don't miss out! Offer ends in
  • Access all 200+ courses
  • New courses added monthly
  • Cancel anytime
  • Certificates of completion

Everything here will be geared towards assisting those pursuing solo development, or developing in small teams with little to no budget, with some advice specifically for people developing in Unity. However, even those outside this scope may find tips inside to better help them with their game design. Hopefully by the end, you’ll be equipped to go forth and playtest.

Let’s get started and learn how to playtest your game!

Concepts:

  1. Identifying Your Needs
  2. Acquiring Playtesters
  3. Tools and Methods
  4. Tips and Tricks

Identifying Your Needs

The first thing you need to do when planning a playtest is figuring out what you want to get out of it. You’re seeking feedback from players, but what kind of feedback will be the most useful to you as the developer? What do you need from your players, that will best help you to improve your game? To figure this out, let’s break down the various types of feedback that you can easily collect working solo, or with a small team:

  • Bug reports
  • Player engagement
  • Data and statistics
  • Gameplay screenshots and footage
  • Feedback and advice

To determine what kind of feedback will be most useful to you, you need to be acutely aware of the game that you are making. For example: if you’re making an intimate and personal narrative experience, or a deeply artistic and inspired piece with a lofty message, then very detailed feedback from a few playtesters will probably be the way to go.

Conversely, if you’re aiming to make something that lives and dies on gameplay balance, then large sums of data from a diverse population will probably suit your needs more closely. Depending on which of these you’re seeking, you’re going to go about collecting your playtesters and running your playtest differently. So let’s start there: how to collect playtesters, and what to do with them.

Group of people standing excitedly around a computer

Acquiring Playtesters

Getting people to playtest your game for free can be challenging. Doing QA is legitimately a job that one can aspire to in game development. So understand that what you’re asking of your playtesters is essentially free labor and approach gathering playtesters with that in mind.

The first and easiest place to start is people who are already aware of your game. Peers, mentors, collaborators, and even friends or relatives that you’ve bragged about your game to. Among those people, you’ll want to consider a few things:

  • Their relative investment in the project
  • The amount of free time that they have
  • Their experience with games as a medium

If a person has very limited free time, you may not wish to detract from that by asking them to do work for you. That is unless they are heavily invested in the development and success of your game, such as a collaborator who has provided music and wants to see their work being put to good use. To that end, always try and show your collaborators that their work is of value to the project. There’s no feeling better than seeing the joy on someone’s face when they see how they’ve contributed to something cool.

It’s also valuable to get players with varying levels of experience gaming. You’re going to get vastly different data from someone who plays League professionally than you will from a family member who has only played Wii Sports at family gatherings.

Similarly, people who you’ve told about the game are going to have preconceptions about what you’re doing. People going in completely blind is not inherently more valuable, but getting both is more valuable than either one alone.

Hands planning out something on a board

You also want to consider how many playtesters you’re going to want, because that will affect your methods (which we’ll go into in a moment) and also the means by which you gather playtesters. Using your social circles to get maybe up to a dozen playtesters is fantastic for certain types of games, but others will require large sums of data to identify trends and balance for the largest number of people.

To that end, you’d want to be using social media (Twitter is the platform where game devs do most of their communications), posting about your game in game dev communities (you’ll find dozens of subreddits, forums, and Discord servers for this sort of thing) and potentially even reaching out to journalists (Gamasutra, Rock Paper Shotgun, and Polygon, among others, will often post about in-development games).

Tools and Methods

So you have your playtesters. Now you’re going to want to set up your playtests, and for that you’re probably going to need some tools. Especially in the current environment of social distancing, any tool that doesn’t require you to sit across from your playtester and ask them questions is your best friend. So, what methods should you employ, and what tools would I recommend for them?

Well let’s look back at our different types of feedback and list off a few for each:

Bug Reports & Player Engagement

The preferred method for measuring Player Engagement is a questionnaire. Ask your players questions about their experience with your game. Try and make them think hard about their experience.

Google Forms is my software recommendation for this sort of thing.

Collection of Google Forms as seen in drive

If Google Forms isn’t your cup of tea, some alternatives include:

Data and Statistics

The easiest way to collect important data for your game is through the use of analytics software. This enables you to balance and test individual mechanics, map trends in player behavior, ensure that players are seeing all of the content you want them to see.

Most game engines have first-party analytics software, and I will be talking specifically about Unity Analytics later in this piece.

Analytics demonstration for Unity

Gameplay, Screenshots, and Footage

Recording gameplay footage of your playtesters can be incredibly insightful. You probably spend so much time with your game that you play it in a way no normal person would, so being able to see what players actually do when given control and left to their own devices can open your eyes to things you never would have spotted otherwise, and, you can potentially even use the footage you collect for marketing (more on that later).

The best free screen recording software is still Open Broadcaster Software.

Open Broadcaster Software window

Feedback and Advice from Peers and Mentors

Much of the time the most valuable advice you can receive is from someone who has been where you are and made the mistakes you’re liable to make. So if you have access to professionals, and they’re willing to give you the time, use that.

While there’s no software that can substitute for a professional’s genuine advice, there are thousands of hours and millions of words of tutorials by professionals in the field out there. I’ll link to some relevant ones in the Further Reading section at the bottom of the page.

Neat Tips and Tricks

I’ve run a few playtests in my time, and I’ve accrued a good number of tips and tricks for general use by the aspiring playtest aficionado, particularly for the tools outlined above.

Google Forms

Google Forms gives you a range of different question types from multiple choice, to scales of one to five, making their service highly customizable for a variety of different use cases. I’m here to tell you, however, that the only one you care about is the “Paragraphs” answer type.

Paragraph answer option for Google Forms

Obviously this isn’t a hard and fast rule. If you have hundreds of playtesters, you can probably get away with asking the player to “rate your engagement on a scale of one to five” and get some significantly useful data.

If you have a sample size of say five to ten, however, then you need to ask questions that interrogate in specific the experience that players are having. You want to put the player being asked the question in the position of being unable to give you a lazy answer.

My master trick for doing this is simple. Take the question you think you want to ask about the game and rephrase it as a request for something about the player’s experience.

For example:

What was your favourite moment in the game? question in Google forms

… becomes:

Unity window menu with package manager selected

This prompts the player to interrogate their own experience and give you a more detailed answer. It also prompts them to consider things that they did, rather than things that just happened in the game.

Due to the specificity and detail these questions ask for, usually you want to aim for the sweet spot of 3-5 questions of this type so as not to exhaust your playtesters. Here’s a playtest questionnaire for this article that I mocked up, just so that you can see how I would structure it.

https://forms.gle/Cr8TcTDWdrErQ7NZA

Unity Analytics

Unity Analytics works in a way that can be somewhat obtuse to a first time user, but gets easier once you’re through the initial setup. So:

The first thing you’re gonna want to do is open up the Unity Package Manager by going Window > Package Manager.

Unity window menu with package manager selected

Wait for the packages to load in and install the Analytics Library package.

Unity Analytics Library package manager

Then under Window > General, you’ll find the Services tab (which can also be accessed with Ctrl+0).

Unity Window > General menu open with Services selected

You will need an account with Unity to access Services, so run through the setup process for that if you don’t have one.

Unity Hub Sign In page to access services

Once you’re in, you’ll need to create a Project ID and then click on Analytics once Unity has finished doing that.

Unity Services screen with Project ID added and Analytics selected Pt1

Unity Services screen with Project ID added and Analytics selected Pt2

Then you’re going to enable Analytics. For legal reasons, you are required to indicate whether your app is intended to be used by children under the age of 13. This will limit the kinds of data that you are legally allowed to collect on your users (for further reading on this, go here).

Unity Analytics terms of service Pt1

From here you can access your dashboard in browser, where you have access to all of your data with some room for delay as events are transmitted and compiled.

Unity Analytics dashboard portal

Unity Analytics dashboard

The tabs that you care most about here are the Event Manager and Data Explorer. The former displays every unique event that has been received from your game (to make sure that all of your events are actually sending), and the latter visually displays the data collected in a variety of helpful ways.

Unity Analytics relevant tabs in dashboard

Setting up events is, comparatively, the easy part. It’s essentially one line of C# code that you place at whatever point in your game you want to transmit an event from. This can be when players meet basically any criteria.

// First reference the Unity Analytics namespace
using UnityEngine.Analytics;

//  Use this call wherever a player triggers a custom event
AnalyticsEvent.Custom(string customEvent, new Dictionary<string, object> { { "parameterLabel", parameterData } });

Keep in mind that Unity analytics can only transmit so much data: 100 events per hour per instance of your game, 10 parameters per event, with only 500kb of data for the event name (100 characters max). A helpful tip is to limit event parameters and names to single characters or acronyms, to be as efficient as possible. For instance:

// This event is transmitting the total number of objects a player has touched in a scene
// The number transmitted will be an int, in this case the number of objects in the "objectsTouched" list
// The parameter name is "OT" to indicate that this is "Objects Touched"
Analytics.CustomEvent("EventStarted", new Dictionary<string, object> { { "OT", objectsTouched.Count } });

Miscellaneous

If you’re not setting up the playtest because, for instance, you are social distancing due to the current world climate, and thus need your playtesters to download and install software like OBS to collect footage, you’ll need to provide instructions on how to do so.

Put a space in your questionnaire for them to provide you with a link to the uploaded footage. Also, put a question in there where they will indicate if they’re okay with the footage they recorded be used for marketing purposes, and lastly a field for them to indicate if they would like to be included in the game’s credits (these last two points aren’t strictly necessary, but it’s polite and good optics).

Google form question addressing video uploading, marketing, and credits

Always, always, always provide clear instructions on how to participate in the playtest. Be exhaustive about it. Even if you think you know that your playtesters understand how .ZIP files work, and how to set up a screen capture with OBS, you always want to be prepared for the one time you’re wrong.

Lastly, when reading and interpreting feedback, you’re going to probably have moments where you experience either strong positive or negative feelings about your work. It can be extremely validating to hear that people like the thing you made, likewise it’s easy to feel like you’re somehow failing if people aren’t engaging with your work.

The important things to remember are that you are not your work, that your work as it is is not the way it always will be, and that your playtesters aren’t necessarily right about your work anyway. Take heart in the fact that you’ve made it to the point of having work to show for your efforts, and in the fact that it will be even better for the next playtest. Also, don’t be afraid to shake things up and change course if things aren’t working for you the way that they are.

Conclusion

Playtesting, like most things, gets easier the more you do it. You will become comfortable with your own rhythms, and figure out what works for you over time and with experience. However, if you’re just starting out and not sure how your first playtest is going to go, hopefully, this piece has given you a few angles to start approaching this from so that you can make all of your games the best that they can be.

Remember that these techniques can be scaled and adjusted as well, so don’t stick to one formula.  Like game design itself, mastering how to playtest your game is an ongoing challenge filled with a lot of trial and error.  Nevertheless, it is something everyone, even solo developers, can do, so we can’t wait to see the games you come up with and improve using the techniques above!

Good luck with your playtests, and get that dream game project out there!

Links

Unity vs Unreal

$
0
0

When learning game development, people often wonder about what the best game engine is. In terms of versatility, power, popularity and use in the industry – there are two that most people talk about. The Unity game engine and the Unreal Engine. Both are similar in some aspects, yet different in others. Throughout this article, we’ll be going over the pros and cons for each engine and it will hopefully give you an informed choice on what to use.

Versatility

As a game developer, you might want to experiment with different types of games – 3D, 2D, multiplayer, VR, etc. Having an engine which caters to a wide range of games is important and luckily, both Unity and Unreal do just that. Let’s have a look at a range of different game types and which engine would be best suited for them:

  • 3D – Both engines have great 3D capabilities, although Unreal is best in terms of graphical fidelity.
  • 2D – Both engines can do 2D, although Unity has a much larger focus and tool-set.
  • Virtual Reality – Unity excels in VR as the plugins are very versatile and integrate into the overall XR infrastructure.
  • Augmented Reality – Both engines can do AR, although Unity has been doing it for longer and has much more defined systems.
  • Multiplayer – Both engines can do multiplayer, although Unreal is the only one with integrated support. Unity’s integrated multiplayer is still in-development although there are many 3rd-party frameworks.
  • Mobile – Unity is considered the best engine for mobile.
Creating a 2D game in the Unity engine.
Creating a 3D game in the Unreal Engine.

Coding

When starting out with a game engine, what language you code in can be a determining factor. In Unity, you write code using the C# language, while in Unreal you use C++. Generally, C++ is considered a more difficult language to learn, although Unreal has its own integrated visual scripter called Blueprints. Visual scripting is a great alternative to coding as it allows you to do the same things – yet with no coding required. Just create nodes and connect them together in order to develop logic for your game.

Right now, Unity has no integrated visual scripter, but there are a number of 3rd-party options available such as: Bolt (now free with future integration planned for the engine) and PlayMaker.

Unreal Engine Blueprint visual scripting.
Blueprints in the Unreal Engine.

If you are looking to code, Unity may be the easier option with C#, although if you don’t want to code you can use Unreal’s Blueprints.

Industry Presence

You may choose a game engine based on what the professionals are using. Both Unity and Unreal are used to create games on the market, but in different ways.

First, Unity is the most popular engine for indie developers and mobile games. There are a number of larger games made with Unity such as: Hearthstone, Cities: Skylines, Rust, Ori and the Blind Forest and most mobile games.

In terms of the AAA-industry, Unreal is used more than Unity. Games such as: Fortnite, Bioshock, Sea of Thieves, Star Wars: Jedi Fallen Order and a large number of others use the engine.

Something to also keep in mind is how the engine developers themselves use it. Unity don’t create their own games apart from small educational projects. Epic Games (developers of the Unreal Engine) on the other hand, have developed many games such as: Fortnite and Gears of War using the Unreal Engine.

Community

An important aspect of a game engine is the community. Both engines have a pretty large online presence, with their own respective forums, Sub-Reddits, YouTube channels and more.

  • Unity – has a yearly game developer convention called Unite. Most game development YouTubers focus on using and teaching Unity.
  • Unreal – Epic Games has more of a presence online with live tutorials.

Both engines also have their respective asset stores. An asset store is a marketplace for 3D models, textures, systems, etc for an engine which you can get for free or a price. These can be great for developers who may not be the best artist or lack knowledge in a certain area.

Tutorials

Both Unity and Unreal have great learning resources. Documentation, tutorials, online courses, etc. Here at Zenva, we have a number of different courses on Unity and Unreal.

Unity

Unreal

Conclusion

So in conclusion, which engine should you use? If you’re a beginner looking to learn how to code and create a wide range of games – go with Unity. If you’re not interested in coding and want better graphical performance – go with Unreal. These are still quite surface level statements, so I recommend you try both. There’s no best game engine, there’s only the game engine you feel most comfortable using.

Don't miss out! Offer ends in
  • Access all 200+ courses
  • New courses added monthly
  • Cancel anytime
  • Certificates of completion

How to Train a Machine Learning Agents via Demonstration

$
0
0

Whenever a human learns a new subject, whether it be a musical instrument or a new language, there’s always a theme of “trial and error.” Attempting to get the correct finger placement on the violin or correct pronunciation of a foreign word oftentimes involves getting it wrong several times over.

This is a well-known way people learn, and it’s the analog we draw when it comes to machine learning. A machine learning agent “learns” in a way very similar to how we as humans learn. But, human learning differs drastically from machine learning, because a human can be shown how to perform a task while a machine cannot.

Or can they? Can we demonstrate a task to a computer? Could we train an agent by demonstrating the task? The exciting answer to this question is yes!

In this tutorial, we’re going to “supercharge” our AI by learning how to train a Unity machine learning agent through demonstration. We will also be looking at how to tweak some special parameters (called “hyperparameters”) that will make the training process much faster and more accurate. And to me, having an agent learn by demonstration is a much more intuitive way of interacting with machine learning.  Not only will this save on development time for you, but help you make even more complicated agents!

Let’s get started and learn how to train ML-agents in Unity!

Don't miss out! Offer ends in
  • Access all 200+ courses
  • New courses added monthly
  • Cancel anytime
  • Certificates of completion

Project Files and Overview

The starter files we’re going to be needing can be downloaded here: Starter Files. This contains a basic scene with some cubes, a boundary, and a special script that will be used as the “goal” for our agent. The plan is to have an agent spawn randomly in a scene, locate the box, and push it onto the green part of the environment.

What the

This project comes from the Unity ML-Agents example package which you can find on the Unity Github (https://github.com/Unity-Technologies/ml-agents). If you have a look at the starter files, there are a couple of components here that are not the focus of the tutorial and so they will not be explained fully. Mainly how the agent and target script are coded. Fortunately, there is nothing new in the starter files so if you want to know how to make it from scratch, check out the other ML-Agents tutorials on the Game Dev Academy (An Introduction to Unity’s ML-Agents and How to Make AIs Target Objects with Unity ML Agents). Once you’ve got the project files downloaded and imported, we can get started!

Configuring the Agent

Taking Observations

If you have a look at the Behaviour Parameters component on the Agent, you’ll notice that the “Observation Space Size” is set to zero.

Observation space size is zero

How then are we to take any observations at all? The answer is we use a special, almost magical component called the “Ray Perception Sensor 3D” component.

Searching for the Ray Perception Sensor 3D component

Adding the Ray Perception Sensor 3D Component to the Agent

This sends out a series of raycasts and automatically adds them to the observation stack. What’s more, the parameters on the component are very intuitive and the gizmos in the editor only add to the ease of use. Therefore, we can use this component as the way in which our agent “sees” the world. Because of this, we’re going to need two of these with the following configuration:

Two Ray Perception Components offset from each other

In essence, what we’re doing is giving the agent two lines of sight. One is high above the agent to be used likely for making sure it is upright and still in the environment, the other is lower and is used for detecting the box and the goal. One of the strengths of the Ray Perception Sensor component is that it observes basically everything about its detectable target. Whether it be velocity, speed, even color, the component can observe it all.

Now, because of this, it can take a while for the neural net to figure out what bits of information is useful. So what we gain in the convenience we also lose in training speed. This isn’t much of a cost, however, since coding each raycast manually would be quite a chore. Because we’re using Raycasts, we need to make sure the agent itself isn’t detected by switch the layer to “Ignore Raycast.”

Switching the agent layer to "Ignore Raycast"

And we need to make sure the “Max Steps” value on the “PushAgent” script is not zero.

Max Step Value set to 5000 on the PushAgent script

This basically just sets the duration of an episode. If this were zero, it would be an unlimited length. And so, with our agent now seeing our beautiful world and possessing the proper number of maximum steps, let’s jump into the scripts that came in the starter file to see what’s going on under the hood.

 An Overview of the Agent Script

As I mentioned earlier, we’re not going to be going over every single line of this script but we do need to know the basics of what’s going on.

using System.Collections;
using UnityEngine;
using Unity.MLAgents;

public class PushAgent : Agent
{
    /// <summary>
    /// The ground. The bounds are used to spawn the elements.
    /// </summary>
    public GameObject ground;

    public GameObject area;

    [HideInInspector]
    public Bounds areaBounds;

    private VisualSettings visualSettings;

    public GameObject goal;

    public GameObject block;

    [HideInInspector]
    public GoalDetection goalDetect;

    public bool useVectorObs;

    Rigidbody blockRigid;  
    Rigidbody agentRigid; 
    Material groundMaterial; 

    Renderer groundRenderer;

    EnvironmentParameters defaultParameters;

    void Awake()
    {
        visualSettings = FindObjectOfType<VisualSettings>();
    }

    public override void Initialize()
    {
        goalDetect = block.GetComponent<GoalDetection>();
        goalDetect.agent = this;

        agentRigid = GetComponent<Rigidbody>();
        blockRigid = block.GetComponent<Rigidbody>();
        areaBounds = ground.GetComponent<Collider>().bounds;
        groundRenderer = ground.GetComponent<Renderer>();
        groundMaterial = groundRenderer.material;

        defaultParameters = Academy.Instance.EnvironmentParameters;

        SetResetParameters();
    }

    public Vector3 GetRandomSpawnPos()
    {
        var foundNewSpawnLocation = false;
        var randomSpawnPos = Vector3.zero;
        while (foundNewSpawnLocation == false)
        {
            var randomPosX = Random.Range(-areaBounds.extents.x * visualSettings.spawnAreaMarginMultiplier,
                areaBounds.extents.x * visualSettings.spawnAreaMarginMultiplier);

            var randomPosZ = Random.Range(-areaBounds.extents.z * visualSettings.spawnAreaMarginMultiplier,
                areaBounds.extents.z * visualSettings.spawnAreaMarginMultiplier);
            randomSpawnPos = ground.transform.position + new Vector3(randomPosX, 1f, randomPosZ);
            if (Physics.CheckBox(randomSpawnPos, new Vector3(2.5f, 0.01f, 2.5f)) == false)
            {
                foundNewSpawnLocation = true;
            }
        }
        return randomSpawnPos;
    }

    public void ScoredAGoal()
    {
        AddReward(5f);

        EndEpisode();

        StartCoroutine(GoalScoredSwapGroundMaterial(visualSettings.goalScoredMaterial, 0.5f));
    }

    IEnumerator GoalScoredSwapGroundMaterial(Material mat, float time)
    {
        groundRenderer.material = mat;
        yield return new WaitForSeconds(time); // Wait for 2 sec
        groundRenderer.material = groundMaterial;
    }

    public void MoveAgent(float[] act)
    {
        var dirToGo = Vector3.zero;
        var rotateDir = Vector3.zero;

        var action = Mathf.FloorToInt(act[0]);

        switch (action)
        {
            case 1:
                dirToGo = transform.forward * 1f;
                break;
            case 2:
                dirToGo = transform.forward * -1f;
                break;
            case 3:
                rotateDir = transform.up * 1f;
                break;
            case 4:
                rotateDir = transform.up * -1f;
                break;
            case 5:
                dirToGo = transform.right * -0.75f;
                break;
            case 6:
                dirToGo = transform.right * 0.75f;
                break;
        }
        transform.Rotate(rotateDir, Time.fixedDeltaTime * 200f);
        agentRigid.AddForce(dirToGo * visualSettings.agentRunSpeed,
            ForceMode.VelocityChange);
    }

    public override void OnActionReceived(float[] vectorAction)
    {
        MoveAgent(vectorAction);

        AddReward(-1f / MaxStep);
    }

    public override void Heuristic(float[] actionsOut)
    {
        actionsOut[0] = 0;
        if (Input.GetKey(KeyCode.D))
        {
            actionsOut[0] = 3;
        }
        else if (Input.GetKey(KeyCode.W))
        {
            actionsOut[0] = 1;
        }
        else if (Input.GetKey(KeyCode.A))
        {
            actionsOut[0] = 4;
        }
        else if (Input.GetKey(KeyCode.S))
        {
            actionsOut[0] = 2;
        }
    }

    void ResetBlock()
    {
        block.transform.position = GetRandomSpawnPos();

        blockRigid.velocity = Vector3.zero;

        blockRigid.angularVelocity = Vector3.zero;
    }

    public override void OnEpisodeBegin()
    {
        var rotation = Random.Range(0, 4);
        var rotationAngle = rotation * 90f;
        area.transform.Rotate(new Vector3(0f, rotationAngle, 0f));

        ResetBlock();
        transform.position = GetRandomSpawnPos();
        agentRigid.velocity = Vector3.zero;
        agentRigid.angularVelocity = Vector3.zero;

        SetResetParameters();
    }

    public void SetGroundMaterialFriction()
    {
        var groundCollider = ground.GetComponent<Collider>();

        groundCollider.material.dynamicFriction = defaultParameters.GetWithDefault("dynamic_friction", 1);
        groundCollider.material.staticFriction = defaultParameters.GetWithDefault("static_friction", 0);
    }

    public void SetBlockProperties()
    {
        var scale = defaultParameters.GetWithDefault("block_scale", 2);
        blockRigid.transform.localScale = new Vector3(scale, 0.75f, scale);
        blockRigid.drag = defaultParameters.GetWithDefault("block_drag", 0.5f);
    }

    void SetResetParameters()
    {
        SetGroundMaterialFriction();
        SetBlockProperties();
    }
}

A very dense script but the reason it’s so complicated is not because it has a lot of conceptually unique things going on but because it’s dealing with the most basic actions of moving the player and resetting the scene when an episode ends. In fact, the methods “SetResetParameters,” “SetBlockParamters,” “SetGroundMaterialFriction,” “GetRandomSpawnPos,” “OnEpisodeBegin,” “ResetBlock,” and “Initialize”are all dealing with resetting everything.

The parts you should pay attention to (after you’ve basically understood what the resetting methods do) are where we’re assigning rewards and performing actions. Notice, at line 79 we’re adding a reward of 5 in the “ScoredAGoal” method which is called externally. And we’re subtracting a reward in the “OnActionRecieved” method at the 130th line. This system gives a very large reward for scoring a goal but also encourages the agent to do it quickly by punishing it slightly whenever it uses an action.

Notice also when we’re telling the agent to move in the “OnActionRecieved” and the “MoveAgent” methods. Because we’re using a discrete action space (to learn about what this is, visit the introduction tutorial https://gamedevacademy.org/unity-ml-agents-tutorial/), we’re using a switch-case at line 100 to determine which direction to go. It seems like a very busy script but all we’re really doing is assigning rewards, performing actions, and resetting the environment as we have always done. And so with this basic understanding of the script which powers our agent, lets get to the meat of this tutorial and train it.

Training the Agent

The First Attempt – No Demonstration

I mentioned in the introduction that we’re going to be using a demonstration to train the agent. But what happens if we just have it train without a demonstration? Let’s go ahead and have a go at this. Duplicate the environment several times

Duplicating several training environments

open up a command line and run this command

mlagents-learn --run-id=AIPushAgent

Hit play in the Unity Editor and it’ll start training.

A gif of the first training process

Training stops at 50,000 steps and has amassed a mean reward of 1.819 which is not a lot.

The mean rewards of the first training process

We could bump up the number of steps to make it train longer in the hopes that it will eventually work, or we could train it after we’ve demonstrated how to complete the task. There’s no real way to find out how long it could take to train this agent (the Unity example had 15,000,000 steps!) so we’re better off just doing a demonstration. With that, let’s go ahead and disable all but one of the environments in preparation for the demonstration.

Disabling all the other environments to make changes to one

The Second Attempt – With Demonstration

Unity ML-Agents has two methods of doing imitation learning, GAIL and BCBC stands for “Behavioural Cloning” and it basically is an agent that exactly copies whatever was demonstrated. This is useful for only the most basic of AI agents. We’re obviously not going to be using BC since our agent and block spawn in random places. This makes it impossible for an agent to properly execute a task because each scenario is new.

Therefore, we are going to be using GAIL which stands for  “Generative Adversarial Imitation Learning.” Using this method, two neural networks are effectively used. One is the actual policy that the agent will operate on and the other is a special network called the “discriminator.” The discriminator determines what actions or observations are original (as in, if the agent came up with that decision itself) or if the action or observation came from the demonstration. If it came from the agent itself, it assigns a reward. This way, two optimizations are working in parallel to give us a faster and better agent. To record a demonstration, add a “Demonstration Recorder” component to the agent.

What a blank Demonstration Recorder Component looks like

The Demonstration Recorder component

As usual, Unity has made recording demonstrations super intuitive. We’ve got two string fields that specify the path and name of the demonstration. And a boolean that we can check to begin demonstrating. Call your demonstration “PushBlockDemo” and let’s create a new folder called “Demonstrations” to save this demonstration in.

The new "Demonstrations" folder in the project files

Now click the “Record” boolean and play through a couple of episodes to get a good demonstration. Use the WASD keys to move the agent around and push the block into the green

Toggling the "Record" boolean

A gif of me demonstrating the task

Remember how the agent assigns rewards. If you get a goal it’s +5 rewards, using actions subtracts a reward by a small amount. So try and get the block into the goal without using too many actions. Once you’re satisfied with your demonstration, exit play mode, uncheck “Record” (super important, always remember this!), and simply refresh the Demonstrations folder to see your demo.

Refreshing the Demonstration folder

Our demonstration file has appeared!

If you select the demonstration and have a look at the inspector, it’ll tell you how many episodes you played through and how many rewards you amassed.

A looking at how well we demonstrated the task

For this project, I’ve found that a mean reward of over 4.5 is fine but it’s best to try and get as high as possible. And so, with our brand new demonstration ready to be thrown into the neural network, let’s go ahead and tell ML-Agents to use GAIL to train the agent. Open up the “configuration.yaml” file located in the “results” folder.

Locating the Config file in the "results" folder

behaviors:
  PushAgent:
    trainer_type: ppo
    hyperparameters:
      batch_size: 1024
      buffer_size: 10240
      learning_rate: 0.0003
      beta: 0.005
      epsilon: 0.2
      lambd: 0.95
      num_epoch: 3
      learning_rate_schedule: linear
    network_settings:
      normalize: false
      hidden_units: 128
      num_layers: 2
      vis_encode_type: simple
      memory: null
    reward_signals:
      extrinsic:
        gamma: 0.99
        strength: 1.0
    init_path: null
    keep_checkpoints: 5
    checkpoint_interval: 500000
    max_steps: 500000
    time_horizon: 64
    summary_freq: 50000
    threaded: true
    self_play: null
    behavioral_cloning: null
env_settings:
  env_path: null
  env_args: null
  base_port: 5005
  num_envs: 1
  seed: -1
engine_settings:
  width: 84
  height: 84
  quality_level: 5
  time_scale: 20
  target_frame_rate: -1
  capture_frame_rate: 60
  no_graphics: false
parameter_randomization: null
curriculum: null
checkpoint_settings:
  run_id: AIPushAgent
  initialize_from: null
  load_model: false
  resume: false
  force: true
  train_model: false
  inference: false
debug: false

To integrate GAIL into the training process, we need to add these lines under “reward signals”:

reward_signals:
      gail:
        gamma: 0.99
        strength: 1.0
        demo_path: D:\PushBlockAI\Assets\Demonstrations\PushBlockDemo.demo

With the “demo_path” pointing to where your demonstration is stored. Now, since we’re here in the config file, are there any other settings we can tweak to make the agent train better? Let’s have a look at the “hyperparameters.” This config file houses what are called “hyperparameters” which are a special set of parameters that affects the neural network at the most granular level. For example, the “hidden_units” value at line 15 is the number of neurons that are going to be used in the neural network.

The “num_layers” on line 16 are how many layers of neurons we’re going to be using. Obviously, larger values for both of these will result in longer training time but you might need the extra neurons if you’re training a complex agent. Let’s go ahead and more than double the number of neurons to give us a bit more precision.

hidden_units: 256

Having a quick look at the other values, “gamma” on line 21 determines whether the agent should look for immediate rewards or pursue a policy that will gain more rewards in the long run. A lower value results in the former while a higher value (as it is at 0.99) will look for something which gains rewards long-term. “Batch_size” and “Buffer_size”, on lines 5 and 6 respectively, determine how many experiences the agent should use before it updates the policy and continues in gradient descent. We’re going to set this to 128 and 2048 respectively to give us fewer experiences during gradient descent but more when it comes to updating the policy. These must be multiples of each other or else the math doesn’t work out.

There are many more values in this config document but the final one we’re going to be investigating is the “beta” value on line 8. This influences the number of random actions the agent will take. A higher value makes it more random. Let’s set this to 0.005 since the task doesn’t necessarily require much deviation if the agent has found a path that maximizes rewards. Before we save this out, let’s increase the “max_steps” value, on line 27, from 500,000 to 8,000,000 just to give us a bit more space to let the agent train. Also, I had to delete line 51 because of a bug at the time of writing. Save the config file as “PushBlockAIConfig.yaml” to a convenient location (I just chose my Documents folder) and then resume training by punching in this command:

mlagents-learn Documents\PushBlockAIConfig.yaml --run-id=PushBlockAI --force

Make sure to enable all the environments and then hit play.

A gif of the second training attempt with a few more environments added

To get a more detailed view of the training process, open up a new command window and punch in this command:

tensorboard --logdir=results --port=6006

Now, we can go to a web browser and go to “http://localhost:6006/”. This will open up a graph like this:

A view of the training process through Tensorboard

This will give us information about things like mean rewards, episode length, GAIL rewards, etc. It’s a good sign if the rewards have reached 4 to 4.5.

The mean rewards of the second attempt (looks promising!)

We can import the neural network and assign it to our agent.

Dragging the neural net into our project files

Assigning the neural net to the agent

We can hit play and watch the agent automatically push the block into the green area.

A gif of an agent successfully accomplishing the task

Conclusion

And that’s it!  Congratulations on finishing your machine learning agent!

Through this tutorial, we learned a novel method of training our machine learning agents – through the power of demonstration.  Just like how one would show a human, we managed to teach our AI to push a block to a goal purely by performing the act ourselves.

In fact, being able to have so much control over agent training is one of the strengths of Unity ML-Agents. Plus, imitation learning is a much more intuitive way of training an AI. It makes so much more sense to show the agent what to do, rather than hope it figures out what to do. By completing this tutorial, though, you can see just how advanced an AI made with machine learning can be, and we’re sure you can find a multitude of applications for it in your own games!
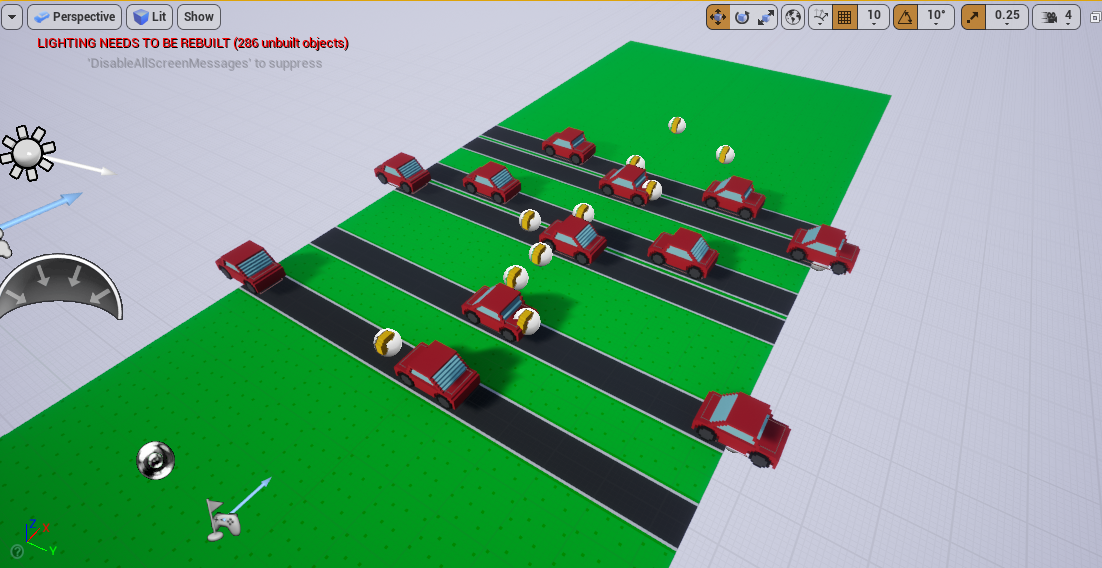
Either way, you’ve got another tool under your belt to…

Keep making great games!
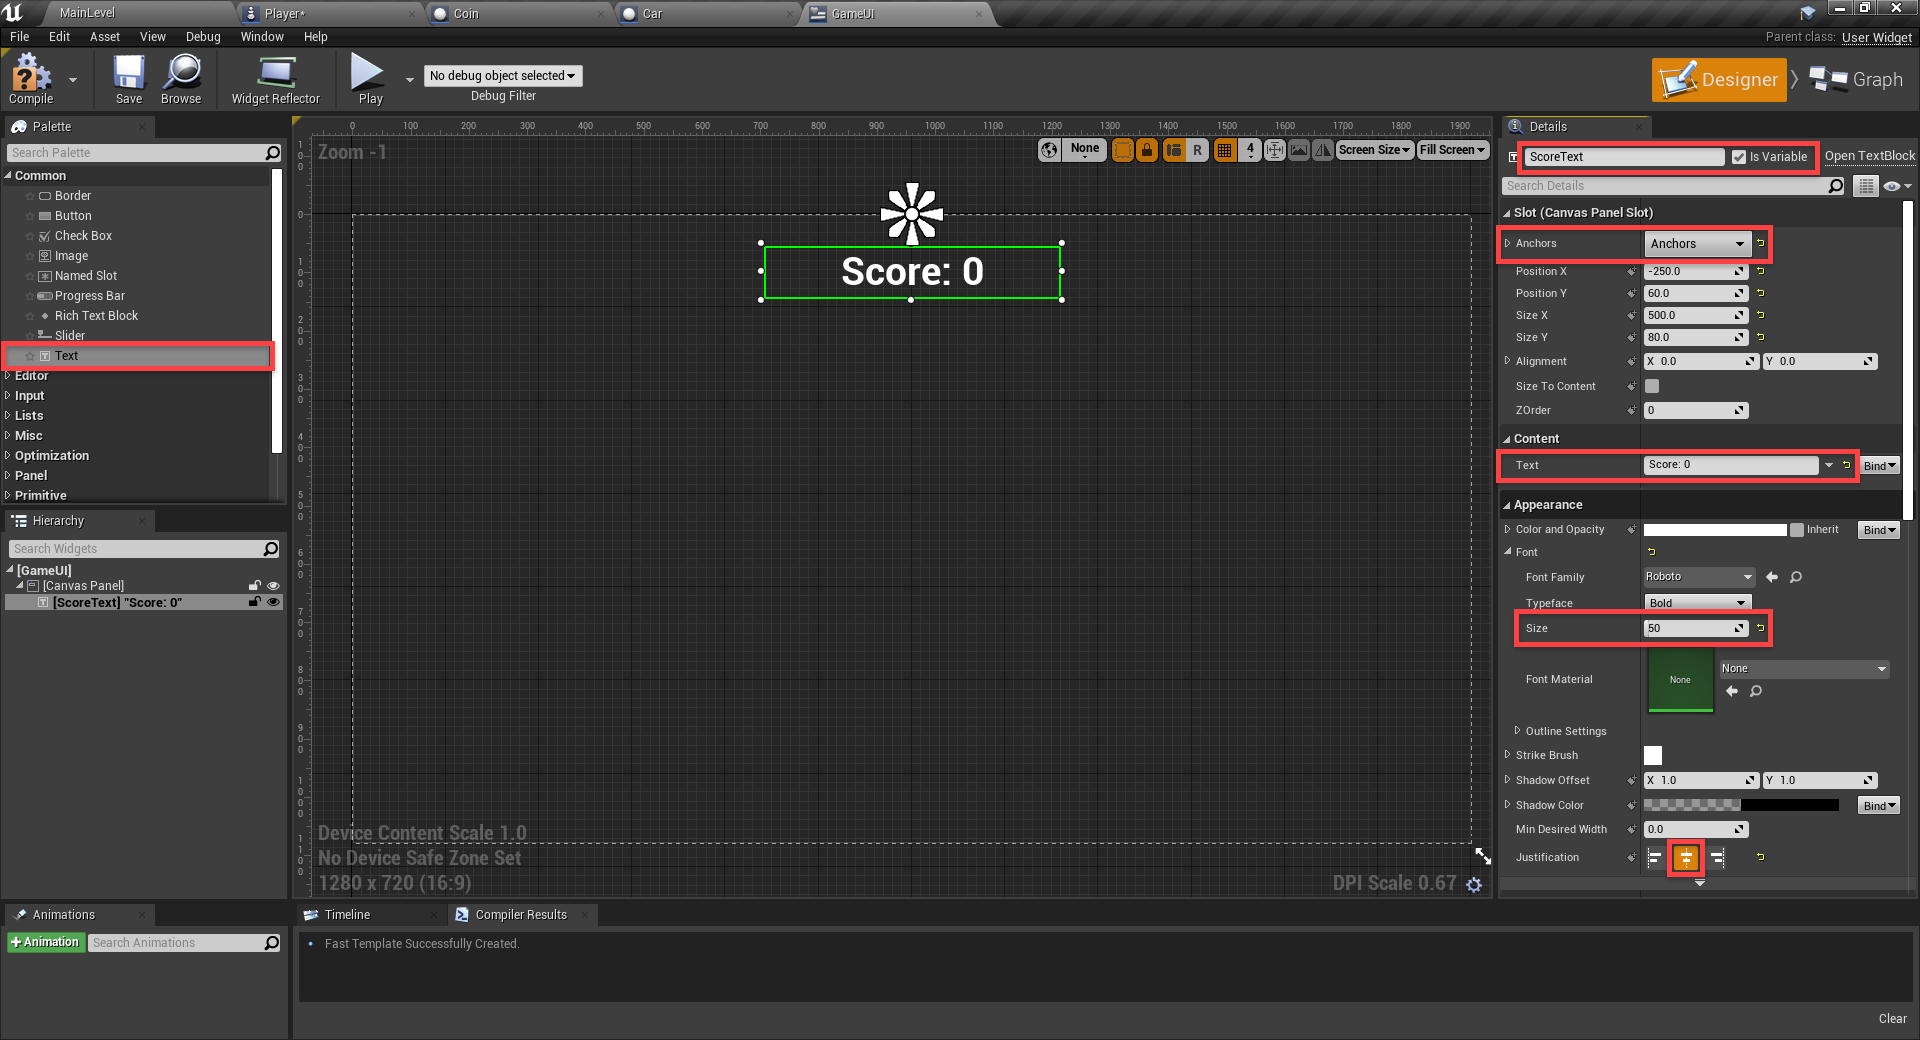

How to Approach Game Narratives

$
0
0

One of the most difficult aspects of game design to get into is narrative design. To be frank, there just aren’t that many jobs for narrative designers in video games compared to adjacent fields like level design, game writing, systems design, tutorial design, and so on. As a result of this, there are limited resources for someone to use when getting into the narrative aspects as it pertains to game design. However, today I will endeavor to fix this and teach you a little something about how to approach game narrative and design great games!
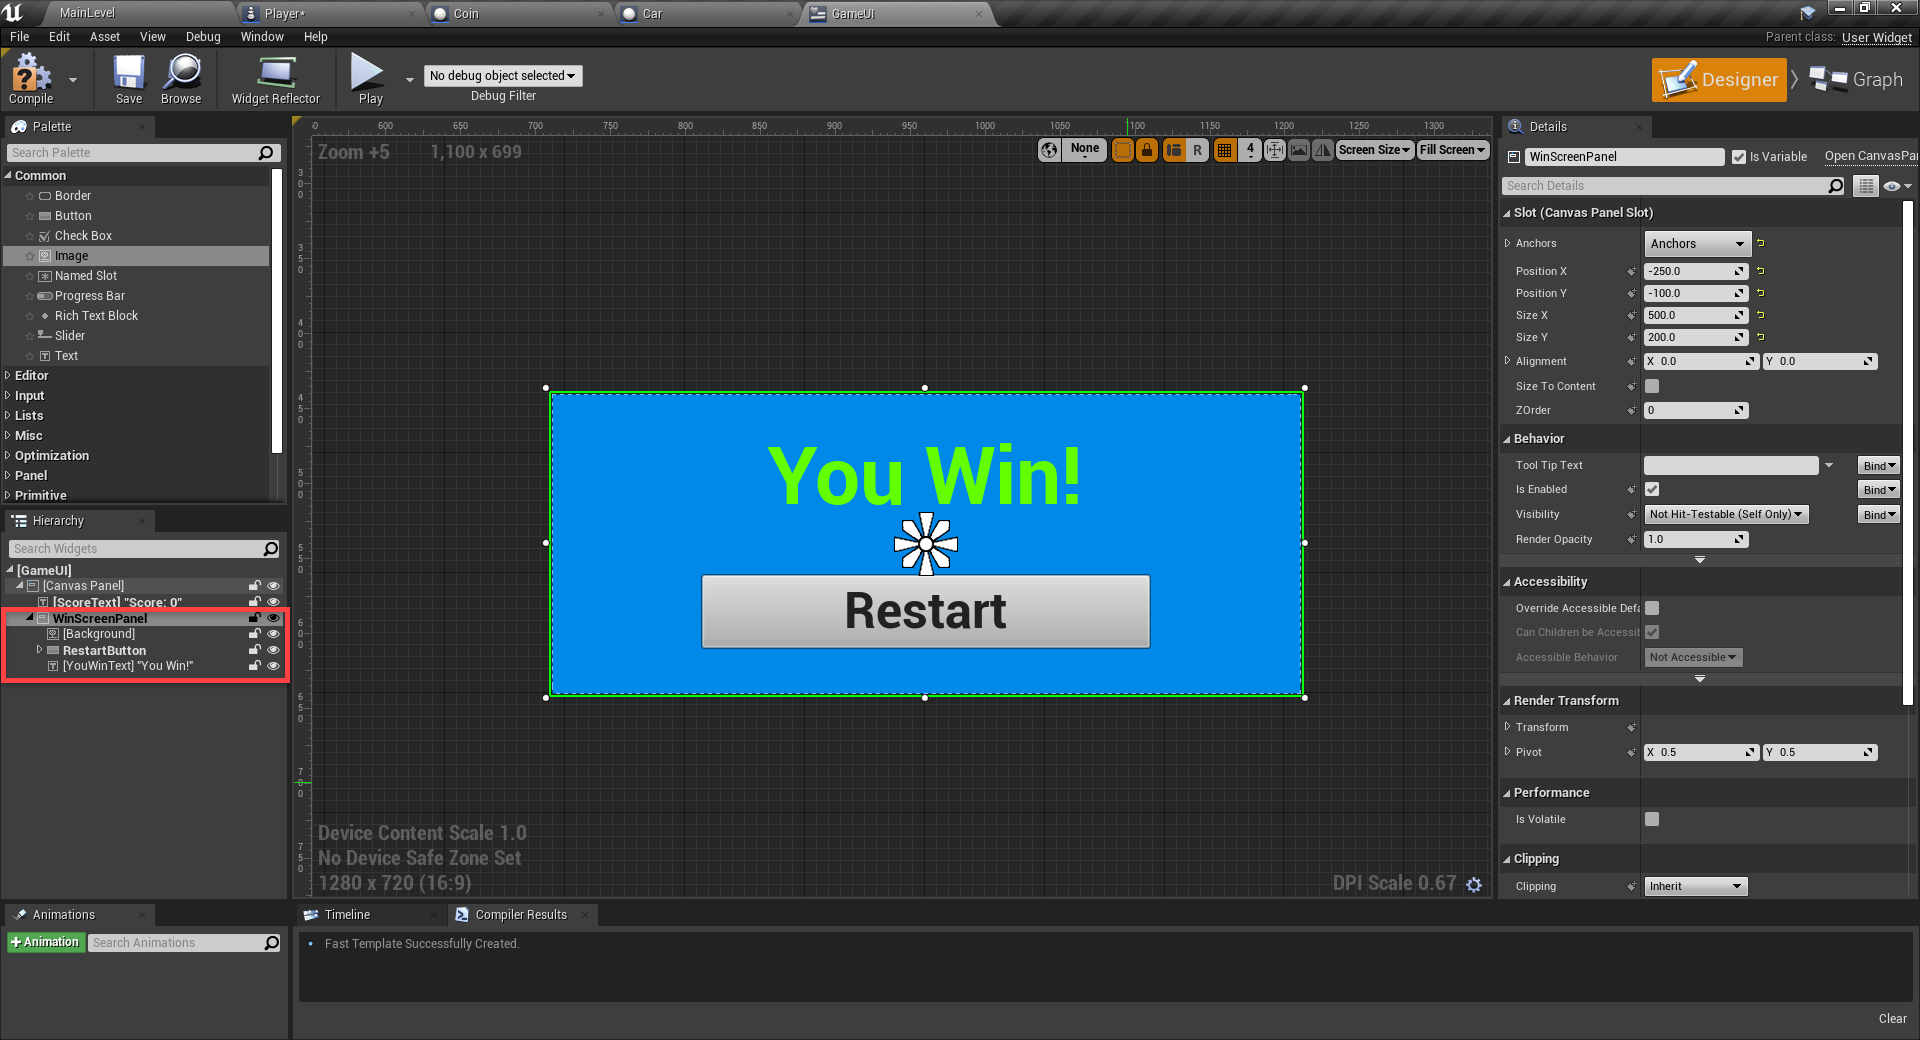
Whether you’re working alone as a game developer or in a small team, game narrative is important to understand. In this guide, we will tackle a few approaches that will help you break into game narrative. If you’re a programmer, rest assured we will also be doing this in a way that won’t require you to have a deep understanding of things like character arcs, symbolism, pacing, or anything else you’d expect to be lectured about in a literature class. Rather, we will focus on three simple things:

  1. Changing the nouns in your game to re-frame the player’s actions.
  2. Changing the verbs that your player is performing without changing the input.
  3. Answering how you can do game narrative in an extremely small game?

If you’re ready, let’s learn about game narrative and game design.

Don't miss out! Offer ends in
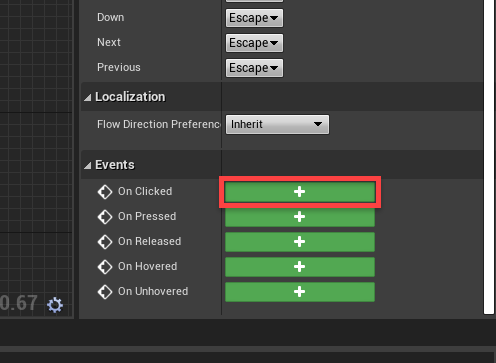
  • Access all 200+ courses
  • New courses added monthly
  • Cancel anytime
  • Certificates of completion

Project Files

To help you along, I’ve provided a Unity project with a few exercises that you can play around with yourself, but it’s not essential that you follow along for yourself. I will walk you through each of them and explain what they’re supposed to teach you. The project was created in Unity Version 2019.2.19f1, so use that for best compatibility. You can download the files here.

Changing Your Nouns

So first let’s tackle the nouns, as this is a good first step for your game narrative design. If you’re following along with the unity project, open up the scene “Changing Your Nouns”.

Location of First Activity Scene in Unity Project Files

If you’ve ever written games documentation, you might be familiar with the concept of an objects and interactions table. If not, well it’s a fairly simple concept. You write down a list of everything in your game, arrange them along both axes of a table, and fill in the intersecting cells with all of the possible interactions those two objects can have. Here’s one I made for a VR project I worked on.

Example Objects and Interactions Table

Generally, if you’re doing objects and interactions this way, you can be specific with the nouns in your game. In this exercise, we want to be as broad as possible so that we can mess with the specifics in simple ways. So first, let’s figure out all of the objects, or nouns, in our game.

Game View of First Activity in Unity Inspector

So this is our game. It’s a simple, top-down perspective shooter. You can move with WASD and shoot square bullets towards the mouse cursor. Enemies will spawn, but not too many, and move towards you until you shoot them away. The nouns at play here are:

  • The Player
  • Enemies
  • Bullets

The “story” is fairly straightforward, because the story as it is is simply the action that the player takes. Player shoots enemy with bullet, or if you want to be more specific, action-dude shoots goblin-thing with bullet. Let’s see if we can find fun ways to mess with them.

Location of Large Sprite Sheet in Unity Project Files

In the project files, you’ll find a whole bunch of sprites courtesy of the wonderful Kenney.nl (a fantastic source for free game assets). We’ll use these to replace the three elements we found, and come up with some new stories.

Image Highlighting Specific Sprite Being Used in Example

If you’ll cast your attention to the character sheet, you’ll see this dog. Personally, I am a big fan of this dog and want to incorporate it into this game. So, let’s go down the list and replace each element one by one with this dog:

  • If you replace the player with a dog, suddenly the tone of the game changes. If it wasn’t comedic before, it is now. You’re a dog marine, fighting relentless waves of goblins.
  • If you replace the enemies with a dog, however, then the game becomes just awful. No one worth knowing wants to play a game about shooting dogs.
  • However, if you want to play a game about shooting dogs, you might replace the bullets with dogs instead and wind up with something like this.

Animated gif of the player character firing hundreds of dogs at the enemy sprites

And I can’t speak to your sensibilities, but a game where I fend off hordes of goblins with unlimited dogs is potentially the best thing ever to me.

So by changing any one of the objects in our game, we’ve completely recontextualized the player’s actions. By swapping out anyone sprite, we’ve made three different games. There are heaps more assets in the project files, so spend a bit of time swapping things around and see what stories you can engineer. The player, enemies, and bullets are all prefab assets, you can change their sprites like so.

Location of prefab assets for first activity, and demonstration of how to change their sprites

Changing Your Verbs

Now let’s talk about changing your verbs for your game narrative. As with changing the things you are interacting with, you can also change the way that the player is interacting with those things in very simple ways. To put this as bluntly as possible: a button prompt that says “press F to talk to” an NPC is going to tell a very different story from a button prompt that says “press F to attack” an NPC.

Similarly, the way the game reacts to player input expands on that story. If you had the NPC react violently to the player talking to them, for instance, then that would indicate something about the character the player just interacted with, and maybe informs the player about how they should interact with them in the future. Likewise, if the NPC reacts passively to the player acting violently.

So, this activity is the simplest of the three. Open up the scene “Changing Your Verbs” and see what we’ve got.

Location of Second Activity Scene in Unity Project Files

The “player” is on the left, and the NPC that will react to the player’s action is on the right. There are two dropdowns wherein you can change what each of them will do when you hit “Run Interaction”.

Game View of Second Activity in Unity Inspector

If you want to add more actions and reactions to either dropdown, you can do so by clicking on the dropdowns in the hierarchy and finding the dropdown component on the game object.

Location of dropdown UI elements in the unity hierarchy, and demonstration of how to ad elements in the inspector

So as before, the exercise is simple. Change the values on the dropdowns, and find a story. The things you want to be considering are:

  • What does the player’s action, unprompted, say about the player character?
  • What does the NPC’s reaction to the player say about them, and more broadly about the world that both they and the player inhabit?

Perhaps the most important consideration is whether or not there is a dissonance between your intended message and the one conveyed by the actions and interactions of your game. For instance, if your intention is for your player to be heroic, but they commit acts of unprompted violence against NPCs, then perhaps you’ve found a dissonant element. At that point perhaps you want to change your game to push the player into behaviors that you consider desirable or lean into the actions your game encourages and change the story to better fit.

These two things don’t need to be as much work as they seem. A lot of the time your game will be built on rather fundamental verbs with a large degree of plasticity. This is where changing your verbs can overlap with changing your nouns, because as with the nouns, if you’re as broad as possible with the application then you can mess with the specifics without having to change anything fundamental.

For instance in a shooting game, rather than thinking of the action the player is taking as “shoot”, you can reframe it as “kill”. So then, if you change what the player is shooting from bullets to tranquilizer darts, you change the action the player takes from “killing” to “subduing”, which can create a very different experience on the player’s end. Then you can add a splash more of changing nouns to have a completely different game – swap the enemy sprites out for dinosaurs for instance and suddenly you have a Jurassic Park game.

Writing Poetry

But suppose you’re like me, and you want to write your game and design your game around that. There are effective ways to write for small games with very limited scope, while also improving your writing skills for larger projects in the future. The one I’ll go over in this section is writing poetry.

Poetry can be long, florid, detailed, and what have you, but if you ask me there is one thing that the medium is extremely good at – more so than any other – and that is conveying emotions, stories, and experiences concisely. Writing poetry is actually incredibly popular as a storytelling mechanism in games precisely because of this fact. It can convey things like mood, tone, emotion, etc. without ever interrupting the flow of the game. As such, many games from the hugest AAA to the tiniest indie project use poetry to supplement their larger narratives.

The reason it works so well is that games are an audiovisual medium, so you don’t have to rely on words alone to convey your narrative. You can juxtapose your poetry with visuals and audio cues to create an atmosphere that none of the above can do on their own, and the player’s identification with all three will be stronger because they are inhabiting the role of the player.

But if the aim of poetry is just to write short things, why am I calling it poetry and not just short-form writing? Well, poetry specifically is good for a few reasons:

  • Poetry literally has rules and being forced to write in a certain way which will make your writing better. Not just in this specific context but in general. Constraints breed creativity, as they say.
  • It also lends itself well to variable interpretation and can be re-framed by something as simple as the color that it is presented alongside – or the time of day – at which it is read. It’s extremely visceral in that way
  • Lastly, poetry doesn’t have to be specific. The great thing about writing in this way is that you don’t have to have a concrete narrative to convey emotion. You’re aiming for texture, mood, atmosphere. Things that will give the player an emotional experience, but not necessarily tell them a story in the conventional sense.

The exercise for writing poetry is a little more pliable than the other two. The scene “Writing Poetry” should give you a nice view of a tabletop with some objects on it.

Location of Last Activity Scene in Unity Project FilesGame View of Last Activity in Unity Inspector

If you press play, you will be treated to a poem of my own creation about the objects I’ve already placed on the table. The activity here is to add your own poetry to the options available, and then mix and match to find different story permutations. You can switch between however many of them there are by changing the “Desired Story” value (remember that lists and arrays start at zero). You don’t have to keep my writing at all if you don’t want. Like I said, this exercise has a lot of leeway for you to experiment.

Location of text fields in unity hierarchy and demonstration of how to ad elements in inspector

There is a folder of assets for you to switch out the objects on the table. They’re all scaled appropriately, you can just drag and drop them on the tabletop. The way that words re-frame objects is a two-way street, and leaving the words the same but changing the objects can in itself be a good exercise for any aspiring narrative designer. Ask yourself, “What if x was y, and how would that change this experience for my players?”

This is not only a helpful tool for just the creative writing part of narrative, it also can help you challenge any assumptions or biases you might have about the way games should be made. There’s no wrong way to do narrative, and these considerations will help you get better at your craft, and enable you to bring more kinds of experiences to the table for more different kinds of people.

Location of model assets for the last activity in unity project files

As for integration into your games, well when it comes to poetry that really can be anything you want. The example provided is incredibly basic, and essentially all that’s needed to retrofit this onto any other type of game is to change what the poetry reacts to. In this game, it’s mouse clicks, but in a first-person game for instance, it could be a reaction to the player standing in a certain place or looking at a certain thing.

Conclusion

And there we have it! Some surefire tips to help you not only improve your game design habits, but also help you take those first crucial steps into game narrative.

The framework that I’ve talked about in this post is similar – yet different – to the MDA framework outlined by LucasArts developer Clint Hocking in his 2011 GDC talk “Dynamics: The State of the Art”. That talk is extremely influential and useful for anyone seeking to work in narrative, so I recommend checking it out yourself (as well as some other useful talks from industry veterans linked below).

Either way, game narrative design is one of the most subjective fields of game design, and it will require different skills for each and every project you work on. As such, the broader your palette of knowledge, the better you will be at it. However, rest assured there are tools to help you along in your journey, and despite the lack of resources, game narrative is something open to everyone!

I hope that you’ve found these approaches novel and helpful. Take this knowledge, and use it to make all of your games the best that they can be!

Resources

Asset Sources

GDC Talks

Narrative Design Tools

To supplement this piece, I also highly recommend checking out How to Improve Game Feel in Three Easy WaysGame feel is super important to game narrative, as representing inputs and reactions to inputs helps build your narrative.

How to Design a Game: Game Design Documents

$
0
0

So, you’ve got your brilliant game idea that you just can’t wait to turn into an actual game. You start searching around on the internet (something you will likely continue to do) and maybe you come across a tutorial about How to Make a Game. In it, you notice this section on “game design” and a reference to this thing called a “Game Design Document” (or GDD).

If you do a bit more searching, you’ll find other developers and designers frequently mention “Game Design Documents” when they talk about the projects they’ve created. Given the number of times a GDD is talked about, you might start to think that a GDD is pretty important when designing a game. However, most of these mentions fail to answer three questions: “What even is a GDD, how do I make one, and why does it matter to game design?”

If you’re asking yourself these questions, I have good news for you! You’re not only starting your project in the best way possible, but you’re also in the right place when it comes to answering those questions.

This tutorial is my “Magna Carta” of game design. Throughout, we’re going to be taking that idea in your head and work through designing it via a GDD. We’re going to be taking the raw ore of your idea and putting it on the anvil to hammer out its form (borrowing a figure from the world of metalworking). A Game Design Document is, in my opinion, the biggest step you will take to making your dream game come true.

And so, with all that said, let’s get into the specifics of what a GDD is and what it is not.

Planing on a dry erase board

All About the Game Design Document

What is a Game Design Document?

I can give you the material and formal definitions of a GDD. What a GDD is physically is usually a document consisting of your game’s description. What it could look like is a 3-ring binder with 20 or so pages, or it could just be 8-10 pages in a spiral notebook. The physical characteristics (i.e. number of pages, page length, even page size) will be different for different projects.

What will not be different is the “formal” characteristics of a GDD (i.e. What a GDD is meant to communicate). A GDD is supposed to communicate the “big ideas” of your game. What the essence of your game is. One way of thinking about it is, “What sets your game apart?” It is important to think this way for two reasons, the first is it encourages you to be unique and creative. If you have an idea for a game and you just think, “Well it’s going to be exactly like Mario Brothers,” then you probably should think about it more. Players are not going to like exact copies of another game. There are some exceptions to that statement but as a general rule, it’s accurate.

Secondly, thinking like this will help you determine what you should put in your GDD. Answering, “What is unique about my game?” will help you figure out what characteristics you should emphasize or what you can leave out. When I first started making games, I quickly realized that projects with a GDD tended to be more polished than ones where I just jumped straight into coding.

What a Game Design Document does cover

So that’s what a GDD is, but let’s get more specific than that. What specifically does a Game Design Document Cover? The best Game Design Documents answer these four questions:

  1. What is/are the mechanics?
  2. Who is the player?
  3. What is the story/point?
  4. What will it look like?

If you can answer these questions and compile them into a single document, you will be well on your way to making your game a reality. Also, please note that this is a list, not an order. The order in which the answers to these questions appear in your GDD is something you can decide once you’ve already thought it through. However, I would encourage you to think about it in this order for reasons we’ll get to later.

But having seen what a GDD is about, let’s look at what it is not about.

What a Game Design Document does not cover

This is almost as important as knowing what it does cover. If you continue to make games (as I sure hope you will), you’ll likely have family or friends “pitch” you an idea for a game. Usually, they will tell you their idea without having thought about it from the perspective of a developer. I’ve had friends tell me about their game idea and then launch into a long and detailed explanation of the game’s story or a description of what the player will look like. This is important to think about but it’s not going to help you draft a GDD or make it anything more than just an idea. Therefore, let’s look at what a GDD is not.

  • A GDD is not an exhaustive story or “script”

A GDD is not a place where you do your world-building. This should be a separate document for two reasons. The first is that this is usually very long and needs to be written much like a movie script. While it is a good idea to include your game’s complete storyline, the exhaustive story should be done separately. You are writing a game design document, not a novel. Therefore, it’s important to only include the portions of the story that affect the design of the game.

Secondly, the game’s complex story, with all its intricacies and backstories, is not the big question you need to answer at the moment. If you’re going for a game with expansive lore, then there will be a time when the story should be described in detail. But when it comes to drafting a game design document, the focus is the other things about your game that will make it fun.

  • A GDD is not set in stone

Do not worry about getting everything right first go. Feel free to modify and change this thing if you feel it is necessary. In fact, it’s bad practice to not have some sort of fluidity attached to your GDD. Lots of things happen during development that can necessitate a change in your GDD.

  • A GDD should not contain entire programming scripts

This one is a bit obvious but it’s important for programming nerds (like myself) to understand. Don’t copy-paste a script into the GDD. Leave it in your proof of concept, it’s fine there.

Now that we’ve seen what a GDD is in broad strokes, let’s get into the details about your game’s design and how you can put that into your GDD.

Getting ready to work on the computer

What are the Mechanics?

By putting this first, I’m deviating a bit from conventional game design wisdom. Most GDD guides say to include other things like characters or story elements first. But I’ve found that thinking about the mechanics first is extremely important for one big reason, it answers the two important questions, “Is this even possible, and is this even fun?”

Maybe I’m a bit biased but I am a huge fan of games that have one incredibly interesting mechanic rather than a deep and moving story. Memorable mechanics are one of the reasons we’re still playing games like Asteroids, Pac-man, and even Pong.

A Retro game being played

This is why I think it is important, especially for indie developers who don’t have a lot of resources at their disposal, to consider the integral mechanics going into your game.

Here’s an example from one of my projects. I had this idea for a 2D platformer where the only way you could kill enemies was by picking up a block and throwing it to deal damage. No weapons, no magical powers, just this block, and a throwing ability. The player could also manipulate some physics and do a couple of other things but that was the main idea.

Now, on paper, it sounds like a great idea. Whenever I would talk to people about it, they’d say, “That sounds awesome!” I had an idea for a core mechanic and it sounded interesting. But when I created a prototype of the mechanic, it was obvious this would kill the game. It was slow, clunky, and not an ideal combat system in any respect. By thinking about mechanics first, I was able to determine that, yes, this was possible but that it also wasn’t extremely fun.

The unfortunate mechanics of my game

With that said, let’s get into the nitty-gritty of the “Mechanics” section of your GDD.

What even are “mechanics”?

This is an excellent question we need to think about before we can start doing anything with our game. The textbook definition of game mechanics is that they are: ” [a] construct of methods or rules designed for the player to interact with” [Beginners Guide to Game Mechanics, gamedesigning.org]. An example would be the “shooting” mechanic in Asteroids and the way the asteroids break up. The player presses a key and the space ship shoots (this is the method). A large asteroid breaks up into smaller asteroids when shot (this is the rule).

A mechanic can be as simple as “Press E to open the door” or it can be as complicated as a crafting tree (like in Minecraft or Terraria). Another way of thinking about it is “how does the player accomplish the game objective?” If you answered, “By killing enemies in the dungeon”, that’s your mechanic. If you answered, “by swimming around to find resources to craft items,” that’s your mechanic (two mechanics in that case; swimming and crafting).

A shooting mechanic in a first person shooter

This way, projects that are heavily mechanics focused will have a GDD developed in areas where it matters most (i.e. the mechanic’s section). If a project is more story-focused, then the mechanic’s portion of the GDD can be completed relatively quickly.

Coming up with a “proof of concept”

This is basically where you build a prototype of your mechanic. I use the term “proof of concept” in its most general sense. For mechanics in your game, you need a “proof” that this “concept” will work. This is especially important if the mechanic is unique or new. In fact, only do a proof of concept for mechanics that need it. You don’t need to spend time working on a health bar mechanic if all that the health bar does is increase or decrease. You don’t need to prove that “Press E to open the door” is possible. Keep your efforts in this section to the most difficult and obfuscated mechanics your game needs. Also, please do not make it complicated when it comes to graphics or setup. My 2D platformer looked like this in its prototyping stage:

The ugly graphics prototype of my mechanic

It should be so simple that you can sit someone down, hit play, and say, “This is what our combat system will be like,” or “This is how the player is going to swim,” or “This is how the player can craft items.” The point of this section is to make the programming part of your game’s development quicker. If you can do the hard work of coming up with your mechanics, you can focus on the other parts of the game when it comes to full-on production.

Talking about mechanics in your GDD

So you’ve created your “proof of concept” and you conclude, after testing it thoroughly, that this is indeed what your game needs. Or let’s even say that your game has some simpler mechanics like door-opening or dynamic day-night cycles (I guess the latter can vary in simplicity), how should you put this in your GDD? As always in a GDD, formats are fluid rather than rigid but a general format should look something like this:

  1. A Quick Description of the Mechanic [e.g. “Blocks can be picked up and thrown to deal damage”]
  2. A Quick Description of how it’s going to be implemented [e.g. “The player uses this to defeat enemies”]
  3. A way to access your proof of concept

The third step is important if you’ve got a team of people working on it with you. If you’re working on a digital GDD (like a Google Doc or slide presentation), then you can simply add a link to a Github or a Google Drive. The specifics of how you do this isn’t important. The important part of this entire section is that you know what mechanics are going into your game. Having this nailed down will help you in answering the next question.

Who is the player?

A player character in a scene

Since I’ve stressed the mechanics part of your game, we need to jump to the next logical step and talk about how those mechanics affect your player. What is the player going to be doing in your game? This is where you can talk about the story, placement, and characteristics the player has. You can do this in whatever format makes sense for your project. Usually, a short paragraph makes the most sense. An example from a survival game would be something like this:

“The player is a scientist who crash-landed on a watery planet. The player must swim around the environment to locate resources necessary for survival and escape. The player must also fend off hostile aquatic aliens if they hope to survive. By crafting items, the player can build vehicles, tools, and housing.”

This will give some helpful context to your player.  Please note that while we are talking about the story, we aren’t laying it out fully at the moment. We just need to highlight some portions of the story to better describe the player. The full story progression will be addressed later on in this tutorial. This short description will serve as a sort of introduction to the other things about the player. First of which being the abilities required of the player when they play your game.

What are the player’s abilities?

We need a list of all the abilities the player has. As close to comprehensive as possible. Going back to our example from the survival game, a list of abilities might look like this:

  • Swimming with WASD and mouselook
  • Item pickup
  • Inventory management
  • Item crafting
  • Object scanning

By hitting as many points as possible, it goes into much more depth than the description we wrote earlier. And there are two reasons this is important. The first is that it will tell you what level of proficiency is required to play your game. Given the above example, I’d say only very young children wouldn’t be able to play this game (i.e. it has a broad possible audience). The second reason is it will reveal whether or not there is a possibility for imbalance. Imbalance usually crops up when the player has the ability to make a wide range of choices either from characters or items. And it just so happens that imbalance is the topic we’re going to talk about next.

Balancing your game

Grabbing items in a level

Balancing a game is a huge topic so we’re obviously not going to cover everything in this short little section. However, there are some important guidelines we can look at when it comes to writing your GDD.

First off, realize that certain genres require more balance. By looking at our player description and realizing what sort of genre that falls into (i.e. survival games), we can determine that most of the balancing will take place in level creation.

Secondly, realize that balancing a game can be an ongoing chore rather than a one-time event in your development. In a survival game, you as the dev have the ability to tweak everything until it’s perfectly balanced. However, for online games with many players (the most obvious example being online shooter games), balancing is going to be a bit more nuanced. If you play Counter-Strike: Global Offensive, you’re likely familiar with all the balancing the devs have done throughout the game’s history. In fact, most of these guidelines are going to be targeted for that sort of game genre. So let’s have a look at how we might improve the balance of that sort of game.

#1 Look for complementation not cancelation

If you’re the dev of a shooter game and you notice that one gun has four-times more kills than any others, your immediate reaction might be to tweak some parameters on that gun to make it less powerful. This may be necessary for some situations but as a general rule, it’s much better to tweak another weapon to match the strength of that weapon.

For example, if the over-powered gun is a shotgun that instantly kills when close to the enemy, you might consider giving a bit more strength to the sniper rifles that work better with long distances. This is a more ideal situation that leaves players saying, “The shotgun is good for some situations and the sniper is good for others.” The technical terms are “nerfing” and “buffing” and what I’m encouraging is to buff rather than nerf. Obviously, this is a guideline and not a rule.

There are situations when it is better to nerf. The Counter-Strike devs decided to nerf the SG 556 (also known as the “Krieg”) in April of 2020 because it was quite obviously overpowered. However, they didn’t nerf it to be equal, rather, they nerfed it on only a few parameters (like fire rate and short-range accuracy) while buffing another gun on the opposing team (the Counter-Terrorist AUG). This shows that complementation is still much better than cancelation and buffing is better than nerfing.

#2 Use math and then don’t

When approaching a balancing problem, it might be tempting to come up with some sort of mathematical formula that guarantees a balanced game. This is a good idea when you’re drafting your GDD to have some sort of idea as to how you’re going to balance your game. If you write out your player’s abilities and find that your player can pick from a catalog of weapons or characters, you’re going to need to know how to balance everything. But the danger of this is that your game-play isn’t fun anymore. A set of characters or items may be mathematically balanced, but that can take the fun out of a game. Rob Pardo, the former Chief Creative Officer at Blizzard Entertainment, talked about the effects “mathing everything” can have on your game:

“..often times […] I have more junior deisgners that are more analytical and very math based [who] get very scared of too powerful abilities or too powerful of units. And they want to spread sheet everything down and they want to do a nuanced kind of balance. ‘What if we just increase their damage by one or increase their damage by two?’ Well why don’t you just increase it by 10 and then look at [the opposite team and see] about increasing their armor by more?…Celebrate the big differences between units because otherwise you’re going to end up with an army game […] where everything kinda feels the same…and you can high five each other and say it’s balanced but is it fun? Probably not.” (“Making a Standard: Blizzard Design Philosophies”, GDC 2010)

In other words, a mathematically balanced game isn’t as important as a fun game.

What is the story?

A cut scene of a serene lake view

Now that you’ve got a good idea of what the player is supposed to be, you are ready to place the player into the larger narrative. Here is where your bright fantasy world or cold survival story comes to life. Keep in mind who is going to be reading your GDD. Other developers or artists are going to be reading it. This means you don’t have to write a novel but more like a synopsis. It should contain details about the setting, theme, and actors in your game. The exact format is, as with everything in the GDD, not as important as getting the information from your head onto paper.

Also, please note that this section is one that can and should be expanded and changed. Story-telling is complicated and so don’t worry about writing a triple-A story the first go. In fact, please take your time with this section especially if your game is story focused. That being said, here are some helpful tips to guide you along as you think about crafting your game’s narrative.

Who are the actors?

Who is taking part in the story? What are their motivations? Are they allies, enemies, or NPCs? Familiarize your dev or artist team (i.e. the people who are going to be reading the GDD) with these characters. Describe their place in the story and how the player will interact with them. Consider working out the story behind your enemies as well. This a classic way to add depth to your story. Think about adding a motivation as to why they’re against the player. Lots of storytelling opportunities can be found by using this approach.

Where does your game take place?

Is it an aquatic alien planet? Is it a wooded forest? Is it a post-apocalyptic world torn apart by nuclear war? Think about some of these things and even include some sketches if you think it’s necessary. This will help you describe the overall theme of your game and what sort of artistic skills are going to be needed.

How does the story progress?

Basically, a list of all the events that will happen to your player. This way you can tell what emotion should be felt at that moment. If the player defeats an enemy, it should be a feeling of triumph and victory. If a player watches their home get destroyed, it should be one of grief. These are things that may be obvious to you as you’re planning this but are a bit less obvious to whoever is working on the game with you. Placing the correct emotion at the correct moment is key to good storytelling.

What is the goal?

What is your player trying to do? Is it to rescue a princess? Reach a destination? It’s also important to think about this if you’re using a level system. What is it going to take to defeat a level? This is also important to make clear even if you’re not going to have a story-based game. A simple explanation of the goals your player must accomplish to beat the level and/or the game.

Drawing the story on a dry erase board

What will the game look like?

This is your concept art section. This, at least in my experience, is a really important section for capturing those most memorable moments in your game. And if you’re anything like me, a visual image solidifies everything I’ve read about on paper. A description of the character or the landscape is useful but an image of it is invaluable.

Getting good concept art can take your GDD from, “Okay I can kind of see what this game will be like,” to, “Ah, now I know exactly what this game is about.” The visual portion of your game is what users are going to be greeted with the most. It’s worth taking the time to plan out your game’s visual aesthetic. Also, another important part about this section is being able to draw menus and UI as well. It is a good idea to plan your UI along with your concept-art. Drawing what the buttons look like and where they will appear on the screen is a designing trick I’ve found very helpful. Otherwise, you’ll end up dropping a UI that doesn’t integrate into the game at all.

An example of landscape concept art

Some concluding remarks

Video game design is one of the most unexplored forms of digital art. Many skills mesh together with so many different combinations that it’s really unfathomable. However, it’s quite exciting to think about all the possibilities when it comes to designing and building a video game.

I hope by reading through this guide, any questions you have had about game design have been answered and you feel more confident about designing your game. Remember, designing games is not an exact science, and while there are guidelines, much of designing a game is up to your own creativity. Nevertheless, with the help of Game Design Documents, the process can be a lot more accessible and put you on the right train of thought.

I hope you use this brief guide to draft your Game Design Document, launch your unique video game, and…

Keep making great games!
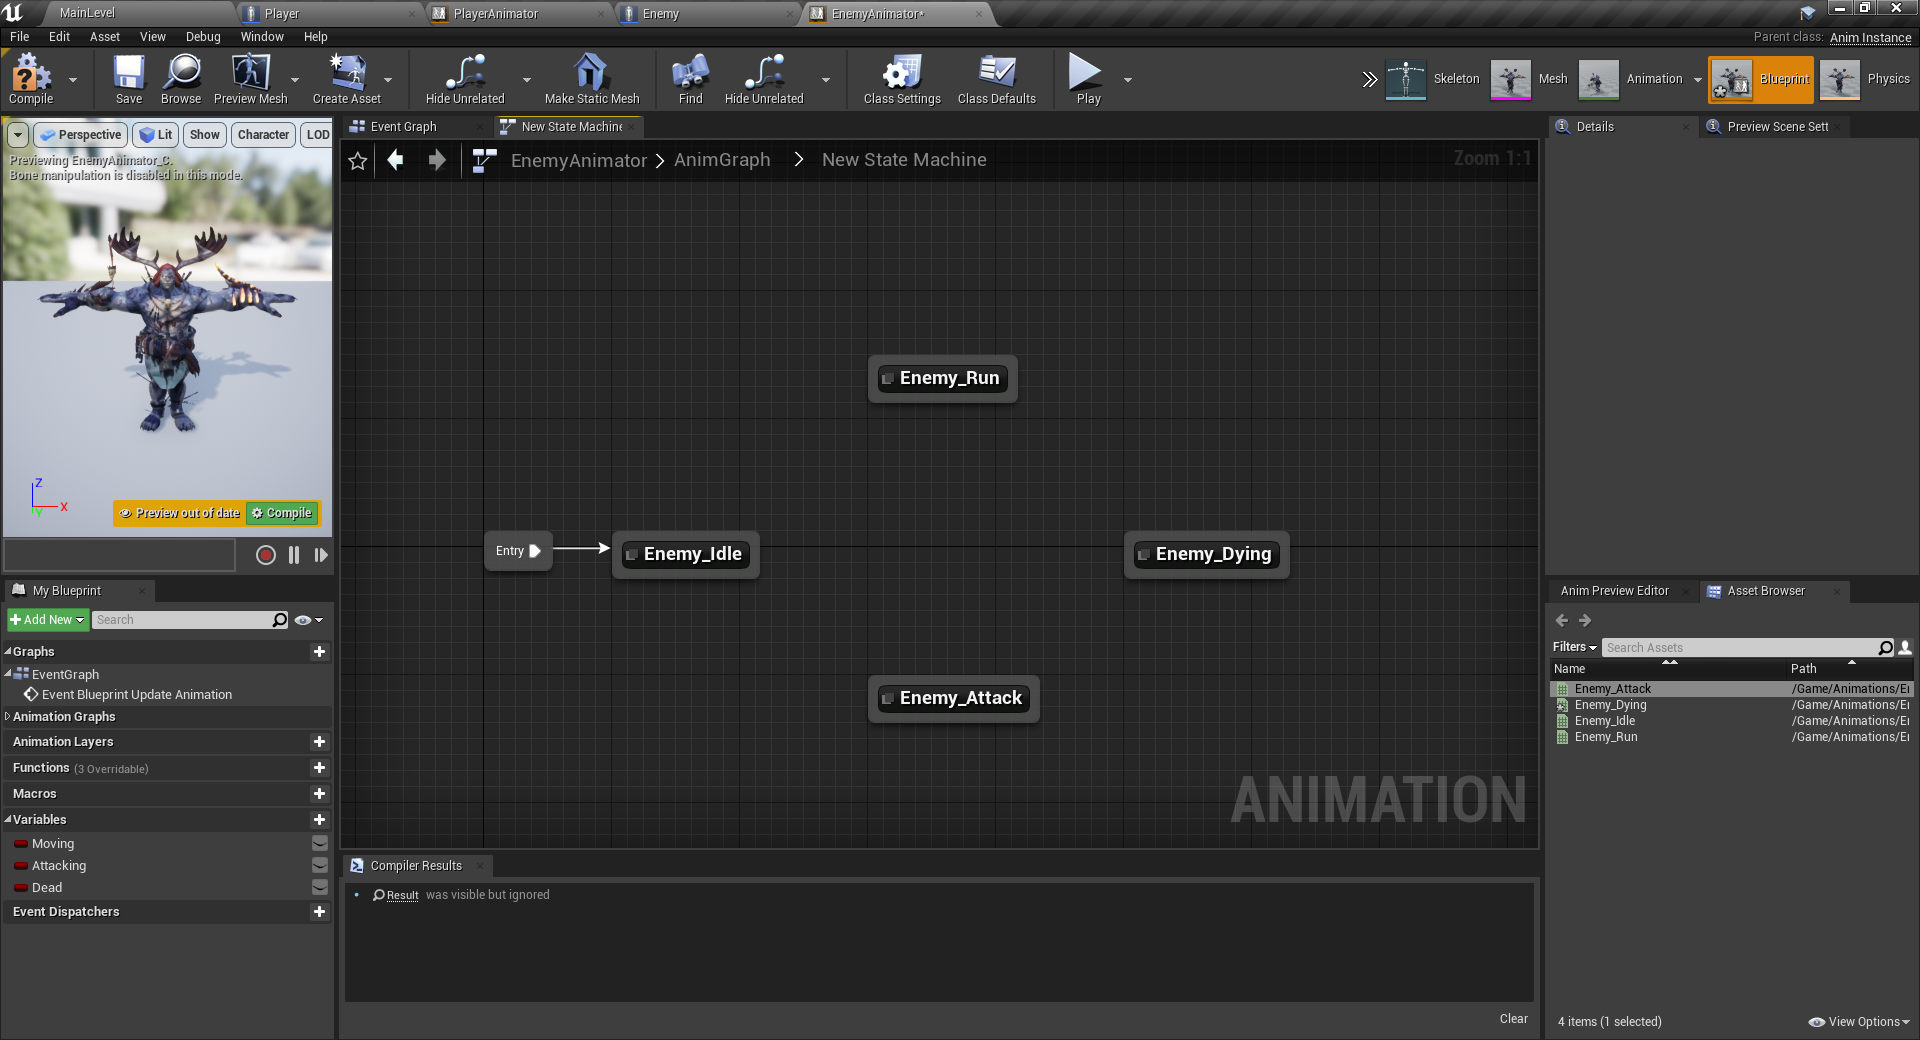
Don't miss out! Offer ends in
  • Access all 200+ courses
  • New courses added monthly
  • Cancel anytime
  • Certificates of completion

Unreal Engine Blueprints Tutorials – Complete Guide

$
0
0

The Unreal Engine, is a game engine which is accessible to both triple-A game developers and beginners. When creating a complex and large scale game, you’d most likely use Unreal’s built in C++ support to have deep-rooted control over the engine’s systems. Although for a beginner, programming can be seen as a daunting task, especially if they also need to learn the engine. That’s where blueprints come in handy. Blueprints, is Unreal Engine’s visual scripting system.

What is Visual Scripting?

Visual scripting is where you can create logic for your game (just like programming) but in a visual form. In Unreal, blueprints use nodes connected to each other. These nodes can be events (i.e. whenever you press the space bar), actions (i.e. move the player here), conditions (i.e. is this equal to this?), etc. Nodes can also have inputs and outputs. You give a node some input values, it will calculate what it needs then return some outputs for you to use.

Example of flow control with Unreal blueprints.

One import concept of blueprints is flow control. In programming, the code is read from the top down, computing everything along the way. It’s the same with blueprints, although we can guide the progression of flow. Nodes can have an input, output, or both for the flow to pass through. In the image below, you’ll see that we have a number of different nodes, connected by white lines. These white lines control the flow and tell the compiler which nodes to trigger next. Think of this as electricity, and the white lines are powering nodes along its path.

You’ll see that some nodes also have these colored connectors on the left/right. These are the input and output values. Nodes can take in data to use, such as with the DestroyActor node. This node takes in a Target and destroys that object. Some nodes also have both inputs and outputs. It takes in some values, uses those to calculate something, then outputs a result.

A number of nodes connected in Unreal Engine's blueprint system.

You can connect a large number of these nodes together, setup loops, functions, and events just like you would in a programming language.

Here’s another example blueprint. When we press the space bar (triggers the Space Bar node), we’re moving ourselves up in the air. Then the Delay node will hold the flow for 1 second and after that, move us back down.

Event Graph preview from Unreal Engine

There are many online resources to learn Unreal Engine and the blueprint system. With diverse documentation and video tutorials, Unreal sets up their developers with many avenues to learn the engine.

Blueprints vs Programming

In Unreal, we have the choice between using blueprints and C++ programming, but which should you use? When starting out with the engine, using blueprints can be a great way of getting into game development without needing to learn programming. Although if you ever wish to create a more complex/large scale game or intend to work in the industry, learning to program may be the next step.

If there’s something you want to create in Unreal, then most likely it can be done using blueprints. Player controllers, AI enemies, cars, etc. The blueprint system is quite powerful and boasts a large number of nodes for you to use. What you can create is only limited by what you don’t know, so I recommend you just play around with the engine and try creating some blueprints of your own. A great way to get started would be to look at the template projects that come with Unreal. There are a number of different games, each with their own systems – all created with blueprints!
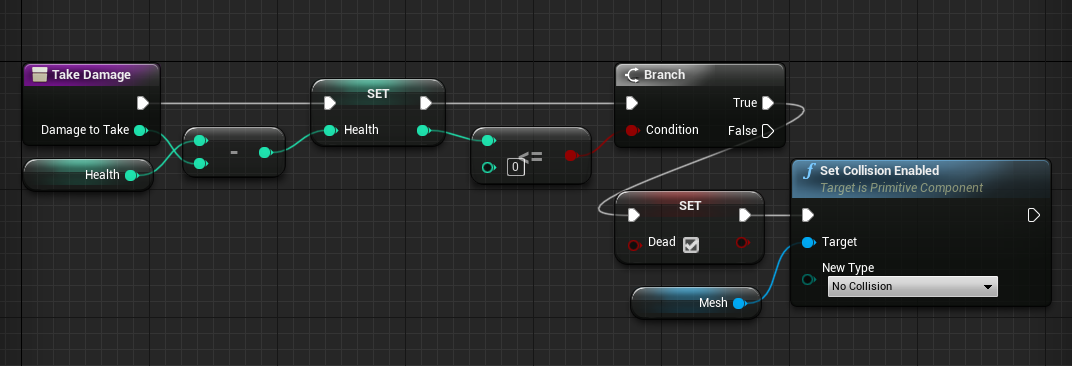
Links

Tutorials

Hopefully these links help you get on track with your Unreal Engine projects. However, if it’s your first time diving into game development, we recommend checking out our tutorial on making a game in general.

Don't miss out! Offer ends in
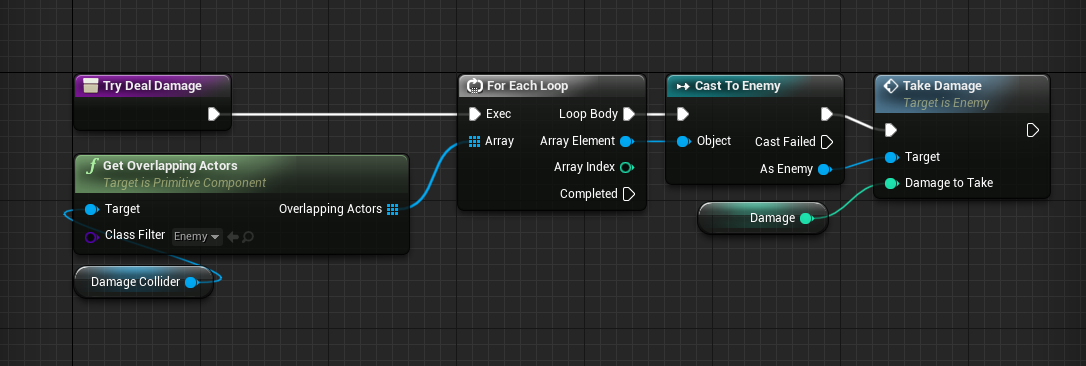
  • Access all 200+ courses
  • New courses added monthly
  • Cancel anytime
  • Certificates of completion

Unity Device Simulator Tutorials – Complete Guide

$
0
0

The Device Simulator is a package for Unity which can display your game on a number of different devices. This is so when you’re developing your game, you can see how it looks on mobile devices, consoles, and various other devices. The default Unity game window already has the ability to change the resolution and aspect ratio, but not all devices are an exact rectangle. Some have curved edges, notches, and other screen designs which may get in the way of UI or important game details.

Here’s an overview of the device simulator as written in Unity’s official blog post. The package features:

  • An extended Game View, which allows you to turn Simulation Mode on and off and to select devices
  • An extensible device database that stores the device and phone configurations and characteristics that will drive API shims’ return values
  • API shims that return device-specific API’s results (screen resolution, device model, orientation, etc.) when used in Editor Play Mode

Each device also has a safe area defined (which you can modify) and this shows the bounds of where your UI will fit. This especially helps when developing mobile apps, as notches and beveled edges are becoming more commonplace.

device simulator safe area

Links

Tutorials

Other New Unity Features

Don't miss out! Offer ends in
  • Access all 200+ courses
  • New courses added monthly
  • Cancel anytime
  • Certificates of completion

Godot 4.0 Tutorials – Complete Guide

$
0
0

Godot 4.0 is the next major update for the Godot game engine. In January 2018, Godot 3.0 was released which introduced many new features such as a new rendering engine and improved asset pipelines. With the release of Godot 4.0 being aimed for mid-2020, similar major advancements are to be expected.

Vulkan Rendering Engine

One of the major features for 4.0, is the Vulkan rendering engine. It was introduced to the master branch of the engine back in February, although OpenGL ES 3.0 is still supported. Godot 4.0 will feature full implementation of the Vulkan engine. So why make the change? Well right now Godot is using OpenGL which is supported on many platforms, but as tech is moving forward compatibility becomes much less of an issue. Vulkan is also much more “lower-level” than OpenGL, allowing it to perform better and faster.

Core Engine Improvements

Godot 4.0 is also going to feature some major updates to the core of the engine. With an update like this, it’s given the developers an opportunity to make these much-needed changes. Here’s a few things we can expect:

  • Support for multiple windows
  • General cleanup of the API
  • Renaming of nodes and servers

Godot multiple windows.

New Lightmapper

Godot’s new lightmapper for 4.0 is so much of an improvement, that the devs are going to back-port it to Godot 3.2 as well. Lightmapping is pre-calculating the light for a game scene. This provides the benefit of having realistic lighting at a low computational cost. Here’s how the new lightmapper improves upon the older one while also making the experience easier for you as a developer.

  • GPU based – allowing for faster bake times
  • Easy to use – minimal number of parameters
  • Lightprobes
  • Automatic UV unwrapping

Conclusion

To sum it all up, the aim of Godot 4.0 is not necessarily to introduce a large number of new features, but to improve upon the rendering and engine performance in order to bring it up to the same level as other game engines out there.

Links

Godot Blog Posts

Videos

Older Godot Tutorials

Don't miss out! Offer ends in
  • Access all 200+ courses
  • New courses added monthly
  • Cancel anytime
  • Certificates of completion

Viewing all 1620 articles
Browse latest View live