Imagine this, you’ve just gotten a puzzle for Christmas. You don’t read the writing on the box and just toss it aside as you begin to construct this masterpiece. You pride your self on the fact that you’re almost done and it only took about 40 minutes. You get up to take a better look at your completed puzzle only to find out that it is not completed! How do you know this? Because it is a three-piece puzzle but you only have two pieces. You need to find the third piece.
In this tutorial, that is what we are doing, finding the last piece in a three-part puzzle. More specifically, we will be making our game mobile compatible and optimizing it as such. We will be adding a sort of scoring system, and we also will get a bonus section on how to make shattered glass. Let’s get started!
Check out the other tutorials in this series!
This is the final part in a three-part tutorial series on Game Dev Academy. Check out the other tutorials here:
Since we are going to be building a mobile game, we need some hardware i.e., a mobile device; more specifically, a device that you can build to directly from Unity. This is because we are going to be doing a lot of testing, testing things that will only run on a mobile device. If you don’t have a device that you can build to directly, I suggest that you get one. They’re actually really inexpensive. I just use an Amazon Fire Tablet which is about $50 (usually less when you can get them on sale). Seriously, it is a very helpful asset. So, grab your favourite “build-to” device and let’s start building!
Save the executable!
At this point, if you like your game the way it currently is, build it to the desktop as an executable. We’re going to be changing lots of different things that are going to make this game unplayable on a desktop computer. If you’d like, you could make a copy of the project folder. That way you’d always have a backup desktop version. It’s up to you. Once you’re done, say goodbye to all desktop related parts of your game as we begin to convert this to mobile.
Converting it to Mobile
Building it in the current state
Let’s just go ahead and build to our device to see what actually needs to be done. I am using the Android platform so I’ll just go ahead and switch the platform.
This took a really long time, probably because of the sample scene which has a lot of complex shaders.
Now, we need to “Add Open Scenes” to the “Scenes in Build”, uncheck the sample scene since we aren’t using it and it will only be using up space on our device.
For Android, I had to supply a Bundle Identifier before I could build it, go ahead and do this if you haven’t already.
Alright! With your device connected and recognized, let’s hit Build and Run to see what it looks like.
Right off the bat, it seems to be running fine. We can spawn balls on touch and interact with our UI. But when we try and use more that one finger to spawn balls, i.e spawn two balls by tapping with two fingers, it only spawns one in between our two fingers.
Also, my device was suffering from a lot of lag, this may not be the case with your’s but I think it is worth addressing. Let’s start by fixing the performance issues.
Fixing the performance issues
The reason we are doing this first is that it makes easier to fix the spawning balls issue when we don’t have any lag. As for performance, there are a few things that we can do: First, and most effective, was having a collider that deletes any glass that goes out of the view of the camera. Think about, we can’t see the shards but Unity is still doing Rigidbody calculations. This is extremely taxing so let’s fix this. Click on your Main Camera and create a cube that is large enough to cover all of the ground.
Then disable the Mesh Renderer and set the Collider to trigger. Next, we need to create a new script on this object called “CullObjectManager”.
This is the code for the script:
using System.Collections;
using System.Collections.Generic;
using UnityEngine;

public class CullObjectManager : MonoBehaviour {

	// Use this for initialization
	void Start () {

	}

	// Update is called once per frame
	void Update () {

	}
    private void OnTriggerEnter(Collider other)
    {
        if (other.tag != "Untagged") {
            Destroy(other.gameObject);
        }
    }
}
This will delete everything except for our ground planes which have a tag called “Untagged”. If you run this on your device you should see a noticeable improvement to the frame rate. At this point, we should have some workable circumstances. It may still be lagging a little (as it was with my device) so I did a few other things. First, I went to the Quality settings (Edit -> Project Settings -> Quality)
and I changed the settings to the following:
I then went to the Lighting window and disabled “Auto Generate” and simultaneously clicked “Generate Lighting”.
When I built this to my device I noticed a slight improvement. If it is still lagging (especially when the ball collides with the glass) there is a final thing we can do which we will come to in a later section. For now, I think we have a high enough frame rate to create a better way to spawn balls.
Fixing the spawning issue
When fixing this issue, we need to understand the difference between MousePosition (what we’re currently using) and TouchPosition (what we’re going to use). MousePosition does return the position of your finger but only if you’re using one. If you use more than one it returns the average position. TouchPosition on the other hand, not only keeps track of each finger’s position but also how many fingers are currently on the screen. With this knowledge, let’s go to our CameraCharacter script (the script where we spawn the balls) and change it to implement TouchPosition. In the script, delete this logic statement:
if (Input.GetMouseButtonDown(0) && camMoving)
        {
            GameObject ballRigid;
            ballRigid = Instantiate(ball, BallInstantiatePoint, transform.rotation) as GameObject;
            ballRigid.GetComponent<Rigidbody>().AddForce(Vector3.forward * ballForce);
        }
At this point, let’s go ahead and create a static integer called “BallCount” with the default set to 15.
public static int ballCount = 15;
Now, let’s implement TouchPosition. First, we need to make sure the player is actually touching the screen by replacing the old logic statement with this:
//checks if the player is touching the screen and the camera is moving
if (Input.touchCount > 0 && camMoving)
        {
}
Next, we need to make sure we haven’t shot out all our balls.
if (Input.touchCount > 0 && camMoving)
        {
            if (ballCount != 0)
            {
}
}
Third, we need to loop through each touch and grab its position. Then we need to spawn a ball at that position.
if (Input.touchCount > 0 && camMoving)
        {
            if (ballCount != 0)
            {
                for (int i = 0; i < 2; i++)
                {
                    float mousePosx = Input.GetTouch(i).position.x;
                    float mousePosy = Input.GetTouch(i).position.y;
                    if (Input.GetTouch(i).phase == TouchPhase.Began)
                    {
                        GameObject ballRigid;
                        Vector3 BallInstantiatePoint = _cam.ScreenToWorldPoint(new Vector3(mousePosx, mousePosy, _cam.nearClipPlane + spawnHelper));
                        ballRigid = Instantiate(ball, BallInstantiatePoint, transform.rotation) as GameObject;
                        ballRigid.GetComponent<Rigidbody>().AddForce(Vector3.forward * ballForce);
                        ballCount--;
                    }
                }
            }
So that’s it! We have now implemented TouchPosition and we can shoot balls with more than one finger. Not only that, but we can actually limit the number of fingers the player can use. You can do this by changing the conditional on the for loop. You can set it to i < 3 or i < 4 if you’d like, I have it set so that the player can only use two fingers. Before we build this to the device, go through the CameraCharacter script and delete any references to MousePosition. Save the script, allow Unity to compile, and then hit Build and Run.
Huzzah! It works! We have now successfully converted it to mobile!
Tying up loose ends
We’ve got our game working on mobile, now we just need to tweak a few things. The first is to use “BallCount” to give the game a more competitive edge. We can do this by adding more balls whenever the player destroys a pane of glass. This is done simply by going to the “GlassShatter” script and adding in a line that increments “Ballcount” in “OnTriggerEnter”.
private void OnTriggerEnter(Collider other)
    {
        if (other.CompareTag("destructive"))
        {
            //picks a random gameobject in the array
            int objectIndex = Random.RandomRange(0, shatteredObject.Length);
            Instantiate(shatteredObject[objectIndex], transform.position, shatteredObject[objectIndex].transform.rotation);

            //By using a static variable, we can access the variable directly
            CameraCharacter.ballCount += destructionReward;
            Destroy(gameObject);
        }
    }
But we can actually improve upon this. Let’s have a public variable called “destructionReward” that we can change in the inspector so that we can make certain panes of glass worth more.
public int destructionReward = 2;
And then changing the syntax of the incrementation line:
CameraCharacter.ballCount += destructionReward;
Now we just need a UI that will tell us how many balls we have left. Go to your CameraCharacter script and add in a public variable of type “Text” called “ballText”:
public Text ballText;
Next, in the update function, we make this text always display “ballCount”:
This part is optional, but I did an “if-else” for this logic statement that displays a message when we run out of ammo:
if (ballCount != 0)
            {
                 //This comment represents all the code that goes here :-)
}else
            {
                 //This part is what I added
                 ballText.text = "We're out of ammo!";
}
Now we just need to create some UI text in the editor. I made my text green, fairly large, and anchored to the top.
Assign this to the “Ball Text” field on the CameraCharacter script
and then click build and run!
It works! Huzzah! The last loose end that we need to tie up is just making sure that our “ballCount” always resets everytime we restart the game. This is done in the Start method on the CameraCharacter script:
And that’s it! All loose ends are tied up, all balls are spawning in the right place, and now we can move on to the bonus section!
Bonus: Creating shattered glass in Blender
We have a pretty good game. It’s challenging enough so that it remains fun. But what would take this game from being pretty good toAMAZING? What would give this game the extra punch that it needs? The answer: variety. Think about it, all we’ve got is a sort of monotonous smashing of pesky glass. If we could change the look or shape of the glass, it would leave lot’s of room for creativity and make it more aesthetically and dynamically pleasing. That’s what we’re doing in this section. If you’re a game developer, chances are you already have Blender installed. If you don’t, you can download it for free at https://www.blender.org/. Open it up and delete the default cube.
For the sake of example, go ahead and create a Monkey Head.
Next, navigate to File -> User Preferences.
Then go to Addons and search “Cell Fracture”.
Enable this addon then close the window. You should see a new button titled “Cell Fracture” in the toolbar.
If you click on this, it will open a new window.
This is how you can make Blender “shatter” objects for you. I suggest that you investigate the settings for yourself but I can give you a few general guidelines for making a glass-like shatter. First, you’ll want more than 0.5 noise, this will help randomize the look. Second, don’t have too much recursion, this will greatly increase the size and complexity of your model. Once you’ve found a good set of settings, hit OK. After a little while, it will be finished and you’ll find your shattered model on the next layer.
Next, you can delete the whole model and export the shattered as a Collada (or .dae) and import it into Unity. You usually want to delete the default light and camera in Blender before you export.
Also, this is how you can fix some of the lag. You can import the whole cube and re-fracture it with a much lower recursion.
This will lower the number of fractured pieces which will increase the frame rate in the game because Unity doesn’t have as many shards to calculate physics for. This, coupled with our “CullObjectManager”, is what mostly improved the lag on my device.
The Scripts we changed
Here is the entire code for the CameraCharacter script:
using System.Collections;
using System.Collections.Generic;
using UnityEngine;
using UnityEngine.SceneManagement;
using UnityEngine.UI;

public class CameraCharacter : MonoBehaviour
{
    public float speed = 1;
    public float incrementFactor = 0.02f;
    public float spawnHelper = 4.5f;
    public GameObject ball;
    public float ballForce = 700;
    public GameObject button;
    public Text ballText;

    public static int ballCount = 15;

    //We use this when we implement UI
    public static bool camMoving = false;

    private CharacterController cameraChar;
    //A boolean whose value will be determined by OnTriggerEnter
    private bool collision = false;
    private Camera _cam;


    // Use this for initialization
    void Start()
    {
        ballCount = 15;
        cameraChar = gameObject.GetComponent<CharacterController>();
        _cam = GetComponent<Camera>();
    }

    // Update is called once per frame
    void Update()
    {
        ballText.text = CameraCharacter.ballCount.ToString();
        Debug.Log("Speed is " + speed);

        //This checks if we have collided
        if (!collision && camMoving)
        {
            cameraChar.Move(Vector3.forward * Time.deltaTime * speed);
            //This is so that the camera's movement will speed up
            speed = speed + incrementFactor;
        }
        else if (collision || !camMoving)
        {
            cameraChar.Move(Vector3.zero);
        }
        //checks if the player is touching the screen and the camera is moving
        if (Input.touchCount > 0 && camMoving)
        {
            if (ballCount != 0)
            {
                for (int i = 0; i < 2; i++)
                {
                    float mousePosx = Input.GetTouch(i).position.x;
                    float mousePosy = Input.GetTouch(i).position.y;
                    if (Input.GetTouch(i).phase == TouchPhase.Began)
                    {
                        GameObject ballRigid;
                        Vector3 BallInstantiatePoint = _cam.ScreenToWorldPoint(new Vector3(mousePosx, mousePosy, _cam.nearClipPlane + spawnHelper));
                        ballRigid = Instantiate(ball, BallInstantiatePoint, transform.rotation) as GameObject;
                        ballRigid.GetComponent<Rigidbody>().AddForce(Vector3.forward * ballForce);
                        ballCount--;
                    }
                }
            }
            else
            {
                //This part is what I added
                ballText.text = "We're out of ammo!";
            }
        }
    }
    private void OnTriggerEnter(Collider other)
    {
        if (other.CompareTag("glass"))
        {
            collision = true;
            Debug.Log("Collided with glass!! Man down!!");
            camMoving = false;
            button.SetActive(true);
        }
    }
    public void StartCam()
    {
        camMoving = !camMoving;
    }
    public void Reset()
    {
        SceneManager.LoadScene("Scene1");
    }

}
And the entire code for the GlassShatter script:
using System.Collections;
using System.Collections.Generic;
using UnityEngine;

public class GlassShatter : MonoBehaviour {
    public GameObject[] shatteredObject;
    public int destructionReward = 2;
    // Use this for initialization
    void Start()
    {

    }

    // Update is called once per frame
    void Update()
    {

    }
    private void OnTriggerEnter(Collider other)
    {
        if (other.CompareTag("destructive"))
        {
            //picks a random gameobject in the array
            int objectIndex = Random.RandomRange(0, shatteredObject.Length);
            Instantiate(shatteredObject[objectIndex], transform.position, shatteredObject[objectIndex].transform.rotation);

            //By using a static variable, we can access the variable directly
            CameraCharacter.ballCount += destructionReward;
            Destroy(gameObject);
        }
    }
}
If you were confused when we made changes to the scripts, here is the entire thing that you can copy and paste.
Conclusion
Congratulations! You’ve found the third piece to your puzzle and you can now complete your masterpiece. That is no small achievement, so you should be very pleased with yourself. I hope you found it helpful and instructive.
If you ever find yourself at your desk, staring at your computer because you have absolutely no video game ideas (every game developer has experienced this), then you know where to look for inspiration! Go to the app store, pick a game that you like to play, and then innovate upon its concepts in your own way. This way you can improve or change things about it, while learning and improving your game development skills. So again I encourage you:
Hello everyone. Welcome to the Unity Procedural Dungeon Generation course. In this course you are going to learn how to use Unity to generate a procedural dungeon for your games.
We are going to do this by means of this demo with multiple rooms, obstacles, and enemies. In this course you are going to learn how to generate the level using Unity tile map features, so a level like this dungeon room here. How to procedurally generate a dungeon with multiple rooms, as you can see here, this room has doors to other rooms. Also, you’ll learn how to dynamically change tiles in the level to add obstacles in the dungeon such as those rocks here. And finally, how to randomly add other objects such as those enemies here, and a dungeon ghoul.
Now, let’s move to the first lesson, where we are going to start building our room.
Transcript Part 2
Hello everyone, in this lesson we are going to start building our demo by creating a tilemap.
You need to provide style map generation features, so we are going to use that. First, download the sprites for this tutorial which is this folder here. I already have my project. So, I have just created an empty Unity 2D project and I have added the sprites from the source code. And here, we are going to use this Terrain sprite here to build the tilemap.
So first, we need to do two things here. I have already done those things but I’m going to show what I did here. First, you need to change the Pixels Per Unit here to 40, so it to have the correct size in your game. And also we need to change the Sprite Mode here to Multiple and then open the Sprite Editor, click on the Slice, and slice the sprites here by the cell size using a size of 40 by 40. So this’ll slice the terrains exactly on their size here. So that’s what you need to do. Then you need to apply.
Now we can create a tilemap object from this sprite here, its Terrain sprite here. So let’s go here to our, I’m going to rename our scene to Demo and not SampleScene. And I’m going to create a new 2D object tilemap. This’ll create a grid and a tilemap object inside the grid. Now we need to populate this tilemap. So first, I’m going to open here the Window, 2D, Tile Palette. Let’s put it here. And here we are going to add the Terrain’s sprite to use for the tilemap. So we need to create a new palette here. New Tile Palette called, for example, Dungeon Palette. Let’s create it. We need to save it in a folder. I’m going to create a folder here called Tile Palettes. And then here, it is the Dungeon Palette. Now we go to the, we drag and drop the terrains here so that you’re going to add the tiles of this sprite here in the palette. So again, we need to select the folder. Let’s save it in the same folder.
And it’s going to generate the tile objects for all the different tiles here in the spreadsheet. So here we have all the terrains for our game. Now we can start creating our tile map using this palette here. So we need to select the Brush Tool here and, for example, let’s select this tile here, and then we can put it in our map like this. And let’s put some walls here. So for example, want to put the walls around here, leaving an empty space here for the door. And then we save it.
The next step is making the walls here collidable because we don’t want the player to be able to walk through the walls. So, in order to do this, we need to select tilemap object here and we need to add a component called Tilemap Collider 2D. This will add colliders to all the tiles in the tilemap. However, we don’t want the floor to be collidable as well. The only collidable tiles should be the walls. So the way we make the floors not collidable is going here, the tile palettes folder, select the floor tile, and changing the Collider Type here to None. Now, if you select the game, you can see that to have colliders, the colliders are those green squares here around the tile, and they are only on the walls. The floor doesn’t have any colliders on it. Now let’s try running the demo to see the map.
So, this is the tilemap. It don’t have anything special happening right now but soon we’re going to more stuff in our map. As an exercise, create your own tilemap. Feel free to use the tiles you prefer. The only requirement is that it must be a dungeon room with at least one way out. For example, the door I added in the bottom of the room. Don’t worry about the elements inside the room. For example, adding rocks and things like that.
We are going to procedural generate some obstacles later in the course. And that’s it for this lesson. In the next one, we are going to add a player to this map.
Transcript Part 3
Hello everyone. In this lesson we are going to add a player to our tile map. The player should be able to move through the dungeon and navigate to the rooms.
So let’s start by creating the player prefab. First, we are going to use this player sprite here from the sprites folder. So again, you need to change the pixels per unit to 30, I have already done this. And we need to change the sprite mode to multiple. And slice it into two sprites. We are only going to use one of them, but we need to slice otherwise we’re going to have two players walking in the game. So now we can select the first one here, drag and drop it to the scene. Change the name to player and this will be our player prefab. Now we need to add the components of it.
First let’s add a box collider 2D, and a rigid body 2D because we want to move the player. We don’t want the player to rotate and collide with things. So here in the rigid body we are going to open the constraints and check freeze rotation on Z. So this way it won’t rotate in the z axis when colliding with anything. Also we need to reduce the size of the collider so this green rectangle here is the collider, and we want the box to be a little bit smaller than the player. For example 0.7, this way we can make the player walk on the space of the exit. Otherwise it’ll be very hard to make the player fit here, because the box will be exactly the same size as the space.
Finally, we are going to assign the player tag to the player object, because we are going to use this tag later to identify the collisions between the door and the player. And in it we are going to create a prefabs folder and drag and drop the player here to create it’s prefab. So now it is officially a prefab.
Since this is a top-view game, we are seeing the game from the top, we don’t want any gravity force because we don’t want the player to fall in the screen like this, when we start playing. So we need to disable the gravity. We do this here in edit, project settings, physics 2D. And then here we have gravity x and gravity y. We are going to change gravity y to 0. This way the player won’t fall because there isn’t any gravity. Now let’s create the script to move the player.
So we’re going to create a new folder here called scripts. Let’s add a new C# script called player movement. And let’s open it. So you have the player movement script. This script you’ll need serializefield representing the speed of the player. So we are going to set the speed for the player. And the only method we need is the fixedupdate, which we’re going to use to update the player velocity. The way we do this is by getting the horizontal and vertical input axis. So first put horizontal, and then we will do the same for the vertical. And then we access the rigid body 2D, setting it’s velocity to be a new vector2 where the x velocity is the value of the horizontal input, multiplied by the speed. And then the y is the vertical input multiplied by the speed. And that’s it, we just need this for the player movement.
To test it, we need to add the player movement here in the player prefab. And set a speed here, for example 5. Now let’s try playing and see if it’s working. So you have the player and we can move it with the arrow keys on the keyboard, so it’s working. And the player is colliding with the walls, as you can see. Also, we should be able to move the player here on the door because we reduced the box collider, otherwise it’ll be very hard to make the player fit on the space here. And that’s it for this lesson. In the next one we are going to add the door prefab to our demo. The door prefab will be here, and will be responsible to allow the player to leave the room.
Hello everyone, how are you? My name is Glauco Pires and welcome to the Cinemachine Course. In this course we’re going to learn how to use one of the best tools available into making nice camera effects.
And this is what we’re going to learn to do in this course, it’s called Boulder Trouble. We just have a simple sphere, simple boulder, just falling down a mountain and we’re going to have multiple camera effects that are going to give some smooth transitions and nice looks, like a camera that looks really closely at the sphere, another one that is more versatile that can just navigate around, and other cameras that can do things like focusing on two objects at the same time, like the sphere and the lake. We could talk about four or five different camera effects and they are kind of, pretty much the best things that you can have, the best tools that you can have to make these effects. And we saw a demo of the game here in this game window but you might want to see how that’s happening behind the scene.
We have the scenario and we’re going to have multiple cameras being used here, so as the boulder falls down using Minute’s Physics simulation, we can see our camera just travelling around our scenario, just changes positions, changes angles always focusing at the sphere. And it can also follow a track like this one and then switch to other cameras as well. If you work to do this programmatically by writing lines of code, you would have to do a lot of complicated things but with Unity you don’t have to touch any C-sharp or any scripting language, it’s just a matter of positioning elements and selecting the right settings to have all of these effects up and running.
I’ve been working with games for more than 10 years and I’ve learned how to work with tools like Unity, like Unreal Engine, I worked with JavaScript games, so I have a lot of experience and I’m going to share that with you in this course. We’re going to learn how to make these interesting things.
So I hope we’re excited to start this, and that I see you in the next video where we’re going to do a little review on how to install Unity and get all of the tools that we need to make all of this to work. So I’ll see you soon.
Transcript Part 2
Hi there. So the first step we have to take in case you don’t have Unity installed already is to head over to the unity3d.com website and download the latest version of Unity. Depending on when you’re watching this course, there might be minor differences here and there like where certain options are, where certain windows are, but the underlying knowledge for making the things we’re going to learn in this course is pretty much the same throughout time. So we want to get stared here in Unity website. It’s going to take us to another page where we can select the version of Unity we want to use.
We can either get the Plus one which is $25 a month, Pro one, but we also have the Personal, which should be perfect for you. You don’t have to worry, there’s no need to pay anything right now if you’re just learning, if you’re not making a huge revenue with Unity-made games, or other games, then you can just head over to the Personal version. Just make sure you take a look on the conditions to see if you are entitled to this, but you probably are. We need to click on Try Personal, and once we hit here, you need to read the Terms of Service, agree with them if you of course do, and then you just download the installer. It’s a pretty straight forward process, just download Unity and then it’s going to appear in your Downloads folder. You’re just going to open it here, and then you’re going to see this file, UnityDownloadAssistant. It depends if you’re on Mac or on a Windows, it really doesn’t matter, the installation process is pretty much the same.
You just double-click the file, it’s going to wait for a few seconds, going to open the installer, and it’s from a trusted location, it’s from Unity website, and after the assistant opens, we are just going to continue, agree with the license, if we do, then you have to select the components. Now here is a good moment for you to review everything you need. The first thing you need of course is the Unity tool, so we want this to be checked. If you already have Unity, you probably have Visual Studio installed along with it, so if you want to do any sort of coding, make sure that this is checked, all right. And depending on where you want to distribute your game, you have a few options of platforms here.
We have iOS and Android, which are the leading mobile platforms. You can enable these two if you want to make some sort of video or a game with scene machine in these two platforms, and WebGL as well, which should be selected here because it can just distribute them to whoever you want to watch your video in a desktop device.
So after you’re done selecting these, you’re just going to hit Continue, the installation process is going to continue and we’re going to head over to the next lesson where we’re going to set up our first project, so I see you there.
Transcript Part 3
If you have reached this part of the course then it means Unity has already been installed. What we have to do is to create a new project to try Cinemachine’s features.
First of all, I’m going to hit the New button. Then I need to change the project to Boulder. Let’s start with the 3D template as we are making a three-dimensional game. It does not need to be two-dimensional. The location of the project is going to be a Projects folder inside my Home folder. It doesn’t matter if you are on a Mac or in a Windows computer. It’s important for you to make a Projects folder and put all your projects there.
Just to make sure things are properly organized, you’re going to leave Unity Analytics disabled. We set that to Off, and after that we’re just going to hit Create Project. After a few seconds Unity is going to load and we should be able to start working on learning Cinemachine. We are, however, going to talk about an initial setup process because if you just start a new project in Unity, there are no assets there. There is nothing slightly beautiful that you can do right out of the box.
What we can do is to get some assets provided by Unity, which are free to use, okay. There is no third-party restrictions in that situation. Use these assets and learn a lot of what there is in Unity without having to download many things from the Internet. You can of course get your own assets later, like your own files, your own maybe effects, maybe a sun effect, maybe some water. There is a lot that you can do, but right now we are just going to start using Unity’s default stuff.
First of all, let’s make sure we start with the same layout from my side and your side. I need to click here on Layout and choose default so we are reset to this mode here where we have the Scene, the Game window, and the Asset Store. I’m going to select the Game window and move it to the right and align them like this just so it’s easier for us to see the simulation that I’m going to do in the scene that we have here. We also want to make sure that we select Window, then Sequencing, and finally, Timeline.
We are talking about Cinemachine here, so Timeline is a special ally for you to making what we want to achieve here. It’s important to work with this feature that has kind of been introduced really recently in Unity less than two years ago. Okay, in the Project folder we just have the Scenes window, which is fine, and at the Packages there are some packages that were already provided by Unity. Package Manager, TextMesh Pro, but since we are talking about Cinemachine, we want that package to be included here. To do this, we need to find where that package is. We go to the Window, select Package Manager, which is going to open here which is going to show the packages that you have installed. Unity is going to show a list of other packages that you can get from them and you notice that one of the options is Cinemachine.
Okay, as it says here, it’s smart camera tools for passionate creators. You can do great effects in your game or in an animation that you want to make. It’s important for you to understand that this works for both animations and for games. It just makes everything look much more beautiful. It just looks gorgeous to use these camera effects. Once we have Cinemachine selected here, I’m going to hit the Install button. In case you don’t have it already, you’re going to download it. We just hit Install. It’s going to extract all the assets. It’s going to import them here to Unity to this Package folder. Once you are installed and up to date, notice that I’m on version 2.2.8, you’re going to see here that Cinemachine has been installed. Right now there is no need for you to worry about what these files are because one of the things Cinemachine wants you to do is not to code at all.
We can do a lot of things by just using the Unity Editor, the Inspector, we can change some properties, some components, some assignments and references to game objects. And just do everything in really quick and easy way. You notice that I’m not going to talk a lot about concepts in this course. Not in the sense, I want to explain things to you, but I want to show them to you as quickly as possible. We need to change properties or we need to see their effect here in Unity and learn in this process.
We have Cinemachine here, but we don’t have anything to add to the scene right now. Okay, it’s completely empty. What we want to do is to import the full asset package that we have in Unity. This was already here in Unity’s previous versions and Import Package, but right now it’s not in Unity’s version. You have to manually download that from the Asset Store. It’s important for you to open the Asset Store here. I’m just going to open this window.
We want to download the Standard Assets Package from Unity. I’m going to put standard assets and search for it. You’re going to see that one of those is provided by Unity Technologies which is the one you’re looking for. We’re going to open that, and it’s a free package. If you don’t have it, download it. You’re going to download it, or in my case, since I already have it in my computer and in my cache, I can just click Import and add all the assets here. All of these assets, the SampleScenes and Standard Assets folders that we have contain lots of different props that we can use. You can see a few images here, a few characters and spheres. There is quite a lot that you can play with with these Standard Assets.
We’re just going to import and use them. This package might take a while to import, like, a minute or two, but once it is complete, we can already work with what we have here. With these two things installed here, we’re going to head over to the next lesson where we’re going to start building and looking at a very simple scene.
Hey guys, my name is Austin Gregory. And in this course, I’m going to teach you how to create a simple little multiple-choice quiz game where you can ask questions in different forms, from audio, images, or just simple text questions, and then you have a choice of answers ranging from two choices up to however many you can fit on your screen.
So I can continue a game from where I left off. It will take me to the set or the topic of questions that I made it to, whereas New Game will start me from the very beginning here. What I can see is my first question is an audio question. I can listen to the sound. (gentle music) Okay, that sounds like a flute. Go to the next question. What color are these flowers? Well, they’re not orange or black. I want to say they’re magenta. Then I have a nice little score screen here that says you had two questions, you got two right, so your score is 100%.
Now typically you would have more than two questions, and you’d probably get some wrong. But that’s just how this is going to work because I know the answers to these questions unfortunately. What country does this shape most represent? This is going to be Germany. It’s not Italy or France for sure, so that’s Germany. Which of these items is cheese? Now that could be a difficult question if I tried on this question. There’s a lot of cheese names that are confusing and unusual. But in this case, provolone, umbrella is obviously not. And there we go, back to the main menu, and I can continue from the last set that I opened up. So in between sets, we have a score screen, and then the last set we go back to the main menu.
Just a nice little system that will allow you to create whatever kind of quiz game you have in mind. My name is Austin Gregory, and I will see you in the first lesson.
Transcript Part 2
Hey guys, my name is Austin Gregory, and in this course we’re going to build a cool little quiz game that’s going to allow us to ask questions and provide optional answers where the player will then have to choose what is the correct answer for this question.
Now it’s pretty simple and pretty straight forward, but we’re gonna have basic questions that are just strings of questions, then we’re gonna have image questions that are gonna provide an image, and then an optional caption. So you have an image of a bird, the caption can say what is this bird? That kind of thing, and then we’re also gonna have audio clip questions where we can click a button to play an audio clip with a caption as well. And it’ll be like what is this instrument playing, or what animal makes this noise? And then you’re gonna have options to choose from. At the end of each question set or each topic set, or however you wanna organize your questions, you’ll see how easy that is to do once we get our system set up. You’re gonna get scored on how you did for that set of questions. So if there’s 10 questions and you got seven out of 10, you got a 70%, or a 70, or whatever kind of arbitrary rating system you want to add for your game, but in this case, it’s gonna be all pretty straight forward, and all pretty simple stuff.
So I wanna create a new project. I’m gonna call it Super Quiz, and I’m gonna use the latest version I have available to me, which is 2018.3.2, and I’m just gonna make sure that I just have it on 2D. It doesn’t really matter for this, but it’s just gonna be a UI game. There’s not gonna be any game graphics beyond just the interface. So it’s gonna be pretty simple stuff, and I’m gonna click Create Project. And while it’s doing that, I wanna show you that in this folder here, I have a couple bits of media. I have a picture that’s going to just be a field we can just use for a dummy question. And this is just a Wikimedia Commons image, and then I have an outline of a country just for an example of another image question, and then I have an audio clip here that’s just a flute. So what I wanna do in this first lesson is I wanna set up the UI for our quiz game. So what I wanna do in this first lesson is get started by setting up our UI for our quiz game. Let’s see if we can knock it all out in one quick lesson here.
So what I wanna do is create just a UI. Let’s create a UI panel object here. Now what this is gonna do for us is create a canvas object and an event system object, which we need to work with the Unity UI system. So I’m just gonna just lay out my quiz question and answer layout here. And that can just be a half and half 50-50 thing here, or we could do, I don’t know, whatever you’d like to do here, but I’m just gonna have a section for my question and then a section for my answers. And I don’t want this to have an image on it, necessarily. You could, if you would like to do that, but I just wanna just have the object there to help me lay out my game here. Now this isn’t gonna stretch. We’re not gonna do any fancy UI stuff. I’m just gonna make sure that it works. So I’m just gonna anchor this to the left side here just like that.
So now this is going to be where we can put our questions. Whatever the template may be, but we’re gonna start with a simple, just a string question. Just a text question. So we’re in this panel, I’m gonna create a UI TextMeshPro Text object. We wanna use TextMeshPro because it’s just better. Then I’m gonna just import the TMP essentials here. Which is going to give me all the stuff I need to use TextMeshPro. So we had this text. I’m just gonna center this up top a bit here. Then we can just stretch it out. Let’s see. We’ll just do something like that. It depends on what kind of questions you plan on asking here. I plan on my questions being pretty simple and straight forward. Just a sentence, but you may want to do some serious paragraphs. So you wanna set up your layout and your design to accommodate that, but in my case, this is where my question is going to go. Pretty cool? Let’s make it a question at least. Okay, I want to make sure that I have it centered. And I want to center it horizontally and vertically. Just like that, and we can increase the font size a bit here. You can also make it auto size so it fits in the text area that it has. So if you were to keep typing, for instance. This is cool too, it’ll resize to match that. Which is pretty cool, I guess.
So you probably wanna do that, in fact, and I was actually lining this up so that I could put something below it, but this is just the text question. So it doesn’t have to have anything below it there. So we’ll just do it just right in the center, and now off to the right here is where we’re gonna have our buttons that are gonna be the answers for the question. So if the question what color are elephants typically? You would have blue, green, gray, and purple, I don’t know, and then you would just click on gray. You’d get the answer correct, and move on. But even if you get the answer incorrect, you’ll still move on, and at the end you’ll just see that you got one incorrect. So to do that, what I wanna do is add another panel that’s going to go off to the right side of our question here. So just drag this off just like that. And again we’re just going to anchor this to the right. Now fancy UI stuff for this.
We’re keeping the UI very simple. We’re focusing more on the data and the interaction with that data. The storing of that data, and the displaying of that data, and we can just name these answers, question. Now I wanna be able to have how ever many answers I want for every question. So one could have true or false, one could have three different numbers as an option, one could have 10 different options. So it doesn’t really have to conform to four answers per question. It’s just a silly restriction. So we’re not gonna have that. So in order to accommodate for that we’re gonna have to make sure that we have a flexible system that can deal with how ever many buttons we throw in there. So to do that, I’m going to have on answers, first of all, let’s just throw a button in here so that we can see what it’s going to look like. So if I just throw a button in my answers panel here.
Now on answers, I’m gonna go add a component, and I wanna add, it already has it there. Vertical layout group. Now vertical, you know, up and down. We’re going to lay out or objects that are within this panel. We’re gonna stack them on top of each other, and we’re gonna make sure it fills the space that we have. So to do that, we’re gonna say child control size width. Which means gonna stretch to the width of the panel, and child control size height. Which means it’s gonna stretch to the height of the panel. Now that doesn’t really work if we have one option as an answer, but also one option doesn’t work for a question in a quiz game. So we’ll never have that issue. But if I were to duplicate the answer, now we have two. You see then we have two buttons, and they just divide the space evenly. Which is exactly what we want, but I can tell we’re gonna need some spacing in between there, so let’s add a little spacing. And I can also tell gonna add some padding around the side of this panel so we’re not just snug up against the corners. Maybe you want that. It’s kinda cool looking in fact, but for this we’re just gonna add some padding around the sides.
Cool, now if we added more buttons, you can see what happens there. As many buttons as you want. Now I wanna make sure that I take this text that’s in here, I wanna delete that text and I’m going to make sure then I add TextMeshPro Text. We wanna keep all of the text using TextMeshPro. It’s just sharper, has more options, it’s more efficient to use. It’s just better all around. Answer, and again we’re going to make sure it’s centered vertically and horizontally, and let’s take this button here and we’ll just change the color on it a little bit. I don’t know what we’d do with it. Just do something with it then, and on the answer text here, we could do, if we do auto size, that may work pretty good because we can have any size answer in there, and also we have options for auto size. So the minimum size could be 14. The maximum size could be 60. That would work pretty good. That way they can get really small, but it can also not get too big. Notice the size goes down there.
But I don’t like the margin around that. So if we were to look at what’s happening here, I can grab this yellow box and drag it in, and it’s gonna be my margin on the text element. If we go down to extra settings, we have margins, left, top, right, and bottom. I can just add margins all around, just like that, and now let’s try this again. There we go, now it’s not snug up against the button. Look in the game view here. The game view is in free aspect, and since our UI is a little, it’s not fancy like I was saying. We’re gonna make sure that we restrict everything to 16 by nine, and just for this example, and we see that, that causes an issue here, because of the size of this. So what we could do, is I know we said we weren’t gonna do anything too fancy, but I wanna make sure that we work at every size. Go to my canvas here and go to UI scale mode. I can set this to scale with screen size. Which means when my screen size changes, this also scales. I’m not gonna be completely static, but we have a couple things to do here.
I wanna make sure the width and the height is 50-50. The way that it affects the scaling, the width and the height both do it exactly, and the reference resolution I would like to be a bit more than what we’re looking at there. So maybe just 720 P, and that gives us a starting point so we can start scaling our objects to work with this. So I just sort of drag this in here, and then we’re gonna drag this over. And we can just make this fit. We should have done this before we did the layout, but sometimes you gotta go back and make a few changes, and that’s perfectly fine. So there we go. Now if I were to go into here and I were to go back to free aspect, it doesn’t completely break like it was before. Because we’re scaled down to match, but as long as we stay within 16 by nine resolution, we should be fine. If I were to pull the game view out here, it’s gonna stay within 16 by nine, and the last thing I wanna do for this lesson is I wanna create a prefab of our buttons that we have for answers, because we’re gonna be able to create those at run time for every answer that we have per question.
Pretty basic stuff. I’m gonna create a prefab folder really quick here. Prefab, and we’re going to put an answer button in there. Just gonna name this answer button. And I’m gonna delete these other buttons here. And I wanna call this, actually as our question prefab, as our question panel. Text, it’s gonna be called text question, and that’s because this is going to be the default question layout. We’re gonna have the audio layout, we’re gonna have the image layout, and we’re going to design those in the next lesson, guys.
So my name is Austin, and I will see you there.
Transcript Part 3
Hey guys, my name is Austin Gregory, and in this course, we’re gonna build a cool little quiz game that’s going to allow us to ask questions and provide optional answers, where the player will then have to choose what is the correct answer for this question.
Now it’s pretty simple and pretty straight forward. But we’re gonna have basic questions, that are just strings of questions. Then we’re gonna have image questions that are gonna provide an image and an optional caption. So you have an image of a bird. The caption can say, what is this bird? That kind of thing. And then we’re also gonna have audio clip questions, where we can click a button to play an audio clip with a caption as well. And it will be like, what is this instrument playing? Or, what animal makes this noise? And then you’re gonna have options to choose from at the end of each question set, or each topic set, or however you wanna organize your questions. You’ll see how easy that is to do once we get our system set up. You’re gonna get scored on how you did for that set of questions. So, if there’s 10 questions, and you got seven out of 10, you got a 70%, or a 70, or whatever kind of arbitrary rating system you want to add for your game.
But in this case, it’s gonna be all pretty straight forward, and all pretty simple stuff. So, I wanna create a new project. I wanna call it, Super Quiz. And I’m gonna use the latest version I have available to me, which is 2018.3.2. And I’m gonna make sure that I just have it on 2D. It doesn’t really matter for this, but it’s just gonna be a UI game. There’s not gonna be any game graphics beyond just the interface. So it’s gonna be pretty simple stuff. And I wanna click, create project. And while it’s doing that, I wanna show you that in this folder here, I have a couple bits of media. I have a picture that’s going to just be, a field. We can just use for a dummy question. And this is just a Wikimedia Commons image. And then I have an outline of a country, just for an example of another image question. And then I have an audio clip here, that’s just a flute. So, what I wanna do in this first lesson, is I wanna set up the UI for our quiz game.
So, what I wanna do in this first lesson is get started by setting up our UI for our quiz game. And we’ll see if we can knock it all out in one quick lesson here. So, what I wanna do, is create just a UI. Let’s create a UI panel object here. Now, what this is gonna do for us, is create a canvas object and an event system object, which we need to work with the UI system. So I’m gonna lay out my quiz question and answer layout here. Now, this could just be a half and half, 50/50 thing here, or we could do, I don’t know, whatever you’d like to do here. But I’m just gonna have a section for my questions and then a section for my answers. And I don’t want this to have an image on it, necessarily. You could, if you would like to do that, but I just wanna have the object there to help me lay out my game here. Now, this isn’t gonna stretch, we’re not gonna do any fancy UI stuff. I’m just gonna make sure that it works. So, I’m just gonna anchor this to the left side here. Just like that. So, now this is going to be where we can put our questions. Whatever the template may be.
We’re gonna start with a simple, just a string question. Just a, you know, text question. So, within this panel, I’m gonna create a UI Text Mesh Pro text object. We wanna use Text Mesh Pro because it’s just better. And I’m gonna just import the TMP Essentials here. Which is going to give me all the stuff I need to use Text Mesh Pro. So we have this text, I’m just gonna center this up top a bit here and we can just stretch it out. Let’s see. We’ll just do something like that. It depends on what kind of questions you plan on asking here. I plan on my questions to be pretty simple and straight forward. You know, just a sentence, but you may want to do some serious paragraphs so you wanna set up your layout and your design to accommodate that. But in my case, this is where my question is going to go. Pretty cool. Let’s make it a question at least. Okay, I want to make sure that I have it centered and I want to center it horizontally and vertically. Just like that. And we can increase the font size a bit here, you can also make it auto-size, so it fits in the text area that it has. So if you were to keep typing, for instance, this is cool too. It’ll resize to match that, which is pretty cool I guess so you probably want to do that, in fact.
And I was actually lining this up so that we could put something below it, but this is just the text question so it doesn’t have to have anything below it there. So we’ll just do it, just right in the center. And now off to the right here is where we’re gonna have our buttons that are gonna be the answers for the question. So if the question, you know, what color are elephants typically? You would have blue, green, gray and purple. I don’t know. (laughs) And then you would just click on gray and you get the answer correct and move on. But even if you get the answer incorrect you’ll still move on, and at the end, you’ll just see that you got one incorrect. So, to do that what I wanna do is add another panel, that’s going to go off to the right side of our question here. So just drag this off, just like that. And again, we’re just going to anchor this to the right, no fancy UI stuff for this. We’re keeping the UI very simple, we’re focusing more on the data and the interaction with that data.
The storing of that data and the displaying of that data. And we can just name these, Answers, Question. Now I wanna be able to have, however many answers I want for every question. So, one can have true or false, one can have three different numbers as an option, one can have 10 different options. So, it doesn’t really have to conform to four answers per question, that’s just a silly restriction so we’re not gonna have that. So, in order to accommodate for that, we’re gonna have to make sure that we have a flexible system that can deal with however many buttons that we can throw in there. So to do that, I’m going to have on Answers, first of all just throw a button in here so that we can see what it’s going to look like. So if I just throw a button in, my answers panel here. Now, on Answers, I wanna go Add a Component and I wanna add, it already has it there, Vertical Layout Group. Now, vertical, up and down.
We’re going to layout our objects that are within this panel. We’re gonna stack them on top of each other and we’re gonna make sure it fills the space that we have. So to do that, we’re gonna say Child Control Size Width, which means it’s gonna stretch to the width of the panel. And Child Control Size Height, which means it’s gonna stretch to the height of the panel. Now, that doesn’t really work if we have one option as an answer, but also, one option doesn’t work for a question in a quiz game. So, we’ll never have that issue, but if it were to duplicate the answer. Now we have two, you see then we have two buttons and they just divide the space evenly. Which is exactly what we want. But, I can tell we’re gonna need some spacing in between there. So let’s add a little spacing, and I can also tell I wanna add some padding around the side of this panel.
So, we’re not just snug up against the corners maybe you want that, it’s kinda cool looking in fact, but for this we’re just gonna add some padding around the sides. Cool, now if we add more buttons you can see what happens there. As many buttons as you want. Now I wanna make sure that when I take this text that’s in here, I wanna delete that text and I’m going to make sure then I add Text Mesh Pro Text, and we wanna keep all of the text using Text Mesh Pro, it’s just sharper, has more options, it’s more efficient to use, it’s just better all around. Answer, and again we’re going to make sure it’s centered vertically and horizontally. And let’s take this button here and we’ll just change the color on it a little bit. I don’t know what we’d do with it, just do something with it there. And, on the answer text here, we could do, if we do Auto Size that may work pretty good because we can have any size answer in there. And also, we have options for Auto Size.
So the minimum size could be like 14, the maximum size could be like, 60, that would work pretty good. That way it can get really small but it can also not get too big. Notice the size goes down there, but I don’t like the margin around that. So if we were to look at what’s happening here, I can grab this yellow box and drag it in, and that’s gonna be my margin on the text element. If we go down to Extra Settings, we have Margins, Left, Top, Right and Bottom. I can just add Margins all around, just like that, and now let’s try this again. There we go, now it’s not snug up against the button. Look in the Game View here. The Game View is in Free Aspect and since our UI is a little, you know, it’s not fancy like I was saying. We’re gonna make sure we restrict everything to 16 by nine and just for this example. And, we see that, that causes an issue here because of the size of this.
So what we could do, I know we said we weren’t going do anything too fancy, but I wanna make sure that we work at every size. Go to my Canvas here and go to UI Scale Mode. I can set this to Scale With Screen Size, which means when my screen size changes, this will also scale, it’s not gonna be completely static. But, we have a couple things to do here. I wanna make sure the width and the height is 50/50. The way that it affects the scaling is, the width and the height both do it exactly. And the Reference Resolution I would like to be a bit more than what we’re looking at there. So maybe just like 720p, and that gives us a starting point so that we can start scaling our objects to work with this. So I just wanna drag this in here, and I wanna drag this over, and we can just make this fit, we should’ve done this before we did the, the layout. But sometimes you gotta go back and make a few changes. And that’s perfectly fine.
So there we go, now, if I were to go into here and I were to go back to Free Aspect, it doesn’t completely break like it was before because we’re scaled down to match. But, as long as we stay within 16 by 9 resolution, we should be fine. If I were to pull the Game View out here, it’s going to stay within 16 by nine and the last thing I wanna do for this lesson is I wanna create a prefab of our buttons that we have for answers because we’re gonna be able to create those at runtime for every answer that we have per question.
Pretty basic stuff. So I’m gonna create a Prefab Folder really quick here. Prefab, and we’re going to put an answer button in there. Just gonna name this Answer Button, and I’m gonna delete these other buttons here. And I wanna call this, actually that’s our Question, Prefab, or that’s our Question panel. Text, it’s gonna be called Text Question, and that’s because this is going to be the default question layout.
We’re gonna have the audio layout, we’re gonna have the image layout and we’re going to design those in the next lesson guys. So, my name is Austin and I will see ya’ there.
Hey, guys, my name is Austin Gregory, and in this course, I’m gonna teach you how to build a neat little language quiz based on our Super Quiz game that we built in the last course.
This quiz is gonna take the things that we built there, and expand on a few of the features, add some new features, and just make an all-around better quiz experience while focusing on teaching a language, or just a simple idea for a different type of quiz game. So we check this out. I go to New Game, and I have a button that says Listen, and there’s the question, What’s this word? So we’re gonna listen to this. I can hear him say, Car. Listen for this, what’s this word? Heard him say, house, so I just select the correct answer. Now this works the same way as the last quiz game that we did, and these are just buttons that you click on, and it compares to see if you got it right or not, but notice, there’s now a sound effect, these can be images, they’re, it’s laid out entirely different, it’s just an entirely different game on the front end, but the back end is pretty much the same.
And we get a nice little score screen here, we continue on to the next and Select an odd number, now this shows me that there are multiple options for the correct answer. So if I were to pick, I’d be correct, and if I were to pick , I’d be correct. If I were to pick , I would be incorrect, so I can do that for testing. It tells me I am incorrect, and another word for me, and that means building. Now there’s also an image template just like there was in the previous one, but I don’t have any that’s using that at the moment. So that’s what we’re gonna cover throughout this course, guys.
My name is Austin Gregory, and I will see you in the first lesson.
What if I told you that you could create intricate 3D games, complete with AAA graphics, with a third person character, all without writing a single line of code. What would you do with this tool I am describing? Just think about it for a moment. AAA features at your fingertips without having to learn a programming language. It almost sounds too good to be true, and yet, it is real.
Enter, the 3D Game Kit. This massive toolset put together by the good people at Unity Technologies seeks to make the Unity engine, and game making in general, more accessible to artists and non-programmers. Now anyone with a game idea can immediately see crisp results without having to learn the Unity coding ecosystem.
But this kit is not exclusive to artists: programmers and developers can find it useful in prototyping, the testing of a game idea before implementing complex mechanics. “Do you think that we should put a moving platform on this level? Let’s just throw it in and test it out to see if it will work.” These are a few of the things possible with the 3D Game Kit, and it is only just the beginning. In this tutorial, we will explore the immediate aspects of the game kit. From how to get the kit, to level creation, and implementing interactable game objects, we will cover all of that in the next 2000 words.
Downloading the Kit
Open up Unity 2018.1 or later, create a new project (the kit cannot be imported into an existing project), and go to the asset store. This is where we will download the kit. Simply search 3D Game Kit and it should be one of the first suggestions.
Click on it and hit the download button. The entire kit is a couple of gigabytes so be prepared for a long download time (it took me a couple of tries because my internet was timing out).
Once it has been downloaded (hopefully it didn’t take too long), import the package. Now we are ready to have a look at what’s inside.
The Example Project
To get an idea of what this kit is capable of, go to the newly created folder called “3DGameKit” and open the folder marked “Scenes”.
Double-click the scene named “Start”.
If we hit play we can look at what features this kit possess. It is worth noting first off that this example utilizes high-end graphics to deliver the final image. Because of this, I recommend using a computer with a dedicated graphics card if you want to enjoy what I think is a very slick looking example. For those of you who are using an integrated graphics card (like I was when I first used it), then you’re going to have to turn down the quality settings in order to get decent frame rates. Go to Settings -> Project Settings and choose “Quality”.
Just switch the Quality level from “Fantastic” to “Performance” and you’re good to go. I also recommend just going ahead and exporting the game since it’s a large example and it may take a while to complete. Go to file and hit “Build and Run”.
It’ll ask you for a location to store the demo and then it’ll start compiling. Once it’s done, boot it up and have a look at what can be created with this kit.
Environment creation
Creating a new scene
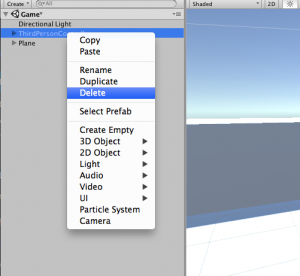
After you’ve thoroughly gone through the example project, let’s start actually using the kit. First things first, let’s create a new scene. Go to your toolbar and click on “Kit Tools” -> “Create New Scene”.
It’ll ask for a name so just give it a generic title like “Scene1”. Hit “Create” and that will create our new scene called “Scene1”.
You’ll notice that the 3D Game Kit comes with ProBuilder which, if you don’t know what that is, check out this tutorial on the Game Dev Academy to learn more about it: Designing Assets in ProBuilder. We won’t be using ProBuilder much in this tutorial so just close the tab.
You’ll also notice that we have a character in our scene along with a ground. Something to note about this setup is that it comes with a couple of things that you should pay attention to. First, there is an object called “DeathVolume”.
This is simply a collider that will kill the player if it crosses into the collider. You can use this to set up an acid pit or to kill the player if it falls off the world. Its already set up to do the latter so just leave it that way for now. It is important to understand what this does, otherwise, your character might walk somewhere and just die without being attacked. The second important thing to note is the “Checkpoint” game object.
This is self-explanatory, it is just a checkpoint for the player. You can change the position if you want your character to respawn at a different place. Have a look at the ground that was placed here for us.
If you scale it in either direction, you’ll notice that it tiles nicely for us.
This is a very neat feature since it allows us to easily manipulate the size without making it look stretched. Go ahead and scale this plane up to be as big as you like and then we can start throwing some rocks and architecture into the scene.
Adding some organic and man-made objects
Go back to the 3D Game Kit folder and find the folder named “prefabs”. Open it up and double-click on the folder marked “Environment”. Here you’ll see all sorts of cool things to add to your scene. From plain ordinary rocks to complex structures, even vegetation is included!
But before we start adding these things to our scene, have a look in the hierarchy and notice that game objects in the scene are under a label.
With things like the EventSystem and the UI canvas under the category “UI”, you can see that the developers have given us a way to organize our game objects. It would be best to utilize this organization technique since it will really speed things up down the road. With this in view, our environment prefabs go under “SceneAssets”. And that’s pretty much it! Now we can start populating our scene with these prefabs. Get creative and make your level. Once you’re done, let’s have a look at a tool that will help us lay down some plants.
The Instance painter
Chances are once you started to lay down some small objects like rocks and grass, you noticed that it quickly became cumbersome to duplicate and rotate each prefab. Well, there’s a tool that can do all this for us. Let’s just say that you want to lay down some vegetation. To do this quickly you could just find the “VegetationPainter” in your hierarchy (it’s under the “Tools” category”) and select one of the child objects (“VegetationSmall” for example).
Now you can paint vegetation straight onto your terrain!
It works the same way for rocks. Find the object “RocksPainter” and select the child object to paint.
And all of the settings for the brush are in the inspector on this script called “Instance Painter”.
So if you don’t like how random the stones are looking, then just change the “Max Random Rotation”. Start laying down some rocks and foliage to complete your scene
Adding Enemies
Now that our environment is completed, it’s time to start putting some non-static objects into our scene, specifically, enemies. In the prefabs folder, there is a folder called “Characters”. Open this up and you’ll notice there are three separate folders which contain the specific enemy’s prefab.
Have a look at each (Chomper, Grenadier, and Spitter). The “Chomper” enemy:
… will run up to the player and attack them. “Spitter”:
… will shoot acid at the player but run away when the player gets too close. And the “Grenadier” is like the “boss battle” enemy:
… it approaches and attacks the player while also shooting it the player; it can only be damaged when the player strikes it in the back. Go ahead and add whichever you’d like into your scene (Enemies go under the “Characters” category).
When you press play, you’ll see that the console will give you an error saying that you need a NavMesh in order to for the enemies to work.
If you want to learn in detail about Unity’s navigation system, check out this tutorial on the Game Dev Academy: Navigation in Unity. To quickly create a NavMesh we can do one of two things, we can just go to the ground and add a “NavigationSurface” component:
… and click “Bake” …
… or we can go to the Navigation tab and bake it there.
Either way works, it just depends on if you like your NavMesh as a component or as a separate entity. Just make sure that you set the agent type to “Chomper” and not “Humanoid”.
With your NavMesh created, hit play and you’ll see your enemies will work now and that you can attack with Left-Click.
You also can customize the enemies (such as, make them see the player sooner or how much health they have) by tweaking the settings in the inspector. As you can see, you can change how wide the enemy’s sight is or how long they will pursue the player.
As an extra feature, you can make the weapon collectable by dragging in the “WeaponPedestal” prefab from the “Interactables” folder into the scene (it goes under the “Gameplay” category).
Select the child object “StaffTakeTrigger” and drag the “Ellen” character into the empty slot. Set the function to “PlayerCharacter.SetCanAttack” and make sure it is set to “true”.
Then just disable “Can Attack” on the player character…
… and you are set to go! You now have enemies in your scene and also a way to attack them.
Interactables: Moving Platforms
If you go to your project folder and open the 3D Game kit folder, you’ll notice that there is a folder named “Interactables”. Open this up and let’s have a look.
When I first had a look at what was inside, I felt like a five-year-old at Christmas! There are so many fun things here! The prefab we are first going to use is the “MovingPlatform” prefab. The title is pretty self-explanatory so let’s just throw it into our scene to see what it does (it goes under the “Gameplay” category).
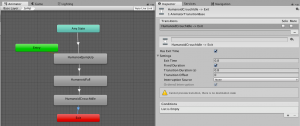
As you can see, it gives us two gizmos that tell us the start and end position of the platform. Go ahead and place these transforms in the position that you’d like. Now, if you hit play, you’ll notice that it doesn’t go anywhere. The reason is that we need to make sure that the boolean “Activate” is set to true.
Once it is, we can hit play and watch our platform start off at the “Start” transform and then interpolate to the “End” position. But you’ll notice that it only does this once. If you’d like to have it loop through this action or bounce back and forth between transforms, we can do that by changing the “Loop Type”.
With this set to “Ping Pong,” the platform will bounce back and forth between the start and end position. “Repeat” will see the platform translate to the end position and then reset to the start when it reaches the transform. I’m sure you can think of when you’d need to use either setting so just utilize it to serve your purposes. And you can obviously customize how the platform translates by changing the “Duration”, “Start Delay”, and even the way in which it accelerates by editing the curve.
Conclusion
So as I said we would in the beginning, we’ve gone through level creation and how to implement an interactable game object. We’ve also covered how to add enemies into your level (I guess those could count as an “interactable” too). Just from doing those things, you probably already know that we have only covered the tip of the iceberg when it comes to the 3D Game Kit. I suggest that you investigate for yourself the other things that this kit can do. You could do that, or, you could read the second part of this tutorial. Whatever you chose to do, just:
Hey everyone, my name’s Daniel Buckley and I’ll be your instructor for this course.
We’re gonna be learning how to create the life cycle of a butterfly using augmented reality. This is a look at what we’ll be making. It’s an augmented reality app that uses image image targets, which are like little QR codes that can render models on top. We’re gonna be using those, four of them, to showcase a different segments in the life cycle of a butterfly. The aim of the game is for the player to position the segments in the correct order of the life cycle, then click on the Check button to see if they’ve won.
So what are the we’re gonna be learning this course? Well, first of all, we’re gonna be learning how to use the EasyAR SDK in Unity. This is an augmented reality SDK that works by using image targets. Image targets are these little QR codes that the app can identify and can figure out its position, rotation, scale, and then render images, particle effects or whatever you want on top of ’em. In our case, we’re gonna be rendering our four different models as seen in the GIF here. As well as this, we’re also gonna be using Unity’s UI system to display to the player if they’ve won or not as well as checking for inputs on the button.
Zenva is an online learning academy with 350,000 students. We’ve a wide range of courses for people who are just starting out or for those people who just wanna learning something they don’t already know. The course is also very versatile, allowing you to learn in many different ways. You can choose to just watch the course and soak in the information up that way or you can follow along with the included project files. Now let’s get started.
Transcript Part 2
Hey everyone, this is gonna be a tutorial on how to download the Android SDK with Unity.
First of all what you wanna do is you wanna open up the Unity hub and navigate over to the Installs tab. In here you wanna download a version of Unity that is 2019 or higher. Here, I’m gonna download a version of Unity that is 2019, and when you click on download, and you wanna make sure that you have Android Build Support and Android SDK and NDK tools selected. With those selected, you can then click on next. Click that you agree, and the download will begin. Alright, when the download’s finished, either open up a new Unity project or open up your existing project that you want to use with the new version.
Now what you want to do, is you want to do two things. First of all, change our build platform from PC Mac and Linux Standalone over to Android. So to do that, let’s go to File, Build settings and let’s switch over to the Android Build Platform. So, click on Android here, and then we want to click on the Switch Platform button down at the bottom of the window. This may take time depending on how large your project is. If it’s a empty project then it shouldn’t take too long, but if you do have quite a few assets it can take some time. So, once that’s done we can exist out of the Build Settings window and what we want to do now is check to see whether or not the STK is installed. So to do that, let’s go up to Edit and down to Preferences here. Once we open this, click on External Tools and we should see that we have the JDK Installed with Unity ticked, We have Android STK, Android NDK and the Graddle Installed with Unity ticked as well. That means that we have our STK installed and we’re ready to publish to Android.
To build to your Android device, make sure that you have your device plugged into your computer and then what you wanna do is in your Unity project, again making sure that the platform is set on Android, go to the Build Settings menu and File, Build Settings and click on the Build and Run button down here.
This will prompt you to save your APK at a certain location, and when you save it there, and click save, it will begin the build and, when that’s complete it should then launch onto your device. Make sure that you do click the Build and Run button and not just the Build button, otherwise it won’t launch on your device.
Transcript Part 3
Hey everyone, this video’s gonna show you how to build Unity app to an iPhone or iOS device.
First of all, what we want to do is we want to navigate over to the Installs tab. Here, you want to make sure that you have a version of Unity that is 2019 or higher. If you don’t, you can install that. But if you do, we want to make sure that we have the iOS component installed. Click on those three little dots, and click on Add Component. And here, you want to make sure that you have iOS Build Support ticked and installed. And we can open up now our existing project or create a new one.
Now that we’re in our project, we need to change our build platform from PC, Mac, and Linux Standalone over to iOS. So to do that, go File, Build Settings, and then what we want to do is we want to select the iOS Build Platform, and then click on Switch Platform. This may take some time depending on the size of your project. If it’s a small project, it shouldn’t take too long. But the larger it is, the longer it will take. Once that’s done, we can exit out of that window. And as you can see, we are now in the iOS Build Platform.
What we want to do now is go to our Project Settings window. So to do that, go Edit, Project Settings. This will take us to the Project Settings window and we want to make sure that we’re on the Player tab. Here, scroll down to where it says Bundle Identifier. This is basically the identifier for the app. It’s gotta be unique for the app and the way it’s structured is you have com, dot, your company name, dot, your product name. In this example here, I’m just going to enter in Zenva for the company and Test Project for the project name. Now we’re ready to build our scene. To do this, we can go up to File, Build Settings. In here, we want to first of all make sure that we have all of our scenes we want to build in the Scenes In Build section.
We’re in our default scene at the moment, so we can just click on the Add Open Scenes button and that’ll add our current scene to the build. With that done now, we can click on the Build button. This’ll prompt us to choose a location to save it in. You can save this wherever you want, really. I’m just gonna also save this as TestApp and put in my folder. The name for the test app, that’s just for the file. We will change that later on in Xcode. Then once that’s done, click on Save and it’ll start to build. Again, this may take time depending on the size of your project. Once that’s done, you want to navigate over to your app and find the Unity-iPhone.xcodeproject.
You will need Xcode installed. You can download this on the App Store. When that’s done though, you can just double click on the Xcode project and it should open up in Xcode. Now that we’re in Xcode, we can click on our Unity-iPhone project to bring it up. But what we need to do first is connect our Apple ID to Xcode to be able to build apps. And to do that, you want to go Xcode, Preferences, and then you want to click on the Accounts tab. Here, you want to make sure that you have your current added. I’ll put a link on the screen right now and the section below which can link you to a tutorial on how to set up your Apple ID account for Xcode. Once that’s done though, we can exit out. And what we want to do now is go to where it says Signing, and we want to tick Automatically Manage Signing. Click Enable Automatic and this’ll basically just reduce the amount of options we have to enter in as it can reduce it down to just one.
Here, we want to click on the Team dropdown, and select our team or creator. And this is for me it’s gonna be Zemva. But for you, it could be your name or your company. Once that’s done, we can also change the display name. This will be what the app shows up on the screen as on your iPhone. You can make that really whatever you want, it’s just a Bundle Identifier that has to be unique. And that’s basically all there is to setting up. You can of course go onto more detail in more of the settings, if you want.
But for the basics, this is all you really need to do. Now, you just need to make sure that you have your iPhone or your Apple device connected. You can see in the top left side of the screen I have my iPhone connected. And once that’s done, just click on the play button and it should start to build. This is probably the most lengthy process in all of the process so far. So this can take time. It took me about 10 minutes to do this.
Now that we’re done, we have our app on our phone. And if we click on it, it’ll boot up. But of course, we didn’t really do anything to our app so it’s just a blank scene. But yeah, that’s the basics of how to set up a project on Unity and build it to your iPhone, see ya.
Hey everyone. My name is Daniel Buckley and I’ll be your instructor for this course. In this course, we’ll be learning how to create an AR crane operator game. This is a look at what we’ll be making.
As you can see, we have our crane here, which can rotate. It can pick up a container and place it in a truck. As well as this, we also have an AR dashboard. And all of these four different things are actually image targets, which are these little QR codes that you can print out. And you can place them anywhere you want and the app will be able to render models and various different things on top.
So let’s have a look at some of the stuff we’ll be learning this course. First of all, we’ll be learning how to use the EasyAR SDK. This is an augmented reality SDK, which allows you to use image targets. Like I mentioned, these are little QR codes that you can print out and the app is able to identify them. It can figure out their position, their rotation, their scale, and then it can render models, images, particle flex, whatever you want on top of them. As well as the crane controller, this will feature the crane being able to rotate, move the hook, lift, down, pick up the container and place it in the truck. Something pretty cool as well with this project, is we’re going to be having the controls actually part of the AR app. It’s going to be a little dashboard that you can choose to place wherever you want, and you’ll actually be tapping on the buttons on the screens to be able to move the crane.
To do that, we’ll be creating a touch input manager and this will be able to detect touches from the screen, figure out where in the game world they are touching. And if they’re touching any objects, then that object will be triggered. If it’s a button, then whatever that button is connected to will be triggered. This is a script that is also very versatile, and can be used in many other projects.
ZENVA is an online learning academy with 350,000 students. We feature a wide range of courses for people who are just starting out, or for people who just want to learn something new. The courses are also very versatile in how you want to learn with them. You can choose to just review them and soak the information up that way, or you can follow along with the included project files. So, with that all said, let’s get started on the project.
Transcript Part 2
Hey everyone, this is gonna be a tutorial on how to download the Android SDK with Unity. First of all what you wanna do is you wanna open up the Unity hub and navigate over to the Installs tab. In here you wanna download a version of Unity that is 2019 or higher.
Here, I’m gonna download a version of Unity that is 2019, and when you click on download, and you wanna make sure that you have Android Build Support and Android SDK and NDK tools selected. With those selected, you can then click on next. Click that you agree, and the download will begin. Alright, when the download’s finished, either open up a new Unity project or open up your existing project that you want to use with the new version. Now what you want to do, is you want to do two things. First of all, change our build platform from PC Mac and Linux Standalone over to Android. So to do that, let’s go to File, Build settings and let’s switch over to the Android Build Platform. So, click on Android here, and then we want to click on the Switch Platform button down at the bottom of the window. This may take time depending on how large your project is. If it’s a empty project then it shouldn’t take too long, but if you do have quite a few assets it can take some time.
So, once that’s done we can exist out of the Build Settings window and what we want to do now is check to see whether or not the SDK is installed. So to do that, let’s go up to Edit and down to Preferences here. Once we open this, click on External Tools and we should see that we have the JDK Installed with Unity ticked, We have Android STK, Android NDK and the Graddle Installed with Unity ticked as well. That means that we have our STK installed and we’re ready to publish to Android. To build to your Android device, make sure that you have your device plugged into your computer and then what you wanna do is in your Unity project, again making sure that the platform is set on Android, go to the Build Settings menu and File, Build Settings and click on the Build and Run button down here.
This will prompt you to save your APK at a certain location, and when you save it there, and click save, it will begin the build and, when that’s complete it should then launch onto your device. Make sure that you do click the Build and Run button and not just the Build button, otherwise it won’t launch on your device.
Transcript Part 3
Hey everyone, this video’s gonna show you how to build a Unity app to an iPhone or iOS device.
First of all, what we want to do is we want to navigate over to the Installs tab. Here, you want to make sure that you have a version of Unity that is 2019 or higher. If you don’t, you can install that. But if you do, we want to make sure that we have the iOS component installed. Click on those three little dots, and click on Add Component. And here, you want to make sure that you have iOS Build Support ticked and installed. And we can open up now our existing project or create a new one. Now that we’re in our project, we need to change our build platform from PC, Mac, and Linux Standalone over to iOS. So to do that, go File, Build Settings, and then what we want to do is we want to select the iOS Build Platform, and then click on Switch Platform. This may take some time depending on the size of your project. If it’s a small project, it shouldn’t take too long. But the larger it is, the longer it will take. Once that’s done, we can exit out of that window. And as you can see, we are now in the iOS Build Platform.
What we want to do now is go to our Project Settings window. So to do that, go Edit, Project Settings. This will take us to the Project Settings window and we want to make sure that we’re on the Player tab. Here, scroll down to where it says Bundle Identifier. This is basically the identifier for the app. It’s gotta be unique for the app and the way it’s structured is you have com, dot, your company name, dot, your product name. In this example here, I’m just going to enter in Zenva for the company and Test Project for the project name. Now we’re ready to build our scene. To do this, we can go up to File, Build Settings. In here, we want to first of all make sure that we have all of our scenes we want to build in the Scenes In Build section.
We’re in our default scene at the moment, so we can just click on the Add Open Scenes button and that’ll add our current scene to the build. With that done now, we can click on the Build button. This’ll prompt us to choose a location to save it in. You can save this wherever you want, really. I’m just gonna also save this as TestApp and put in my folder. The name for the test app, that’s just for the file. We will change that later on in Xcode. Then once that’s done, click on Save and it’ll start to build. Again, this may take time depending on the size of your project. Once that’s done, you want to navigate over to your app and find the Unity-iPhone.xcodeproject. You will need Xcode installed. You can download this on the App Store. When that’s done though, you can just double click on the Xcode project and it should open up in Xcode. Now that we’re in Xcode, we can click on our Unity-iPhone project to bring it up. But what we need to do first is connect our Apple ID to Xcode to be able to build apps. And to do that, you want to go Xcode, Preferences, and then you want to click on the Accounts tab. Here, you want to make sure that you have your current added.
I’ll put a link on the screen right now and the section below which can link you to a tutorial on how to set up your Apple ID account for Xcode. Once that’s done though, we can exit out. And what we want to do now is go to where it says Signing, and we want to tick Automatically Manage Signing. Click Enable Automatic and this’ll basically just reduce the amount of options we have to enter in as it can reduce it down to just one. Here, we want to click on the Team dropdown, and select our team or creator. And this is for me it’s gonna be Zemva. But for you, it could be your name or your company. Once that’s done, we can also change the display name. This will be what the app shows up on the screen as on your iPhone. You can make that really whatever you want, it’s just a Bundle Identifier that has to be unique.
And that’s basically all there is to setting up. You can of course go onto more detail in more of the settings, if you want. But for the basics, this is all you really need to do. Now, you just need to make sure that you have your iPhone or your Apple device connected. You can see in the top left side of the screen I have my iPhone connected. And once that’s done, just click on the play button and it should start to build. This is probably the most lengthy process in all of the process so far. So this can take time. It took me about 10 minutes to do this. Now that we’re done, we have our app on our phone. And if we click on it, it’ll boot up. But of course, we didn’t really do anything to our app so it’s just a blank scene. But yeah, that’s the basics of how to set up a project on Unity and build it to your iPhone, see ya.
This tutorial is the second installment of a series on the amazing 3D Game Kit (click here for the first one). Part 1 left things soft of on a cliffhanger as we opened up the expansive “Interactables” folder. In this follow up, we will be covering most of the prefabs in this fabulous feature full folder. This includes things like switches, counters, and doors. With this knowledge, you will be able to understand how the 3D Game Kit works behind the scenes, and it will give you the ability to make your games more engaging for the player. Without further ado, let’s continue examining this terrific tool to transform our textured terrains (that was my attempt at alliteration).
Doors and Switches
You will notice in the Interactables folder that there are three different door prefabs.
The differences between these prefabs are mainly in the design and not in the actual function. A door has many uses in a game and that’s why we will focus a lot on these sorts of prefabs. Go ahead and drag one of the prefabs into your scene (doors go under Gameplay) and let’s have a look at what we can do with it.
At first glance, we can see two things that look fairly significant. The first is the “start” and “end” gizmos. These are designed to be self-explanatory when the door is triggered it will move to where ever the “end” transform is. This gives us a couple of design advantages, for example, when the door is triggered it could open up one passage and then simultaneously be moved in front of another passage. So that the player is forced to make careful decisions about where to trigger doors knowing that it will block another potential path. This is just one example of what we could do with this system of opening doors. The second thing that is apparent when we examine this door is the “Game Reciever” component in the inspector.
This is the actual component that does the “behind the scenes” work and it tells us about how the 3D Game Kit deals with its Interactables. The way the 3D Game Kit handles things like doors is through a system of Senders and Receivers. The door is an example of a receiver. In order to be opened, it must obtain a command from a separate game object known as a Sender. A Sender could be a switch, a pressure pad, or even just an inventory that possess all the required items. This system is a fairly common messaging system that has been set up so that we don’t have to program all these reactions. So let’s see what Interactables we can use to open this door. Go ahead and drag the “Switch” prefab somewhere in your scene, this is what will open the door so place it accordingly (this goes under Gameplay as well).
You will notice that the switch has a “Send On Trigger Enter” component.
This is where the data is sent to the receiver. Drag the door game object into the “Interactive Object” field. Change the “Interactive Type” to “Open”.
Notice that the switch and the door are now connected by a line gizmo. If you hit play you’ll notice that we can now open the door through this switch!
Doors and Counters
A switch is a pretty basic way of opening a door. The player crashes into it and the portal flies open. Thankfully, there are two other ways of opening a door with the 3D Game Kit. One of them is mainly design oriented and the other is for gameplay purposes. Let’s look at the aesthetics one first. You may have already noticed the “PressurePad” prefabs in the Interactables folder.
These work the same way as the switch except they’re a little less noticeable. This could be useful if you wanted to make one of them hidden so the player has to search for it. It has the exact same components as the switch so you already know how it works. The other way of opening doors is by using multiple switches. We do this by using the “Counter” prefab in the Interactables folder.
This allows us to add another level of complexity, and therefore entertainment, to opening a door. Go ahead and drag in the Counter prefab and let’s have a look at it (it goes under “Gameplay”).
We recognize the “Send Game Command” component from the switch but there is also another component called “Gameplay Counter”. One thing that is very convenient about the 3D Game Kit is that everything has a nice descriptive title. Such is the case with this component, this is what keeps track of “activated” switches. At first glance, we recognize the “Interaction Type” field along with the standard “Cool Down” and “Start Delay”. But notice that there are two new integer fields named “Current Count” and “Target Count”. This is the legendary descriptive title at work which renders these variables self-explanatory. “Target Count” is currently set to three so let’s go ahead and drag in three switches (or pressure pads, it works the same way) onto our terrain.
Since the Counter game object is only really visible in the hierarchy, let’s change the size and color of its gizmo so that we can see it.
Now we need to wire these switches together, we do this by selecting a switch and dragging the Counter object into the “Interactive Object” field. Set the “Interactive Type” to “open” and then repeat this across the other two switches.
Next, make sure the both of the “Interactive Type” fields on the Counter are set to “open”. Then drag the door game object into the “Send Game Command” component.
You’ll notice that we have arrows running from each switch to the counter than from the counter to the door. This visual aid will be a huge help if you start adding in more doors with switches. With all of this done we can hit play and open our door by activating each switch!
Bonus: adding a visual progress
When we add multiple switches into our scene it would be much better to space the switches out all over the level. This is so the player can go and “hunt” for all the switches in order to open the door. Let’s go ahead and place the active switches in different places in our scene.
This really is the reason we use multiple switches so that it is more challenging for the player. But the problem with immediately throwing switches in obscure places is that the player doesn’t know how many switches to look for.
It could be two or twenty-two but the player still wouldn’t know if the switch he just activated was the first of ten or the first of twenty. We need a way to visually indicate to the player the progress of unlocking the door. We do this by having “crystals” next to the door which lights up every time a switch is activated. Go to the Interactables folder and drag three “Crystal” prefabs (one for each switch) on the left side of the door (these crystals go under Gameplay).
Now, all we have to do is to add another “Send On Trigger Enter” component to a switch, then drag a crystal into the “Interactive Object” field.
Make sure that “Interactive Type” is set to “activate”, the Layer is set to “Player”, and that “One Shot” is enabled. Now when you activate this switch in the game, you’ll notice that the crystal lights up as well!
Fantastic! Now just repeat that process for the other two switches and you’re good to go!
Teleporters
A game as complex as this wouldn’t be complete without teleporters. There are two types of teleporters in the 3D Game Kit. The first is your standard “place to place” teleporter where the player is transferred from one place in the scene to another. The other is used to “teleport” the player to another scene. This one can be used as a level completion teleporter. Let’s have a look at the first sort of teleporter.
The “Interpolation” teleporter
Let’s go ahead an drag in a “GateWayHugeTeleporter” (this is in the “Structures” folder), this will serve as our teleporter. Rotate it around so we can see the nice “teleporter” overlay.
Next, open up the “GateWayHugeTeleporter” and find the “TeleportPlane” game object.
This will be the collider that will trigger teleportation so make sure it has a Box Collider that is set to “trigger”.
Click “Add Component” and search “Teleporter”.
Add the “Teleporter” script and let’s wire up this teleporter.
The settings here are pretty straight forward, we need to change the layer to only pick up the player, and we need to set up a destination transform. Let’s do the latter before the former, create an empty game object (this could go under “GameUtilities”) and name it “TeleportDestination”.
Drag this into the respective slot on the “Teleporter” script and we’ll see that the gizmo in the scene view has changed. Next, let’s go ahead and add in a particle effect when the player leaves the teleporter. All we need to do is to expand the Ellen game object and drag the “RespawnParticles” onto the “Exit Effect”.
Now hit play and walk into the DoorGateway. Boom! The teleporter is online!
The “Scene to Scene” teleporter
This next one is a bit more involved. We first off need two scenes, one to teleport from and one to teleport in to. We already have the first one so let’s set up the end scene. Create a new scene in the 3D Game Kit named “Scene2”.
From here go to the “SceneControl” folder and drag in the “TransitionDestination” prefab (this goes under Gameplay).
Here we need to set what is known as a “DestinationTag”, this is just a letter that the teleporter uses to identify the correct destination. Set it to something other than the default because the demo package likely uses the default tag. Next, drag the “Ellen” game object into the “Transitioning Game Object” field and make sure the “On Reach Destination” function call is set to “CharacterStateSetter.SetCharacterState”.
Okay! We’re done with this scene so let’s add it to the build settings. Go to File->Build Settings
and click “Add Open Scenes”.
Now go back to Scene1 and let’s set up the teleporter on this end. Go ahead and place another DoorGateWayHuge in the scene to serve as the new teleporter.
Go to the “SceneControl” folder and drag the “TransitionStart” prefab in the doorway.
Right off the bat, there is something that we must do to this prefab or else it will not work. When I was using this, I noticed that the collider attached to this game object is a 2D collider.
They may update this in the future, but for right now, we need to switch this out with a 3D collider or else the attached script will not work. Add a Box Collider, scale it so that it fits the doorway, and make sure it is set to “Trigger”.
Okay, now drag the “Ellen” game object into the “Transitioning Game Object” field … and set the “Transition Type” to “Different Zone”. Next, set the proper scene (Scene2) and the proper tag. Change it transition “On Trigger Enter” and that should complete our “Scene to Scene” teleporter!
Hit play and beam her up Scotty!
Dialogue boxes
The last thing we are going to look at is the dialogue used in the demo to tell the player how to use the game. I thought this was pretty cool so let’s go ahead and re-create this in our own scene. Let’s have it so that when the player walks up to the locked door, we’ll get a dialogue box that says something like, “Hmm… Looks like I have to find all the switches in order to open this.” To do this, go back to the “Interactables” folder and find the “InfoZone” prefab. Drag it and scale it so that it covers the door very liberally (this goes under GameUtilities).
Next, go to the “UIPrefabs” and drag in the “DialogueCanvas” (this goes under “UI”).
Now, all we have to do is to drag the DialogueCanvas into the two slots in the InfoZone.
Set the layer to only detect the player and set the “On Enter” call to be “DialogueCanvasController.ActivateCanvasWithText” and the “On Exit” to be “DialogueCanvasController.DeactivateCanvasWithDelay”. Now, to finish this, all we do is to type our text in the “On Enter” field and we’re all set up!
Now we have a way of telling the player what is happening.
Conclusion
You probably already know that the 3D Game Kit can do more than I have detailed in the second part of this tutorial series. You would be correct. I suggest acquiring a spirit of exploration in order to understand more about this expansive tool. Unity has decent documentation which you can use as a starting point. I would suggest that you start there, but don’t forget to…
Hey everyone. My name is Daniel Buckley, and I’ll be your instructor for this course. In this course, we’re gonna be creating tectonic plates in augmented reality.
Let’s have a look at what we will be making. We’re gonna be using an image target, which renders two tectonic plate models that we can interact with to create different plate boundaries. At the top left, we have the convergent boundary, where two plates move towards each other, and this will be done by simply dragging across the screen, like swiping across the screen towards the center on both plates. Then, to the right of that, we have the divergent boundary. This is where the user will swipe away from both plates, and that will cause the plates to move apart from each other. And down at the bottom, we have the transform boundary. This is where the user swipes parallel to each other, going in opposite directions, which causes the plates to grind along each other horizontally.
Let’s have a look at what we’ll be learning in this course. First of all, we’ll be learning how to use EasyAR in Unity. EasyAR is an augmented reality SDK, which allows us to use image targets. These are little QR codes that you can print out that the app can identify. You can figure out its position, its rotation, and its scale and can then render models, particle effects, or whatever you want on top. In our case, we’re gonna be rendering these two tectonic plates, as well as a little lava image. One of the largest parts of this project is gonna be the animations. As you can see, each of these different type of boundaries have specific animations that play, even some that have particle effects playing along with them. These animations will then be combined with Unity’s timeline. The timeline is a tool that allows you to pair animations with each other, as well as various other things, like enabling and disabling objects and calling functions and scripts. This is a very versatile tool that is mainly used to make cut-scenes and different scripted segments in games.
For us to also be able to drag and move the tectonic plates, we’ll be creating a touch-and-drag manager. This will detect touches on the plates and then figure out the direction that the player drags in to calculate then which direction to move the plate.
ZENVA is an online learning academy with 350,000 students. We feature a wide range of courses for those people who are just starting out or for those people who just want to learn something new. The courses are also very versatile. You can learn many different ways. If you just want to view the course and soak up the information that way, that’s fine. You can also follow along the course with the included project files. All right, with that done, let’s get started on making our project.
Transcript Part 2
Hey everyone, welcome to how to create interactable tectonic plates in augmented reality. In this lesson, we are going to be creating our plates, ready to be animated and scripted in later lessons.
So to begin, let’s first of all set up our EZAR SDK inside of our unity scene. To do that, go down to the EZAR folder, go to pre-fabs, and then drag in the EZAR, start a pre-fab into your scene. Once that’s done, go to the side where we have our EZAR behavior, and you just want to paste in your SDK key that you created on the EZAR website. Now, once that’s done, we can just delete our main camera over here, as it’s no longer needed as EZAR actually comes with a camera already set up here. Now that we have that done, we are ready to actually start making our plate. So to do that, we can go back to our EZAR photo, go pre-fabs, primitives, and drag in the image target. Now, what image target is, is basically a image that the app can actually identify through the camera and render whatever you want on it, in our case, we’re going to be rendering a 3-D model of two tectonic plates and following animations.
The image marker looks like this, so it’s a very specific image, looks a bit like a QR code. And the point of having all of this sort of detail, and all of this contrasting colors is so that the app can easily identify it. It’s got to be an image that is very specific and with a lot of points, see, there’s a lot of right edges, sharp points, a lot of contrasting colors, in our case two very contrasting colors, white and black. In doing that, we’ll create an image target that is very identifiable by the app. Now that we have our image target here, let’s actually rename it to Image Target underscore Tectonic Plates, and down here, in our path, we need to enter in the path of our image target. Now, with these here, it’s pretty easy to set up image targets, you only need to create a photo called streaming assets, down here, and you place in your image targets as a jpeg image.
So it’s easy as that, EZAR is able to identify this photo when the game starts, and to load up these images. So, going back to our image target, we can enter in the path of that image, and that image is called tectonicplatesmarker.jpeg, so you can just enter that in here. And then down in the name, we just need enter in the name of the file, we don’t have to include the file extension. So that will just be tectonicplatesmarker, and for the size, we’re just going to enter in 5 by 5, and what this is, it’s basically a reference to the marker in real world, basically, so whatever models or images or particle effects, or whatever you put on top of this, however large it is in reference to the size of this pink square is how large they will be in reference to the actual image target. So if you print out a really small one, and let’s say the model is twice the size of this pink square, and you print off a one centimeter by one centimeter little image target, then the model will be two centimeters wide. Whereas if you print off a, let’s just say, ten by ten one, then the model will be twenty by twenty. So it scales up, it’s not necessary that you make this pink square a specific size, but if you do want to use the empty units for whatever reason, then you might want to do that. But in our case, five by five is fine, because we’re only using two models and most of this stuff is done in script anyway.
Now, it’s time to actually start importing your models on top. So, to do that, we’re gonna’ right click on the image target, let’s actually drag this out a bit, right click on the image target, and go create empty. I’m going to create an empty game object just to store our models, make it a little more easier, act like a little container, and also the fact that the scale is one one, whereas on the image target, it’s actually five, so just for scale purposes and ease of use, I’m going to do this. And let’s just call this tectonic plates. Now that done, we also need to create two more empty game objects, one for the left plate and one for the right plate. So let’s just do that now, let’s create one here, call this left plate, we can also duplicate with control d, so let’s just do it like that instead of having to make a new one. And we’ll call that right plate. Like so. Now it’s time for the model. To do that, let’s go back to assets folder, let’s go to models, and we want to drag in the tectonic plate model right here.
So simply click and drag, and drag in on top of the left plate, like so. It’s pretty large at the moment. If we zoom out we can use WSD and hold right click to look around and move, and as you can see, it is pretty large at the moment. So what we’re going to be doing is we’re going to re-size it, so down here on the scale let’s make this point five by point five by point five. See how large that is it’s pretty large compared to the pink square so let’s actually scale it down a bit more, let’s go point two by point two by point two. And, yeah, that looks about right. So what we can also do now is we need to rotate this so this side here is facing here so with that we can alter the y let’s make this 90 on the y like so, and we want to drag it back so it’s about in the center like so so that’s about one, well not really one, let’s turn off the lighting up here actually. Up here there’s a little icon, in the scene view, and we can just disable them, what that does that basically turns off the lighting in the scene view because, with the directional light, some sides can be quite dark, whereas, if we do go back to game view, you can see the lighting is still on.
We’ll talk about the game view later and how to work on it in the editor. Come back to the scene view now. We can now duplicate this tectonic plate with control d, and drag it into the right plate there. Let’s then set the x to negative one, since it’s on this side now, and set the y to negative 90 so we can flip it like so. And there we go, we got two plates set up ready to be animated. See, if you go into game view, you can see our plates here. Now, something we can do, I personally find it that the plates are a bit too wide on the side, so we can actually lower that zed scale, let’s make that one eight over here, point one eight, and we can make them a bit closer by making it negative point nine. So to rename these, we’ll call this right plate model, right plate model here, and our left plate model, we’ll call that left plate model, like so.
And there we go. We have our plates set up, ready to be animated in the next lesson. So yeah, see you then.
Transcript Part 3
Welcome back everyone, in this lesson, we’re gonna be starting to create the actual animations for our app.
These animations are gonna involve the transform, forward and backwards, the divergent animation, and the convergent over-under and convergent under-over. I’ll be explaining these in a second, why there are some duplicates, and so yeah, let’s get started. First thing you wanna do, is open up our image target, open up our tectonic plates, and open up to see the models. And what we wanna do is we just wanna remove the animated component on both of our models, as that won’t be needed, as we are gonna be animating them as a whole. So once that’s done, click on our tectonic plates up here, our empty game object which holds our two plates, and what we wanna do is we wanna add an animator component to that, so just look up animator, and add that like so, and now what we wanna do is we then want to go over to our animations folder here, open that up, if you don’t have an animations folder, simply create one, and what we wanna do in there is right click, go create, and we want to make an animated controller, and we’ll simply call this Tectonic Plates.
And once that’s done, we click on tectonic plates here with our animator, and drag that into our controller. What an animated controller is, it is basically if I double click, it’s basically a place, it’s basically a list of all the different animations and states and the connections between them. So you’re able to call specific animations, and then those animations can pass onto others, it’s very useful for if you have states, such as a character, such as your default state would be idle, then there would be running, and there’d be jumping, those sort of animations. But in our case we’re not really gonna be using the animator, we’re just gonna be having it, it’s ’cause it’s kind of a necessity for the animations. We’re gonna be mainly focusing and building our animations inside of a timeline, which we will going on over next lesson. But for now, let’s start creating our animations.
So our first one, let’s right click in the animations folder, go create, and animation. And we are gonna be calling this one our TransformForwardsBack. Let’s click on our tectonic, actually let’s click into our animator here, and simply drag and drop it in, there we go. Now, what we wanna do is we wanna go back to our scene view, we want to click on our tectonic plates here, and then we wanna open up our animation window down here. If you don’t have this window already, you can go window, then you can go animation, animation, and that should open up the animation window. And once you have your tectonic plates selected, we should then be introduced to this window here, the animation window. Make sure that you have your TransformForwardsBack animation selected here, and we can begin animating. Now, the TransformForwardsBack animation it is simply the two plates grinding along each other horizontally, and what forwards back means, is basically the left plate is gonna go forwards, while the right plate is gonna go back. We’re gonna have an alternate animation as well, called TransformBackForwards, which means the left plate goes back and the right plate goes forward.
This is because we’re gonna allow the player to swipe either direction pretty much, so they’re not gonna be restricted to going, they have to swipe up on the left and swipe down on the right, they’ll be able to do either on both and it’ll play a different animation. So to begin, let’s click on add property, and what we wanna be animating is our left plate. Our left plate model right here. So we wanna open up that left plate model, open up it’s transform, and position like so. Do the same for the right plate as well, right plate, right plate model, transform, and position. Now, what we wanna do here, is we pretty much want these two plates to move in a tiny bit, and then the left plate to move up, right plate to move down. So for that, we want to go to, actually, we wanna have it so that it does the animation in two seconds, we wait two more seconds, and then it reverts back to default.
So let’s actually stretch this all the way over to six seconds like so, at the two second mark here, we want to click on this red circle here to go into recording mode, click on our left plate model, and let’s just say we want to drag this forwards about, about here, so let’s go negative .7, like that, and on our right plate model, let’s go .7. It’s a bit too far, let’s go .5 instead, negative .5 on our left model, there we go. So now, if you play that back, you can see, that the positions are moving from zero, all the way up to .5 here, and then slowly going back. But we wanna hold this for two seconds, so let’s click on this animation here, go control + C, and then let’s go over to four seconds, and control + V, and there we go. So if you play that back now, it should go up like so, wait two seconds, and then slide back, pretty simple. But we also wanna make ’em move in a tiny bit, so let’s go close, and once we’re here, we also want these to, actually let’s do it here, a bit early on. Alright, let’s go on our left plate model, move that in a tiny bit, let’s make that, actually see if .8 works, .85, .88, and on the right model, negative .88, yep. So as you can see, it goes in a bit, and then slides across, and then they go back. Alright, let’s duplicate this here.
Cause we also want, actually, if we open up these we can see our individual keys here, so as we go up here, we can go here, and enter in our .88 here, our negative .88 there, we can copy this again, and we can paste it over that like so. And then we can also copy that there and paste that there. So now when we play it back, it should go together, out, come back, and like so. So yep, that’s our TransformForwardsBack animation, now let’s also go and create our TransformBackForwards animation, which is pretty much just gonna be a duplicate of this one.
Something you can do to make it easy, if these are mirrored animations, we can simply select all the key points on our ForwardsBack, go to our BackForwards, paste them in, and from there we can easily just go through and flip the individual values.
And there we go. Our BackForwards animation is done. Now we can actually go and move on to our next set of animations in the next lesson. So yeah, see you then.
VR, the ability to experience and be present in worlds that don’t exist is certainly a super exciting field
Using hand controllers is one of the main ways in which we can interact with these virtual worlds.
But the VR ecosystem is very fragmented. Until very recently, your options as a developer were to focus on just one platform using their native SDK, or to embark in a cross-platform hell where you were at the mercy of frameworks that were not always well maintained.
But that’s all changed for good in Unity 2019.1 thanks to the new XR input mapping, which gives you an easy way to access all buttons in all the main controllers.
Hey guys, my name is Austin Gregory and in this course we’re gonna cover Unity Analytics, which is a free service provided by Unity that allows us to track and manage player progression through our game, as well as acquisition to see when we’re picking up new players, where we’re losing players, what kind of retention we’re having, where players are finding difficulties in our games, tweaks to make the experience a bit more smooth for our players.
So in this course, we’re gonna first create a simple little demo that’s just gonna be a few buttons on the screen that allows us to send out these events that the analytics service requires to build the metrics that we’re going to use. So very simple start. Then we’re gonna set up the analytics service itself inside of the editor, which is also a very simple thing to do, and then we’re gonna look at the core events that Unity sends for us. These are events that Unity handles for us. Then we’re gonna look at sending out standard events which are events that Unity has defined for us, but we get to decide when they fire off. So we can use this to track player progression through certain levels, for example. We’re also gonna track some simple in-app purchase events.
We’re gonna send some dummy data to the service that say hey, somebody bought something, just to see how that looks in the dashboard. And then we’re gonna set up and talk about funnels. Funnels are quite powerful and maybe the most powerful tool you will use from this course. And then we’re gonna take all of that that we’ve learned and talk about the individual metrics that we will need to understand to make meaningful changes to our game.
So my name is Austin Gregory and I will see you in the first lesson.
Transcript Part 2
Hey, guys, welcome back. In this first lesson, we’re gonna set up a quick demo that we’re going to use to interact with our analytic events. We need some way to fire off the events, some way to actually send these things to the service. So we’re going to use a simple little demo.
It’s just going to be some UI buttons that we can click and do something that would kind of mock what a game would do. So we’re gonna have buttons that actually act like they’re purchasing something from like an in-app purchase store. We’re gonna have buttons for loading and completing levels. We may end up killing player and seeing what that can do for our game-over, maybe. Maybe, we have an event for the game ending.
And we’re also going to have like leveling and stuff like that, and then we can send an event every time a milestone is reached. So every time you reach five levels, or 10 levels, we’ll send that event. You don’t wanna go too heavy on the data that you’re sending, because you’re going to have to use this data for something later on to actually make meaningful changes to your game or to see how people are interacting with your game. So if you have too much data, you can really kinda go crazy with that. So we’re going to keep it very simple and just go over the basics and talk about what we can do with analytics in Unity.
So in Unity Hub, I’m gonna create a new project just by clicking New Project and I wanna call it Unity Analytics. And I’m gonna use the latest version I have, which is 2019.1.0b9. It’s the beta for that. And I’m just gonna select 2D because we need to keep it very simple, and just Create Project. Once our project loads, I’m gonna go up to Layout and go to Default to make sure we’re all on the same layout here. And I’m also going to change my game aspect ratio to be 16:9, just so I know what I’m working with when I’m laying out my simple little UI here. Because we’re gonna do very basic UI stuff and I want to make it restricted to a 16:9 screen. So I’m going to create a UI panel to hold a few buttons. So just create UI panel. Double-click on that to center it in my frame here. And this is just going to be kind of like our main buttons here.
And then, off to the right here, we’ll have out in-app purchase mock buttons that will send in-app purchase events to our analytics service. So no background and we’ll change the color to be whatever you’d like. And now, inside of this panel, I’m gonna have a grid of buttons. So I’m gonna Add Component, Grid Layout Group. And they’re gonna be about 300X75. Some spacing all around. Padding all around the panel. And I want these to be centered right in the middle. Now, with that inside the panel, we’re gonna create some more buttons here. And now, we can actually create a button that already has TextMesh Pro text in it, which is what we want to do. We don’t have to create a button, and then, remove the text and add it and all that stuff. Import TMP Essentials so we can use the nice text engine, TextMesh Pro.
Let’s grab this color here and we’ll make this a lighter version of the background. And take the text and make it kind of like a cool gold color. Bold, a little underlay, maybe. And this will say Load Next Level. So we’re gonna be able to load a level then complete a level. So we’re gonna be kind of mimicking how you play a game. Load level, complete level. Load level, complete level. And we’re gonna have a set number of levels, maybe, that you have to complete. And then, we’re going to send all this data to our Unity Analytics service so we can see what levels people are struggling with, where they are stopping, and trying to decide what changes we have to make to get them back into the game to continue and complete the levels that they stopped on.
Or, at least, to get people in the future to continue those levels so we don’t have people dropping off on certain levels. And then, CTRL + D to Duplicate. Complete Level. Kill Player. Level-up one. And then, I’ll just add a simple text element to the top here. Game Events. Bold and center it horizontally and vertically. And we can keep going with these but this is gonna be enough for me to test these events. And then, I want to have another panel over here for in-app purchases. So I’m just gonna take this and duplicate it, and then, just scale it down, move it over just like that.
And, in fact, we could probably do with a little extra space here. 100 Lives, $100. Very cheap. A dollar every time you die. And then, change the background color of this panel. Something like that. Store. And this is going to be the demo that we’re gonna be using to interact with our analytic events to fire off these mock game events so that we can actually track what’s happening in a, quote-unquote, game.
So in the next lesson, we’re going to get started by actually setting up our analytics and Unity itself. My name is Austin, and I will see you there.
Transcript Part 3
Hey guys, welcome back. In this lesson we’re going to set up our Analytics Service in Unity. It’s very simple to do, just a couple of button clicks. And then we’re gonna check out the online dashboard, where we’re going to actually view all of the data that we are sending to the service.
So back in Unity, I’m gonna go up to Window, go down to General and go over to Services. Now this is where you can play with all the services you have for your game or for your project. But in this case, I’m simply going to use that Analytics Service. Now I have a few organizations setup on my account. You probably just have the one at this point, but if you have multiple, just choose the one you want the project to be under.
If you don’t have an organization showing here, you can go to your account and add an organization from the online dashboard, which I’ll show you here in a second. So I’m just gonna use and click create. Now we have a bunch of services, but I care about the analytics and the analytics only for this, so I’m gonna click on Analytics and I’m going to enable Analytics. Mine is not just for young children, so I’m gonna click Continue. Now what is this saying to do? Whenever you click play, it will send the first set of events to the service, kind of syncing it up, so it knows. Okay, I got the project, we’re all hooked up.
So I click play and now whenever I click stop. Now if it doesn’t work immediately for you and show you what you just did in the services tab here, you can try going to the dashboard and coming back in and seeing if that will change, update your events over here for you. If not you may want to, go outta the editor and come back in or reload the services tab. Just try that a couple of different times until you get this validator showing you, okay this is what I did. So it’s showing you, this is when this app started, this is the app running, and these are the core events that Unity is sending out for us that we don’t have to handle.
We don’t have to tell the service, hey this is my app starting, hey this is my app running, this is how long it’s running for, this is my app stopping and all that stuff. It handles all of the base events like that for us, which is great because we do want that information. We wanna know when people come back and play. We wanna know when people stop playing, how long they played for, and it handles all that by default, which is great. So now if we go to the dashboard, you’re gonna see a whole lot of nothing here, because it’s gonna take a while to populate the dashboard with the data that you’re sending.
So what we’re gonna do is we’re gonna do some stuff with our events over the next couple of lessons, and then we’re gonna look at another project I have that I’ve already set up for this purpose that’s already been populated. Took a couple days to get everything populated, but it’s all there now. So we’re gonna be able to see the data there.
It’s gonna be a very similar setup to what we are gonna make in this course, so it’s going to look very familiar. But if I go to event manager, we can see that our validator is visible here as well, the same thing that we’re seeing in our editor. So it is working, everything’s working good, it’s just gonna take a while for this to do anything for us in our actual analytics here.
But we have everything set up and we are ready to start working with our analytics. So in the next lesson we’re gonna have a quick overview of the basic core events. My name is Austin and I will see you there.
Hey, everyone, my name’s Daniel Buckley, and I will be your instructor for this course. So what are we gonna be making? Well, we’re gonna be creating an app that accesses an API to display information to the user onscreen. Specifically, this is gonna be an app that shows upcoming firework displays in the Queensland area. Let’s have a look at this app.
Here in Unity, I have the app open here, and we can search by suburb. If we just, if we don’t enter in anything, it just appears with all the suburbs here. And yeah, we can see that the locations, as well as the date, that they’ll be happening. So for example, we can click on one here, and it will show us information. Starts at 4:45 p.m., it’s a public event, and it’s close proximity, and we also have an address, as well. And as you can see, there’s also a little firework effect going on here. We have different colored particles going off.
We can also filter these selections by – let’s just say we want to have all the firework events that are happening within the next 24 hours. We can click on Today, and that’ll show, within the next 24 hours, the events. You can click on Week to show them within the next seven days. And then we can go Month as well to show within the next month, as well as All. So yeah, this is gonna be an app, very versatile.
This is just one example of what you can do with it. You can do many more sorts of things with APIs, as the database we’re gonna be accessing has hundreds -it has thousands of different data sets you can access.
So what are some of the things you’ll be learning during this course? Well, first of all, we’re gonna be learning about how to connect to an API. We’re gonna be using the Queensland government data sets to access their APIs, as they have a wide range of different information available. We’ll be testing this out, then, in Postman, which is an API development environment that you can download. You can easily enter in APIs, enter in parameters, and then get the result in JSON files to easily test it out before opening Unity. And when we do open Unity, we’re gonna be using the Unity’s UI system to create a very dynamic UI system for our app.
I’ll show you back in the editor here. What we’re able to do is, right now, it is in the nine by 16 aspect ratio. But what we can do as well is pretty much have this work in any aspect ratio. Here, I’ll go to 16 by nine, and as you can see, the UI stretches and warps to the respective size of the screen. We can go back to phone, we can go back, we can try all these different aspect ratios, they all work. So we’ll be using the Unity’s UI system, more specifically, the anchoring and positioning of the UI elements as well as different layout groups. So we’ll be goin’ over a wide range of different UI aspects and components during this course. We’ll also be using Render textures, which are textures that a camera can project onto to display whatever it’s looking at. In our case, we’ll be displaying the different firework particles that we’ll have the camera aiming at, and then have that render to a texture which will then appear on top of the UI.
Zenva is an online learning academy with over 400,000 students. We feature a wide range of courses for people who are just starting out or for people who just wanna learn something they don’t already know. The course is also very versatile, allowing you to watch them whenever or however you want as well as the accompanying lesson summaries. You can choose to watch lessons or read them, or even both. So let’s get started on our project.
Transcript 2
Hey everyone. In this lesson, we’re gonna be figuring out what sort of data we want to have inside of our app, and for that we’re gonna go to the Queensland government website which is a data set website with a lot of free data sets. They have around 2,000 different data sets here, all with different sorts of information but the one we want to do, and the one we’re gonna be designing our app around, is the upcoming firework displays. This is just a list of all the upcoming firework displays, where they are, what time and the sort of types of the actual fireworks.
So to get here we can just go data.qld.gov.au/dataset/fireworks and this will take you to this page here. Now to access the API, we need to click here where it says data and resources. We just click on the API here and this will open up this screen here, but you may be thinking to yourself, what is an API?
Well an API is a framework that allows us to connect to a website or connect to a program application or something that we can then return information from it. And in this sense, we are accessing the Queensland government website, their data website, and we are accessing the upcoming firework displays information. There’s APIs for many different things. There’s APIs for many different websites and services have APIs that we can access. For example, a lot of bus networks would have APIs so that, if you want, you could build an app around that to access the location data and timetables of buses and lots of other websites where it allows you to sort of access their features outside of their website. For example, Google has this, Twitter has this, Facebook has this. There’s many APIs for them that allow you to access their website. For YouTube, you can modify your channel settings and video settings and account settings and all that. That’s not directly on their website, that is done through an API.
We can actually see all the data right now if we just click here on the visualization preview button. This will open up a page with a table similar to sort of, the sort of thing you’d see in Excel. It has all the data listed out for us with all these different fields with ID, display date, the times, the suburb, postcode, display address, the event type, and the display type, so most of this information we’ll be using inside of our app. We’ll be able to display to the user all these different fields and even sort by the display date and suburb.
All right, now, to access the API, ’cause that wasn’t really the API, that was just the visualization side so to access it, we can just click here on data API. Now if you want, you can download this as a CSU file, which is like that table you just saw, but we want the live and updated version of it so whenever I update, we’ll have -constantly have the newest firework displays displayed to us.
So click on the data API button here and this will open up this little window here. This shows us the API here with a couple of query examples. The first one here has the API but it gets the fields (gets a limit of five fields) and this sorts by date so it will get the five most recent fields. Down here we have another one where you can search for keywords and this one searches for a query of Jones. This is just a common theme on the website that it has to show as an example, but for our example we’ll be using this one and this will allow us to search and receive data for a suburb, for example. We can enter in suburb name and that will return all the results with a suburb.
Now let’s just say we click on the first five results one here, this will open up in a new page where it sends the API and it returns this. Now this is an unformatted JSON file. Now a JSON file is basically a way to display data. It has objects inside of those, in these brackets it has the information. Now it’s kind of hard to read here because we see the information, we can see places like Tamborine, event type, we can see some addresses, some times, but it doesn’t really have it in a format that is easy for us to read. So something we can do is convert this to a formatted version that allows us to actually see the data in objects, and a lot more structured in a way.
So to do that we can copy all of this and then we can go to a JSON formatter website, which there’s many of these on the internet. I just went to this one up here, jsonformatter.curiousconcept.com and in here we can paste the raw data and click process. This will then give us a nice looking text here that shows us all of our data. We have these little containers that we can open and close and the one we want to look at is records, because records is all the stuff we’ll be reading. It has each record here. You have your ID, your display date, your time, the same stuff as that table we just saw. So this if the format that we’ll be using it in (inside this JSON object), and good thing about Unity is that it already has a built-in function and built-in utility to actually get these files and deserialize them (which we’ll be going over later on but yeah, that is the data we’ll be needing).
What we need for later on in the next lesson and in Unity is pretty much just this line of text here: this URL so you got the website name, action slash data store search, and we just want the resource ID of this long text here, and we want it just before the at, or the and limit equals five, so up to the seventh B here. And that’s pretty much all we need for that.
So yeah, I’ll see you in the next lesson where we’ll actually be testing this out to see if this works in a external source such as Postman.
Transcript 3
Welcome back, everyone. Before we hop on Unity and create our app, we wanna actually test out the API and be able to visualize the actual JSON file that we get. So, to do this, we’re gonna be using Postman. Postman is an API development environment, which allows us to connect to an API and get a result from it, basically.
So, what you wanna do, is you wanna go to getpostman.com. You then want to sign up or sign in if you’ve already got an account, and then scroll down to the bottom of the page, where it has the downloads link here, under resources. Click that, and then it will take you to the download page. Just download the version of Postman that is for your operating system. If you’re on Windows, it’s right here, Mac, and Linux. And once that’s done, you should then be able to install Postman and launch it up.
Now, this is what it looks like inside of the Postman app, and what we wanna do is in here, where it says enter, request URL, enter in that URL that we copied last lesson. If you remember, it was the, if we click on Data API here on the firework displays, we can just copy the API here up to the limit. So pretty much we want it just the resource ID at the end of the URL. So once you got that, and go here, in the inside of the enter request URL, we can paste that in and -oh, you already have that resource ID popped up here. Okay and we want for another key here. Now these are the parameters, so these are the little parameters here (after when you see the question mark), that’s the start of the parameters, and then every parameter from then is separated by a & sign,
Okay, so what we want our, we actually don’t need another key at the moment, because I’ll just show you how we get all the results first of all. So lets click on send, and as you can see we have a JSON file here, and this is a result of all the upcoming firework displays. I think there is probably around, yeah looks like there might be twenty or so at the moment. So get it all here, and inside of the JSON file here, we have our results container. And inside of the result container we have the records. Now the records are what we are looking for, and each record has an ID, a display date, a time, a suburb, a postcode, a display address, an event type, and a display type.
And we’ll be using all that information inside of the app to display to the user, and even allow them to filter by the date. If they wanna filter by events that are coming up today, during the week or during the month. So yeah, we’ll have all that. But what if we wanna search by a suburb? Okay, so lets just say here we wanna search for all events that are in Toowoomba for example. So we’d go up here and inside of the key, we want to enter in the key, the key name of q, which stands for query and the value for that we can enter in Toowoomba. Let’s click on send, and our returning events are three this time. We have three records, and as you can see, they’re all from Toowoomba.
And yeah, that’s all for this lesson. In the next lesson we’ll start to hop into Unity and start creating our app. So yeah, I’ll see you all then.
In this tutorial we are going to build an RPG game using Unity. Our game will have three scenes: a title scene, a town scene, that represent the game world, where the player can navigate and find battles, and the battle scene. The battles will have different types of enemies, and the player units will have different actions such as: regular attack, magic attack, and running from the battle.
In order to follow this tutorial, you are expected to be familiar with the following concepts:
C# programming
Using Unity inspector, such as importing assets, creating prefabs and adding components
Basic Tiled map creation, such as adding a tileset and creating tile layers
Before starting reading the tutorial, create a new Unity project and import all sprites available through the source code. You will need to slice the spritesheets accordingly.
You can download the tutorial source code files here.
Assets copyright
The sprites used in this tutorial are from the Superpowers Asset Packs by Pixel-boy. All sprites are available under the Creative Commons Zero (CC0) license. So, you can use them in your games, even commercial ones.
Title Scene
Background canvas
First of all, we are going to create a Canvas to show the background image in the Title Scene. You can do that by creating a new Canvas called BackgroundCanvas, and setting its render mode as Screen Space – Camera. In order to do so, we need to specify the camera of the canvas, which will be our main camera. Also, the UI Scale Mode (in Canvas Scaler) will be set to follow the screen size, with a reference resolution of 1280×960.
After doing that, we create a new Image object as a child of this canvas. The source image will be the background image, and we can set its native size in order to properly show it.
HUD canvas
Now, we need another Canvas to show the HUD elements. In the Title Scene, those elements will be a title text, and a play button.
Let’s start by creating another Canvas following the same process as the BackgroundCanvas. However, in order to show this canvas over the background one, we need to properly set its sorting layer. We are going to create another layer called HUD, and put the HUDCanvas on this layer.
Finally, we need to create the two HUD objects. The first one is a Text, while the second one is a Button. For the Text object we only need to set its message. On the other hand, for the Button object we need to set its OnClick callback.
The PlayButton object will have the following ChangeScene script for the OnClick callback. This script will simply define a method to start a new scene given its name. Then, we set the OnClick callback of the play button to call the loadNextScene method with “Town” as parameter.
public class ChangeScene : MonoBehaviour {

	public void loadNextScene(string sceneName) {
		SceneManager.LoadScene (sceneName);
	}
}
Player party
In our game, we want to keep the player units data saved even when changing scenes. In order to do so, we are going to create a PlayerParty persistent object, which won’t be destroyed when changing scenes. You will also need to properly set its position so that it will be created in the correct position in Battle Scene.
In order to keep the PlayerParty alive when changing scenes, we are going to use the following script, called StartBattle. This script keeps the object from being destroyed when changing scenes in the Start method. It also adds a callback when a new scene is loaded and set the object as inactive, so that it won’t be shown in the title screen.
The configured callback (OnSceneLoaded) checks if the current loaded scene is the Title scene. If so, the PlayerParty object must be destroyed, to avoid duplicates. Otherwise, it should be set as active if the current scene is the Battle scene.
public class StartBattle : MonoBehaviour {

	// Use this for initialization
	void Start () {
		DontDestroyOnLoad (this.gameObject);

		SceneManager.sceneLoaded += OnSceneLoaded;

		this.gameObject.SetActive (false);
	}

	private void OnSceneLoaded(Scene scene, LoadSceneMode mode) {
		if (scene.name == "Title") {
			SceneManager.sceneLoaded -= OnSceneLoaded;
			Destroy (this.gameObject);
		} else {
			this.gameObject.SetActive(scene.name == "Battle");
		}
	}

}
Also, the PlayerParty will have two children to represent the player units. So, first let’s create a PlayerUnit prefab with only a few things for now. Later on this tutorial, we are going to add the rest of its behavior.
For now, the PlayerUnit will have only the Sprite Renderer and a script called UnitStats, which will store the stats of each unit, such as: health, mana, attack, magic attack, defense and speed.
public class UnitStats : MonoBehaviour {

	public float health;
	public float mana;
	public float attack;
	public float magic;
	public float defense;
	public float speed;

}
The figure below shows the example of one player unit, called MageUnit. In this example the UnitStats script has other attributes, which will be used later (such as Animator and Damage Text Prefab), but you can ignore those attributes for now.
By now, you can already try running your game with the Title scene. You can create an empty Town scene only to test the play button.
Town Scene
We will start by creating the Town Scene. So, create a new Scene in your project and call it Town.
Integrating Tiled map with Unity
Town scene will have a Tiled map, so we will start by creating it. We will create a Tiled map only with tile layers. The objects will be later added in Unity.
I’m going to use the map below in this tutorial. Since Tiled map creation is not the focus of this tutorial, you’re free to use this same map (available with the source code) or creating your own.
In our map there is a layer called buildings, which must be collidable with the player. In order to create the collider for those tiles in Unity, we need to set the collision area for each collidable tile. We can do that by opening the Tiled Collision Editor in Tiled (in the view menu) and adding a rectangle representing the collision area. This must be done for each collidable tile.
In order to import this map in Unity we are going to use a third party program called Tiled2Unity (http://www.seanba.com/tiled2unity). This program will load our Tiled map and create Unity GameObjects for it.
After downloading Tiled2Unity, the first thing you have to do is opening Tiled2Unity.unitypackage, which will import the package to your Unity project.
Then, you can open the Tiled map file in Tiled2Unity, open your Tiled map and export it to your Unity project.
After doing that, Tiled2Unity will create a GameObject in TownScene for the town map. Observe that it automatically creates the collider for the collidable tiles. The figures below show the town object in the scene and its properties in the inspector.
For now, you can start your game and check if it is correctly loading the map.
Player prefab
Now that we added our town map to Unity, we are going to create a Player prefab. The player will be able to move around the town, and must collide with the collidable Tiles.
So, let’s start by creating a GameObject called Player, adding the correct sprite renderer, a Box Collider 2D and a Rigidbody 2D as shown below. Observe that we need to set the Gravity Scale attribute of the Rigidbody2D as 0, so that the Player won’t be affected by the gravity.
We also need to create the Player animations. The Player will have four walking animations and four idle animations, one for each direction. So, first, we create all the animations naming them IdleLeft, IdleRight, IdleUp, IldeDown, WalkingLeft, WalkingRight, WalkingUp and WalkingDown.
The next thing we need is the player animator. So, we create a new animator called PlayerAnimator and add all the created animations to it. Once we add the animator to the Player object in the inspector, we can create its animations using the Unity animation window and the player spritesheet. The figure below shows the example of the WalkingUp animation.
Now we need to configure the animation transitions in the player animator. The animator will have two paremeters: DirectionX and DirectionY, which describes the current direction of the player movement. For example, if the player is moving to the left, DirectionX is equal to -1, while DirectionY is equal to 0. Those parameters will be correctly set later in a movement script.
Each idle animation will have a transition to each walking animation. The direction parameters should have the values according to the animation direction. For example, the Idle Left animation will change to Walking Left if DrectionX is equal to -1. Also, each walking animation will have a transition for its correspondent idle animation. Finally, if the player changes its walking direction without stopping, we need to update the animation. So, we need to add transitions between the walking animations as well.
In the end, the player animator should look like the figure below. The next figures show examples of transitions between animations (IdleLeft -> WalkingLeft and WalkingLeft -> IdleLeft).
Now let’s create the PlayerMovement script. All movement happens in the FixedUpdate method. We use the horizontal and vertical axis inputs to check if the player should move horizontally or vertically. The player can move to a given direction if it is not already moving to the opposite direction. For example, it can move to the left if it is not already moving to the right. We do that for both vertical and horizontal directions. When moving to a given direction, we need to set the animator parameters. In the end, we apply the velocity to the Player Rigidbody2D.
In the end, the Player prefab should look like the figure below.
For now, you can start your game and try moving the player around the map. Remember to check if the tile collisions are properly working.
Starting battle
The player can start battles by interacting with enemy spawners. The enemy spawner will be an immovable object that, when touched by the player will switch to another scene called Battle Scene.
Also, the enemy spawner will be responsible for creating the enemy units objects in the Battle Scene. This will be done by creating an EnemyEncounter prefab, with enemy units as children. Like the player units from the Title Scene, for now we are only going to add the UnitStats script and the Sprite Renderer to enemy units. The figure below shows an example of an enemy unit. You can create the EnemyEncounter by creating a new prefab and adding the desired enemy units as children to it. You will also need to properly set its position so that it will be created in the correct position in Battle Scene.
So, let’s create a prefab called EnemySpawner. This prefab will have a collision box and a Rigidbody2D, in order to check for collisions with the Player prefab.
Also, it will have a script called SpawnEnemy as below. This script implements the OnCollisionEnter2D method to check for collisions with the Player prefab. We do so by checking if the other object tag is “Player” (remember to properly set the Player prefab tag). If there is a collision, it is going to start the Battle Scene and set a spawning attribute to true.
In order to create the enemy units in the Battle Scene, the script needs as an attribute the enemy encounter prefab, and the enemy spawner must not be destroyed when changing scenes (done in the Start method). When loading a scene (in the OnSceneLoaded method), if the scene being loaded is the Battle Scene, the enemy spawner will destroy itself and will instantiate the enemy encounter if the spawning attribute is true. This way, we can make sure that only one spawner will instantiate the enemy encounter, but all of them will be destroyed.
By now, you can try running your game and interacting with the enemy spawner. Try creating an empty Battle Scene to allow changing the scenes.
Battle Scene
Background and HUD canvases
Let’s start by creating the canvases that we are going to use for Battle Scene. Similarly to Title Scene, we are going to use one for the background and another for the HUD elements.
The background canvas will be the same as for the Title Scene, so I’m not going to show its creation. The HUD canvas, on the other hand, will need a lot of elements to allow proper player interaction.
First ,we will add an actions menu, which will show the possible actions for the player. This will be an empty object used as parent of all action menu items. Each action menu item, by its turn, will be a button, added as child of the ActionsMenu.
We are going to add three possible actions: attacking with physical attack (PhysicalAttackAction), attacking with magical attack (MagicAttackAction) and running from the battle (RunAction). Each action will have its OnClick event but, for now, we are not going to add it. The figure below shows only the PhysicalAttackAction, since the other ones will only change the source image for now. The source images for those menu items are from the icons Sprite, which was sliced in many icons.
The second menu we are going to add to the HUD canvas is the EnemyUnitsMenu. This menu will be used to show the enemy units, so that the player can choose one to attack. Similarly to the ActionsMenu, it will be an empty object used to group its menu items. However, the enemy menu items will be created by the enemy units, when the Battle scene starts.
In order to make the enemy unit to create its menu item, we need to create the menu item prefab. This prefab will be called TargetEnemy and will be a button. The OnClick callback of this button will be used to select this enemy as the target.
We need to add two scripts to the EnemyUnit prefab to hadle its menu item: KillEnemy and CreateEnemyMenuItem.
The KillEnemy script is simple. It will have as an attribute the menu item of this unit, and when the unit is destroyed (OnDestroy method), the menu item must be destroyed too.
public class KillEnemy : MonoBehaviour {

	public GameObject menuItem;

	void OnDestroy() {
		Destroy (this.menuItem);
	}
}
Now let’s create the CreateEnemyMenuItem script. This script will be responsible for creating its menu item and setting its OnClick callback. All this is done in the Awake method. First, the menu item position is calculated based on the number of existing items. Then, it is instantiated as children of EnemyUnitsMenu, and the script sets its localPosition and localScale. In the end, it sets the OnClick callback to be the selectEnemyTarget method, and sets the menu item as the one for this unit in KillEnemy.
The selectEnemyTarget method should make the player to attack this unit. However, we don’t have the code to do that now. So, for now we are going to leave this method empty.
The final HUD elements we are going to add are those to show the player unit information, such as health and mana. So, we are going to start by creating an empty GameObject called PlayerUnitInformation, to hold all those HUD elements.
Then, we are going to add an image as child of this object called PlayerUnitFace. This element will simply show the face of the current unit. For now, let’s select any unit face.
The next elements will be the health bar and its text. The health bar will be an image showing the health bar sprite, while the text will show the HP message. Finally we do the same for the mana bar, only changing the sprite and the text message. The figures below show only the health bar, since the mana bar is very similar.
By now, your Battle Scene should look like this. This figure corresponds to the Scene viewer, and not the running game, since there is a lot of content we still need to add to properly run the Battle Scene. The righthand figure shows the objects hierarchy in the scene.
Units animations
The next thing we are going to do is creating the units animations. Each unit will have four animatios: Idle, PhysicalAttack, MagicalAttack and Hit. So, let’s start by creating an animator for one of the player units (for example, the MageUnit), and adding it to its correspondent prefab.
Now, if we select this prefab and open the Animator view, we can configure its animations state machine as below. We are going to create a state for each animation, with Idle being the default one, and all other ones having transitions to Idle when they end.
Now, we need to create the four animations to add them to their correspondent states. The figure below shows the MagicalAttack animation for MageUnit. You can create all animations following the same process with the animation view, so I’m not going to show them all. Also, you have to do the same for all units (including the enemy ones).
We still need to define when to play those animations. However, we are going to do so when adding more functionalities for the units. For now, the units will only play the Idle animation, as it is the default one.
If you play the game now, it should show the units with the Idle animation. However, remeber you have to play Title Scene and go until the Battle Scene, in order to see the units.
Turn-based battle system
The next thing we are going to add to our game is a turn-based battle system. So, let’s start by creating an empty game object with a script called TurnSystem.
The TurnSystem script will keep a List with the UnitStats script of all units (player and enemy ones). Then, in each turn, it can pop the first element of the list, make the unit act and add it again to the list. Also, it needs to keep the list sorted according to the units acting turns.
This script is shown below. The UnitStats list is created in the Start method. This is done by iterating through all game objects with the tags “PlayerUnit” or “EnemyUnit” (remember to properly tag your objects). For each unit, the script gets its UnitStats script, calculate its next acting turn and add it to the list. After adding all units the list is sorted. Finally, the menus are disabled, since they will be used only on the player turns, and the first turn begins (by calling nextTurn).
The nextTurn method, by its turn, will start by removing the first UnitStats from the list and checking if it is not dead. If the unit is alive, it will calculate its next acting turn in order to add it again to the list. Finally, it will make it act. We still don’t have the acting methods of the units, so we are only going to print a message in the console for now. On the other hand, if the unit is dead, we are simply going to call nextTurn without adding it to the list again.
Before moving on, we need to implement the UnitStats methods we used in TurnSystem, so let’s go back to the UnitStats script.
First, the calculateNextActTurn method is responsible for calculating the next acting turn based on the current one. This is done based on the unit speed, as shown below. Also, we need to make UnitStats to extend the IComparable interface, and implement the CompareTo method, so that we can properly sort the UnitStats list. The CompareTo method will simply compare the acting turn of the two scripts. Finally, we need to implement the isDead getter, which will simply return the dead attribute value. By default, this attribute is false, because the unit is alive at the beginning of the game.
public class UnitStats : MonoBehaviour, IComparable {

	public float health;
	public float mana;
	public float attack;
	public float magic;
	public float defense;
	public float speed;

	public int nextActTurn;

	private bool dead = false;

	public void calculateNextActTurn(int currentTurn) {
		this.nextActTurn = currentTurn + (int)Math.Ceiling(100.0f / this.speed);
	}

	public int CompareTo(object otherStats) {
		return nextActTurn.CompareTo (((UnitStats)otherStats).nextActTurn);
	}

	public bool isDead() {
		return this.dead;
	}

}
For now, you can try playing the game again, to see if the turn message is being properly printed in the console.
Attacking units
Now that we have our turn-based battle system we are going to allow units to attack each other. First, we are going to create Attack prefabs, which will be used by the units. Then, we are going to add the action scripts of both player and enemy units, so that they can properly attack. When receiving damage, units will show a Text prefab with the damage value.
The Attack prefab will be an inivisible prefab with an script called AttackTarget. This script will describe the attack properties such as attack and defense multipliers and mana cost. Also, the attack will have an owner, which is the unit currently attacking.
First, the script checks if the owner has enough mana to execute the attack. If so, it picks random attack and defense multipliers based on the minimum and maximum values. So, the damage is calculated based on those multipliers and the attack and defense of the units. Observe that, if the attak is a magical attack (this.magicAttack is true), then it will use the magic stat of the unit, otherwise it uses the attack stat.
In the end, the script plays the attack animation, inflicts the damage to the target unit and reduces the mana of the owner accordingly.
We are going to create two attack prefabs: PhysicalAttack and MagicalAttack, each one with its own multipliers.
Now we need to implement the reiceveDamage method, used in the AttackTarget script. This will be a method from UnitStats that, besides reducing the unit health, it will also show the damage using a Text over the unit’s head.
This method is shown below. First, it will simply reduce the unit health and play the Hit animation. Then, it will create the damage text (using this.damageTextPrefab). Observe that the damage text must be a child of the HUDCanvas, since it is an UI element, and we need to properly set its localPosition and localScale. In the end, if the unit health is less than zero, the script set the unit as dead, change its tag and destroy it.
Now we can already implement the act method of the units. An enemy unit will always attack a random enemy with the same attack. This attack will be an attribute in EnemyUnitAction. In the Awake method we are going to create a copy of it for the unit and properly set its owner. We need to create a copy since we want each unit to have its own attack object instance.
Then, the act method will pick a random target and attack it. The findRandomTarget method, by its turn, will start by listing all possible targets given their tags (for example, “PlayerUnit”). If there is at least one possible target in this list, it will generate a random index to pick the target.
Player units, by their turn, will have two different attacks: physical and magical. So, in the Awake method we need to properly instantiate and set the owner of these two attacks. Also, we are going to set the current attack as the physical one by default.
Then, the act method will receive as parameter the target unit and will simply attack it.
Now, we can already call the enemy unit act method in the TurnSystem script. We still can’t do the same for player units, since we still need to properly select the current unit and its attack. This is the next thing we are going to do.
We need to properly select the current player unit each turn. This will be done by adding the following script (SelectUnit) to the PlayerParty object. This script will need references to the battle menus, so when the Battle scene is loaded it is going to set them.
Then, we need to implement three methods: selectCurrentUnit, selectAttack and attackEnemyTarget. The first one will set a unit as the current one, enable the actions menu, so that the player can choose an action, and update the HUD to show the current unit face, health and mana (this last method will be implemented later).
The selectAttack method, by its turn, will call selectAttack for the current unit, and will change the current menu, by disabling the actions menu and enabling the enemies menu. The selectAttack method also needs to be implemented in the PlayerUnitAction script. This way, now that the player has selected an attack, it can select the target.
Finally, the attackEnemyTarget will disable both menus and call the act method for the current unit, with the selected enemy as the target.
The second one (selectAttack), will be called by the PhysicalAttackAction and MagicalAttackAction buttons in the HUDCanvas. Since the PlayerParty object is not from the same scene as these buttons, we can’t add the OnClick callbacks in the inspector. So, we are going to do that using the following script (added to those buttons objects), which will add the callback in the Start method. The callback will simply call the selectAttack method from SelectUnit. This same script should be added to both buttons, only changing the “physical” attribute.
public class AddButtonCallback : MonoBehaviour {

	[SerializeField]
	private bool physical;

	// Use this for initialization
	void Start () {
		this.gameObject.GetComponent<Button> ().onClick.AddListener (() => addCallback());
	}

	private void addCallback() {
		GameObject playerParty = GameObject.Find ("PlayerParty");
		playerParty.GetComponent<SelectUnit> ().selectAttack (this.physical);
	}

}
The third method (attackEnemyTarget) will be called from the enemy unit menu item. When creating the CreateEnemyMenuItems script, we left the selectEnemyTarget (which is the button callback) empty. Now, we are going to implement it. This method is going to find the PlayerParty object and call its attackEnemyTarget method.
Finally, now we need to update the HUD to show the current unit face, health and mana.
We are going to use the following script to show the unit health and mana. This script will start its initial localScale in the Start method. Then, in the Update method it will update the localScale according to the current stat value of the unit. Also, it will have a method do change the current unit being showed and an abstract method to retrieve the current stat value.
Instead of directly using this script, we are going to create two other ones that specialize it, implementing the abstract method: ShowUnitHealth and ShowUnitMana. The only method in those two scripts will be newStatValue, which will return the correct unit stats (health or mana).
public class ShowUnitHealth : ShowUnitStat {

	override protected float newStatValue() {
		return unit.GetComponent<UnitStats> ().health;
	}
}
public class ShowUnitMana : ShowUnitStat {

	override protected float newStatValue() {
		return unit.GetComponent<UnitStats> ().mana;
	}
}
Now we can add those two scripts to the health and mana bar objects. Another thing to do is to change their Pivot in the X coordinate to be zero, so that it will change the scale only on the right side of the bar.
Finally, we need to call the changeUnit method in those scripts when the current unit changes. This will start in the selectCurrentUnit method of SelectUnit. After setting the actionsMenu as active, it will call a method called updateHUD for the current unit.
The updateHUD method, by its turn, will start by setting the sprite of the PlayerUnitFace object to be the current unit face (saved as an attribute of PlayerUnitAction). Then, it will set itself as the current unit in both ShowUnitHealth and ShowUnitMana.
[SerializeField]
	private Sprite faceSprite;

public void updateHUD() {
		GameObject playerUnitFace = GameObject.Find ("PlayerUnitFace") as GameObject;
		playerUnitFace.GetComponent<Image> ().sprite = this.faceSprite;

		GameObject playerUnitHealthBar = GameObject.Find ("PlayerUnitHealthBar") as GameObject;
		playerUnitHealthBar.GetComponent<ShowUnitHealth> ().changeUnit (this.gameObject);

		GameObject playerUnitManaBar = GameObject.Find ("PlayerUnitManaBar") as GameObject;
		playerUnitManaBar.GetComponent<ShowUnitMana> ().changeUnit (this.gameObject);
	}
By now, you can try playing the game to see if you can select different actions, and if the stats are being correctly updated. The only action from the menu that we still have to implement is the Run action.
Finishing the battle
We still have to add ways of finishing the battle. There are three ways of doing that:
All enemy units are dead, and the player has won the battle
All player units are dead, and the player has lost the battle
The player ran from the battle
If the player wins the battle, it will receive a reward from the enemy encounter. In order to do that we are going to use the following script, which will be added to the enemy encounter object. In the Start method, it will set the enemy encounter in the TurnSystem object. Then, the collectReward method (which will be called from TurnSystem), will equally divide the encounter experience among all living player units.
Now we need to implement the receiveExperience method used in collectReward. This will be a method from UnitStats used only to save the received experience. This can be used later to implement a level system in the game, but we are not going to do that in this tutorial.
public void receiveExperience(float experience) {
		this.currentExperience += experience;
	}
Finally, let’s call the collectReward method in TurnSystem. We are going to change the nextTurn method to check if there are still living enemy units, by finding the objects with the “EnemyUnit” tag. Remember that when a unit dies, we change its tag to “DeadUnit”, so that it won’t be found by this method. If there are no remaining enemy units, it calls the collectReward method for the enemy encounter, and go backs to the Town scene.
On the other hand, if there are no remaining player units, that means the player has lost the battle, so the game goes back to the Title scene.
The last way of finishing a battle is by running from it. This can be done by selecting the run action in the actions menu. So, we need to attach the script below to the run button, and add its OnClick callback.
The RunFromBattle script will have a tryRunning method. This method will generate a random number between 0 and 1, and compare it with a runningChance attribute. If the generated random number is less than the running chance, the player successfully avoids the battle, and goes back to the Town scene. Otherwise, the next turn starts.
public class RunFromBattle : MonoBehaviour {

	[SerializeField]
	private float runnningChance;

	public void tryRunning() {
		float randomNumber = Random.value;
		if (randomNumber < this.runnningChance) {
			SceneManager.LoadScene ("Town");
		} else {
			GameObject.Find("TurnSystem").GetComponent<TurnSystem> ().nextTurn ();
		}
	}
}
Finally, by now you should have everything working. Try playing battles until the end to check if everything is working. Now you can also try adding different enemy encounters and tuning some game parameters, such as units stats and attack multipliers.
Also, try adding things that could not have been covered in the tutorial, such as more intelligent enemies and a level system.
Let me know in the comments section your opinion and questions!
Since the release of Unity 2017.1 in the summer of 2017, Unity Technologies has made making 2D games incredibly easy and fast. In this tutorial, we will create a fully-featured 2D platformer. This project will incorporate a number of key topics including how to make cutscenes, how to quickly build and prototype a 2D level, and how to precisely choreograph game objects using the Timeline Editor. This tutorial can also be thought of as the culmination of several tutorials – posted on Game Dev Academy – about these topics. You can check them out here:
Let’s think about what we will be making. As said in the introduction, it will be a 2D platformer. We will use the 2D character from the Unity Standard Assets pack. Then we will create an environment using tilemaps and Unity’s new Tilemap Editor. Then we will create an enemy that has an Idle/Attack animation (you’ll see). Then we will create a cutscene where the camera views the entire level then zooms on the character: here we will use the Timeline Editorand Cinemachine for 2D.
When Unity Technologies released the Unity 2017 version cycle, they introduced three pivotal tools designed to make Unity more accessible to artists. These tools were the Tilemap Editor, Timeline, and Cinemachine. The Tilemap Editor, released later in the 2017 cycle, allowed users to “…literally paint directly in Unity” according to Rus Scammell, the project manager of Unity for 2D. The Tilemap Editor gives you the ability to create vast and complicated Tilemaps without having to use a third-party program. The Timeline Editor and Cinemachine were released at the same time, though improvements to Cinemachine were released later. Cinemachine is a suite of cameras that allows you to create cutscenes, specify how the camera tracks a game object, and, in the end, allows you to tell a better story. Combine this with the Timeline Editor, a tool that allows you to choreograph game objects like a movie editor. With these two tools, you can create stunning compositions with having to write any code. Well, that’s a summary of the tools that we will be using! This tutorial is by no means exhaustive, for more information about these tools check out the tutorials linked above.
Setting up our project
The assets for this project you can get here. Then create a new Unity project. Let’s import the 2D Standard Assets package by going to Assets -> Import Package -> 2D.
Next, we need to create two new folders. One called “Animations” and the other called “Tiles”.
In the Tiles folder, create another folder called “Tile Palettes”.
The use of this folder will become apparent later on. Now let’s import Cinemachine by going to the asset store and searching “Cinemachine”. It should be the first option so just select it and import it.
Now we need to import the Tilemap Editor tools. Click this link to take you to the Github download page. Import this into the “Assets” folder of your project.
Now that we have everything imported we can start getting our tools in order. We will start with the Tilemap Editor. Go to Window -> Tile Palette.
Place it in a sensible place on your workspace. I chose to put it in the space between the inspector and the scene view. Next, we need the Timeline Editor. Go to Window -> Timeline Editor.
The position of this tab is not set in stone so be prepared to move it around. We now have our workspace in order! Time to start creating!
Creating our environment
Go to your Tile Palette tab and create a new palette. Call it “Solids” since these are the tiles that the character will not be able to pass through.
A palette works just like you would expect it to based on the name, it is a set of images that we use to “paint” with. Leave all of the settings set to default and save it in the Tile Palettes folder which we created in the Tiles folder.
Now, go to your “Environment Tiles” folder and pick out a set of environment tile images. Once you have selected an environment theme, select all of them and change the Pixels Per Unit value in the import settings.
The reason we do this is so that the tile images correctly fit the tile cells in the grid space. Click “Apply” and your good to go! Next, we are going to create a special type of tile, called a “Rule Tile”, that will drastically speed up level creation. In the Tiles folder, right click and go to Create -> Rule Tile.
Name it “Environment Tiles”.
We have to do one last thing to our tile images and that is to make them into Tiles instead of just images. The easiest way to do this is to drag all of the environment images into the Tile Palette tab.
You will be asked where to save each tile. This can be kind of tedious so just get through it as fast possible and save each tile in the Tiles folder. Now go to your rule tile and create a place for each of your environment tiles. The settings for this rule tile can be kind of complicated and hard to get used to. That is why it is best if you just copy the settings of this rule tile:
Once you are finished, drag your rule tile into the Tile Palette tab.
Now that all of our tiles are in order, let’s create a “canvas” to paint on. In your hierarchy, right-click and got to 2D Object -> Tilemap.
What it has done is created a grid, and inside that grid is our “canvas”, also known as a tilemap. In order to start painting you need to familiarize your self with the toolbar in the Tile Palette tab. With your rule tile selected, start experimenting with the various types of brushes. Once you feel pretty confident with the tools, start creating your level!
Adding the character
The last thing we have to do to our tilemap is to make it have physics interactions. Right now anything we put on it would just fall through the world. To fix this, Unity Technologies released a new collider component called the Tilemap Collider. This behaves just like you would expect it to based on the title, it creates a collider around each tile. Go to your Tilemap and click Add Component.
Search “Tile” and it should appear first. Once you add this, you can drag the character into the scene!
We will be using the default character that came with the 2D standard asset pack. You can find the character by either going to Standard Assets -> 2D -> Prefabs and then dragging in the “CharacterRobotBoy”, or, you can just search “CharacterRobotBoy” and access it from there. Once the character is in the scene, you can hit play and move the character through the arrow keys. You may have to reposition the camera in order to see the robot. Great! On to the next paragraph!
Creating the enemy
In the “Enemies” folder from the asset pack, pick a certain enemy that you think would go well with your scene.
Drag it into your scene and place it in a sensible spot.
Then create a new tag called “Enemy” and assign it to your enemy.
Now we are going to animate this enemy. You should already have the Animation tab open in the lower window of your workspace. If not, go to Window -> Animation.
With your enemy selected, click “Create” in the Animation tab.
Name it “Enemy1Controller”.
Save the animator controller in the Animations folder we created earlier. Next, click “Create” again
and give the animation a sensible title.
Hit the record button and change the Sprite field to the other image that was provided (in my case it was called Saw_move, it may be similar if you chose a different enemy).
Then move about four frames ahead and change the image back to what it was before.
Then move a couple frames forward and change it back to the first image.
Now if you hit play you will see that our enemy is animating! Cool!
Scripting our enemy
Let’s make it so that whenever the character touches the enemy the level restarts. The best way to do this is to actually create a new script and box collider on our robot character.
Set the box collider to Trigger and make sure it liberally covers the character. Name the new script “EnemyReaction”.
Let’s create a new folder called “Scripts” to house this component.
Here is the content of the EnemyReaction script.
using System.Collections;
using System.Collections.Generic;
using UnityEngine;
using UnityEngine.SceneManagement; // This is very important if we want to restart the level

public class EnemyReaction : MonoBehaviour {

	// Use this for initialization
	void Start () {

	}

	// Update is called once per frame
	void Update () {

	}
	// This function is called every time another collider overlaps the trigger collider
	void OnTriggerEnter2D (Collider2D other){
		// Checking if the overlapped collider is an enemy
		if (other.CompareTag ("Enemy")) {
			// This scene HAS TO BE IN THE BUILD SETTINGS!!!
			SceneManager.LoadScene ("scene1");
		}
	}
}
In order for this script to work, we need to do a couple of things. First, we need to have a collider on our enemy.
A simple box collider works best for covering all needs. Then, we need to save this scene as “scene1”.
Just save it in the root folder since we only have one, but if you are planning on having multiple scenes then you should create a new folder. Finally, that scene has to be put in the build settings. To do this, just go to File -> Build Settings
and then click “Add Open Scenes”.
Now everything should work! Hit play and run into the enemy, the level restarts!
Cinemachine and Timeline
We now come to the last part of this tutorial. In this part, we will be using Cinemachine and the Timeline editor. Let’s start with Cinemachine. You’ll notice that our camera isn’t following the character when he moves around. We can fix this by creating what is known as a Virtual Camera. Navigate to your toolbar and go to Cinemachine -> Create 2D Camera.
Then assign the “follow” field on this camera to be the CharacterRobotBoy. Rename this to “PlayerCam”. Set the Aim to “Do Nothing” and set the Body to “Framing Transposer”.
Now, in the game view, you will notice a set of blue and red areas.
You can click and drag these areas to change their shape. The one that is harder to see is the clear zone. It sits right on top of our character. This is known as the Dead Zone. The Camera will not do anything as long as the character is in this zone. The blue zone is the Soft Zone. If the character crosses over into this zone the camera will reposition itself so that the character is back in the Dead Zone. The red zone is known as the Bias. The character will never ever cross into this area. Now that you have this knowledge, change the size of these areas in order to get the right following style that you like. Next, let’s have a look at the Timeline Editor. Create a new, empty game object, named “Timeline”…
…and then click Create in the Timeline Editor. Call it “TheTimeline” and save it in the root folder.
You can have multiple timeline editors in a scene, which just adds to the complexity so we just have one. With this Timeline, we will create a cutscene where the camera views the entire level and then zooms in on the player. This will occur as soon as the scene starts. In order to do this, we need to combine Cinemachine and the Timeline Editor. We can do this through Cinemachine shot clips. In the Timeline, click “Add” and then go to Cinemachine.Timeline -> Cinemachine Track.
Drag the Main Camera into the field.
Then right-click and go to “Add Cinemachine Shot Clip”.
With this track, we can specify how long we want a certain camera to be active. Let’s create a new 2D camera and position it so that we can see the entire level. Name this one “FullLevel”.
This will be our first camera so select the Cinemachine shot clip and drag this camera into the “Virtual Camera” field.
Set how long you want this camera to last. One thing that helps is to set the timescale to be in second and not frames.
Next, we need to create another clip for the player camera.
Place this at the end of the other clip. Drag either one of the clips on top of each other in order to smoothly transition. Now if you hit play, we have a pretty neat cutscene! But notice when the last track ends it goes back to the first camera instead of staying on the player. The easiest way to fix this is by deactivating the first camera after we have transitioned into the second. We can do this by using an Activation Track. As its title implies, the specified game object will stay active as long as the track persists. Create an Activation track…
…and drag the first camera into its field.
Then set the length to be a little after the transition. Now if you hit play, it all looks good and the player camera persists!
Outro
Congratulations on getting to the end of this tutorial. As I said before, this is not meant to be exhaustive. In order to find out more about these tools, you can either read the tutorials linked above, or you can explore them on your own! In either case:
Oneof the challenges of virtual reality is locomotion. In room-scale VR users can walk around, but limited space is a problem. Mobile VR users with only three degrees of freedom have to rely on head movement or controllers.
Teleportation is a fun way to get around the limitations of VR. Although not truly natural, users are accustomed to the concept of teleportation from sci-fi and fantasy, and it is not hard to implement.
We will be building a scene for Oculus Go/Gear VR that demonstrates teleportation using the controller as a pointer.
Source Code
The Unity project for this tutorial is available for download here. To save space, Oculus Utilities and VR Sample Scenes are not included, but the source files that were modified are included in the top level of the project. These files are OVRPlugin.cs, VREyeRaycaster.cs, and Reticle.cs.
To get started, create a new Unity project, Teleporter. Create the folder Assets/Plugins/Android/assets within the project, and copy your phone’s Oculus signature file there. See https://dashboard.oculus.com/tools/osig-generator/ to create a new signature file.
Select File -> Build Settings from the menu and choose Android as the platform. Click on Player Settings to load PlayerSettings in Unity inspector. Add Oculus under Virtual Reality SDK’s and select API Level 19 as the Minimum API Level.
Download Oculus Utilities from https://developer.oculus.com/downloads/package/oculus-utilities-for-unity-5/ and extract the zip file on your computer. Import Oculus Utilities into your project by selecting Assets -> Import Package -> Custom Package within Unity and choosing the location of the package you extracted. If you are prompted to update the package, follow the prompts to install the update and restart Unity.
A folder named Oculus will be created in your project. Oculus/Prefabs contains the OVRCameraRig and TrackedRemote prefabs that we will use to implement controller support. If you expand TrackedRemote in the project view, you’ll see that it contains prefabs for the Gear VR and Oculus Go controllers.
If you get the error message “‘OVRP_1_15_0’ does not exist in the current context,” open Assets/Oculus/VR/Scripts/OVRPlugin.cs and add #if !OVRPLUGIN_UNSUPPORTED_PLATFORM and
#endif
around code that checks the OVRPlugin version. You can find a fixed copy of OVRPlugin.cs in the included source. This error probably does not occur on Windows.
We will also need the VR Samples package from the Unity Asset Store. This package includes a number of sample scenes as well as prefabs and scripts that we will customize to add a laser pointer and reticle. Click on the Asset Store tab in Unity, and search for “VR Samples.” When loaded, click the import button and follow the instructions to import this package. The folders VRSampleScenes and VRStandardAssets will be created in your Assets folder.
Preparing Your Headset
If you are using the Gear VR, you will need to activate Developer Mode on your phone to test your app. In your phone settings, go to “About Device” and tap seven times on “Build number.”
Let’s start by setting up a VR camera and adding controller support. First, remove the Main Camera object that was created by default. We will be using a custom camera.
Create an instance of the OVRCameraRig prefab included in Oculus Utilities by dragging Assets/Oculus/VR/Prefabs/OVRCameraRig from the project window to the hierarchy window. Expand OVRCameraRig, and you’ll see that it contains a TrackingSpace with anchors for the eyes and hands. Set the position ofOVRCameraRig to (0, 1.8, 0) to approximate the height of a person.
CenterEyeAnchor is the placeholder for our camera that we will replace with the MainCamera prefab included in VR Sample Scenes. Drag Assets/VRSampleScenes/Prefabs/Utils/MainCamera from the project window to the hierarchy. Rename this instance CenterEyeAnchor and nest it under OVRCameraRig -> TrackingSpace. Remove the original CenterEyeAnchor.
Now add the controller using the Assets/Oculus/Prefabs/TrackedRemote prefab. Create instances of TrackedRemote as children of OVRCameraRig->TrackingSpace -> LeftHandAnchor and OVRCameraRig -> TrackingSpace -> RightHandAnchor. TrackedRemote contains models for both the Gear VR controller and the Oculus Go controller. When you run this scene, the correct controller model is displayed depending on which headset you’re using.
Make sure the Controller field of the TrackedRemote instance under LeftHandAnchor is set to “L Tracked Remote.” The instance under RightHandAnchor should be set to “R Tracked Remote.” You can do this in the Unity inspector.
If both hands are set correctly, the controller will automatically be displayed for the correct hand when you run the scene.
Next, add a laser beam that extends from the controller. Add a Line Renderer to CenterEyeAnchor by clicking “Add Component” in the inspector and typing “Line Renderer” in the search box. Disable “Receive Shadows” and set the material to MazeAgentPath, a red material included with the VR Sample Scenes package. If you want a different colored laser, you can easily create a different colored material and use it in the Line Renderer.
Under the Width field, drag the slider down to set a width of about (0.0, 0.02). If the width is too thick, your laser beam will look like a huge block instead of a beam.
to make the endpoints of the laser beam the same as the endpoints of the ray we’re casting.
Reticle
The end of the laser beam will have a reticle, or a targeting circle. The MainCamera prefab already includes a reticle that is displayed in front of the camera. We’re going to change its code so that the reticle is automatically displayed at the end of the laser beam if a controller is connected, but displayed in front of the camera if there is no controller.
In Assets/VRSampleScenes/Scripts/Utils/Reticle.cs, find the
SetPosition()
function. Change this function so that it takes two arguments, a position and a direction:
public void SetPosition (Vector3 position, Vector3 forward) {
  	// Set the position of the reticle to the default distance in front of the camera.
  	m_ReticleTransform.position = position + forward * m_DefaultDistance;

  	// Set the scale based on the original and the distance from the camera.
  	m_ReticleTransform.localScale = m_OriginalScale * m_DefaultDistance;

  	// The rotation should just be the default.
  	m_ReticleTransform.localRotation = m_OriginalRotation;
}
We’ll see a compilation error about
SetPosition()
until we add the arguments
ray.origin
and
ray.direction
to
m_Reticle.SetPosition
at the end of the
VREyeRayCaster.EyeRaycast
function:
if (m_Reticle)
    m_Reticle.SetPosition (ray.origin, ray.direction);
To pull everything together in Unity, make sure VREyeRayCaster’s fields in the inspector are filled. You will need to manually add CenterEyeAnchor to the “Line Renderer” field, which populates m_LineRenderer, and TrackingSpace to the “Tracking Space” field.
If you run the scene in a headset, the reticle will appear at the end of the laser beam that extends from the controller.
Teleport Manager and Player
It’s finally time to implement the scripts for teleportation. Create an empty GameObject named TeleportManager. Create a new script, Assets/Scripts/TeleportManager.cs, and attach it to the TeleportManager GameObject.
Open TeleportManager.cs and create the class:
using System;
using UnityEngine;
using VRStandardAssets.Utils;

public class TeleportManager : MonoBehaviour {
    public static event Action<Transform> DoTeleport;
    [SerializeField] VRInteractiveItem[] teleportLocations;
    [SerializeField] Transform reticleTransform;
}
The VRInteractiveItem component, defined in Assets/VRStandardAssets/Scripts/VRInteractiveItem.cs, allows you to interact with objects in VR. VRInteractiveItem provides events that are activated when different types of interactions occur. We will be using the OnClick event.
teleportLocations
is an array of VRInteractiveItems that, when clicked, cause the user to teleport to the location of the reticle. We will populate
teleportLocations
from the inspector.
When the reticle targets a teleport location, and the controller is clicked, the player will be teleported to the position of
reticleTransform
.
The actual teleporting will be done by the Player object, which we will create later.
Player
will contain a method that subscribes to
TeleportManager.DoTeleport
. DoTeleport is an event like
VRInteractiveItem.OnClick
.
Within TeleportManager, add the following methods:
void OnEnable() {
    foreach (VRInteractiveItem t in teleportLocations) {
        t.OnClick += Teleport;
    }
}

void OnDisable() {
    foreach (VRInteractiveItem t in teleportLocations) {
        t.OnClick -= Teleport;
    }
}

void Teleport() {
    if (DoTeleport != null) {
        DoTeleport(reticleTransform);
    } else {
        Debug.Log("DoTeleport event has no subscribers.");
    }
}
OnEnable is called automatically when the TeleportManager is created. In OnEnable, the Teleport method subscribes to the OnClick event of each teleport location.
TeleportManager.Teleport
is run whenever a teleport location is clicked. OnDisable unsubscribes Teleport when the TeleportManager object is destroyed. Unsubscribing prevents memory leaks.
The Teleport method calls the DoTeleport action, which causes subscribing methods to run.
Now we’ll create a wrapper object for the player. Create an empty GameObject named Player, and attach a new script, Assets/Scripts/Player.cs. Nest OVRCameraRig under Player because the camera is the point of view of the player. Set Player’s position to (0, 1.8, 0), and reset OVRCameraRig’s position to (0, 0, 0). OVRCameraRig’s position is now relative to Player.
Add the code for Player.cs:
using System;
using System.Collections;
using System.Collections.Generic;
using UnityEngine;

public class Player : MonoBehaviour {

	Vector3 playerPosition;       // Keeps track of where Player will be teleported.

	[SerializeField] float playerHeight = 1.8f;

	void OnEnable() {
		TeleportManager.DoTeleport += MoveTo;
	}

	void OnDisable() {
		TeleportManager.DoTeleport -= MoveTo;
	}

	void MoveTo(Transform destTransform) {
		// Set the new position.
		playerPosition = destTransform.position;
		// Player's eye level should be playerHeight above the new position.
		playerPosition.y += playerHeight;
		// Move Player.
		transform.position = playerPosition;
	}
}
playerPosition
is a placeholder for the position where the player will be teleported.
playerHeight
exists because we need to take the player’s eye level into consideration when we teleport.
In
OnEnable
, the
Player.MoveTo
method is subscribed to the
TeleportManager.DoTeleport
event. The unsubscription occurs in OnDisable.
Player.MoveTodoes the work of teleporting a player. We add playerHeight to the y coordinate of the destination Transform’s position to account for eye level. Then we move Player by updating the position of its Transform to the new destination.
The flow of control when the controller clicks a teleport location.
Creating Teleport Locations
Our last step will be creating teleport locations.
In the Unity hierarchy, create a plane named “Ground” and position it at the origin. Enlarge Ground and attach VRStandardAssets/Scripts/VRInteractiveItem.cs. Create a couple of cubes located on the ground to serve as waypoints. As we teleport on the ground, these waypoints will help us tell where we are.
Now create some thinner cubes and form them into the steps of a staircase. Nest the stairs in an empty GameObject named Stairs, and attach VRInteractiveItem.cs to each stair.
Finally, to pull everything together, we will populate the fields of TeleportManager. In the inspector, open the “Teleport Locations” field, and set the size equal to the number of VRInteractiveItems. Fill in the elements by dragging Ground and each of the stairs from the hierarchy window to the fields in the inspector. Fill in the “Reticle Transform” field with GUIReticle.
Building the Project
Now we’re ready to test the app. Plug in your Oculus Go headset or your Samsung phone, and select “Build and Run” from the File menu. If everything works, you will be able to teleport to any location on the ground or on the stairs by pointing the controller and clicking the trigger button. You have now successfully implemented teleporting in VR!
Initial viewView after teleporting to the stairsStanding on the stairs
In this lesson we will explore how to use animations in a scene. This tutorial is a good step for those who have read the tutorial on creating animations. Which you can view here. However, no prior knowledge of animation is required. The scripts for this lesson can be downloaded here
Open up Unity and create a new project. Create a folder called “Scenes” and save the current scene in that folder.
Go to Assets -> Import Package -> and select the “Characters” package.
Uncheck the first person character since we won’t be working with that.
Now make a plane for the character to stand on. Next, make some cubes and ramps for our character to run and walk on
.
This is optional but, go ahead and drag in the “ThirdPersonController” into the scene. Play and look how the character moves. We are going to build, from scratch, a character that moves similar to this.
Once you have got a feel for how the character moves, ThirdPersonController is no longer needed and you can delete it.
The Animator
Navigate in your project files to Standard Assets -> Characters -> Models and drag in the “Ethan” model.
Then create a folder called “Animation”.
Right click and go to Create -> “Animator Controller”.
Name it “Ethan”. Drag our new Animator Controller onto the Ethan model.
The Animator Controller allows you to assign multiple animations to a model. For humanoid characters, such as ours, it requires something called an “Avatar”. Click on the circle next to the Avatar field and find the “EthanAvatar”. Lets have a look at the Avatar.
Click “Configure Avatar”.
As you can see, the Avatar is just a way for Unity to find and configure the bones in the model.
Press done and go back to the Ethan model. Let’s look at some of the settings in the Animator component.
The “Apply Root Motion” boolean determines if Unity will use the movement in the animation or a script. For example, say I have a script that makes my character move forward. I have an animation attached of the character running in place. Since the script is moving the character not the animation then I would want Root Motion set to false. However, as we will see soon, we want to enable Root Motion in this case. With “Update Mode” you can determine how you want your animations to play. Such as with physics, with a fixed speed, or just normal. Culling mode allows you to determine if you want to keep animating even off screen. With the Ethan model selected, navigate to the “Animator” tab.
Here is where we add in the animations that will effect our model.
States
In your Project tab set the filter for animations.
Look for “HumanoidIdle,” “HumanoidWalk,” and “HumanoidRun.”
Drag these three into your Animator tab. Now there are three new boxes in our tab, those are the animations known as State Machines. Also, notice how one of the boxes is orange.
The orange one is the first one you selected in your Project tab. That is known a “Default State”. We want the “HumanoidIdle” to be the Default State. To do this right click on “HumanoidIdle” and select “Set as Layer Default State”.
See how the Default State has an orange arrow coming from the box that says Entry. This means that as soon as the game starts it will go to the Default State. Press play and see what happens. Our model is idling!
That is pretty neat, but it makes for a really boring game. We want our character to be able to run and walk around the scene. To do that, right click on the Default State and select “Make transition”. Then click on the “HumanoidWalk” state.
Now press play and look what happens. Ethan idles for a bit then starts walking.
Now do the same thing for the run state. Then press play and see what happens. Our player idles, walks, then runs.
Parameters and Transitions
We have our model animating but it lacks control. It idles and runs without us doing anything. The way we add control is through Parameters. Parameters are variables that are defined within the animator that scripts can access and assign values to, this is how a script can interact with the Animator. There are three types: Int (or Integer), Float, Boolean, and Trigger.
All of them are pretty self explanatory except for Trigger. A trigger is like a boolean but as soon as it is set to true it immediately goes back to false. We will realize it’s usefulness soon. For now make a float parameter and call it Speed.
Then click on the idle to walk transition and set the condition to be if Speed is greater than 0.5. This means that it will only transition if Speed is greater than 0.5.
Then click on the walk to run transition and set the condition to if Speed is greater than 0.9. Now play, increase or decrease the Speed parameter to see what happens.
Okay not too bad but could use some tweaking. First off I am going to go to each transition and uncheck “Has Exit Time,”
with this enabled the transition would go through the whole animation before transitioning. Which means there will be a delay if the player presses the run key. Second, make two other transitions (disabling Has Exit Time of course), one going from run to walk, and then walk to idle.
Set the Run to Walk condition to Speed is less than 0.9 and the condition of Walk to Idle to Speed is less than 0.5. Okay now that we have that done let’s look at the transition settings. Notice how you can preview the transition?
The blue section is where and how long the transition will be. You can change at what point a certain clip will transition.
This can be used to make your transitions look more realistic. Open up Settings on a transition.
Exit time is how long before the transition starts to exit. With Fixed Duration enabled we can use the blue marker for transitioning. Transition Duration is pretty self explanatory, the length of the transition! Interruption Source is pretty interesting. If a transition’s condition becomes false as it is transitioning, it has been interrupted. When Interruption Source is set to None it can be interrupted be the Any State (which we will look at later). When set to Current State it will go through the transition then be interrupted. Next State runs the next transition then can be interrupted. Current State Then Next State runs the current transition then the next transition before being interrupted. Next State Then Current State is basically the reverse, if an interruption occurs it runs the next transition then the current transition. It doesn’t matter what you set these settings to because we will actually not be using it!
Blend Trees 1D
This locomotion system works but it isn’t very modular. We can’t add turning left or right very easily. A better and cleaner way to do this would be through Blend Trees. Blend Trees are a way to blend multiple animations together smoothly in varying degrees. To make a Blend Tree right click in the Animator and select Create State -> From New Blend Tree. Name it “Locomotion” or “OnGround”.
Double click on it, add three motion fields and put the three animations in it idle, walk, run.
The thresholds are already setup for us but if you want to customize them uncheck “Automate fields”. Basically, it is everything we have already done but in a nicer format. When the Speed parameter gets over 0.5 the character walks, when Speed equals 1 the character runs. Go back to the Base Layer and delete the three other states.
Then make a transition (unless it does it for you) from entry to our Locomotion Blend Tree.
Now play and see what happens. Looks good, if you notice it blends the walk and run animation together if Speed is between 0.5 and 1.
Making Our Character Turn
So our character can run, walk, and idle but it isn’t very exciting. Unless you have a game where the character only runs forward (which, who does?) it isn’t even remotely useful. We need our character to be able to turn left and right (obviously!). In order to do this go back to our Locomotion Blend Tree and set the type to “2D Freeform Cartesian.” A Blend Tree has five different types of blending modes: 1D, 2D Simple Directional, 2D Freeform Directional, 2D Freeform Cartesian, and Directional.
We have already looked at 1D. 1D uses just one parameter to check with, while any of the other types require two. 2D Simple Directional is if you need something slightly more complicated than 1D. An example would be if you just need Walk Forward, Walk Right, or Walk Left motions. 2D Freeform Directional is slightly more complicated. It would be able to handle, Walk Forward, Run Forward, Walk Right, Run Right etc. 2D Freeform Cartesian adds another level of complexity to the mix. It allows Run, Walk, and Turning. Before we do anything though we need to create a new float parameter called “TurningSpeed” and put it in the other parameter slot.
Now these next steps may not make much sense but stick with me and hopefully I can explain it well enough. Add twelve more motion slots. Look for and assign these animations to it in this order:
Then assign the values to look like the following:
Your graph should look like this:
Okay, hopefully you are still with us after that huge list of unexplained tasks. If you did everything you can now play and change the values for Speed and TurnSpeed to see what happens.
Pretty neat! But why does it do that? To answer this you need to understand how 2D Freeform Cartesian works. Think of it like a graph. The Speed parameter is the x value and TurnSpeed is the y value. If the both values equal 0 then the player is standing still. If TurnSpeed is -1 the character turns left. If it is 1 the player turns right, all while blending between “StandQuarterTurnRight” or “StandHalfTurnRight.” If Speed equals 1 the player runs, 0.5 and the character walks. If TurnSpeed is 1 and Speed is 1 then the player runs right. If both equal 0.5 the player walks right. If you understand that then you should understand why we set the values to be what they are. Look at this graph for extra visualization:
Hopefully, this has cleared up most questions about 2D Freeform Cartesian. If not don’t worry! Just think about it, it’ll come to you.
The “Jumping” sub-state machine
In order to make our character jump we need a few things. A jump up pose, a fall pose, a landed pose, a way to check if the player presses the jump key, and a way to check if we hit the ground. I am going to do the last two first. Create a new trigger called “Jump”.
And then create a boolean called “grounded”. Okay that is done now we can move on. Filter search for the following animations “HumanoidCrouchIdle” (this is our landed pose), “HumanoidFall”, and “HumanoidJumpUp”.
Before we drag those in we need to change something. If you preview one of the animations you will notice an unwanted twitch. To fix this click edit
then set the motion to be only one frame long.
But we still can’t drag them in yet! We first need to create something called a Sub-State Machine. A Sub-State Machine is a bunch of motions put together that act as one. This is a good thing to use for jumping actions since a jump action isn’t really just one action but a bunch of them put together. Right click in the animator and press “Create Sub-State Machine”.
Name it jump. Now drag all our Jump poses onto the new Sub-State Machine.
Now we can start constructing our Jump action. Make a transition from Any State to the JumpUp pose. The Any State is a very useful tool. It will transition into a motion, if the condition is true, regardless of where that motion is. Set the condition to be our Jump trigger. Then make a transition from JumpUp to Fall. Make a Fall to Crouch transition but remember we only want it to transition if it hits the ground. Set the condition to be if grounded equals true and uncheck Has Exit Time. Where do we transition to after this? From crouch into the Exit state. When something transitions into the Exit state on a Sub-State Machine it will go back to the Entry state in the Base Layer.
Okay, we have our Jump action setup! Although we still need to add physics, play and tweak the settings to get the look you’re after.
Scripting Our Animator
Now we come to the last and arguably most important part of this lesson, scripting. We have already seen how pretty much everything in the Animator is controlled by parameters. So our script should control those parameters. Before we start we need a capsule collider and a Rigidbody on our character. Set the capsule collider to roughly surround our character.
Then create a new script called “PlayerController”. The way we control parameters through script is first getting access to the Animator:
Let’s think about what we need to do. First, we need a forward and backward input:
void Update (){
var v = Input.GetAxis ("Vertical");
thisAnim.SetFloat ("Speed", v);
}
Use the Unity Input axis Vertical, which by default is the up and down arrows, then put it in a variable and assign that variable to the parameter “Speed”. The Input settings can be configured here:
Next we need a turning input:
void Update () {
	var h = Input.GetAxis ("Horizontal");
	var v = Input.GetAxis ("Vertical");
	thisAnim.SetFloat ("Speed", v);
	thisAnim.SetFloat ("TurningSpeed", h);
}
We use the axis Horizontal, which by default is the left and right arrows, just like we used the Vertical axis only this time assigning it to TurningSpeed. Play and see what happens.
Okay our character does a face plant. To fix this, constrain our rotation on the X, Y, and Z axis.
Now play and see what happens.
Wow, just wow. It looks really good! Now we just need to add the jumping input. In order to jump we need a Rigidbody to act force upon, trigger the Jump parameter, check to see when our character lands, and set “grounded” to be true if the player does land. First, we get the Rigidbody and trigger jump with the input button “Jump”:
private Animator thisAnim;
private Rigidbody rigid;
public float JumpForce = 500;

void Start () {
	thisAnim = GetComponent<Animator> ();
	rigid = GetComponent<Rigidbody> ();
	}
 void Update () {
         var h = Input.GetAxis ("Horizontal");
         var v = Input.GetAxis ("Vertical");

         thisAnim.SetFloat ("Speed", v);
         thisAnim.SetFloat ("TurningSpeed", h);
         if (Input.GetButtonDown ("Jump")) {
             rigid.AddForce (Vector3.up * JumpForce);
             thisAnim.SetTrigger ("Jump");
         }
}
“Jump” by default is set to the space bar in the Input Manager. Then we raycast downwards to see if we have hit the ground while changing the value of “grounded”:
This part needs a float, for how far down check for ground, and a layer mask, to define what ground is. A Layer Mask is a way to group objects, kind of like tags. Declare those here:
private Animator thisAnim;
private Rigidbody rigid;
public float groundDistance = 0.3f;
public float JumpForce = 500;
public LayerMask whatIsGround;
This is the full script:
using System.Collections;
using System.Collections.Generic;
using UnityEngine;
public class PlayerController : MonoBehaviour {
private Animator thisAnim;
private Rigidbody rigid;
public float groundDistance = 0.3f;
public float JumpForce = 500;
public LayerMask whatIsGround;
// Use this for initialization
void Start () {
thisAnim = GetComponent<Animator> ();
rigid = GetComponent<Rigidbody> ();
}
// Update is called once per frame
void Update () {
var h = Input.GetAxis ("Horizontal");
var v = Input.GetAxis ("Vertical");
thisAnim.SetFloat ("Speed", v);
thisAnim.SetFloat ("TurningSpeed", h);
if (Input.GetButtonDown ("Jump")) {
rigid.AddForce (Vector3.up * JumpForce);
thisAnim.SetTrigger ("Jump");
}
if (Physics.Raycast (transform.position + (Vector3.up * 0.1f), Vector3.down, groundDistance, whatIsGround)) {
	thisAnim.SetBool ("grounded", true);
	thisAnim.applyRootMotion = true;
} else {
	thisAnim.SetBool ("grounded", false);
}
}
}
Make sure WhatIsGround is set to Default. Play and see what happens.
Yes! It looks amazing!
Conclusion
Wow! We have covered a lot! I hope this tutorial was helpful and that you get an understanding of how complicated the Unity Animator is.
In this tutorial we are going to build a simple demo to learn how to use Unity multiplayer features. Our game will have a single scene where we will implement a multiplayer Space Shooter. In our demo multiple players will be able to join the same game to shoot enemies that will be randomly spawned.
In order to follow this tutorial, you are expected to be familiar with the following concepts:
C# programming
Using Unity Editor, such as importing assets, creating prefabs and adding components
Creating project and importing assets
Before starting reading the tutorial, you need to create a new Unity project and import all sprites available through the source code. In order to do that, create a folder called Sprites and copy all sprites to this folder. Unity Inspector will automatically import them to your project.
However, some of those sprites are in spritesheets, such as the enemies spritesheets, and they need to be sliced. In order to do that, we need to set the Sprite Mode as Multiple and open the Sprite Editor.
In the Sprite Editor (shown below), you need to open the slice menu and click in the Slice button, with the slice type as automatic. Finally, hit apply before closing.
Source code files
You can download the tutorial source code files here.
The first thing we are going to do is creating a background canvas to show a background image.
We can do that by creating a new Image in the Hierarchy, and it will automatically create a new Canvas (rename it to BackgroundCanvas).
In the BackgroundCanvas, we need to set its Render Mode to be Screen Space – Camera (remember to attach your Main Camera to it). Then, we are going to set its UI Scale Mode to Scale With Screen Size. This way the Canvas will appear in the background, and not in front of the other objects.
In the BackgroundImage we only need to set the Source Image, which will be the space one.
Try running the game now and you should see the space background in the game.
Network manager
In order to have a multiplayer game, we need a GameObject with the NetworkManager and NetworkManagerHUD components, so let’s create one.
This object will be responsible for managing for connecting different clients in a game and synchronizing the game objects among all clients. The Network Manager HUD shows a simple HUD for the players to connect to a game.
For example, if you play the game now, you should see the following screen:
In this tutorial we are going to use the LAN Host and LAN Client options. Unity multiplayer games work in the following way: first, a player starts a game as host (by selecting LAN Host). A host works as a client and a server at the same time. Then, other players can connect to this host by as clients (by selecting LAN Client). The client communicates with the server, but do not execute any server only code. So, in order to test our game we are going to open two instances of it, one as the Host and another as the Client.
However, you can not open two instances of the game in the Unity Editor. In order to do so, you need to build your game and run the first instance from the generated executable file. The second instance can be run from the Unity Editor (in the Play Mode).
In order to build your game you need to add the Game scene to the build. So, go to File -> Build Settings and add the Game scene to build. Then, you can generate and executable file and run it by clicking on File -> Build & Run. This will open a new window with the game. After doing that, you can enter Play Mode in the Unity Editor to run the second instance of the game. This is what we are going to do every time we need to test a multiplayer game.
Ship movement
Now that we have the NetworkManager, we can start creating the game objects which will be managed by it. The first one we are going to create is the player ship.
For now, the ship will only move horizontally in the screen, with its position being updated by the NetworkManager. Later on, we are going to add to it the ability to shoot bullets and receive damage.
So, first of all, create a new GameObject called Ship and make it a prefab. The figure below shows the Ship prefab components, which I will explain now.
In order to a game object to be managed by the NetworkManager, we need to add the NetworkIdentity component to it. In addition, since the ship will be controlled by the player, we are going to set the Local Player Authority check box for it.
The NetworkTransform component, by its turn, is responsible for updating the Ship position throughout the server and all the clients. Otherwise, if we’ve moved the ship in one screen, its position wouldn’t be updated in the other screens. NetworkIdentity and NetworkTransform are the two components necessary for multiplayer features.
Now, to handle movement and collisions, we need to add a RigidBody2D and a BoxCollider2D. In addition, the BoxCollider2D will be a trigger (Is Trigger set to true), since we don’t want collisions to affect the ship physics.
Finally, we are going to add a MoveShip script, which will have a Speed parameter. Other scripts will be added later, but that’s it for now.
The MoveShip script is very simple, in the FixedUpdate method we get the movement from the Horizontal Axis and set the ship velocity accordingly. However, there are two very important network-related things that must be explained.
First, typically all Scripts in a Unity game inherits MonoBehaviour to use its API. However, in order to use the Network API the script must inherit NetworkBehaviour instead of MonoBehaviour. You need to inlcude the Networking namespace (using UnityEngine.Networking) in order to do that.
Also, in a Unity multiplayer game, the same code is executed in all instances of the game (host and clients). To let the players to control only their ships, and not all ships in the game, we need to add an If condition in the beginning of the FixedUpdate method checking if this is the local player (if you’re curious on how the game would work without this If condition, try removing it. When moving a ship in a screen, all ships should move together).
using System.Collections;
using System.Collections.Generic;
using UnityEngine;
using UnityEngine.Networking;

public class MoveShip : NetworkBehaviour {

	[SerializeField]
	private float speed;

	void FixedUpdate () {
		if (this.isLocalPlayer) {
			float movement = Input.GetAxis ("Horizontal");
			GetComponent<Rigidbody2D> ().velocity = new Vector2 (movement * speed, 0.0f);
		}
	}
}
Before playing the game, we still need to tell the NetworkManager that the Ship prefab is the Player Prefab. We do that by selecting it in the Player Prefab attribute in the NetworkManager component. By doing so, everytime that a player starts a new instance of the game, the NetworkManager will instantiate a Ship.
Now you can try playing the game. The ship movement should be synchronized between the two instances of the game.
Spawn positions
Until now all ships are being spawned in the middle of the screen. However, it would be more interesting to set some predefined spawn positions, which is actually easy to do with Unity multiplayer API.
First, we need to create a new Game Object to be our spawn position and place it in the desired spawn position. Then, we add the NetworkStartPosition component to it. I’m going to create two spawn positions, one in the coordinate (-4, -4) and the other one in the coordinate (4, -4).
Now we need to define how the NetworkManager will use those positions. We do that by configuring the Player Spawn Method attribute. There are two options there: Random and Round Robin. Random means that, for each game instance, the manager will choose the player start position at random among the spawn positions. Round Robin means it will go sequentially through all spawn positions until all of them have been used (for example, first SpawnPosition1 then SpawnPosition2). Then, it starts again from the beginning of the list. We are going to pick Round Robin.
By now you can try playing the game again and see if the ships are being spawned in the correct positions.
Shooting bullets
The next thing we are going to add in our game is giving ships the ability fo shooting bullets. Also, those bullets must be synchronized among all instances of the game.
First of all, we need to create the Bullet prefab. So, create a new GameObject called Bullet and make it a prefab. In order to manage it in the network, it needs the NetworkIdentiy and NetworkTransform components, as in the ship prefab. However, once a bullet is created, the game does not need to propagate its position through the network, since the position is updated by the physics engine. So, we are going to change the Network Send Rate in the Network Transform to 0, to avoid overloading the network.
Also, bullets will have a speed and should collide with enemies later. So, we are going to add a RigidBody2D and a CircleCollider2D to the prefab. Again, notice that the CircleCollider2D is a trigger.
Now that we have the bullet prefab, we can add a ShootBullets script to the Ship. This script will have as parameters the Bullet Prefab and the Bullet Speed.
The ShootBullets script is also a NetworkBehaviour, and it is shown below. In the update method, it is going to check if the local player has pressed the Space key and, if so, it will call a method to shoot bullets. This method will instantiate a new bullet, set its velocity and destroy it after one second (when the bullet has already left the screen).
Again, there are some important network concepts that must be explained here. First, there is a [Command] tag above the CmdShoot method. This tag and the “Cmd” in the beginning of the method name make it a special method called a Command. In unity, a command is a method that is executed in the server, although it has been called in the client. In this case, when the local player shoots a bullet, instead of calling the method in the client, the game will send a command request to the server, and the server will execute the method.
Also, there is call to NetworkServer.Spawn in the CmdShoot method. The Spawn method is responsible for creating the bullet in all instances of the game. So, what CmdShoot does is creating a bullet in the server, and then the server replicates this bullet among all clients. Notice that this is possible only because CmdShoot is a Command, and not a regular method.
Finally, we need to tell the network manager that it can spawn bullets. We do that by adding the bullet prefab in the Registered Spawnable Prefabs list.
Now, you can try playing the game and shoot bullets. Bullets must be synchronized among all instances of the game.
Spawning enemies
The next step in our game is adding enemies.
First, we need an Enemy prefab. So, create a new GameObject called Enemy and make it a prefab. Like ships, enemies will have a Rigidbody2D and BoxCollider2D to handle movements and collisions. Also, it will need a NetworkIdentity and NetworkTransform, to be handled by the NetworkManager. Later on we are going to add a script to it as well, but that’s it for now.
Now, let’s create a GameObject called EnemySpawner. The EnemySpawner will also have a NetworkIdentity, but now we are going to select the Server Only field in the component. This way, the spawner will exist only in the server, since we don’t want enemies to be created in each client. Also, it will have a SpawnEnemies script, which will spawn enemies in a regular interval (the parameters are the enemy prefab, the spawn interval and the enemy speed).
The SpawnEnemies script is shown below. Notice that we are using a new Unity method here: OnStartServer. This method is very similar to OnStart, the only difference is that it is called only for the server. When this happens, we are going to call InovkeRepeating to call the SpawnEnemy method every 1 second (according to spawnInterval).
The SpawnEnemy method will instantiate a new enemy in a random position, and use NetworkServer.Spawn to replicate it among all instances of the game. Finally, the enemy will be destroyed after 10 seconds.
Before playing the game, we need to add the Enemy prefab to the Registered Spawnable Prefabs list.
Now you can try playing the game now with enemies. Notice that the game still doesn’t have any collision handling yet. So you won’t be able to shoot enemies. This will be our next step.
Taking damage
The last thing we are going to add to our game is the ability to hit enemies and, unfortunately, to die to them. In order to keep this tutorial simple, I’m going to use the same script for both enemies and ships.
The script we are going to use is called ReceiveDamage, and it is shown below. It will have as configurable parameters maxHealth, enemyTag and destroyOnDeath. The first one is used to define the initial health of the object. The second one is used to detect collisions. For example, the enemyTag for ships will be “Enemy”, while the enemyTag for enemies will be “Bullet”. This way, we can make ships colliding only with enemies, and enemies colliding only with bullets. The last parameter (destroyOnDeath) will be used to determine if an object will be respawned or destroyed after dying.
public class ReceiveDamage : NetworkBehaviour {

	[SerializeField]
	private int maxHealth = 10;

	[SyncVar]
	private int currentHealth;

	[SerializeField]
	private string enemyTag;

	[SerializeField]
	private bool destroyOnDeath;

	private Vector2 initialPosition;

	// Use this for initialization
	void Start () {
		this.currentHealth = this.maxHealth;

		this.initialPosition = this.transform.position;
	}

	void OnTriggerEnter2D(Collider2D collider) {
		if (collider.tag == this.enemyTag) {
			this.TakeDamage (1);

			Destroy (collider.gameObject);
		}
	}

	void TakeDamage(int amount) {
		if (this.isServer) {
			this.currentHealth -= amount;
			if (this.currentHealth <= 0) {
				if (this.destroyOnDeath) {
					Destroy (this.gameObject);
				} else {
					this.currentHealth = this.maxHealth;
					RpcRespawn ();
				}
			}
		}
	}

	[ClientRpc]
	void RpcRespawn() {
		this.transform.position = this.initialPosition;
	}


}
Now, let’s analyze the methods. In the Start method, the script sets the currentHealth to be the maximum, and saves the initial position (the initial position will be used to respawn ships later). Also, notices that there is a [SyncVar] tag above the currentHealth attribute definition. This means that this attribute value must be synchronized among game instances. So, if an object receives damage in one instance, it will be propagated to all of them.
The OnTriggerEnter2D method is the one responsible for handling collisions (since the colliders we added were configured as triggers). First, we check if the collider tag is the enemyTag we are looking for, to handle collisions only against objects we are looking for (enemies against ships and bullets against enemies). If so, we call the TakeDamage method and destroy the other collider.
The TakeDamage method, by its turn, will be called only in the server. This is because the currentHealth is already a SyncVar, so we only need to update it in the server, and it will be synchronized among the clients. Besides that, the TakeDamage method is simple, it decreases the currentHealth and checks if it is less than or equal to 0. If so, the object will be destroyed, if destroyOnDeath is true, or it the currentHealth will be reset and the object will be respawned. In practice, we will make enemies to be destroyed on death, while ships will be respawned.
The last method is the respawn one. Here we are using another multiplayer feature called ClientRpc (observe the [ClientRpc] tag above the method definition). This is like the opposite of the [Command] tag. While commands are sent from clients to the server, a ClientRpc is executed in the client, even though the method was called from the server. So, when an object needs to be respawned, the server will send a request to the client to execute the RpcRespawn method (the method name must start with Rpc), which will simply reset the position to the initial one. This method must be executed in the client because we want it to be called for ships, and ships are controlled only by players (we set the Local Player Authority attribute as true in the NetworkIdentity component).
Finally, we need to add this script to both the Ship and Enemy prefabs. Notice that, for the ship we need to define the Enemy Tag as “Enemy”, while for the Enemy this attribute value is “Bullet” (you also need to properly define the prefabs tags). Also, in the enemy prefab we are going to check the Destroy On Death attribute.
Now, you can try playing the game shooting enemies. Let some enemies hit your ships to see if they’re being correctly respawned as well.
And this concludes this tutorial. Let me know your questions and opinions in the comments section.
In this tutorial series you will make a turn-based RPG similar to the early Final Fantasy games, all while learning to use many of the cool, new features incorporated into the current version of the Phaser 3 game engine. For the first part of this tutorial we will focus our attention on creating the world, adding the player and moving on the map. Then we will add some invisible zones where the player will meet the bad guys. Part Two of this series will help you learn how to create the battle system and the user interface. We will make our units fight the enemies!
Learning goals
Scenes, scene management and interaction, events
In this tutorial we will learn how to create and use multiple scenes and how to switch between them. We will have one scene for the world map and another for the battle. Actually, we will have two scenes running at the same time during a fight – the Battle scene and the User Interface scene, where you will see heroes stats, damage information and enemy moves.
Sprites and animations
We will have our hero sprite on the world map and it will use several animations for moving in different directions.
Use map
You will learn how to use a Tiled map in Phaser 3 game engine. For this tutorial you can create your own Tiled map or use the one that comes with the sources. You will learn how to create map layers and make the player collide with map layer elements.
Arcade Physics
We will use arcade physics to move the player character on the world map and to handle some collisions. You will learn how to use Arcade Physics groups, Colliders and Phaser 3 zones.
Effects and camera
You will learn how to use some cool effects like shake and fade when the character meets enemies and before a battle is initiated.
Tutorial requirements
Intermediate level of JavaScript
Code editor
Web browser
Local web server
Assets – map in JSON format and images (you can use the ones coming with this tutorial files)
Assets copyright
All assets used in this tutorial are CC0 licensed. The tiles are created by Kenney Vleugels and can be found at www.kenney.nl
The player sprites can be found here – https://opengameart.org/content/rpg-character-sprites
We will start with creating a simple Phaser 3 game with the help of the config object. For now, in our game we will start with two scenes – Boot Scene and World Scene. Scenes in Phaser 3 are managed by the Scene Manager and as we will see in the next part of this tutorial you can have more than one active scene at a time.
Now we will start with something easier – creating the game and loading the resources.
Here is how your empty project and config object should look:
var BootScene = new Phaser.Class({

    Extends: Phaser.Scene,

    initialize:

    function BootScene ()
    {
        Phaser.Scene.call(this, { key: 'BootScene' });
    },

    preload: function ()
    {
        // load the resources here
    },

    create: function ()
    {
        this.scene.start('WorldScene');
    }
});

var WorldScene = new Phaser.Class({

    Extends: Phaser.Scene,

    initialize:

    function WorldScene ()
    {
        Phaser.Scene.call(this, { key: 'WorldScene' });
    },
    preload: function ()
    {

    },
    create: function ()
    {
        // create your world here
    }
});

var config = {
    type: Phaser.AUTO,
    parent: 'content',
    width: 320,
    height: 240,
    zoom: 2,
    pixelArt: true,
    physics: {
        default: 'arcade',
        arcade: {
            gravity: { y: 0 }
        }
    },
    scene: [
        BootScene,
        WorldScene
    ]
};
var game = new Phaser.Game(config);
You can pay special attention to the pixelArt: true option; when set to true it will prevent the blur of the textures when scaled. We will use it together with the zoom option to make the game scale. In the config object we will ask Phaser to include the arcade physics by default. It will help us move our character.
At the end of it we have scene option with all scenes listed. At the current moment both scenes look almost the same. The only deference is in the create method of the BootScene, where we start the WorldScene with this row:
this.scene.start('WorldScene');
Load the assets
Loading assets in Phaser 3 is very easy, you just need to add whatever assets you need to the loader. Add this code to the preload function of the BootScene:
// map tiles
        this.load.image('tiles', 'assets/map/spritesheet.png');

        // map in json format
        this.load.tilemapTiledJSON('map', 'assets/map/map.json');

        // our two characters
        this.load.spritesheet('player', 'assets/RPG_assets.png', { frameWidth: 16, frameHeight: 16 });
Now we will create our world scene with the map we have loaded. This will happen in the create method of the WorldScene:
var map = this.make.tilemap({ key: 'map' });
The key parameter is the name, we gave to our map when we used the this.load.tilemapTiledJSON to load it.
Now when you refresh the game it is still black. To have the map in game, we need to load the layers of the map.
The map for this example is created with Tiled Editor. To follow the tutorial you can use the map that comes with the source files or create your own map. I have prepared simple map with only two layers – the first one is called ‘Grass’ and contains only grass tiles, the second is ‘Obstacles’ and there are some trees on it. Here is how you add them in game.
Add this code at the end of WorldScene create:
var tiles = map.addTilesetImage('spritesheet', 'tiles');

	var grass = map.createStaticLayer('Grass', tiles, 0, 0);
        var obstacles = map.createStaticLayer('Obstacles', tiles, 0, 0);
        obstacles.setCollisionByExclusion([-1]);
The first row creates a tileset image. The next two rows add the layers to the map. The last one is what is interesting. The method setCollisionByExclusion makes all tiles except the ones send, available for collision detection. Sending -1 in our case makes all tiles on this layer collidable.
When you open the game in your browser, you should have something like this:
Its time to add our player sprite. Add this code at the end of the WorldScene create method:
The first parameter is x coordinate, the second is y, the third is the image resource and the last is its frame.
For moving on our world map we will use Phaser 3 Arcade physics. In order for the player to collide with obstacles on the map we will create it through the physics system – this.physics.add.sprite.
This will make the player stay within the borders of the map. First we set the world bounds, then we make the character’s property collideWorldBounds to true.
Move on the map
Its time to make the player sprite move on the map. We need to process the user input. For this game we will use the arrow keys.
For moving the player we will use the physics engine. We will set the body velocity of the sprite according to the direction we want to move. Now we need to add an update method to the WorldScene. We will add the player’s movement logic there.
Here is how your update method should look:
update: function (time, delta)
{
	this.player.body.setVelocity(0);

        // Horizontal movement
        if (this.cursors.left.isDown)
        {
            this.player.body.setVelocityX(-80);
        }
        else if (this.cursors.right.isDown)
        {
            this.player.body.setVelocityX(80);
        }

        // Vertical movement
        if (this.cursors.up.isDown)
        {
            this.player.body.setVelocityY(-80);
        }
        else if (this.cursors.down.isDown)
        {
            this.player.body.setVelocityY(80);
        }
}
First we set the body velocity to 0. Then if an appropriate key is down, we set the velocity on x or on y. You can test the movement of the character in your browser.
Our player can move, but the camera don’t follow. To make the camera follow a sprite we need to call its startFollow method.
Add this code at the end of the WorldScene create method:
The first row limits the camera to stay within the map boundaries. The second makes the camera follow the player.
The third row this.cameras.main.roundPixels = true; is a bit of a hack to prevent tiles bleeding – showing border lines on tiles.
Again, try the game in the browser. As you see, the movements of the player look very boring, as there is no walk animation. So we need to animate the character. Animations in Phaser3 are done trough the Animation Manager. Here is how we will add animations to our player character.
To define the animations add this code to the WorldScene’s create method:
//  animation with key 'left', we don't need left and right as we will use one and flip the sprite
        this.anims.create({
            key: 'left',
            frames: this.anims.generateFrameNumbers('player', { frames: [1, 7, 1, 13]}),
            frameRate: 10,
            repeat: -1
        });

        // animation with key 'right'
        this.anims.create({
            key: 'right',
            frames: this.anims.generateFrameNumbers('player', { frames: [1, 7, 1, 13] }),
            frameRate: 10,
            repeat: -1
        });
        this.anims.create({
            key: 'up',
            frames: this.anims.generateFrameNumbers('player', { frames: [2, 8, 2, 14]}),
            frameRate: 10,
            repeat: -1
        });
        this.anims.create({
            key: 'down',
            frames: this.anims.generateFrameNumbers('player', { frames: [ 0, 6, 0, 12 ] }),
            frameRate: 10,
            repeat: -1
        });
The code above defines a bunch of animations, one for each direction. In our case we don’t need separate animations for left and right as we will just flip the sprite and use the same frames.
In the update method you need to switch into the correct animation. Add this code at the end of the update method to do so:
if (this.cursors.left.isDown)
        {
            this.player.anims.play('left', true);
        }
        else if (this.cursors.right.isDown)
        {
            this.player.anims.play('right', true);
        }
        else if (this.cursors.up.isDown)
        {
            this.player.anims.play('up', true);
        }
        else if (this.cursors.down.isDown)
        {
            this.player.anims.play('down', true);
        }
        else
        {
            this.player.anims.stop();
        }
Now if everything is correct, you should have nice walking animation in each direction. But our player walks over trees and obstacles. We need to make it collide with the tiles on the Obstacles layer. To do so, add this row at the end of the WorldScene create method:
It creates physics collider object and it takes two parameters – in our case a sprite and a tilemap layer. If you remember we made all tiles from the obstacles layer collidable calling
obstacles.setCollisionByExclusion([-1]);
Now if you try the game you will see that the player can no longer move through obstacles and have to avoid them.
And its time to think how the player will meet the enemies. For the enemies locations I’ve decided to use a group of zone objects (Phaser.GameObjects.Zone). When the player overlaps with such zone, a battle will be initiated.
Phaser.GameObjects.Zone is an invisible object, to be able to see it during development you can set debug: true like this:
We will create 30 zones in a physics group and we will use this group to test for collisions with the player.
Add this code at the end of WorldScene create method:
this.spawns = this.physics.add.group({ classType: Phaser.GameObjects.Zone });
        for(var i = 0; i < 30; i++) {
            var x = Phaser.Math.RND.between(0, this.physics.world.bounds.width);
            var y = Phaser.Math.RND.between(0, this.physics.world.bounds.height);
            // parameters are x, y, width, height
            this.spawns.create(x, y, 20, 20);
        }
        this.physics.add.overlap(this.player, this.spawns, this.onMeetEnemy, false, this);
With the last row we make the player and our zones interact. When the player overlaps with one of the zones, the onMeetEnemy method is called. Now we need to add this method to the WorldScene.
In the second part of this tutorial we will call the Battle Scene from here. For now our onMeetEnemy will be simpler. We will move the zone to another random location. For picking random coordinate I will use Phaser.Math.RND.between(min, max).
Change the onMeetEnemy code to this:
onMeetEnemy: function(player, zone) {
        // we move the zone to some other location
        zone.x = Phaser.Math.RND.between(0, this.physics.world.bounds.width);
        zone.y = Phaser.Math.RND.between(0, this.physics.world.bounds.height);

        // start battle
    },
We won’t destroy the zone but we will move it to another random location. To make the battle start a bit more intimidating we will add something cool – a shake effect.
Shake effect in Phaser 3 can be added through the camera – camera.shake(duration).
onMeetEnemy: function(player, zone) {
        // we move the zone to some other location
        zone.x = Phaser.Math.RND.between(0, this.physics.world.bounds.width);
        zone.y = Phaser.Math.RND.between(0, this.physics.world.bounds.height);

        // shake the world
        this.cameras.main.shake(300);

        // start battle
    },
You can play a bit with the value to change the duration of this effect. As an exercise you can try and change the effect to flash or fade.
camera.flash(duration);
camera.fade(duration);
And with this, the first part of the tutorial is over. In Part Two we will create our Battle Scene and User Interface Scene, and we will switch to them when an enemy is met. When the battle is over we will switch back to our WorldScene.
Photon Storm’s Phaser is one of the most trusted frameworks for developing professional-quality 2D games in JavaScript. With Phaser, it’s feasible to make performant games that run smoothly in all major browsers, across all major systems, while only having to maintain one codebase. And now, the latest installment of Phaser has made its debut: Phaser 3.
But did you know that the same code that runs in your browser can be wrapped into a “native” mobile application? By combining Phaser 3 with Apache Cordova, we can produce games that not only run in the browser, but can also be published to the App Store and Google Play Store.
In this article, we’ll use Phaser to make a simple “game” that can be built for iOS, Android, and the Web. Though the result won’t truly be a “game” in the playable sense, the concepts it introduces will be referenced again in future tutorials where we will, indeed, create playable games.
Pre-requisites (things to install!)
We’ll be dealing with purely JavaScript (and tiny bit of HTML) through this tutorial, so all you need to install manually is Node.js. This will give you the node and npm executables on your system.
Once Node.js is installed, download the Apache Cordova command line by running this command in your terminal/command prompt:
npm i -g cordova
Learn Phaser 3 with our newest Mini-Degree
The HTML5 Game Development Mini-Degree is now available for Pre-Order on Zenva Academy. Learn to code and make impressive games with JavaScript and Phaser 3!
Cordova includes boilerplate projects that make it much simpler to start off with a mobile-enabled project, so let’s take advantage of that, by running:
cordova create hello
This will create a directory named hello, and copy multiple files into the project.
Next, let’s install Phaser into our project. In our project directory, run the following:
cd www
npm init
npm i --save phaser
For those unfamiliar with npm, the above command downloads the source code of the Phaser framework and saves a local copy in the www/node_modules folder. This way, we have a copy of the code without having to download it from a CDN on every run. The reason we have to have a separate package.json file in the www directory is that static files are served from the www directory, and not from our project root. If Phaser were installed in the project root, we would never be able to access it in the browser.
Next, let’s add support for running our app in a browser. We’ll add support for running on iOS and Android later. Run this:
cordova platform add browser
Next, we’ll want to add support for live-reloading our changes when we edit our file. Otherwise, Cordova will only ever serve one version of our files, which will lead to a lot of head scratching and wondering why errors seemingly don’t vanish, even after changing your code! Run this command:
cordova plugin add cordova-plugin-browsersync
Now that we’ve set our project for development, let’s run the HTTP server:
First, let’s remove the starter code that Cordova gives us; we won’t be needing it anymore. Remove the <div id="app">...</div> code in index.html, and add a reference to our downloaded Phaser source, so that the file looks like the following, ignoring comments:
Feel free to remove the Content-Security-Policy tag in the head. Though it’s a smart choice for security, if you are unfamiliar with CSP, it can be a rather confusing roadblock for such a simple tutorial.
Next, let’s add some code in js/index.js to start up a Phaser instance:
document.addEventListener('deviceready', function() {
    var config = {
        type: Phaser.WEBGL,
        parent: 'game',
        scene: {
            preload: preload,
            create: create
        }
    };

    var game = new Phaser.Game(config);

    function preload() {
    }

    function create() {
    }
});
Even in this relatively small code snippet, there’s quite a bit going on:
We create a configuration object, which we pass to the Phaser.Game constructor to specify where the framework should call our code.
We indicate to Phaser, via, type: Phaser.WEBGL, that we want to use the WebGL-based renderer, which is faster than plain Canvas 2D-based rendering.
We tell Phaser to render into an existing <canvas> where id="game", or to create such a <canvas> element if one does not exist.
We embed a scene object, which points to two functions Phaser will call at different points in the game lifecycle.
Now, let’s run our game! Type the following in your terminal:
cordova run browser -- --livereload
Next, to actually see the game in your browser, visit http://localhost:8000 in your browser. Check out the output!
Beautiful! It’s an empty black screen!
Adding Game Objects
As you can probably imagine, nobody wants to just sit there and stare at an infinitely-blank screen. So let’s spruce it up and add something that moves!
Phaser has long been based on object-oriented programming, but Phaser 3 introduces the categorization of certain objects as game objects, which share common functionality while achieving different goals. The kind of game object we’ll be adding now is called a sprite, which in the 2D world means “image that represents an object.” Common examples of sprites include animated sprites, which are often used to represent characters in games.
Even though a sprite by itself is just an image, in the context of a game engine like Phaser, it is frequently associated with physics computations, and provides an abstraction through which a game can programmatically change what’s visible on screen in a logical way.
Using an asset from Kenney, let’s load an image and draw it to the screen.
First, let’s download the Tappy Plane Asset Pack. Copy SpriteSheet/sheet.png and SpriteSheet/sheet.xml into the local www/img directory. We’ll load these into our game by modifying our preload and create functions as follows:
function preload() {
   this.load.atlas('sheet', 'img/sheet.png', 'img/sheet.json');
}

function create() {
    this.add.sprite(400, 300, 'sheet', 'planeBlue1.png');
}
Note that img/sheet.json is included in the project assets, and is based on the contents of img/sheet.xml.
Quite a bit happened in the lines above. First, we told Phaser that we have a texture file, img/sheet.png, and that the framework should use the contents of img/sheet.json to find the location of frames within the image. img/sheet.json contains a map of frames that map names (i.e. planeBlue1.png) to distinct locations and sizes within the texture file, which contains the entire Tappy Plane pack compressed into a single image.
Next, we created a sprite that references planeBlue1.png within our sheet asset. As mentioned earlier, though a Sprite is just an image, in Phaser, we can use it to perform physics computations and another complex transformations.
Refresh the page to see the current game:
Animating the Sprite
The blue plane sprite included in Kenney’s Tappy Plane pack includes three frames, which can be combined to create an animation. Change the create function as follows:
Firstly, we register an animation configuration in Phaser’s AnimationManager. Using the generateFrameNames helper, we specify that the animation contains the frames planeBlue1.png, planeBlue2.png, and planeBlue3.png. The animation we create, named plane, can be applied to any sprite; however, for this example, we will only apply it to our plane sprite.
Next, we add .play('plane') to our instantiation of the plane sprite. Reload the page, and you’ll see the plane’s turbine spinning infinitely!
Note that the plane key corresponds to the key of the animation object we created.
Adding a Background
Of course, a game with a boring, empty background is (usually) a boring, empty game. Let’s add a background sprite, right before creating our plane. create should look like this:
function create() {
    this.anims.create({ ... });
    this.add.image(0, 0, 'sheet', 'background.png').setOrigin(0);
    var plane = this.add.sprite(400, 300, 'sheet').play('plane');
}
Note the setOrigin(0), which tells the image to position itself according to its top-left corner, rather than the middle (the default origin is 0.5).
Let’s take a look at the game now:
Scaling the Game
As you’ve likely noticed, there’s still a lot of dead space. We can eliminate this by explicitly sizing the game canvas to the size of our background image, 800x480.
One caveat to mobile development is that there is no guarantee of the size of a screen. Even within the context of one device, a resize of the window or orientation switch can throw the scaling of your game completely off-balance. However, with some simple math, we can responsively resize our game. Change your create function as follows (source):
Now, the game will resize automatically when the window does!
Infinite Scrolling
As is the nature of Tappy Plane and Flappy Bird, our background should scroll infinitely. Fortunately, it’s simple to implement this in Phaser. First, let’s update our game configuration to point to an update function we will create. This function will be called once per frame.
Next, let’s change our create function to declare the background image as a tile sprite instead. A tile sprite is a special sprite that can update its position relative to the camera, to create parallax/infinite scrolling phenomena.
Lastly, let’s actually implement that update function:
function update() {
    this.bg.tilePositionX += 5;
}
Refresh the game, and you’ll see the background continuously scrolling, repeating itself once it reaches the end of the screen.
Note that though we are adding to tilePositionX, it looks as though the background is moving to the left. It helps to think of tile sprites as an endless wallpaper, that we are only viewing a certain piece of at a time. When tilePositionX increases, this is analogous to the viewer’s eyes moving to the right, which creates a parallax effect moving to the left.
Building the Game for iOS and Android
Now for the fun part: Running our game on mobile! First off, add the ios and android platforms to the codebase:
cordova platform add ios android
If this errors, you may need to delete package-lock.json.
Next, we can use cordova to run our app in an emulator:
cordova emulate ios
This will bring our app up in the iOS Simulator (granted, you’ll need to install that, which comes bundled with XCode, first):
Distributing the Game
Lastly, we eventually will want to publish and distribute our game. Whether through the App Store, the Google Play Store, or another app distribution platform, our game needs to be downloadable and easily accessible in order for our users to get their hands on it.
Firstly, you’ll need to build your app in release mode. Try the following for iOS:
cordova build --release ios
The steps to build a properly signed application for iOS are quite intensive, and include the following steps:
Sign the application
Register an app ID
Make a provisioning profile
Modify app configuration
Submit to the App Store
This process is well summarized in this article; for the sake of not reinventing the wheel, I’ve linked to it, rather than rewriting content.
After that, you’re done! Good work.
Conclusion
Apache Cordova is a great solution for running applications originally aimed at web browsers on mobile devices. By wrapping such applications in webview wrappers, Cordova lets us produce a “native” (notice the quotes) experience across multiple platforms. This is great when writing games, because it eliminates the need for rewriting code to target different platforms.
With Phaser, we can create games with Cordova that run in the browser, iOS, and Android.
Stick around for the next tutorial, where we continue with the Tappy Plane Pack and turn this into a real game!


 Next, navigate to File -> User Preferences.